
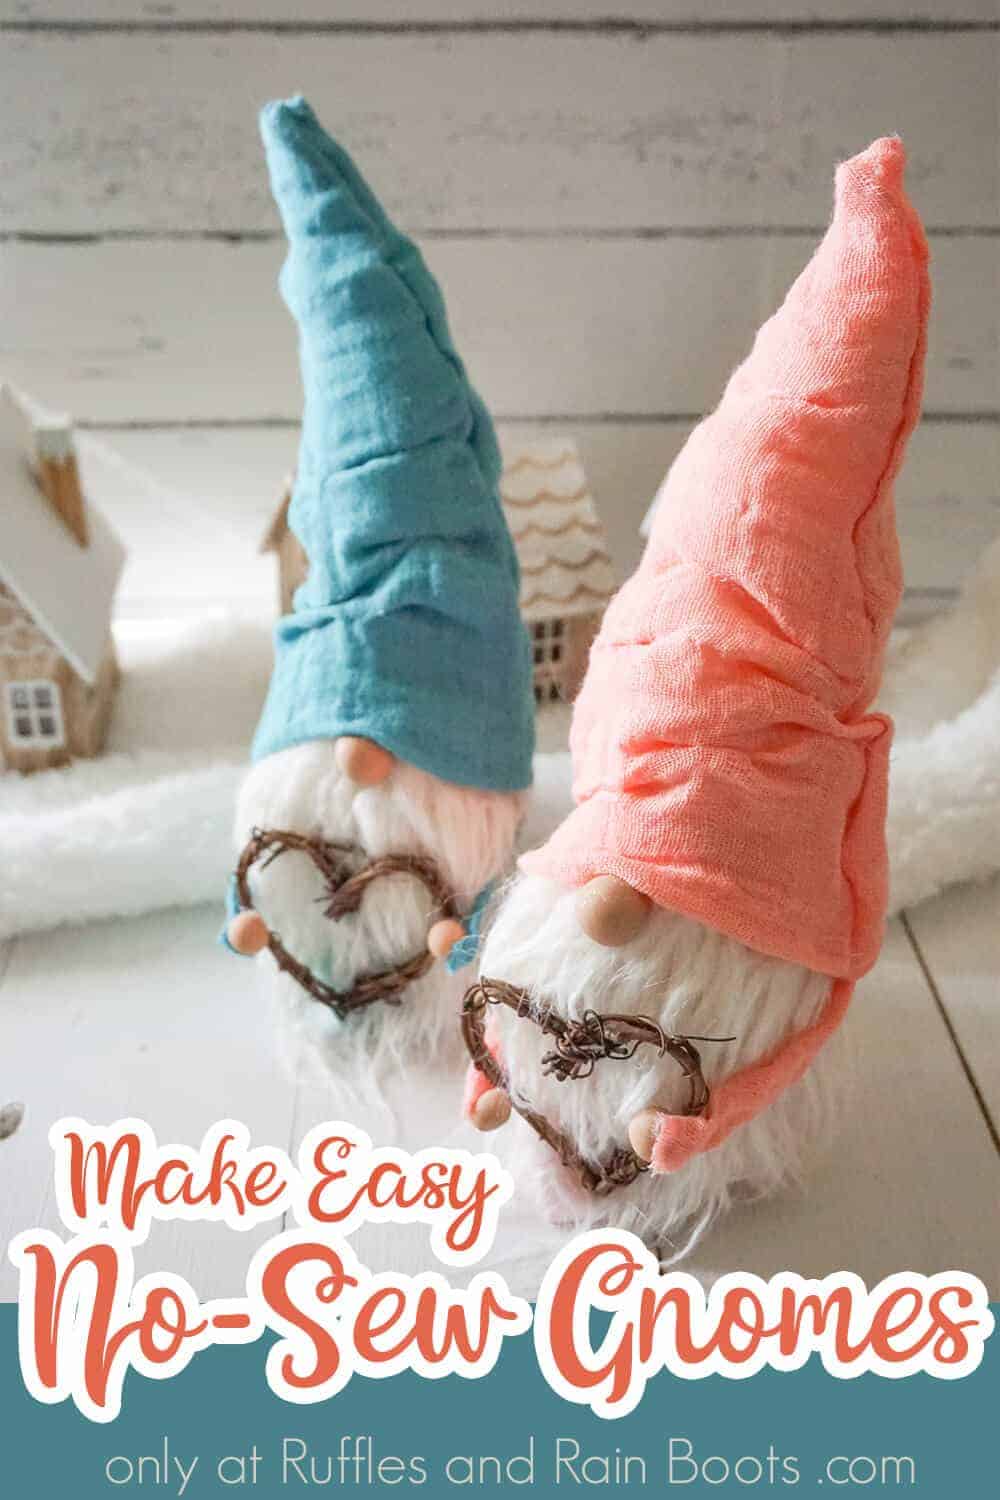
Easy No-Sew Gnome Pattern You Can Use for Every Gnome
This is a super easy no-sew gnome pattern that is so versatile, you’ll be stunned! There are so many fun ways to dress up this gnome and make it unique.

What You'll Find On This Page
Easy No-Sew Gnome Pattern
Here at Ruffles and Rain Boots, I adore making gnomes. I have more gnomes in my house than any sane person should have. I gift them, donate them, auction them, and well, obviously keep them. Making gnomes is so fun and every one of them is unique.
Because I’ve had so many requests, I have made it easy for you to make your very own gnomes. This easy no-sew gnome pattern has been tested by me and thousands of others. Personally, I’ve made nearly 20 different gnomes with this single pattern!
RELATED READING: MERRY & BRIGHT GNOME USING THIS EASY NO-SEW GNOME PATTERN
Get Secret Gnomes, Tips, & Freebies Delivered!
What is the best pattern to use when you don’t want to sew? Do you know the secrets to a properly-proportioned gnome? Do you know where to get the best-priced fur?
Get all of this (and exclusive content just for you) delivered right to your inbox with the gnome-making series, free of charge. Sign up to get the once-weekly newsletter (and a jaw-dropping special offer)!

This is a formal pattern and even comes with an option to get the cut files for your Cricut or Silhouette to reduce your cutting. Isn’t that wild?! I’m ALL about lazy crafting, so if my Cricut can do the work…
If you’re ready to make a fun, easy gnome without sewing a stitch, let’s get started.
DIY Christmas Gnome Tutorials
If you’re looking for the best DIY Christmas gnome tutorials, you have come to the right place. Check out all of my favorite tomte tutorials for the holidays!

First, make your gnome nose and hands by combining a portion of light brown and white polymer clay until you have the color you want.
Roll a quarter-sized portion of this clay into a neat ball. This is the nose. Set aside.
Roll two nickel-sized portions of this clay into two neat balls. These are the hands.
Bake the nose and hands per the clay package’s directions. Allow them to cool fully.
Trace and cut out the large gnome body shape and two hat shapes out of the fabric.
Fold the gnome body shape in half and run a hem along the open side with your hot glue or your sewing machine.
Fold the flap of the gnome body shape over and close the bottom of the gnome with hot glue or a seam. Allow the glue to dry fully. Turn the body of the gnome right side out.
Fill the gnome body with the dried beans or rice.
Tuck a small portion of polyfill into the top of the gnome body to hold the beans or rice inside.

With your hot glue gun or sewing machine, run a hem along the two hat pieces. Allow glue to dry completely.
Turn the hat right side out.
Fill the hat a little with a small amount of scrap fabric or polyfill. Cut out the beard shape from the craft fur by turning the fur over and cutting only the fabric with the exacto knife.
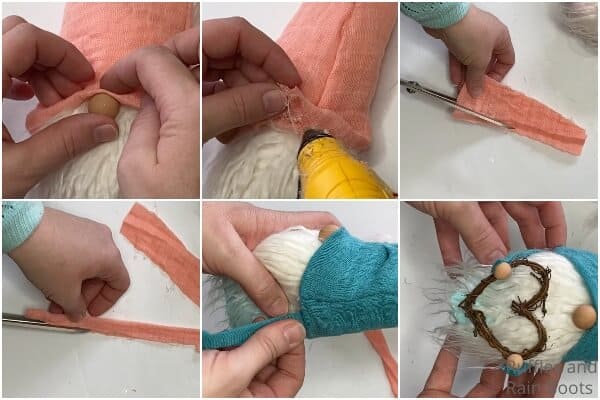
Hot glue the beard to the body, about 2 inches below the edge of the gnome body.
Hot glue the nose in place about 1 inch below the top of the beard.
Place the hat on top of the gnome’s head, tucking it down over the top of the nose.
Hot glue the hat in place in the back and sides in just a couple of places–not the whole way around, then one little dot on the nose to make a wrinkle (this is the best part).

Cut out two arm shapes from the fabric.
Place a line of hot glue down one long side of the arms and then fold the fabric over onto itself twice to make a thin arm.
Slip the arm up into the hat on the side and hot glue it in place.
Trim the arm as desired (make sure your bauble will fit nicely before trimming).Hot glue the hands in place on the ends of the arms.
Attach the bauble to the back sides of the hands.
Note: This gnome stands 10 inches (ish, depending on how twisty you make your hat, of course) and even in Easter Bunny form, the height can still be expected to be 9 1/2 to 10 inches.
No Time to Make This Now? Pin it for Later
Want to save this fun pattern? Pin this to your favorite easy craft ideas board on Pinterest and it’ll be here for when you’re ready.

As an Amazon Associate, I can earn from qualifying purchases.
Tips to Make This Easy Pattern for Gnomes

No-Sew Tucked Gnome Pattern
Click below to add this to your cart. You’re going to have so much fun with this!
- Click here to get the easy no-sew gnome pattern. It’s got everything you need to make your gnome. Click here to get the SVG gnome pattern set to have your cutting machine do the work.
- Because I’m getting asked A LOT about the fabric, it is called bubble gauze from JoAnn’s. I love it and have it in a so many colors.
- I think that one thing that sets this easy gnome pattern apart is that you can do anything with it. I have made several truly unique gnomes with this pattern as the base, including:
- Christmas Scandinavian Gnomes (Nordic gnomes)
- Merry & Bright Gnome
- Christmas Gnome with Feet (Really Big Feet)
- Christmas Countdown Gnome
- Rustic Forest Gnome
- Unicorn Gnome (below)
- Easter Bunny Gnome (below)
- Valentine Wreath Gnome
- If you want to make your gnomes the same as mine, you can grab the little hearts here. Links to everything else I used to make these gnomes is in the pattern.
- Generally, I end up making my gnome noses from whatever is on hand. For this gnome project, I made gnome noses and hands from polymer clay but also use wood beads or rounds a lot.
- I made this entire gnome a no-sew pattern by using hot glue to make all my hems. It’s my recommendation that you use a fabric hot glue stick like these or my favorite brand of non-fabric glue here.
- If you’ve never worked with fur, I have a quick video tutorial on how to cut faux fur here. Please, do not use scissors. :)
Tips to Make this No-sew Gnome Pattern into a Unicorn gnome
The full tutorial is below (including a video gnome tutorial), however, I’d like to talk about additional ideas first like this fun unicorn gnome.
- Beard: I used a colorful pastel bulky yarn I found at the local craft store and gently brushed it out. I attached it to a felt backing to make the beard stable.
- Body: Simple white craft felt or fleece makes up the unicorn body.
- Hat: The soft pink fleece fabric was perfect for the hat, but the flowers were a custom-job. I used nail polish to paint some tiny plastic flowers I found at the craft store.
- Unicorn Horn: I sometimes make my own unicorn horn and ears for unicorn crafts, but with this gnome, I used a unicorn horn headband. I realized I could use the ears AND the horn, so it won out over DIY’ing! If you want to use this little hack, too, you can click here to get a cut unicorn horn headband.
- Nose: My favorite way to make noses is with polymer clay because I’m able to size the nose exactly for the gnome I’m working on. This is a 3/4-inch polymer clay round I made.
- Check out the awesome video I made here of making this adorable unicorn gnome.

Tips to make this No-Sew Gnome Into An Easter Bunny GNOME
This alteration to my basic no sew gnome pattern is perfect for Easter. The updates to the pattern are free, so read through and grab them at the link below.
- Click here to get the FREE altered gnome pattern elements to turn this no-sew gnome into a bunny gnome.
- Beard (and eyebrows): I hand painted this beard. It started out as plain white craft fur but with a little bit of blue watercolor, it turned into a pastel blue dream.
- Body: White lambswool fleece fabric like this here is what I chose for the ears, feet, and body – it’s so fluffy!
- Hat (ears, legs, and face): I used the same fabric for the ears and legs that I used on the body (the white fluffy loveliness). The inside of the ears and toes are pink craft felt and the face is a light beige felt.
- Carrots: These were just little twine-wrapped carrots I picked up at the Dollar Tree. If you want to make them at home, wrap a small carrot-shaped piece of foil in twine and paint it orange. It actually might be more time consuming than just grabbing the little carrots here, but craft ’em if you want.
- Nose: This is made from polymer clay and sized to a 3/4-inch round.
- The pattern adjustments are really easy. Cut the pieces from the pattern and join the two sets of legs with the bottom between the leg pieces on the bottom. Then stuff them and add the toe pads. For the face, cut out a felt using the pattern and glue in place directly on the body. For the ears, cut the pieces, add the pink felt to the *wrong side* of the fleece and glue them together, adding a piece of floral wire into the ear. Slide the wire into the body piece to add stability. Finally, place the head circle on top and hot glue it in place, followed by the ears.
- Check out the bunny gnome video tutorial here and learn how to quickly make this cutie.

How Do I Make this Easy No-Sew Gnome Pattern?
I’m so glad you asked. Below is our written tutorial. If you’re making an easy craft ideas playlist on YouTube, here is our easy no-sew gnome pattern video tutorial. Be sure to click on the specific videos for the unicorn and bunny gnome videos.
More No-Sew Patterns for gnomes You Might Like
- DIY Farmhouse Gnome – You don’t get any easier than this simple farmhouse gnome–it’s adorable and adds farmhouse charm to any room!
- Nordic Gnome with a Twisty Hat – If you love a good twisty hat gnome, this pattern takes a sock and makes it twisty-turny in minutes.
- Make a Gnome in 15 Minutes with a Cone – A fast gnome family in just a few minutes–with braids, pony tails and beards all around!
Please Save This to Pinterest
Your shares are how this site grows and I am sincerely grateful. Know a friend who’d like this? Please share it on Facebook or save it to your favorite DIY crafts board on Pinterest.
Easy No-Sew Gnome Pattern

If you want to learn how to make a gnome without sewing, this pattern is perfect. It's so versatile, there's basically nothing you can't do with this gnome pattern!
Materials
- 1/4 yard Fabric (I used bubble gauze from JoAnn's)
- Polymer Clay in light brown and white
- White Craft Fur
- Dry Beans or Rice
- Small Amount of Polyfill
Tools
- Sewing Machine, optional
- Hot Glue Gun and Glue
- Oven
- Exacto Knife
Instructions
- Make your gnome nose and hands by combining a portion of light brown and white polymer clay until you have the color you want.
- Roll a quarter-sized portion of this clay into a neat ball. This is the nose. Set aside.
- Roll two nickel-sized portions of this clay into two neat balls. These are the hands.
- Bake the nose and hands per the clay package's directions. Allow them to cool fully.
- Trace and cut out the large gnome body shape and two hat shapes out of the fabric.
- Fold the gnome body shape in half and run a hem along the open side with your hot glue or your sewing machine.
- Fold the flap of the gnome body shape over and close the bottom of the gnome with hot glue or a seam. Allow glue to dry fully.
- Turn the body of the gnome right side out.
- Fill the gnome body with the dried beans or rice.
- Tuck a small portion of polyfill into the top of the gnome body to hold the beans or rice inside.
- With your hot glue gun or sewing machine, run a hem along the two hat pieces. Allow glue to dry completely.
- Turn the hat right side out.
- Fill the hat a little with a small amount of scrap fabric or polyfill.
- Cut out the beard shape from the craft fur by turning the fur over and cutting only the fabric with the exacto knife.
- Hot glue the beard to the body, about 2 inches below the edge of the gnome body.
- Hot glue the nose in place about 1 inch below the top of the beard.
- Place the hat on top of the gnome's head, tucking it down over the top of the nose.
- Hot glue the hat in place in the back and sides in just a couple of places--not the whole way around, then one little dot on the nose to make a wrinkle (this is the best part).
- Cut out two arm shapes from the fabric.
- Place a line of hot glue down one long side of the arms and then fold the fabric over onto itself twice to make a thin arm.
- Slip the arm up into the hat on the side and hot glue it in place.
- Trim arm as desired (make sure your bauble will fit nicely before trimming).
- Hot glue the hands in place on the ends of the arms.
- Attach the bauble to the back sides of the hands.
Notes
This gnome stands 10-inches (ish, depending on how twisty you make your hat, of course) and even in Easter Bunny form, the height can still be expected to be 9 1/2 to 10 inches.
For more fun no-sew patterns for gnomes, visit Ruffles and Rain Boots (we have lots...).
Recommended Products
As an Amazon Associate and member of other affiliate programs, I earn from qualifying purchases.


I love your gnomes, but have a different question….those cute little houses in the pic with the gnomes….do you make those??
Oh no, I got those at Target (in their Dollar Spot section). You could definitely make them!
I would like the pattern for the body part which I can’t seem to locate here. These are so cute and it’s great to be able to make a body that isn’t a sock.
Thank you!
The pattern for this no-sew body is here: https://shop.rufflesandrainboots.com/product/no-sew-gnome-pattern-tucked/
WHERE DO YOU GET YOUR BOOTS TY
If I’m making gnomes with boots (like the farmhouse gnomes at the link below), I will buy Christmas tree ornaments or make my own. I’ll have a tutorial on a few ways to make your own soon, but I believe there are some tutorials on YouTube for doll boots.
https://rufflesandrainboots.com/diy-farmhouse-gnomes/