
This Merry and Bright Christmas Gnome is Absolutely Adorable!
This easy Merry and Bright Christmas gnome tutorial is so easy and so perfect for a festive Christmas Eve. The toes on this Swedish gnome make it a fun way to add a little whimsy to the holiday decor.
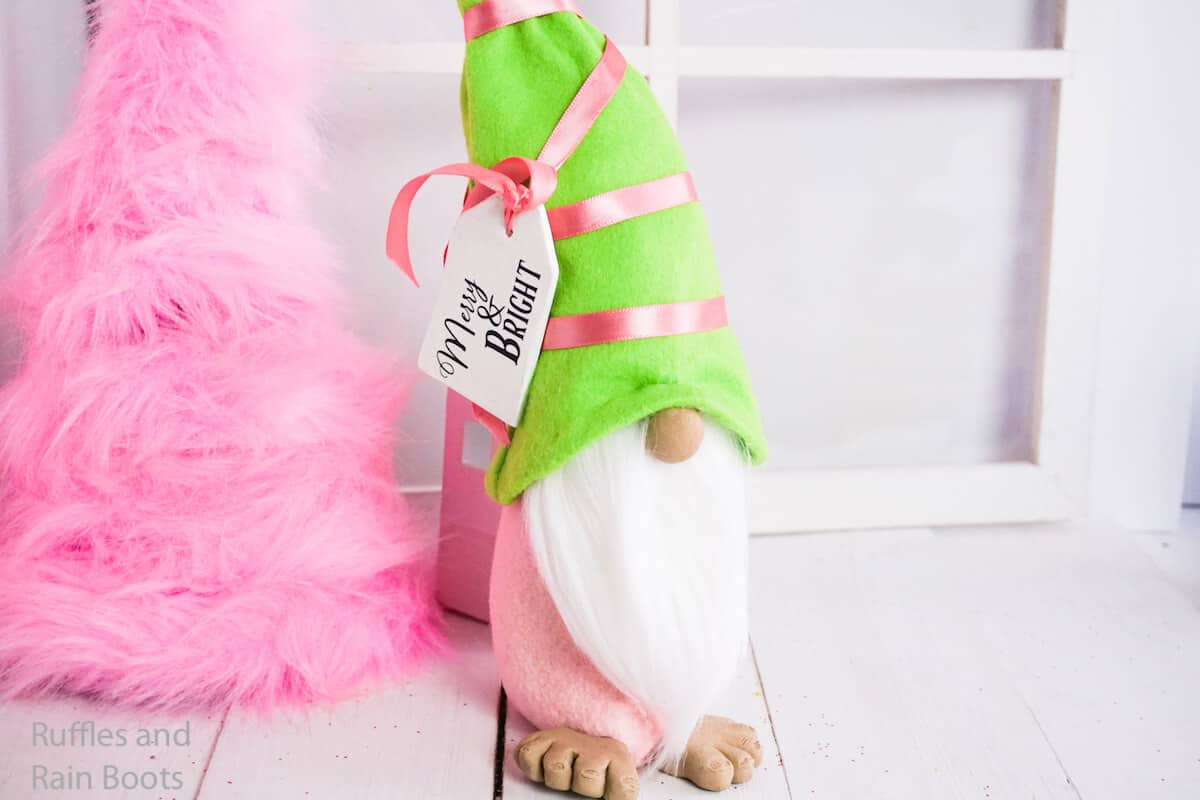
Merry and Bright Christmas Gnome
Here at Ruffles and Rain Boots, we are a little obsessed with Scandinavian Christmas gnomes. Doesn’t matter if it’s a fancy no-sew gnome ornament or a bowl of porridge I found a way to shape a gnome nose in–I love gnomes.
RELATED READING: THE BEST CHRISTMAS GNOME TUTORIALS
And although I love a gnome with a red hat, let’s be honest, sometimes it’s just fun to make a gnome that’s not traditional. One that’s sillier than even the “normal red cap DIY Christmas gnomes.
So, feeling that vibe, I thought back to some of my favorite non-traditional holiday decor and the memory of pink and green really stood out. If you’re ready to add some vibrant color to your Christmas decor in the form of a Scandinavian gnome, well, let’s get started.
DIY Christmas Gnome Tutorials
If you’re looking for the best DIY Christmas gnome tutorials, you have come to the right place. Check out all of my favorite tomte tutorials for the holidays!
No Time to Make This Now? Pin it for Later
You’re busy, I get it. Pin this to your favorite holiday crafts board on Pinterest and it’ll be here for when you’re ready.

As an Amazon Associate, I can earn from qualifying purchases.
Tips to Make a Pink and Green Christmas Gnome
- Click here to get the easy no-sew gnome pattern. It’s got everything you need to make your gnome as cute as a button!
- If you’re using your computer to make the tag, click here to get the Merry and Bright files.
- Generally, I end up making my gnome noses from whatever is on hand. Sometimes it’s wood beads, sometimes buttons. But for this gnome project, it was polymer clay. Why did I pick clay to make this nose? Because I was going to be breaking out the clay anyway to make those adorable feet. When designing, use what you’re already planning to have on the craft table.
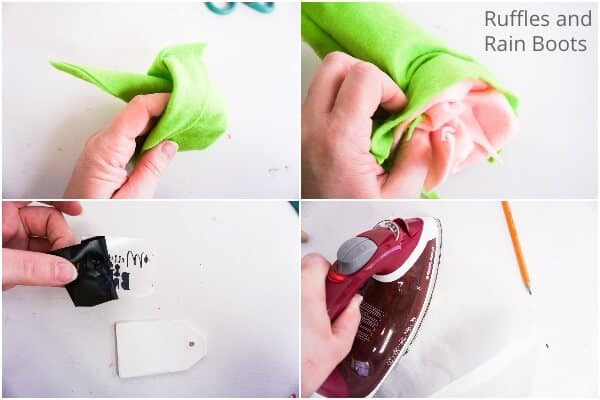
- Grab some super cute embellishment for the hat. I love those gnomes where people like embroider a snowflake into the front of the hat, but, let’s be honest, mine NEVER turn out right! So, for this Nordic gnome, I grabbed some more polymer clay, this time in white, and just rolled it out flat, cut a tag out with a knife and used a straw to poke a hole. Then I baked it. When it was done, I make a little cut file and used an iron to put the words on.
- I made this entire gnome a no-sew pattern by using hot glue to make all my hems. But you could absolutely use a sewing machine. Whatever you’re most comfortable with.
- If you’ve never cut faux fur before, do not just go after it with scissors. You’ll ruin the drape and be super sorry. But, if you flip the fur over and cut the fabric only with an Exacto knife, you’ll be able to save the fur and it’ll look great!
- To make the nisse feet, it’s a lot easier than it looks. So, don’t feel overwhelmed. Just make a rectangle of clay, then cut 4 slots about 1/4 of the way down. Round those over and use an Exacto knife to make toenails. Then bake and attach the to gnome shell.

Get the Gnome Pattern
Click below to add this fun pattern to your cart. So many gnomes can be made with this!
How Do I Make this Christmas Nisse?
I’m so glad you asked. Below is our written tutorial. If you have any questions, let me know in the comments below.
Merry & Bright Christmas Gnome

If you're looking for a non-traditional holiday gnome tutorial, you've come the right place. This colorful gnome will steal everyone's attention!
Materials
- Craft Felt in Pale Pink and Bright Green
- Pink Ribbon
- Polymer Clay in light brown and white
- White Craft Fur
- Dry Beans or Rice
- Small Amount of Polyfill
Tools
- Sewing Machine, optional
- Hot Glue Gun and Glue
- Oven
- Cricut Cutting Machine, optional
- Exacto Knife
- Sand Paper
- Merry & Bright SVG
- Printable Gnome Pattern
Instructions
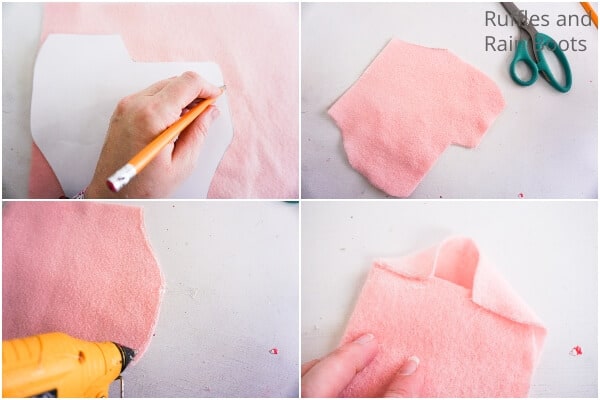
- Trace and cut out the large gnome body shape out of the pink felt.
- Fold the gnome body shape in half and run a hem along the open side with your hot glue or your sewing machine.
- Fold the flap of the gnome body shape over and close the bottom of the gnome with hot glue or a seam. Allow glue to dry fully.
- Turn the body of the gnome right side out.

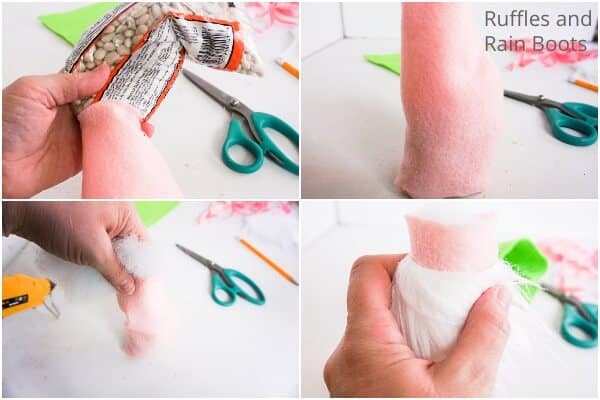
- Fill the gnome body with the dried beans or rice.
- Tuck a small portion of polyfill into the top of the gnome body to hold the beans or rice inside.
- Cut out the beard shape from the craft fur by turning the fur over and cutting only the fabric with the exacto knife.
- Hot glue the beard to the body, about 2 inches below the edge of the gnome body.
- Make your gnome nose and feet by combining a portion of light brown and white polymer clay until you have the color you want.
- Roll a quarter-sized portion of this clay into a neat ball. This is the nose. Set aside.
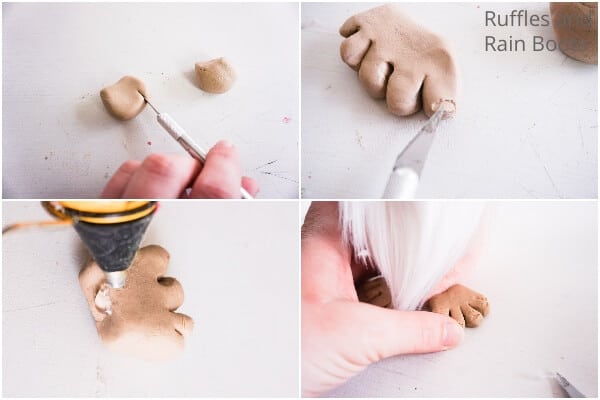
- Break off two equal sized portions of clay about the size of half of your palm and about 1/2 inch thick.
- Form each into similarly sized rectangles, longer and thicker on one end (slightly) than the other.
- With your exacto knife, cut 5 slots into one long side of each rectangle about 1/3 of the way through the rectangle. These form the toes.
- Using your finger or a flat-sided tool, round over the edges of each toe.
- With the exacto knife, flatten and scrape a little bit on the top of each toe to form a toenail.
- Ensure you like the fit of your feet on the bottom of the gnome body.
- Bake the nose and toes per the clay package's directions. Allow them to cool fully.
- Hot glue the toes in place on the bottom of the gnome body.
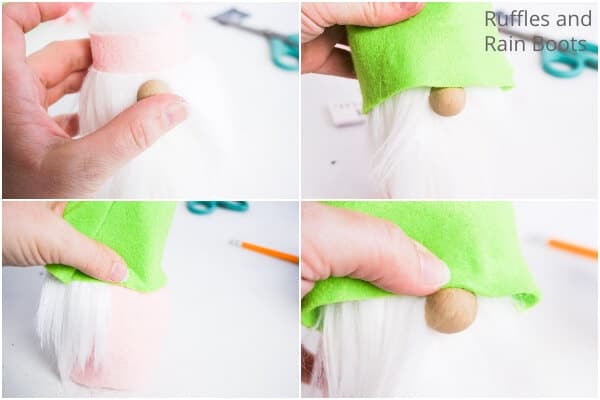
- Trace the hat shape onto the green felt twice and cut out each triangle.
- With your hot glue gun or sewing machine, run a hem along the two hat pieces. Allow glue to dry completely.
- Turn the hat right side out.
- Fill the hat a little with a small amount of scrap fabric or polyfill.
- If you're making a clay tag like I did, roll your clay flat, cut out the shape you want with your exacto knife, poke a hole with a straw and smooth the edges before baking.
- When the tag is done baking, iron on letters for your chosen phrase.
- Hot glue the nose in place about 1-inch below the top of the beard.
- Place the hat on top of the gnome's head, tucking it down over the top of the nose.
- Hot glue the hat in place in the back and sides, then one little dot on the nose to make a wrinkle (this is the best part).
- Wrap the pink ribbon around the hat, affixing the bauble you chose while you wrap.

Notes
For more awesome Scandinavian Christmas gnomes, be sure to visit Ruffles and Rain Boots (we have looooots).
Recommended Products
As an Amazon Associate and member of other affiliate programs, I earn from qualifying purchases.

More Christmas Gnome Tutorials You Might Like
- Christmas Gnome Wreath – I absolutely love a good gnome. And any excuse to put a gnome on a wreath is totally my game.
- Christmas Cowboy Gnome – You put Christmas with a Cowboy and then add a little gnome-magic? This is what you get!
- Gnome Ornaments for Christmas – Easily my most popular post ever, there’s a reason why I still make these little guys and add them to my tree every year!
Please Save This to Pinterest
Your shares are how this site grows and I am sincerely grateful. Know a friend who’d like this? Please share it on Facebook or save it to your favorite Christmas crafts board on Pinterest.


Very cute! I’m not sure what the front of the body is? Is the seam in the back or on a side?
Thank you
The front of the body is the side without the seam. The seam is on the back. I suppose you could hide the seam under the beard in the front, because it doesn’t really matter, but the way I’ve been making it is with the seam in the back.