
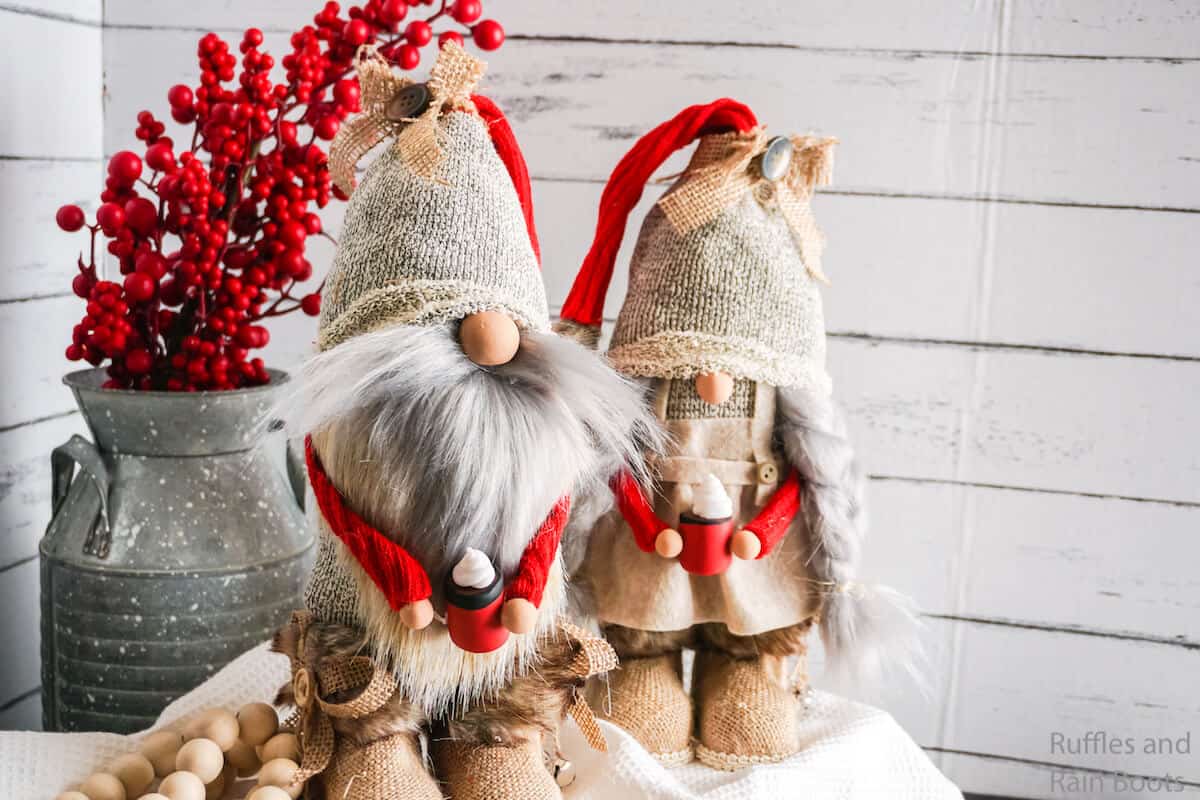
These DIY Farmhouse Gnomes with Boots are CUTE!
I love this set of gnomes with boots. They’re little sock gnomes, but the apron, coffee cups, and boots – these additions make these simple DIY farmhouse gnomes with legs too sweet!
What You'll Find On This Page
DIY Farmhouse Gnomes
Here at Ruffles and Rain Boots, we love coming up with new DIY gnome styles and techniques that have never been used. Seriously, if I have 20 minutes free, I’m in my crafting zone folding paper or fabric, or finding baubles, stuffing, and a bit of Mongolian fur to make a little gnome.
My latest idea was an easy – like, ridiculously easy – gnome with legs. These two adorable DIY farmhouse gnomes with boots – and you’ll never believe what they are!
RELATED READING: Love Farmhouse? Make DIY Highland Cows with Faux Fur
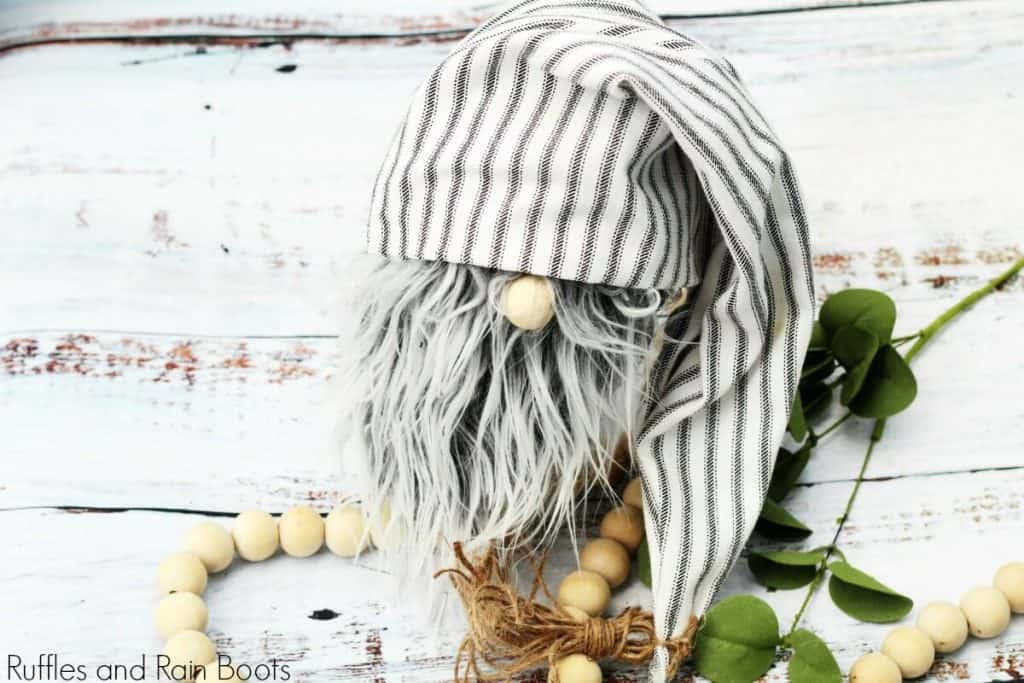
Farmhouse Sock Gnome without Legs or Feet
Looking to make a sock gnome without legs or feet? Check out my popular farmhouse sock gnome with a slouchy hat tutorial here. If you’re new to making gnomes, this easy, wrap-around beard style gnome is done in no time and really gets you started with the basics.
RELATED READING: THE BEST DIY GNOME TUTORIALS
The biggest question I’ve received on these gnomes is, “How did you make those boots?!” Friends, when I say something is an easy craft, I mean E.A.S.Y. Those boots are just little Christmas ornament boots that I found at a craft store! Soon I’ll be sharing more than 10 ways to make gnome boots and shoes, but if you’re ready to make these cuties, let’s get started.
DIY Christmas Gnome Tutorials
If you’re looking for the best DIY Christmas gnome tutorials, you have come to the right place. Check out all of my favorite tomte tutorials for the holidays!
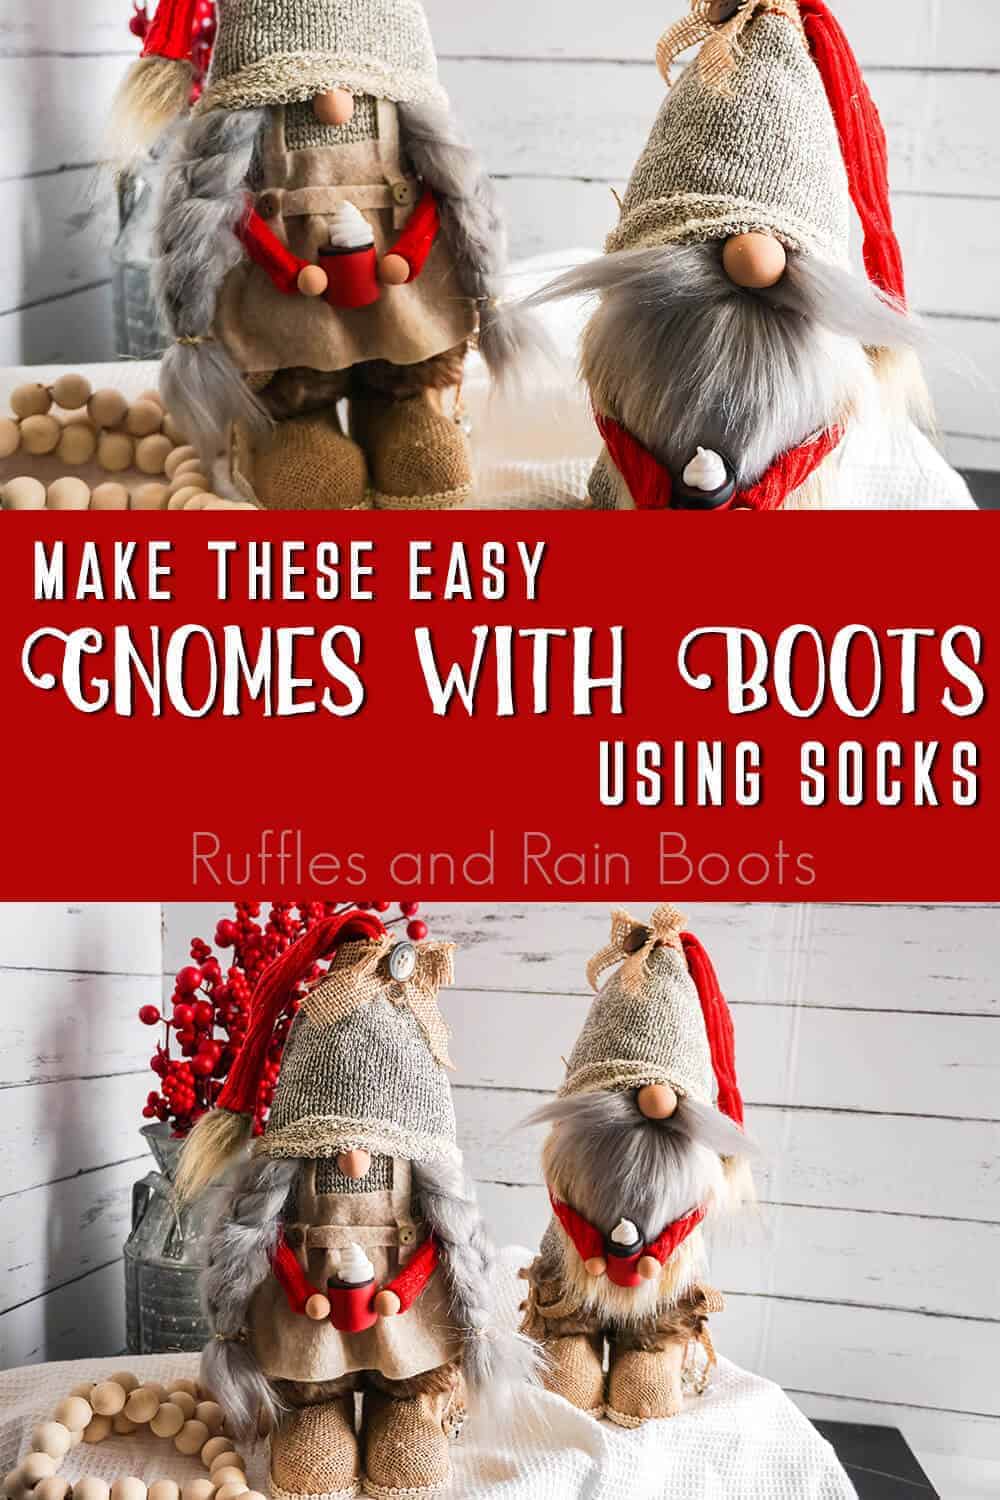
No Time to Make This Now? Pin it for Later
If you’re too busy to make these right this second, pin this to your favorite DIY or gnome board on Pinterest and it’ll be here for when you’re ready.
As an Amazon Associate, I can earn from qualifying purchases. There could be affiliate links within this article.
Tips to Make Gnomes with Boots
- First, grab some boots. I got my little burlap boots at the craft store here locally, but I did find some online for you. Click here to get some absolutely adorable snow boots that would look so fabulous on your gnomes.
- Generally, I end up making my gnome noses from whatever is on hand. Sometimes it’s wood beads, sometimes buttons. But for this gnome project, it was polymer clay. Why did I pick clay to make this nose? I like breaking out the clay sometimes. If you’re not into clay, wood beads like these work just as well!
- Grab some super cute embellishments for the hat. Be sure to browse all of my gnome tutorials for ideas.
- I made this entire gnome a no-sew project by using hot glue. You could absolutely use a sewing machine, however.
- If you’ve never cut faux fur before, watch this video to learn how to cut faux fur for gnomes.

Christmas Sock Gnomes Video Tutorial
I’m so glad you asked. Below is our written tutorial. If you are a visual learner, here is the full DIY farmhouse gnome video tutorial on YouTube. Subscribe while you’re there – I share A LOT of gnomes.
Before you get started, be sure to check the most frequently asked questions and answers on sock gnomes. The list gives you ideas, tips, and tricks for making amazing no-sew sock gnomes.
How to Make These Farmhouse Gnomes
Make Sock Gnome Bodies
First, start making your boy gnome by filling a sock with 1 cup of rice. Fill the sock with Poly-Fil about halfway up the sock.
Cut the top of the sock off and tie closed with twine. Hot glue the top of the sock closed.
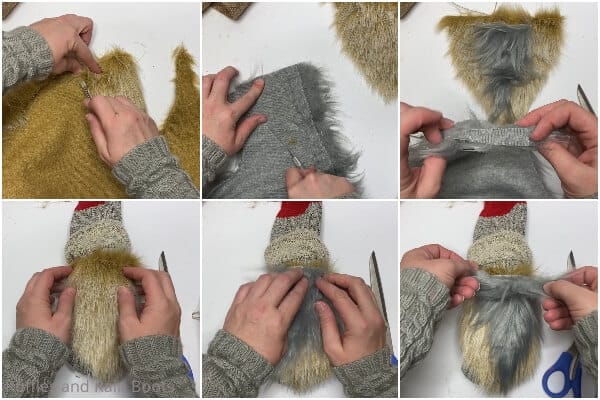
Cut out a large beard shape from the light brown faux fur by turning the fur over and cutting only the fabric with the X-Acto knife.
Slip the remaining portion of sock over the top of the gnome body and make sure you like the fit.
Cut out a much smaller beard shape from the grey faux fur in the same way as above. Cut out a 3-4 inch long rectangle about 1/2 inch wide to make a mustache. Hot glue the beard to the body in the layers of light brown faux fur, grey faux fur and mustache.
Hot glue the nose on just above the mustache.
Pull the hat off the top of the gnome head and fold up the edge, making a neat brim. Hot glue this in place.
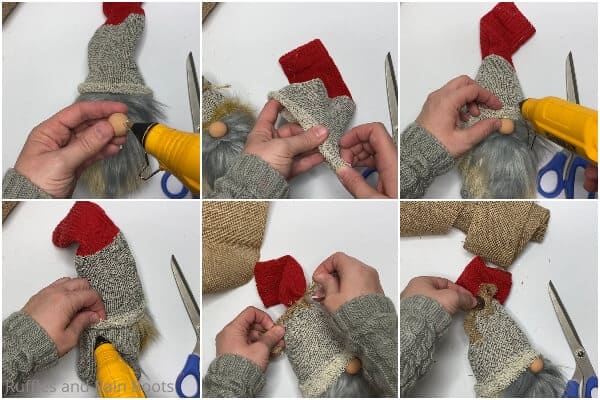
Tuck the hat back down onto the gnome head and hot glue the brim in place over the nose with a cute wrinkle. Pull the hat down low in the back and hot glue it in place. Leave the sides open to place the arms.
Cut a piece of burlap about 8 inches long by 1/2 inch wide. Tie the burlap piece around the bottom of the red part of the sock, right at the top of the gnome head, and make a bow. Hot glue a button in the center of the bow.
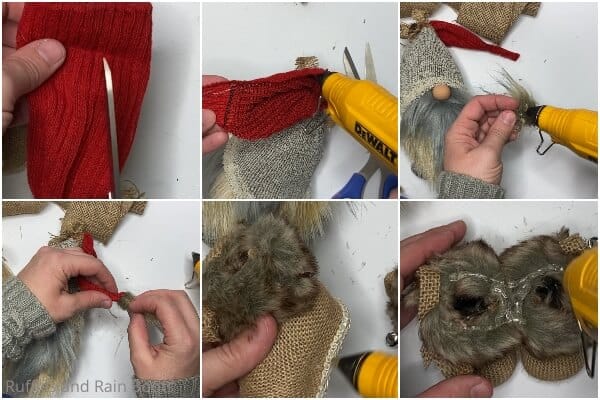
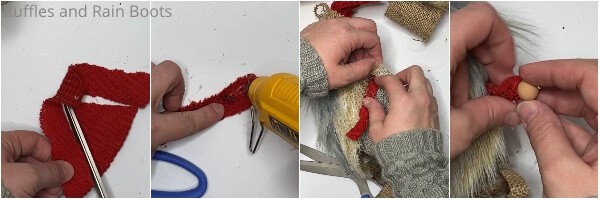
Cut the red part of the hat at a steep angle to make a pointed triangle, starting at the burlap ribbon and working upward to the tip of the sock. Hot glue a hem into the edge of the remaining triangle on the top of the sock. Glue the two hemmed edges of the triangle together to form a pointy hat.
Take a scrap of dark brown faux fur and cut a quarter-sized circle from it, on only the fabric backing.
How to Attach Boots to Sock Gnomes
Place a bead of hot glue around the edge of this quarter-sized circle of dark brown faux fur and then pinch it together to form a tiny pom pom. Hot glue this tiny pom pom to the tip of the hat. Press a pair of shoes together as they would sit side-by side. Where they touch, add a dab of hot glue to hold them in place.
Set the gnome on top of the boots. Where the boots and sock bottom of the gnome touch, add a bead of hot glue and press the gnome into the boots to create a good seal.
With the scraps of red sock that you cut off the top of the hat, cut two 1-inch wide sections as long as you can get. Fold this section of red sock fabric in half twice to form a hem and hot glue in place. Slip each arm up into the hat, behind the beard and hot glue in place.
Hot glue the hands onto the ends of the arms.
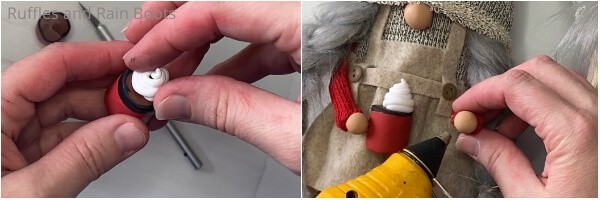
Make Clay Coffee Cups (or Cocoa Cups
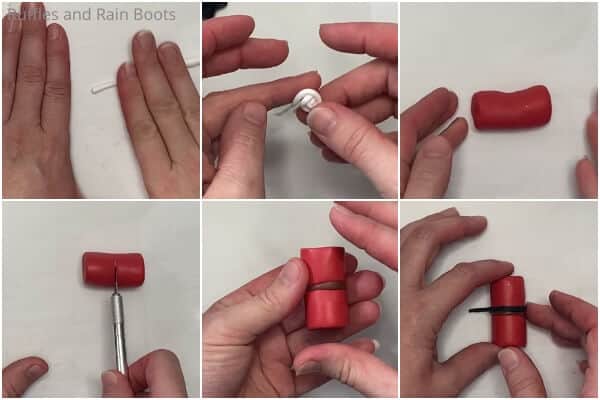
Make a thin snake of white and cut it in half. Twirl the snakes of white into tight coils with a base about the size of a dime.
Make the coffee cups by rolling a 2-inch by 1/2-inch section of red clay into a cylinder and then cut it in half.
Make the coffee by forming a small, thin disc of brown clay about the same width as the red cylinder. Press the disc of coffee in between the two sections of cup.
Make a thin snake of black and press it flat, then straighten the sides. Wrap this flat snake of black around the coffee.
Cut the two coffee cups apart, slicing through the coffee and lip. Smooth the coffee cup and coffee. Bake the coffee cups per the clay package’s directions and allow them to cool.
To make the little girl gnome, follow all of the steps, with the exception of the beard.
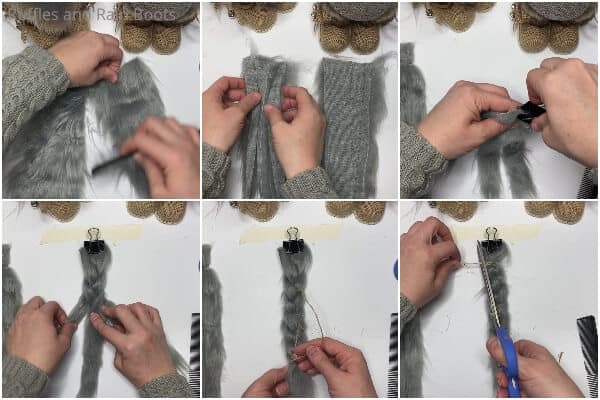
Make Gnome Braids
To make the braids as the alternative to the beard, start by brushing out a 3-4 inch wide section of grey fur, longer than your sock gnome body. Cut 6 – 1/2 inch wide rectangles as long as the sock is from the grey craft fur, cutting it on the fabric side only, as you did with the beards. Clip 3 of the strands together on one end with a binder clip and tape it in place on your desk.
Taking care to not twist the sections of fur and keep the strands down, braid the sections of fur. Tie the end in place with twine. Tie the top in place with the twine and remove from the binder clip. Trim the ends of the braid so that the fur is fairly even. Hot glue the braids on each side of the gnome’s head.
Make a Gnome Dress
To make the apron for the little girl gnome, cut a scrap section of beige felt the width of her body and about half the height.
On one long side of the felt, create pleats by placing a dab of hot glue and then pinching the fabric together. Cut a length of felt about 1/4 inch wide long enough to wrap around the gnome body, plus 2 inches.
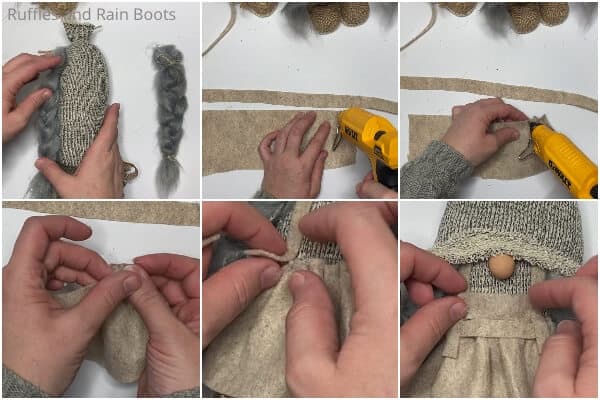
Wrap this around the gnome body and tie it in a knot in the back of the gnome. Hot glue in place.
Cut two lengths of felt about 1/4 inch wide long enough to go down the front of the gnome, from the edge of the hat to the apron, with overhang on both ends–forming apron straps. Hot glue in place. Add a button to each of these apron straps.
Hot glue a coffee cup between each hand of each gnome and enjoy!
More DIY Gnomes You Might Like
- How to Make a Gnome with a Cone – You’re just 15 minutes from having an adorable gnome made from a cone that you can stack to put away!
- No-Sew Gnome Pattern – This is the most versatile gnome ever! It works for any season, color scheme or decor.
- Easy Chef Gnome Tutorial – If you love the kitchen, but need a little company, this is the perfect gnome for you!
Please Save or Share This Fun Christmas Gnome Pair
Your shares are how this site grows and I am sincerely grateful. Know a friend who’d like this? Please share it on Facebook or save it to your favorite Christmas crafts pin board.

DIY Farmhouse Gnomes with Boots
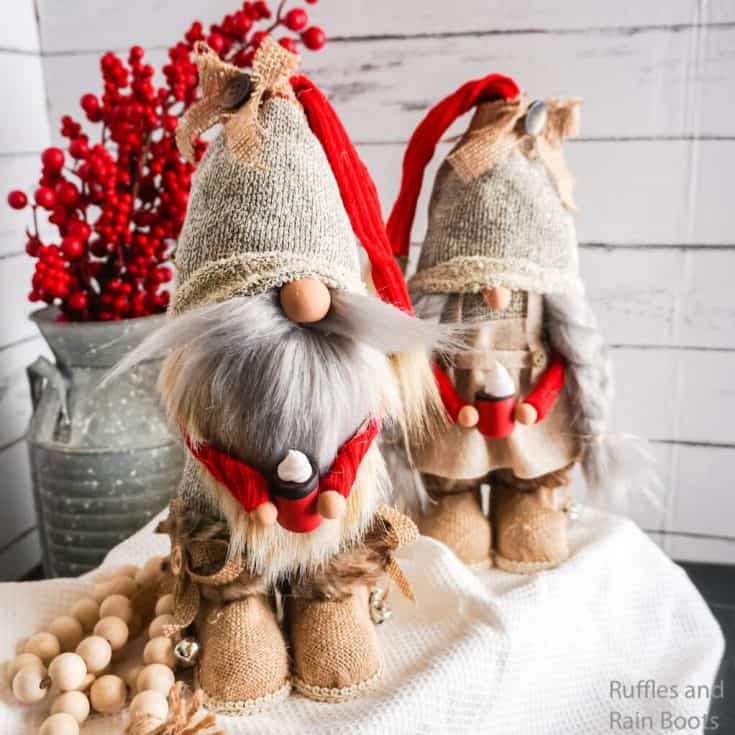
These easy DIY farmhouse gnomes with boots are so simple, but they turned out so cute, I just couldn't wait to share! They're so cute, I just love gnomes holding coffee cups--and these are so simple to make, it's ridiculous.
Materials
- 2 Long Thermal Socks with Red Tops
- 2 Cups Dry, Uncooked Rice, Dry Beans, or Poly Pellets
- Polyfill
- 2 Sets Boot Ornaments (3-inches Tall)
- 2 Gnome Noses (small polymer clay or wood balls)
- 4 Gnome Hands (small polymer clay or wood balls)
- Scraps Beige Felt
- 4 Buttons
- Red, Brown, Black, White Polymer Clay
- Twine
- Burlap Scraps
- Light Brown Faux Fur and Brown Faux Fur
Tools
- Scissors
- Hot Glue Gun & Glue
- Oven
- X-Acto Knife or Razor Blade
- Binder Clip
- Tape
Instructions
- Start making your boy gnome by filling a sock with 1 cup of rice.
- Fill the sock with an additional 4 cups (or so) of Poly-Fil, about halfway up the sock.
- Cut the top of the sock off and tie closed with twine. Hot glue the top of the sock closed.
- Cut out a large beard shape from the light brown faux fur by turning the fur over and cutting only the fabric with the exacto knife. To determine how big to make my beard (the light brown portion of it) I simply laid the filled sock over the fur and made a "u" shape that would leave fur just at the edge of the sock to overhang on the boots (eventually) and starting about 4 inches from the top of the sock--and about as wide as the entire front half of the sock.
- Slip the remaining portion of sock over the top of the gnome body and make sure you like the fit.
- Cut out a much smaller beard shape from the grey faux fur in the same way as above.
- Cut out a 3-4 inch long rectangle about 1/2 inch wide to make a mustache.
- Hot glue the beard to the body in the layers of light brown faux fur, grey faux fur and mustache.
- Hot glue the nose on just above the mustache.
- Pull the hat off the top of the gnome head and fold up the edge, making a neat brim. Hot glue this in place.
- Tuck the hat back down onto the gnome head and hot glue the brim in place over the nose with a cute wrinkle (the best part!).
- Pull the hat down low in the back and hot glue it in place. Leave the sides open to place the arms--we'll glue the sides down later.
- Cut a piece of burlap about 8-inches long by 1/2 inch wide.
- Tie the burlap piece around the bottom of the red part of the sock, right at the top of the gnome head, and make a bow.
- Hot glue a button in the center of the bow.
- Cut the red part of the hat at a steep angle to make a pointed triangle, starting at the burlap ribbon and working upward to the tip of the sock.
- Hot glue a hem into the edge of the remaining triangle on the top of the sock.
- Glue the two hemmed edges of the triangle together to form a pointy hat.
- Take the scrap of dark brown faux fur and cut a quarter-sized circle from it, on only the fabric backing.
- Place a bead of hot glue around the edge of this quarter-sized circle of dark brown faux fur and then pinch it together to form a tiny pom pom.
- Hot glue this tiny pom pom to the tip of the hat.
- Press a pair of shoes together as they would sit side-by side. Where they touch, add a dab of hot glue to hold them in place.
- Set the gnome on top of the boots. Where the boots and sock bottom of the gnome touch, add a bead of hot glue and press the gnome into the boots to create a good seal.
- With the scraps of red sock that you cut off the top of the hat, cut two 1-inch wide sections as long as you can get.
- Fold this section of red sock fabric in half twice to form a hem and hot glue in place.
- Slip each arm up into the hat, behind the beard and hot glue in place.
- Hot glue the hands onto the ends of the arms.
- Make a thin snake of white and cut it in half.
- Twirl the snakes of white into tight coils with a base about the size of a dime.
- Make the coffee cups by rolling a 2-inch by 1/2-inch section of red clay into a cylinder and then cut it in half.
- Make the coffee by forming a small, thin disc of brown clay about the same width as the red cylinder.
- Press the disc of coffee in between the two sections of cup.
- Make a thin snake of black and press it flat, then straighten the sides.
- Wrap this flat snake of black around the coffee.
- Cut the two coffee cups apart, slicing through the coffee and lip.
- Smooth the coffee cup and coffee to your heart's content.
- Bake the coffee cups per the clay package's directions. Allow them to cool fully.
- To make the little girl gnome, follow all of the steps, with the exception of the beard.
- To make the braids as the alternative to the beard, start by brushing out a 3-4 inch wide section of grey fur, longer than your sock gnome body.
- Cut 6 - 1/2 inch wide rectangles as long as the sock is from the grey craft fur, cutting it on the fabric side only, as you did with the beards.
- Clip 3 of the strands together on one end with a binder clip and tape it in place on your desk.
- Taking care to not twist the sections of fur and keep the strands down, braid the sections of fur.
- Tie the end in place with twine.
- Tie the top in place with the twine and remove from the binder clip.
- Trim the ends of the braid so that the fur is fairly even.
- Hot glue the braids on each side of the gnome's head.
- To make the apron for the little girl gnome, cut a scrap section of beige felt the width of her body and about half the height.
- On one long side of the felt, create pleats by placing a dab of hot glue and then pinching the fabric together.
- Cut a length of felt about 1/4 inch wide long enough to wrap around the gnome body, plus 2-inches.
- Wrap this around the gnome body and tie it in a knot in the back of the gnome. Hot glue in place.
- Cut two lengths of felt about 1/4 inch wide long enough to go down the front of the gnome, from the edge of the hat to the apron, with overhang on both ends--forming apron straps. Hot glue in place.
- Add a button to each of these apron straps.
- Make the arms for the little girl gnome just like the little guy.
- Hot glue a coffee cup between each hand of each gnome and enjoy!
Notes
For more fun DIY gnome tutorials, visit Ruffles and Rain Boots.

What is the name of your craft store where you got those boots? I can’t find them at any craft store near me or Amazon or Ebay. Thanks!
I purchased this pair at Hobby Lobby, but you can use any boot ornament you can find. You can also use individual doll boots (I use the 18-inch doll boots and shoes) which you can find at all the craft stores, in Target, and on Amazon.mazon. If using the doll shoes, hot glue them together to better stabilize them.
I’m looking forward to making these gnomes. I have looked at a lot of instructions for gnomes & was impressed with how well it was written. There is a lot of detail on your gnomes, very nice.
IM wondering where you ordered the coffee mugs from?
Julia, I made the coffee mugs from polymer clay and show you how in the video if you want to make your own. That said, Etsy and Amazon both sell miniature coffee mugs that you can “fill” with clay.