
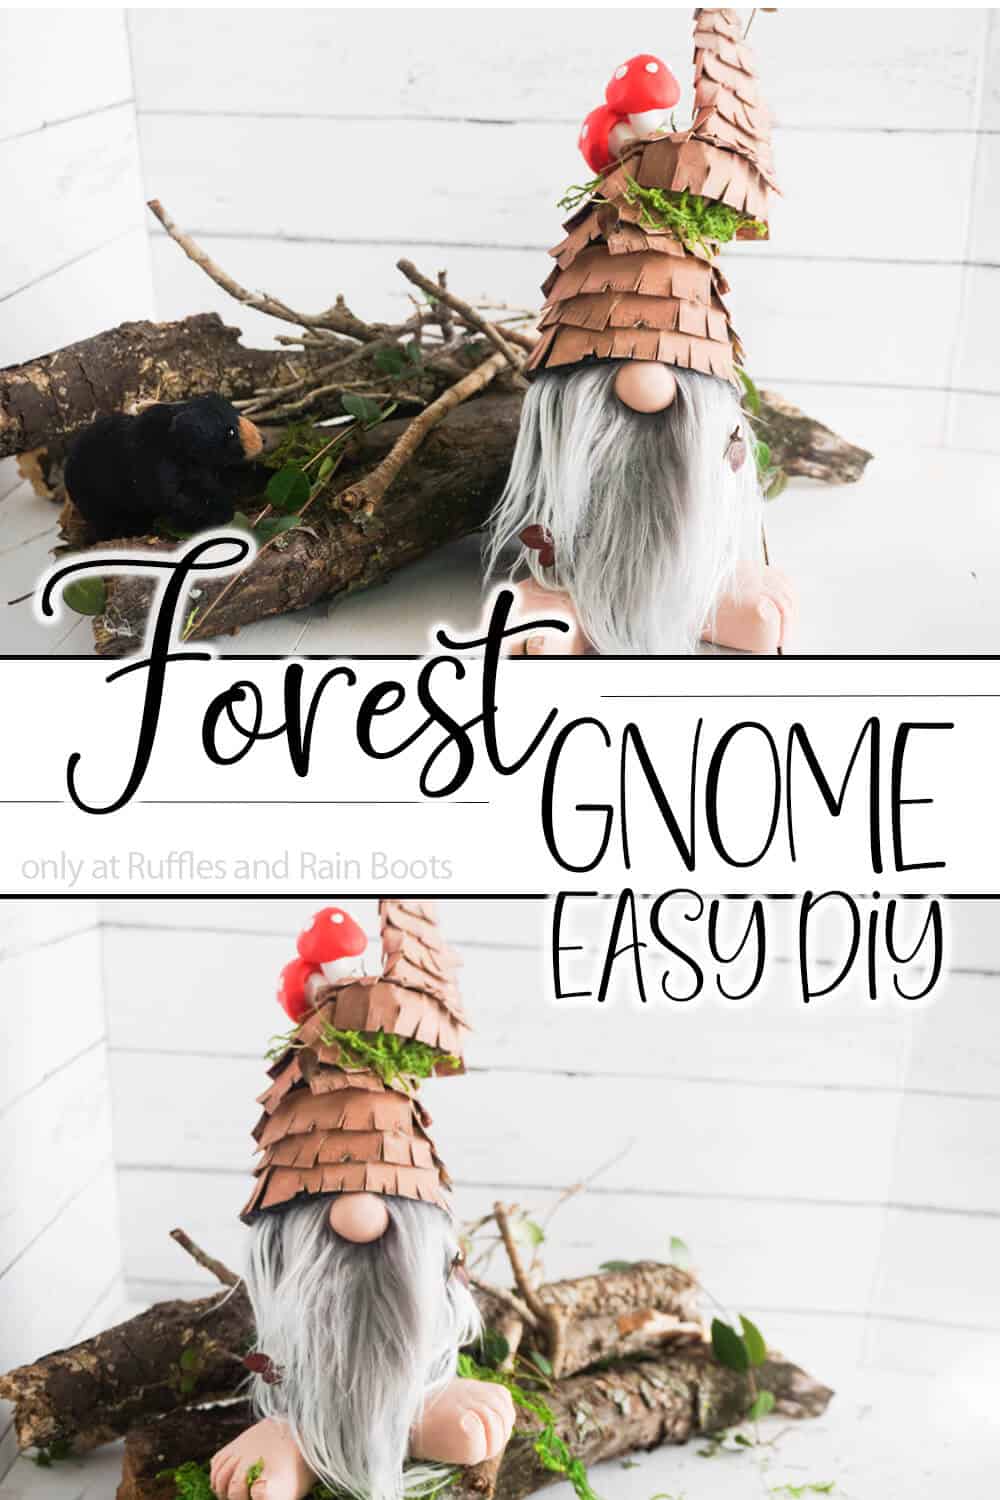
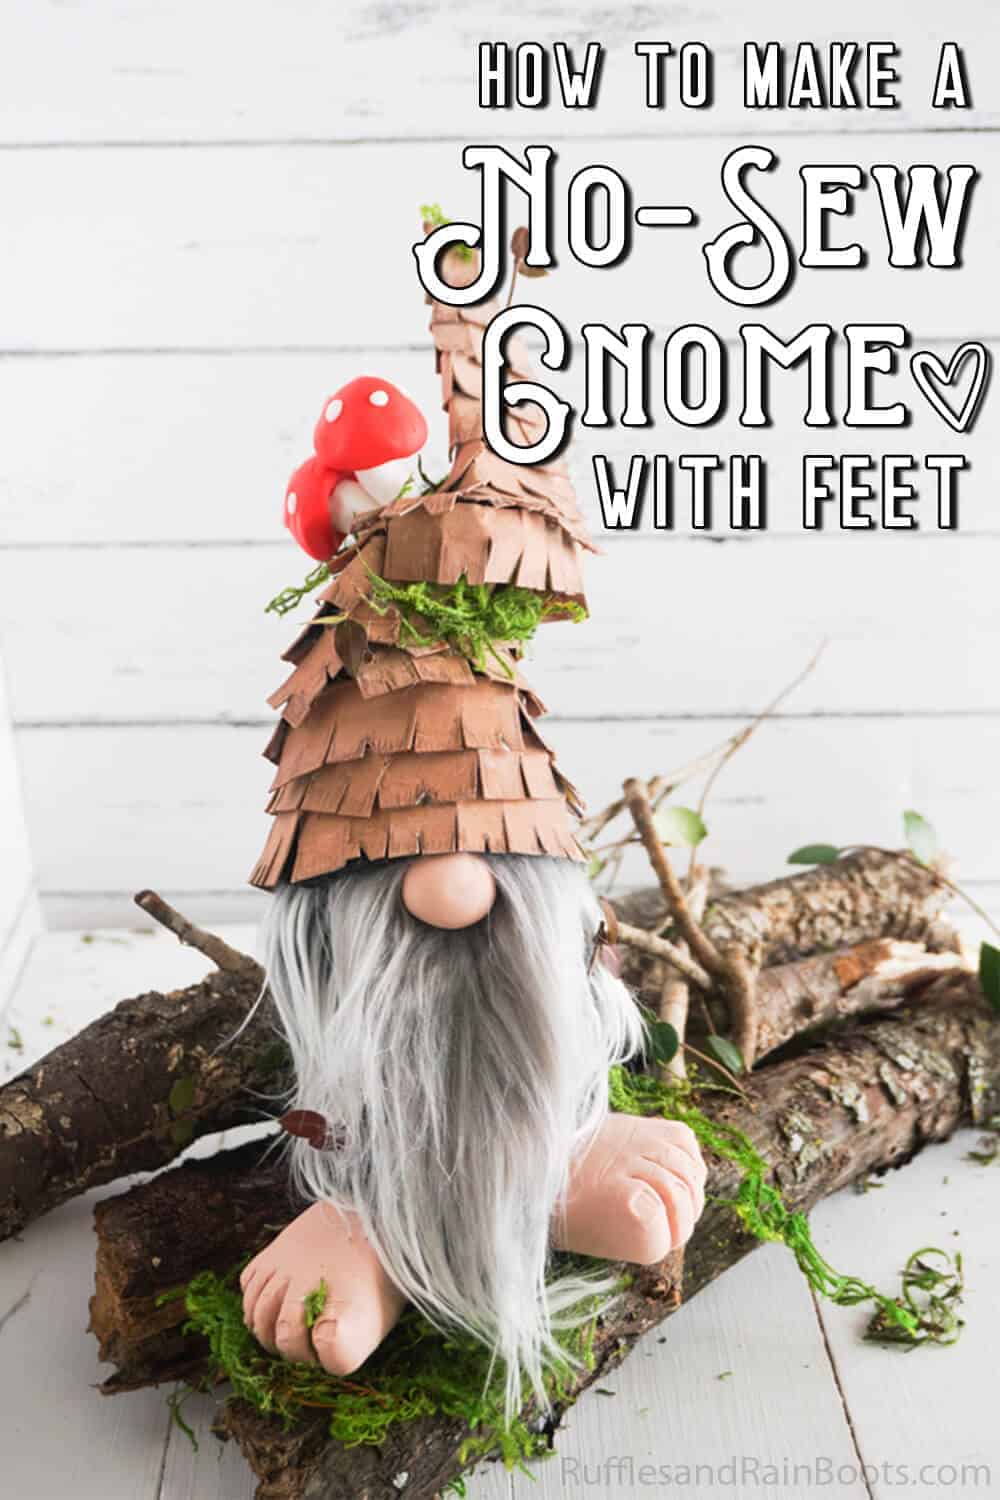
How to Make a Rustic Gnome – DIY Forest Gnome Tutorial
I couldn’t wait to figure out how to make a rustic gnome and this DIY forest gnome tutorial is just too cute. He has so much unique charm and he is a no-sew gnome!
How to Make a Rustic Gnome
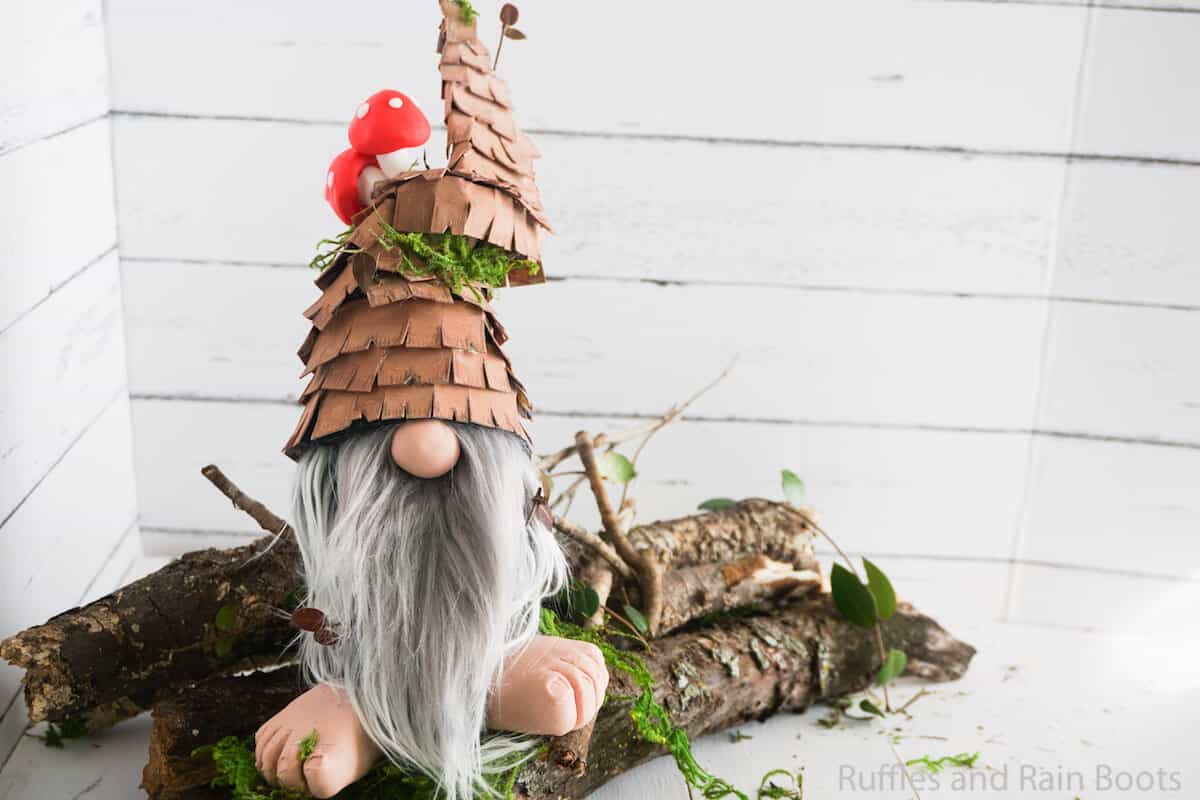
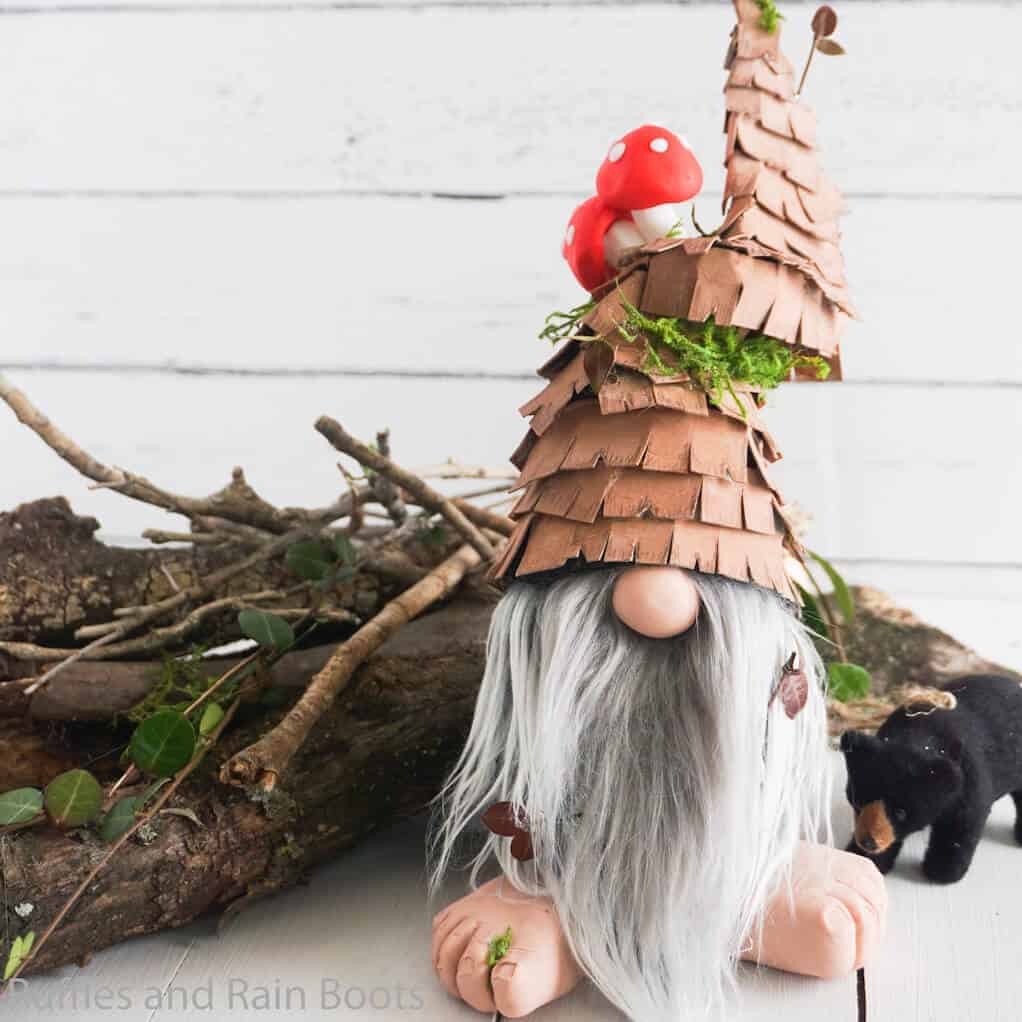
Here at Ruffles and Rain Boots, I have so many ideas for DIY gnomes. I reprioritized this sketch for months and fortunately, I got some time today to make this adorable rustic gnome tutorial. And wow, what an adorable tomte! The feet, the little sticks, the moss between his toes – they all compliment that amazing tree bark hat nicely.
RELATED READING: SOCK GNOME HOLDING A COFFEE CUP
Speaking of that hat… I am so in love with this crazy hat! I’m going to definitely think about making a second one in girl-gnome style because, frankly, that hat was a good time. If you are ready to tackle making your own forest tomte, grab a hot glue gun and let’s get started.
No Time to Make This Now? Pin it for Later
You’re busy, I get it. Pin this to your favorite DIY crafts board on Pinterest and it’ll be here for when you’re ready.
As an Amazon Associate, I can earn from qualifying purchases.
Tips to Make a DIY Forest Gnome
- Click here to get the easy no-sew gnome pattern. It’s got everything you need to make your gnome as cute as a button!
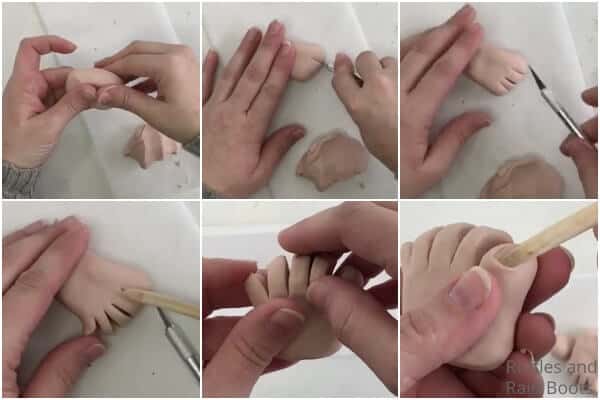
- It’s a lot easier than it looks to make the adorable little gnome feet, so don’t feel overwhelmed. Just make a thick rectangle of clay, then cut 4 slots (making 5 toes) about 1/4 of the way from one end to the other. Round those little toes over and use an Exacto knife to make toenails. Then bake and attach the to gnome. Psst: don’t worry, I have a video below.
- I made this entire gnome a no-sew pattern by using hot glue to make all my hems, but you could absolutely use a sewing machine. Whether you sew or glue, the hat is largely dependent on hot glue.
- If you’ve never cut faux fur before, I have this short video of how to cut faux fur the right way. While you’re there watching it, be sure to subscribe to my channel so you get to see all the latest and greatest gnome tutorials!
Get the Gnome Pattern Here
Click below to add this fun pattern to your cart. So many gnomes can be made with this!
How Do I Make this Forest Gnome?
I’m so glad you asked. Below is our written tutorial. If you’d like to follow along with live instructions, click here for our forest gnome video tutorial on YouTube.
First, make your gnome nose and feet by combining a portion of light brown and white polymer clay until you have the color you want.
Roll a quarter-sized portion of this clay into a neat ball. This is the nose. Set aside.
Break off two equal-sized portions of clay about the size of half of your palm and about 1/2 inch thick.
Form each into similarly sized rectangles, longer and thicker on one end (slightly) than the other.
With your exacto knife, cut 5 slots into one long side of each rectangle about 1/3 of the way through the rectangle. These form the toes.
Using your finger or a flat-sided tool, round over the edges of each toe.
With the exacto knife, flatten and scrape a little bit on the top of each toe to form a toenail.
Make the little mushrooms by rolling a quarter-sized portion of white clay into a cylinder. Cut the cylinder in half, but not in equal portions. Set aside.
Roll out two double-quarter-sized portions of red clay into neat balls. Flatten one side of each of the balls and narrow the other end, making a mushroom top shape.
Make tiny balls of white clay stick them randomly on the red mushroom caps and press down lightly.
Press the mushroom caps onto the top of the white cylinders, then press the base of the white cylinders together.
Bake the mushrooms, nose, and toes per the clay package’s directions. Allow them to cool fully.
Trace and cut out the large gnome body shape out of the felt.
Fold the gnome body shape in half and run a hem along the open side with your hot glue or your sewing machine.
Fold the flap of the gnome body shape over and close the bottom of the gnome with hot glue or a seam. Allow the glue to dry fully.
Turn the body of the gnome right side out.
Fill the gnome body with the dried beans or rice.
Tuck a small portion of polyfill into the top of the gnome body to hold the beans or rice inside.
Trace the hat shape onto the felt twice and cut out each triangle.
With your hot glue gun or sewing machine, run a hem along the two hat pieces. Allow the glue to dry completely.
Cut out the beard shape from the Mongolian fur by turning the fur over and cutting only the fabric with the exacto knife.
Hot glue the beard to the body, about 2 inches below the edge of the gnome body.I wanted my gnome beard to be even fuller (you know, because the forest makes you crazy-hairy, I guess?) by adding a second layer of a slightly different shade of grey craft fur on top of the first with a little smaller size than the first.
Part the top layer of fur a little and make a bit of a mustache.
Hot glue the nose in place about 1 inch from the top of the beard.
Insert the floral wire into the hat and hot glue it in place on one side.
Tuck the hat on top of the gnome’s body and hot glue it in place.
Bend the hat to a ridiculous angle with a flat place.
Cut 10-12 1-inch wide strips of cereal box.
Cut halfway through each strip of cereal box at 1/2-inch increments.
Starting at the bottom of the hat, wrap the strips of cereal box around the base of the hat and hot glue them in place.
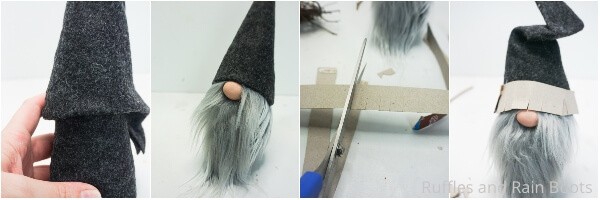
Continue up the hat, overlapping the cereal box strips until you reach the top. Take care to cover all of the hat.
Paint the cereal box strips with brown craft paint. Allow the paint to dry fully.
With the black pen, color the edges of each flap on the strips of cereal box and give each plank its own character.
Hot glue the toes in place on the bottom of the gnome body.Hot glue the mushrooms on the flatter part of the hat.
Affix pieces of moss in random places all over your gnome’s hat, maybe a bit between his toes, and maybe add a little bit of stick in his beard.
Enjoy!
More Easy Gnome ideas You Might Like
- 15-Minute Cone Gnomes – You can seriously turn a cardboard cone into an adorable gnome in just a few minutes–and then make a whole family!
- Farmhouse Gnome Ornament – Seriously one of the best ornaments I’ve made in my entire life because it’s so fast, fun and beautiful.
- Christmas Countdown Gnome – If you’ve got a love for Christmas gnomes, you’re going to love the gnome with countdown blocks!
Please Save This to Pinterest
Your shares are how this site grows and I am sincerely grateful. Know a friend who’d like this? Please share it on Facebook or save it to your favorite easy DIY ideas board on Pinterest.
How to Make a Rustic Gnome - DIY Forest Gnome Tutorial

You can't get cuter than this adorable forest gnome. He's the perfect little rustic gnome that goes with your farmhouse decor, or anything, really.
Materials
- Craft Felt in Charcoal or Black
- Old Cereal Box
- Polymer Clay in light brown and white
- Mongolian Fur
- Dry Beans or Rice
- Small Amount of Polyfill
- Polymer Clay in Light Brown, White and Red
- Craft Moss
- Foral Wire
- Brown Craft Paint
Tools
- Hot Glue Gun and Glue
- Oven
- Exacto Knife
- Sand Paper
- Printable Gnome Pattern
- Sewing Machine, optional
- Scissors
- Paintbrush
- Black Pen
Instructions
- Make your gnome nose and feet by combining a portion of light brown and white polymer clay until you have the color you want.
- Roll a quarter-sized portion of this clay into a neat ball. This is the nose. Set aside.
- Break off two equal sized portions of clay about the size of half of your palm and about 1/2 inch thick.
- Form each into similarly sized rectangles, longer and thicker on one end (slightly) than the other.
- With your exacto knife, cut 5 slots into one long side of each rectangle about 1/3 of the way through the rectangle. These form the toes.
- Using your finger or a flat-sided tool, round over the edges of each toe.
- With the exacto knife, flatten and scrape a little bit on the top of each toe to form a toenail.
- Make the little mushrooms by rolling a quarter-sized portion of white clay into a cylinder.
- Cut the cylinder in half, but not in equal portions. Set aside.
- Roll out two double-quarter-sized portions of red clay into neat balls.
- Flatten one side of each of the balls and narrow the other end, making a mushroom top shape.
- Make tiny balls of white clay and stick them randomly on the red mushroom caps and press down lightly.
- Press the mushroom caps onto the top of the white cylinders, then press the base of the white cylinders together.
- Bake the mushrooms, nose and toes per the clay package's directions. Allow them to cool fully.
- Trace and cut out the large gnome body shape out of the felt.
- Fold the gnome body shape in half and run a hem along the open side with your hot glue or your sewing machine.
- Fold the flap of the gnome body shape over and close the bottom of the gnome with hot glue or a seam. Allow glue to dry fully.
- Turn the body of the gnome right side out.
- Fill the gnome body with the dried beans or rice.
- Tuck a small portion of polyfill into the top of the gnome body to hold the beans or rice inside.
- Trace the hat shape onto the felt twice and cut out each triangle.
- With your hot glue gun or sewing machine, run a hem along the two hat pieces. Allow glue to dry completely.
- Cut out the beard shape from the Mongolian fur by turning the fur over and cutting only the fabric with the exacto knife.
- Hot glue the beard to the body, about 2 inches below the edge of the gnome body.
- I wanted my gnome beard to be even fuller (you know, because the forest makes you crazy-hairy, I guess?) by adding a second layer of a slightly different shade of grey craft fur on top of the first with a little smaller size than the first.
- Part the top layer of fur a little and make a bit of a mustache.
- Hot glue the nose in place about 1 inch from the top of the beard.
- Insert the floral wire into the hat and hot glue it in place on one side.
- Tuck the hat on top of the gnome body and hot glue it in place.
- Bend the hat to a ridiculous angle with a flat place.
- Cut 10-12 1-inch wide strips of cereal box.
- Cut halfway through each strip of cereal box at 1/2-inch increments.
- Starting at the bottom of the hat, wrap the strips of cereal box around the base of the hat and hot glue them in place.
- Continue up the hat, overlapping the cereal box strips until you reach the top. Take care to cover all of the hat.
- Paint the cereal box strips with the brown craft paint. Allow paint to dry fully.
- With the black pen, color the edges of each flap on the strips of cereal box and give each plank it's own character.
- Hot glue the toes in place on the bottom of the gnome body.
- Hot glue the mushrooms on the flatter part of the hat.
- Affix pieces of moss in random places all over your gnome's hat, maybe a bit between his toes and maybe add a little bit of stick in his beard.
- Enjoy!
Notes
To see more adorable gnome tutorials, visit Ruffles and Rain Boots.
Recommended Products
As an Amazon Associate and member of other affiliate programs, I earn from qualifying purchases.


Love Gnomes, so do’es my hole family! Love your site, hope to make some soon, thank you for posting your instructions
Have a wonderful New Year.