
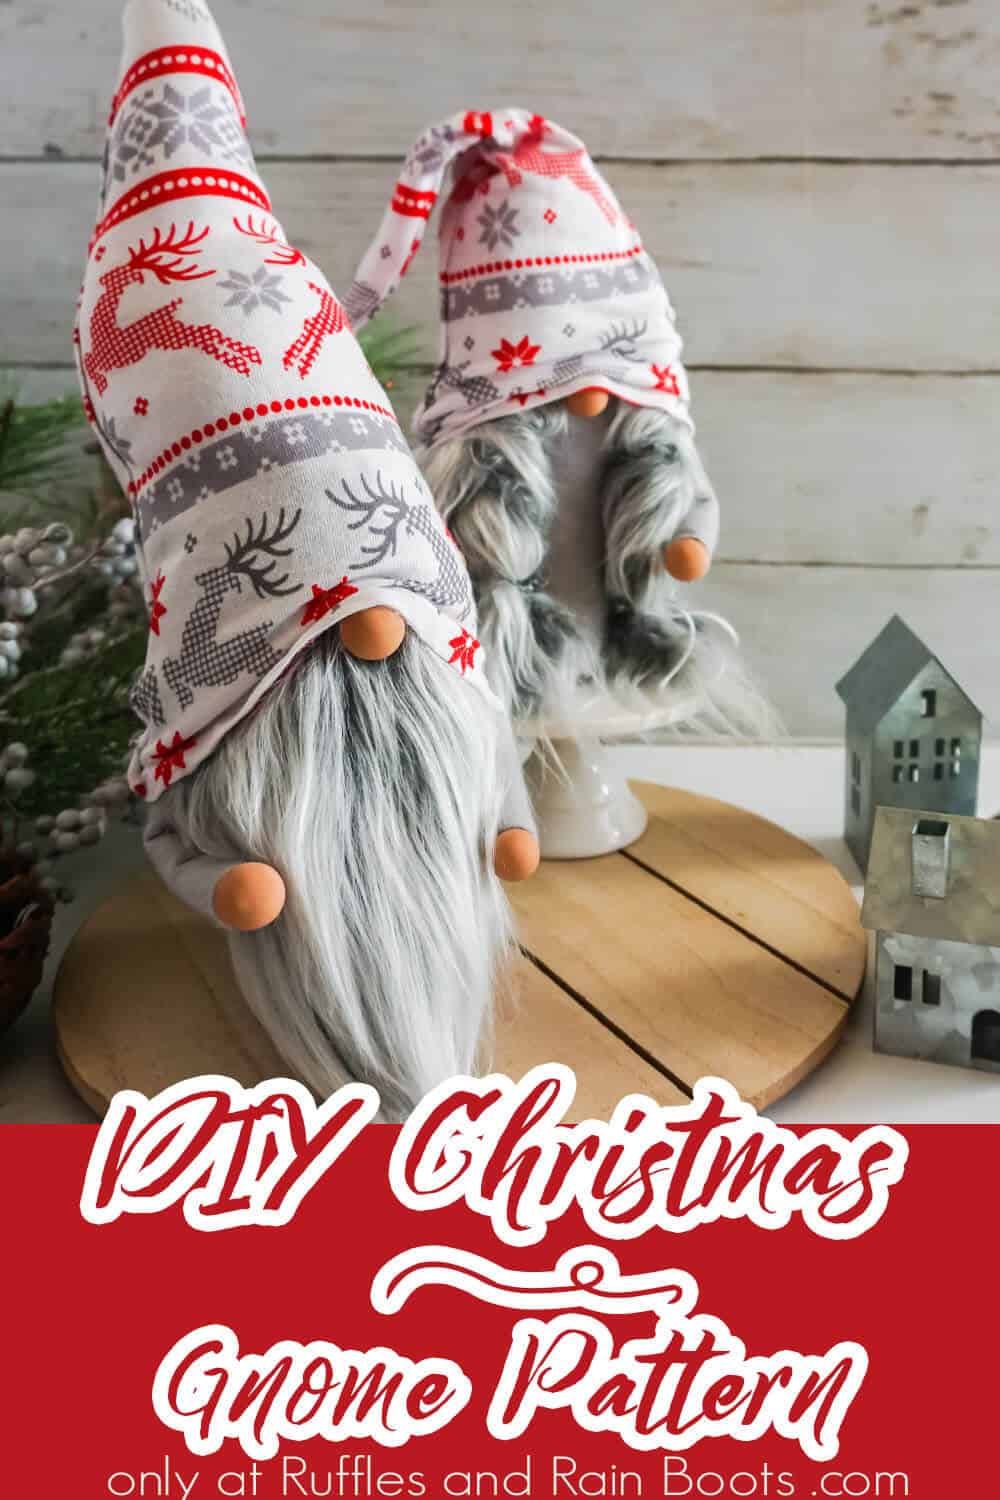
Make this No-Sew DIY Christmas Gnome Pattern in Minutes!
I love an easy gnome pattern, so making this no-sew DIY Christmas gnome pattern was high on my priority list. Super quick to work up, I love this little Christmas gnome couple!
RELATED READING: Free Sock Gnome Hat Pattern for Santa Gnome
No-Sew DIY Christmas Gnome Pattern
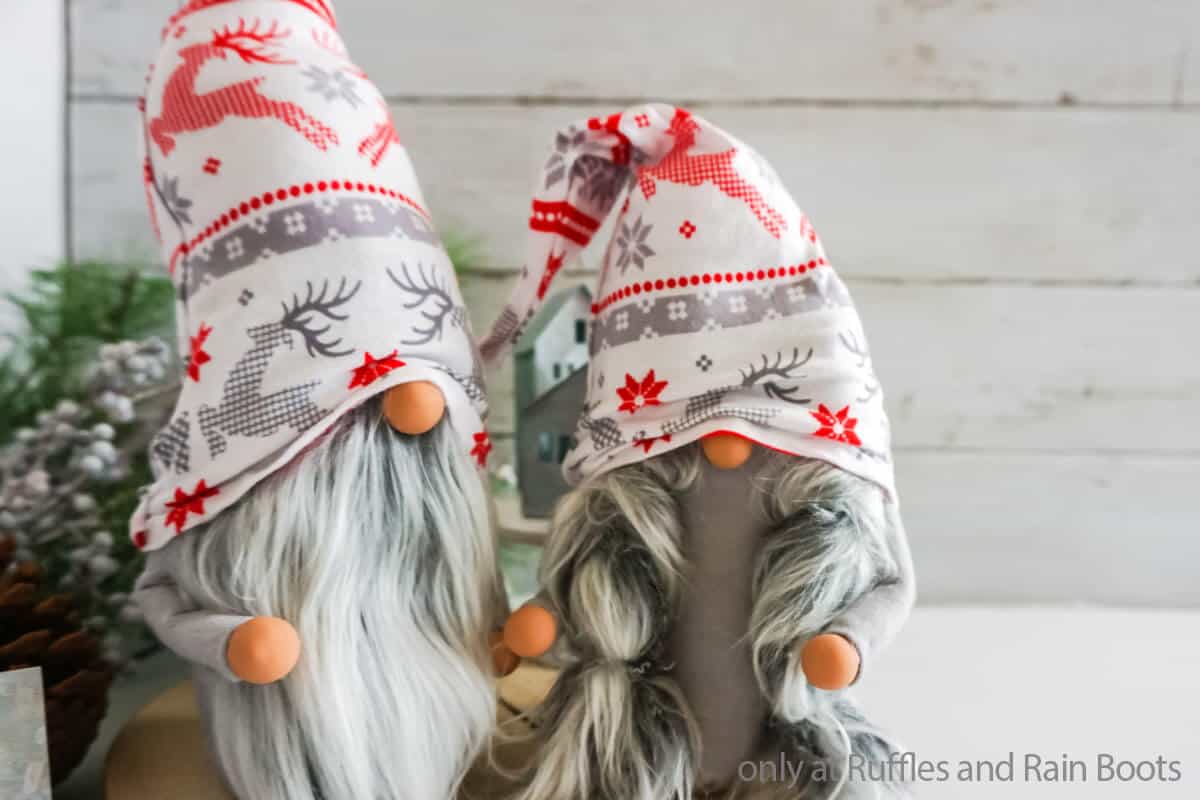
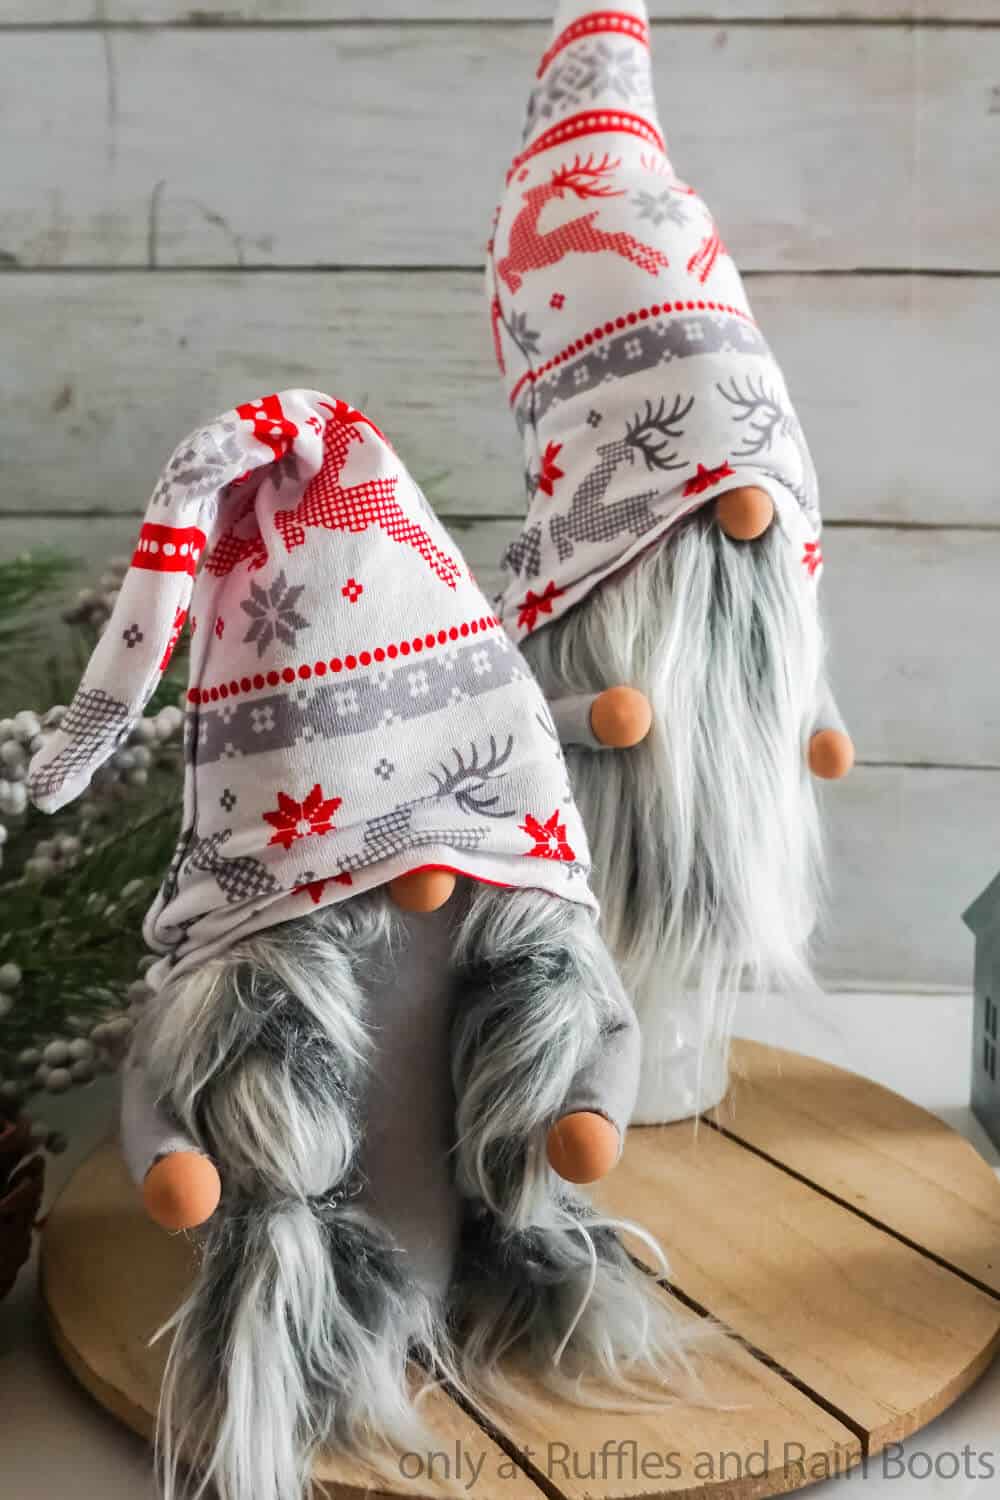
Here at Ruffles and Rain Boots, we love making gnomes. Seriously, it’s become one of the most fun pastimes, coming up with new and fun ways to surprise friends and family with a little tomten for their home. But I have a secret: sometimes I keep them for myself. And this little set of Scandinavian Christmas gnomes are staying in MY house for the duration!
They’re simple, easy and totally no-sew, but so full of character. You can make this no-sew DIY Christmas gnome pattern customized in so many ways, it’s crazy. If you’re ready to make your own holiday gnome, let’s get started.
RELATED READING: EASY DIY CHRISTMAS GNOME FROM A SOCK
No Time to Make This Now? Pin it for Later
You’re busy, I get it. Pin this to your favorite holiday DIYs board on Pinterest and it’ll be here when you’re ready.

As an Amazon Associate, I can earn from qualifying purchases.
Tips to Make a Scandinavian Christmas Gnome Pattern
- Start by grabbing the easy no-sew gnome pattern here for our SUPER popular (literally the most popular full-size gnome pattern we have) Tucked Gnome that I used to make this Scandinavian Christmas gnome. It’s simple, quick, and minimizes the cuts you need to make in the most clever way. Plus, if you’re not a big fan of making cuts, maybe you want to make multiple gnomes at a time, you can get the Tucked Gnome pattern with cut files for Cricut or Silhouette here!
- If you’re a first-timer here, you might not know this, but if you’ve been here before, you know I love making gnome noses using of whatever round, beige item that’s the closest one I can find. Whether that’s a wood bead or a ball of clay, maybe even a bead stolen from the kiddo’s craft kit, then so be it. Honestly, I love using wood beads like these, though, because they’re really super consistent in shape and color. Meaning I don’t have to work at making them look better or anything.
- If you’re a little concerned about making gnomes because of the beard, don’t be. Even if you’re a beginner, you can make that beautiful, lush beard in a heartbeat. All it takes is flipping the fur face-down and, using a straight-razor or craft knife, cut the fabric backing ONLY, taking care not to cut the fur itself, then gently pull the cut piece away. Just leave the scissors on the table and you’ll have a fantastic beard!

Get the Gnome Pattern
Click below to add this fun pattern to your cart. So many gnomes can be made with this!

How Do I Make this No-Sew DIY Christmas Gnome Pattern?
I’m so glad you asked. Below is our written tutorial. The full Nordic gnome pattern video tutorial is here on YouTube.
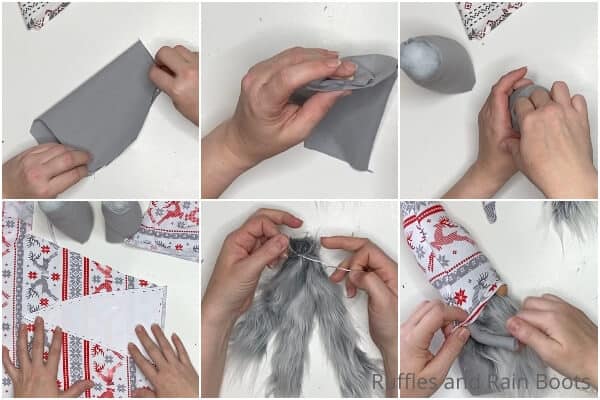
First, trace and cut out two large gnome body shapes out of the grey flannel fabric and cut 4 hat shapes from your Scandinavian print fabric. Keep in mind when you’re cutting your Scandinavian print fabric, that you want the pattern to sit in a specific way AND line up neatly at the seams, so cut carefully. Note that I did not do that the first time I cut my fabric and was disappointed with how the pattern sat – and unfortunately, I didn’t have enough fabric to even fix my mistake, so I had to switch to a new fabric.
Fold the gnome body shape in half and run a hem along the open side with your hot glue. Fold the flap of the gnome body shape over and close the bottom of the gnome with hot glue or a seam. Allow the glue to dry fully.
Turn the body of the gnomes right side out. Fill the two gnome bodies with 1-2 cups of poly beads. Tuck a small portion of polyfill into the top of the gnome body to hold the poly beads inside.
With your hot glue gun, run a hem along two of the hat pieces. Allow the glue to dry completely. Turn the hat right side out and fill the hat a little with a small amount of polyfill if you want a pointy hat; if you want a floppy hat, just put a tiny amount of polyfill in the hat.
Cut out the beard shape from the Mongolian fur by turning the fur over and cutting only the fabric with the razor blade or craft knife. In the same way, cut 6 1/2-inch wide strips of faux fur 8-10 inches long.
Affix the beard to one of the gnomes by hot gluing the beard to the body, about 2 inches below the edge of the gnome’s body. Hot glue the nose in place about 1 inch below the top of the beard. Place the hat on top of the gnome’s head, tucking it down over the top of the nose.
To make the girl gnome’s braids, tie three of the strips of faux fur together about 1 inch from the end. You can clip this end of the braids together and then tape the clip to the table, but I just braided the strands together, taking care to finger brush the fur down as I went so it wouldn’t be so scraggly.
Tie the braid off with the embroidery thread and repeat with the remaining three strands of faux fur, taking care to make the second braid the same length as the first. Hot glue the nose in place between the braids, about 3 inches below the top of the gnome. Place the hat on top of the gnome’s head, tucking it down over the top of the nose.
Hot glue the hats in place in the back and sides in just a couple of places–not the whole way around, then one little dot on the nose to make a wrinkle (this is the best part). Cut out four arm shapes from the grey flannel fabric.
Place a line of hot glue down one long side of the arms and hem it, then place another line of hot glue down the hem and fold the fabric over onto itself to make an arm. Fill each arm with a tiny amount of polyfill, followed by a small length of floral wire, to make the arm bendy.
Slip the arm up into the hat on the side and hot glue it in place. Hot glue the hands in place on the ends of the arms. Stand your gnomes up and enjoy!
More GNome Patterns You Might Like
- DIY Christmas Gnome Ornaments – My favorite (and most popular) gnome is this adorable and easy gnome ornament that you can make in minutes!
- Easy No-Sew Christmas Gnome with Feet – If you love gnomes, but you want something a little more unique, check out this fun and easy gnome with feet – REALLY BIG feet.
- Best DIY Santa Gnome – This jolly old elf is the easiest way to make a Santa gnome. Using a cone, a little velvet and some faux fur, this quick DIY Santa gnome is perfect in every way!
Please Save This to Pinterest
Your shares are how this site grows and I am sincerely grateful. Know a friend who’d like this? Please share it on Facebook or save it to your favorite holiday crafts board on Pinterest.
No-Sew Christmas Gnome Pattern

Making a DIY Christmas gnome doesn't have to be hard! You can make this easy no-sew Christmas gnome pattern in just a few minutes with some very basic craft skills.
Materials
- No Sew Gnome Pattern
- 1/4 yard Grey Flannel Fabric
- 1/4 yard Scandinavian Print Fabric
- 1/8 yard Mongolian Faux Fur
- 2 Small Clay Balls or Wood Beads for Noses
- 4 Extra Small Clay Balls or Wood Beads for HandsGrey Faux Fur
- Poly Beads
- Small Amount of Polyfill
- Floral Wire
- White Embroidery Thread
Tools
- Hot Glue Gun and Glue
- Razor Blade or Craft Knife
- Scissors
- Wire Cutters
Instructions
- Trace and cut out two large gnome body shapes out of the grey flannel fabric and cut 4 hat shapes from your Scandinavian print fabric. Keep in mind when you're cutting your Scandinavian print fabric, that you want the pattern to sit in a specific way AND line-up neatly at the seams, so cut carefully. Note that I did not do that the first time I cut my fabric and was disappointed with how the pattern sat - and unfortunately I didn't have enough fabric to even fix my mistake, so I had to switch to a new fabric.
- Fold the gnome body shape in half and run a hem along the open side with your hot glue. Fold the flap of the gnome body shape over and close the bottom of the gnome with hot glue or a seam. Allow the glue to dry fully.
- Turn the body of the gnomes right side out. Fill the two gnome bodies with 1-2 cups of poly beads. Tuck a small portion of polyfill into the top of the gnome body to hold the poly beads inside.
- With your hot glue gun, run a hem along two of the hat pieces. Allow glue to dry completely. Turn the hat right side out and fill the hat a little with a small amount of polyfill if you want a pointy hat; if you want a floppy hat, just put a tiny amount of polyfill in the hat.
- Cut out the beard shape from the Mongolian fur by turning the fur over and cutting only the fabric with the razor blade or craft knife. In the same way, cut 6 1/2-inch wide strips of faux fur 8-10 inches long.
- Affix the beard to one of the gnomes by hot gluing the beard to the body, about 2 inches below the edge of the gnome body. Hot glue the nose in place about 1-inch below the top of the beard. Place the hat on top of the gnome's head, tucking it down over the top of the nose.
- To make the girl gnome's braids, tie three of the strips of faux fur together about 1-inch from the end. You can clip this end of the braids together then tape the clip to the table, but I just braided the strands together, taking care to finger brush the fur down as I went so it wouldn't be so scraggly. Tie the braid off with the embroidery thread and repeat with the remaining three strands of faux fur, taking care to make the second braid the same length as the first. Hot glue the nose in place between the braids, about 3 inches below the top of the gnome. Place the hat on top of the gnome's head, tucking it down over the top of the nose.
- Hot glue the hats in place in the back and sides in just a couple of places--not the whole way around, then one little dot on the nose to make a wrinkle (this is the best part).
- Cut out four arm shapes from the grey flannel fabric. Place a line of hot glue down one long side of the arms and hem it, then place another line of hot glue down the hem and fold the fabric over onto itself to make an arm. Fill each arm with a tiny amount of polyfill, followed by a small length of floral wire, to make the arm bendy.
- Slip the arm up into the hat on the side and hot glue it in place. Hot glue the hands in place on the ends of the arms. Stand your gnomes up and enjoy!
Notes
This gnome stands 10-inches (ish, depending on how twisty you make your hat, of course).
For more fun no-sew patterns for gnomes, visit Ruffles and Rain Boots (we have lots...).
Recommended Products
As an Amazon Associate and member of other affiliate programs, I earn from qualifying purchases.


The link does not send you to the free pattern and the free pattern is nowhere to be found. Can you send the link for the real free pattern to me, please?
I think you might be on the wrong project with this comment. This is a premium pattern and there are multiple links guiding you to the resource and where to purchase it. Can you show me a picture of the gnome you want to make?