
DIY Christmas Countdown Gnome
I’ve got a surprise for you today: a quick tutorial of how to make a countdown gnome for Christmas. The best part is that it is a no-sew gnome pattern, making it such an easy holiday craft!

What You'll Find On This Page
How to to Make a Christmas Gnome
Here at Ruffles and Rain Boots, we are SO EXCITED about this Christmas countdown gnome. And this is the easiest no-sew gnome pattern you’ll find.
RELATED READING: THE Best Christmas Gnome Tutorials
This is an original pattern that I’ve used on several gnomes. I added a little twist of making this little gnome by giving him a set of blocks to help the the little one countdown to Christmas.
Letting her change the blocks every day is pretty amazing because of her little smile!
DIY Christmas Gnome Tutorials
If you’re looking for the best DIY Christmas gnome tutorials, you have come to the right place. Check out all of my favorite tomte tutorials for the holidays!
Can’t make this right now? Share it to your feed on Facebook or pin to your favorite easy Christmas craft ideas board on Pinterest. It will be here when you’re ready.

As an Amazon Associate, I can earn from qualifying purchases. There could be affiliate links within this article.
Tips to Make Christmas Countdown Gnome
- Click here to get the easy no-sew gnome pattern. It’s got everything you need to make your gnome as cute as a button. If you have a cutting machine (Cricut, Silhouette, etc.), see the last tip.
- Most of my most popular Christmas gnomes call for faux fur. It’s available on Amazon, at craft stores (especially during the holiday season), and on Etsy. I’m using a pale pink faux fur.
- Learn how to cut faux fur properly in this quick video. You’ll get a great gnome beard shape without any harsh edges.
- My favorite gnome nose and hand material is polymer clay because I have more control over how big and what color it is. That said, I also love these wood beads, craft beads I find in my stash, and buttons. Find whatever you have on hand and use it to de-stash your craft supply.
- One of my FAVORITE things about this particular Christmas gonk (yes, that’s a word and it’s real) is that I cut the pattern using my Cricut. Click here to grab the gnome pattern cut files and see just how fabulous of a choice that was.

Get the Gnome Pattern
Click below to add this fun pattern to your cart. So many gnomes can be made with this!
How to Make a Christmas Countdown Gnome
I’m so glad you asked. Below is our written tutorial. If you’re making an easy Christmas crafts playlist on YouTube, here is our Christmas countdown gnome video tutorial.
How to Make a Gnome for Christmas - Christmas Countdown Gnome
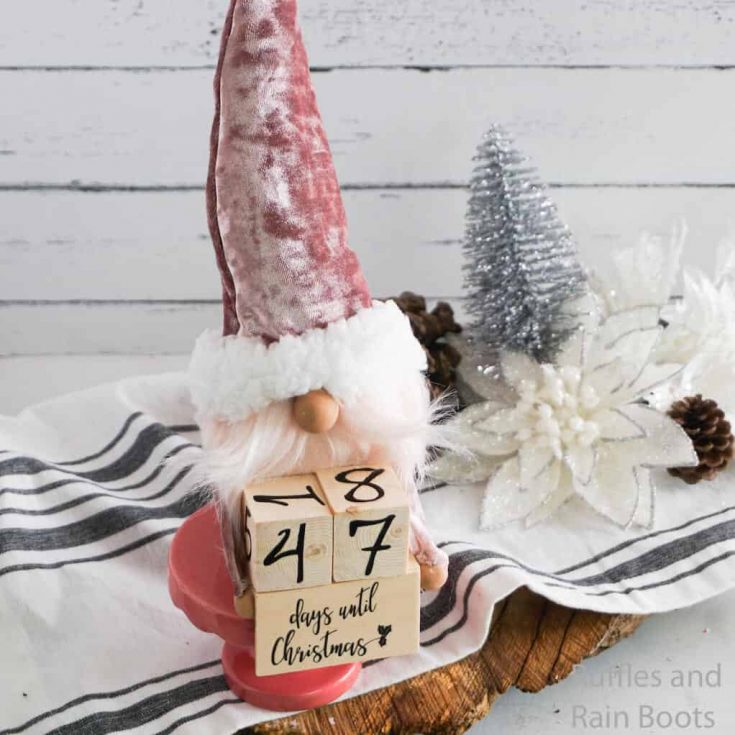
This adorable Christmas countdown gnome has arms that hold a Cricut made set of wood blocks to countdown the days until Christmas!
Materials
- 1/4 yard Pink Velvet Fabric
- Scraps Pouffy White Fabric (Sherpa Fleece)
- Polymer Clay in light brown and white
- Baby Pink Craft Fur
- Dry Beans, Rice, or Poly Pellets
- Small Amount of Polyfill
- 1-inch x 1-inch Wood Blocks
- 2 Scraps 1/8-inch thick Wood about 2-inches by 1 1/2-inch
- Christmas Gnome Pattern
- Gnome Cut Files, optional
- Scraps, Black Heat Transfer Vinyl
Tools
- Scissors
- Cricut or Silhouette Cutting Machine
- Oven, optional for polymer clay nose and hands
- Hot Glue Gun and Glue
- Funnel, optional
- EasyPress Mini or Iron for Heat Transfer Vinyl
Instructions
- Make your gnome nose by combining a portion of light brown and white polymer clay until you have the color you want.
- Roll a quarter-sized portion of this clay into a neat ball. This is the nose. Set aside.
- Break off two equal sized portions of clay about 2/3 the size of the nose.
- Roll each of these portions of clay into neat balls. These are the hands.
- Bake the nose and hands per the clay package's directions. Allow them to cool fully.
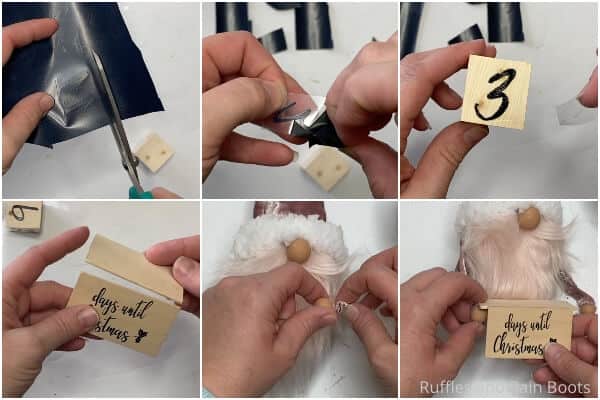
- Cut out the numbers and "days until Christmas" from the heat transfer vinyl. Set aside.
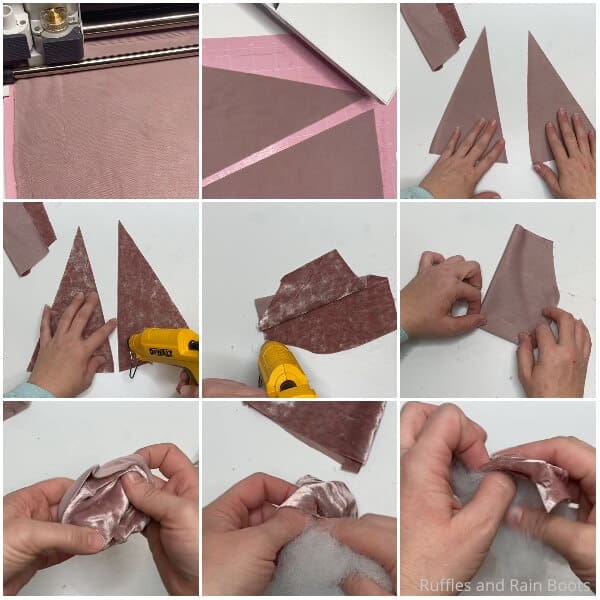
- With your cutting machine or manually, cut out the large gnome body shape out of the pink velvet, as well as two arm shapes and two hat shapes.
- Fold the gnome body shape in half and run a hem along the open side with your hot glue or your sewing machine.
- Fold the flap of the gnome body shape over and close the bottom of the gnome with hot glue or a seam. Allow glue to dry fully.
- Turn the body of the gnome right side out.
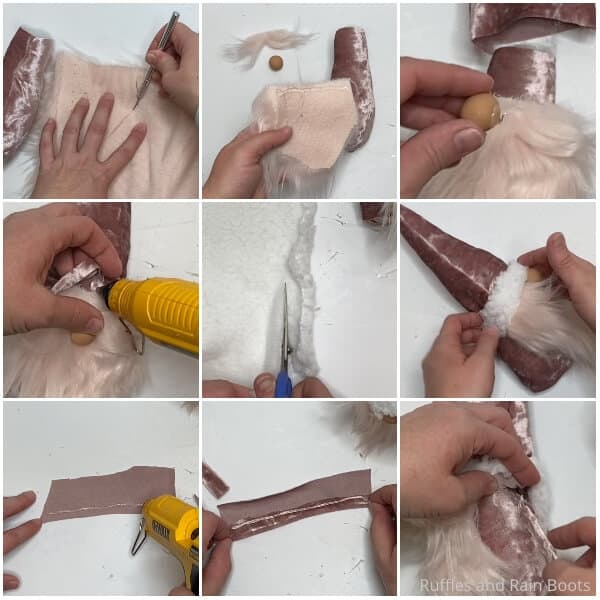
- Fill the gnome body with the dried beans or rice.
- Tuck a small portion of polyfill into the top of the gnome body to hold the beans or rice inside.
- Cut out the beard shape from the craft fur by turning the fur over and cutting only the fabric with the exacto knife.
- Hot glue the beard to the body, about 2 inches below the edge of the gnome body.
- With your hot glue gun or sewing machine, run a hem along the two hat pieces. Allow glue to dry completely.
- Turn the hat right side out.
- Fill the hat a little with a small amount of scrap fabric or polyfill.

- Hot glue the nose in place about 1-inch below the top of the beard.
- Place the hat on top of the gnome's head, tucking it down just above the top of the nose.
- Hot glue the hat in place in the back and sides, then one little dot above the nose.
- Cut a 1-inch wide section of the pouffy white fabric long enough to wrap around the brim of the hat.
- Hot glue this strip of white pouffy fabric to the brim of the hat.
- Make the arms by placing a line of hot glue down one long side of the arm shapes and then fold the fabric over onto itself twice to make a thin arm.
- Slip the arm up into the hat on the side and hot glue it in place.
- Using the EasyPress Mini, affix the HTV numbers and lettering to the blocks. It's important to note that there are repeated numbers and at no time should two numbers be on the same block. That way you can have the number 11 and so on.
- Hot glue the two pieces of thin wood together with the un-lettered piece on the top edge of the lettered piece, at a 90-degree angle, forming a "tray" for the blocks. Set aside.
- Trim arm as desired (make sure your wood "tray" will fit nicely before trimming).
- Hot glue the hands in place on the ends of the arms.
- Attach the "tray" to the back sides of the hands.
- Set the blocks on top of the tray.

Notes
For more fun Christmas gnome tutorials, visit Ruffles and Rain Boots (we have a lot).
More Christmas Gnome Tutorials You Might Like
- Christmas Gnome Ornaments – This is the Internet’s most popular gnome ornament (for good reason).
- Merry & Bright Christmas Gnome – Like bright colors and not having to get out a sewing machine?
- ALL of Ruffles and Rain Boots’ Scandinavian Christmas Gnome Tutorials – This is a fun way to browse through different styles you might want to make.
- 30+ of the Best Christmas Ornament Gnomes – Yes, all of these little gnomes are ornaments.
Please Save or Share This Christmas Gnome Tutorial
Your shares are how this site grows and I am sincerely grateful. Know a friend who’d like this? Please share it on Facebook or save it to your favorite DIY Christmas crafts pin board.

Meet the Creator
Hi there, I’m Sarah Nenni-Daher. I’m a crafty gal and always have at least 14 projects going at once. I am a crafter, designer, DIYer, and pattern maker. I share my creations here and in the Ruffles and Rain Boots® Shop.
Here at Ruffles and Rain Boots®, you’ll find DIY gnomes, crafts, gifts, cupcakes, laser crafts, and so much more. I love sharing video tutorials over on YouTube and chatting with other crafters in my Facebook groups. We’d love to have you!