
Dollar Tree Scarecrow Gnome Craft
Add these Dollar Tree scarecrow gnomes to your fall crafts. Wouldn’t he look right at home on the refrigerator or hanging from a doorknob?
My little one has fall break from school, so I wanted to have a few fun craft projects we could work on. So, I raided the dollar store for some quick supplies.

RELATED READING: Dollar Store Fall Paintbrush Gnome – Fun for Kids and Adults!
What You'll Find On This Page
Cute and Easy Scarecrow Gnome Craft
Here at Ruffles and Rain Boots, we are ready to welcome in fall. A few of my favorite things about fall are the gorgeous leaves and the crisp, cool temperatures.
If you are a long-time follower of this site, you probably know about my gnome obsession. We have created quite a few gnome projects over the years, and a solid number of them are dollar store crafts . Today’s Dollar Tree fall craft idea is fun for kids and adults.
If you need time to gather the supplies for your scarecrow DIY, bookmark this page to make it easy when you are ready to create your fall decor craft project.

As an Amazon Associate, I may earn from qualifying purchases. There may be affiliate links within this article.
RELATED READING: Cute Standing Scarecrow Gnome (Craft for Adults)
Tips For Making A Scarecrow Gnome DIY
- When coloring the mop head strings, we suggest you initially use 1-2 drops of paint and work it in. You can add a drop or two more until you achieve the color you desire.
- If you end up with a darker color paint in your bag than you intended, you can work in a bit more water to dilute the color.
- When you are laying out the colored mop head strings on the aluminum foil, it is important you lay them side by side and as straight as possible. This is because they will dry in the shape you place them.
- You must allow the wooden popsicle stick hat to dry completely when you paint it. This will ensure the pieces you glue to it will adhere properly, and reduce/remove the possibility of smudges from handling.

Supplies For The Scarecrow Gnome Craft
Below are the supplies I used for the scarecrow gnome. Check your craft bin to see what you have on hand. Please read the tips section above for information on drying the strings from the mop head.
- Jumbo Craft Sticks
- Cotton Mop Head
- Wooden Ball or Bead
- Brown Buttons
- Orange and Green Gingham Ribbon
- Silk Sunflower
- Thin Twine
- Gold, Light Brown, Medium Brown Acrylic Craft Paint
- Gallon Ziplock Bag
- Aluminum Foil
- Glue Gun and Glue Sticks
- Scissors
- Paintbrush
- Ruler
- Pencil
- Black Marker
RELATED READING: Dollar Tree Light Up Jack-O-Lantern (Made with Canvases)
How To Make A Dollar Tree Scarecrow Gnome DIY
Each step for this fall decor DIY is detailed below to make it easy to follow. Keep this page open while you are creating your scarecrow gnome. If you would rather have a printable how-to, scroll down and select the print button.
Note: as an alternative to wetting the mop heads and painting with the bag, the younger ones can simply paint the beard when the project has been assembled.

Using scissors, cut approximately 30 individual strings from a new cotton mop head. Younger kiddos might need some help here so be on standby.

Get the strings damp by running them underwater. Squeeze the excess water out and place them in a gallon-sized Ziplock bag.

Squeeze gold acrylic craft paint into the bag, then zip it closed. Make sure that you squeeze out most of the air to avoid popping the bag accidentally. Using your fingers, work the paint into the cotton mop head strings until they are all coated.

Lay out the gold-colored strings on a piece of aluminum foil. Line them up and set them aside to dry. For easy transfer, set the foil on a plate or tray of so you can move them without dropping or squishing them together.

Count out six jumbo craft sticks and mark them at four inches. Cut with scissors. Trim one additional jumbo craft stick to meet the edges of the hat for stability.

Attach the sticks with a glue gun. Flip the hat over and attach one full craft stick to the base as the hat brim.

Basecoat the entire hat with light brown acrylic craft paint. Let dry, and apply a second coat, if necessary.

Using a dry paintbrush, take the smallest amount of dark brown acrylic paint and brush it on in a crosshatch pattern, resembling burlap. Allow to dry.

Flip the hat over and attach 15 colored strings along the base of the bottom wooden craft stick with a hot glue gun.

Attach 15 additional colored strings in a second layer with the glue gun. Trim the bottom of the strings to make an even bottom.

Glue the wooden ball/bead to the top center of the strings/beard.

Tie green gingham ribbon into a bow and glue a sunflower to the center.

Attach the bow to the scarecrow’s hat with a glue gun.

Cut a small piece of orange gingham ribbon into a square. Glue it to the hat and draw stitches with a black marker.

Thread thin twine through a brown button, tie it with a knot, and glue it to the scarecrow’s hat.
NOTE: you can add on a few of the dollar store magnets to the back to make this a refrigerator decoration. If you’d like, you can also add some twine to the back to form a hanger for a doorknob.

Now you are ready to show off your new scarecrow gnome for fall.
Notes For Making A Scarecrow Gnome
- You can use white school or tacky craft glue for this craft. You will need to allow additional drying time.
- Raid your button stash and just use paint if it’s the wrong color.
- We found sunflowers in a package at our local Dollar Tree. Any flower you have on hand will work just fine.
More Fall Crafts You May Like
- DIY Sock Pumpkin Craft for Fall: This unique upcycled craft project for fall is one of our favorites using just minimal supplies.
- DIY Fall Sock Gnome: This DIY no-sew buffalo check fall sock gnome is cute as a button and is done in about 15 minutes.
- DIY Pumpkin Napkin Rings: Spruce up your fall and Thanksgiving table with these farmhouse-style pumpkin napkin rings.
- This Easy Dollar Tree Fall Mug: You get two FREE SVG files to make two mugs with this quick Dollar Tree fall mug Cricut tutorial.
Please Save or Share
Your shares are how this site grows and I sincerely appreciate it. Please save this fall DIY to your favorite craft pin board or share it on Facebook.

Dollar Tree scarecrow gnome DIY

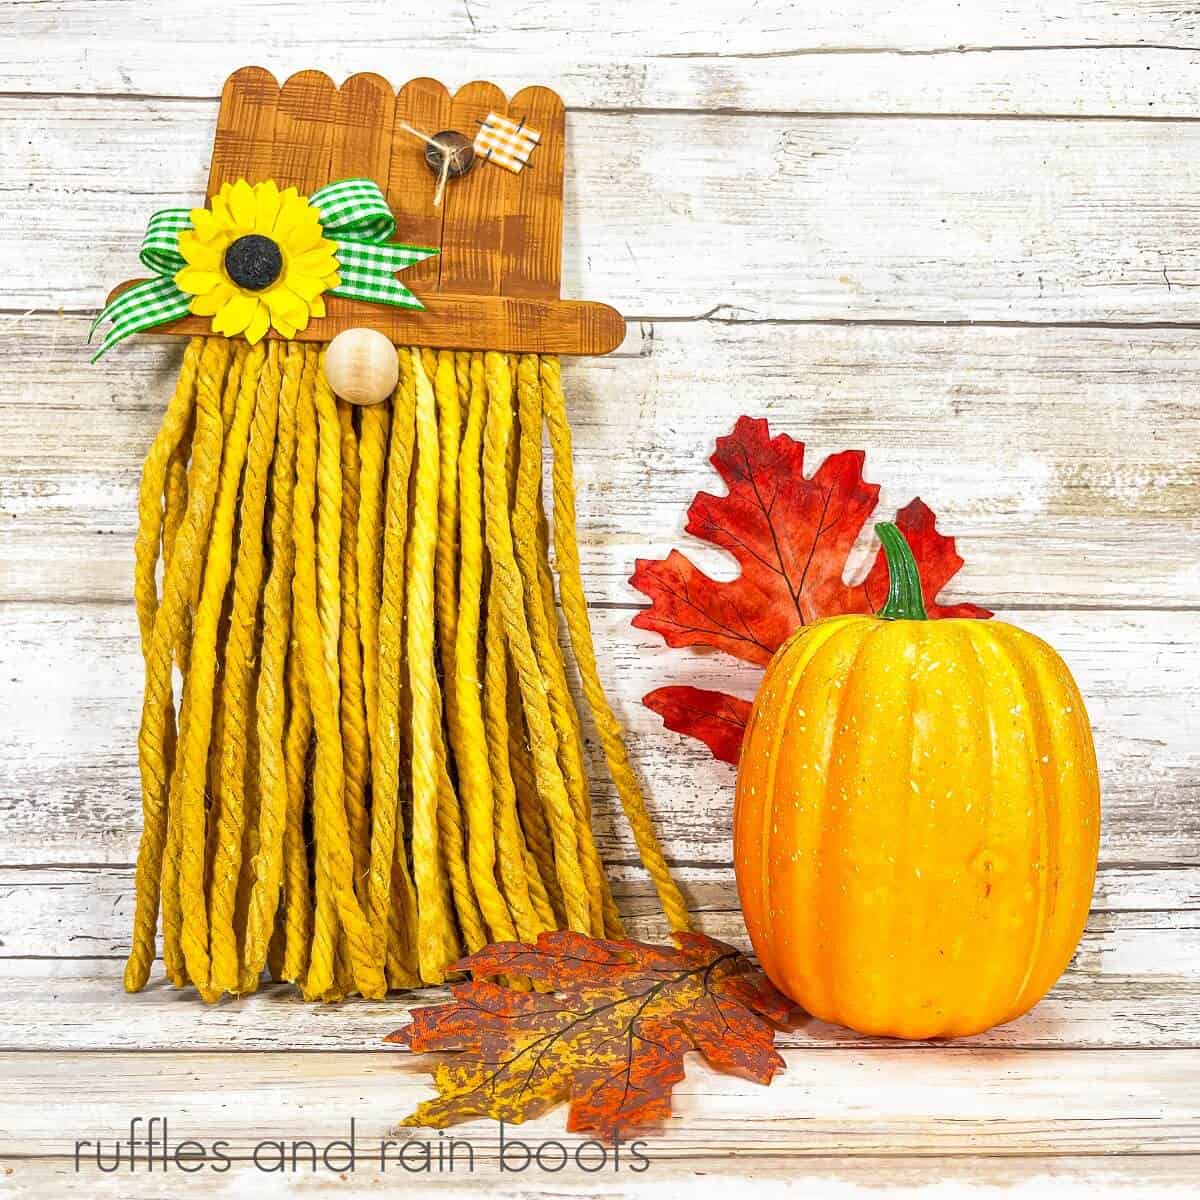
Create this adorable Dollar Tree scarecrow gnome which is perfect for your fall décor collection. Go and grab the kids and let them help you! This easy-to-make fall craft project is made with inexpensive (about $3) and simple supplies in less than 30 minutes (not including drying time.) This scarecrow would be the perfect addition to go with your other gnomes. You can display him on your tabletop, mantle, or even on your front door.
Materials
- Jumbo Craft Sticks
- Cotton Mop Head
- Wooden Ball or Bead
- Brown Buttons
- Orange and Green Gingham Ribbon
- Silk Sunflower
- Thin Natural Twine
- Gold, Light Brown, Medium Brown Acrylic Craft Paint
- Gallon Ziplock Bag
- Aluminum Foil
Tools
- Glue Gun and Glue Sticks
- Scissors
- Paintbrush
- Ruler
- Pencil
- Black Marker
Instructions
- Using scissors, cut approximately 30 individual strings from a new cotton mop head.
- Get the strings damp by running them underwater. Squeeze the excess water and place them in a gallon Ziplock bag.
- Squeeze gold acrylic craft paint into the bag, then zip it closed. Using your fingers, work the paint into the cotton mop strings until they are all coated.
- Lay out the gold mop strings on a piece of aluminum foil. Line them up and set them aside to dry.
- Measure six jumbo craft sticks to four inches long, and then cut with scissors. Trim one additional jumbo craft sticks to the width of the hat.
- Attach the sticks with a glue gun and glue sticks. Flip the hat over and attach one full craft stick to the base as the hat brim.
- Basecoat the entire hat with light brown acrylic craft paint. Let dry, and apply a second coat, if necessary.
- Dry brush medium brown acrylic craft paint in a crosshatch pattern, resembling burlap. Allow to dry.
- Flip the hat over and attach 15 cotton mop strings along the base of the bottom wooden craft stick with a glue gun.
- Attach 15 additional colored mop strings in a second layer with the glue gun. Trim the bottom of the strings to make an even bottom.
- Glue the wooden ball to the top center of the mop strings.
- Tie green gingham ribbon into a bow and glue a sunflower to the center.
- Attach the bow to the scarecrow’s hat with a glue gun.
- Cut a small piece of orange gingham ribbon into a square. Glue it to the hat and draw stitches with a black marker.
- Thread thin jute twine through a brown button, tie it with a knot and glue it to the scarecrow’s hat to finish.
Meet the Creator
Hi there, I’m Sarah Nenni-Daher. I’m a crafty gal and always have at least 14 projects going at once. I am a crafter, designer, DIYer, and pattern maker. I share my creations here and in the Ruffles and Rain Boots® Shop.
Here at Ruffles and Rain Boots®, you’ll find DIY gnomes, crafts, gifts, cupcakes, laser crafts, and so much more. I love sharing video tutorials over on YouTube and chatting with other crafters in my Facebook groups. We’d love to have you!