
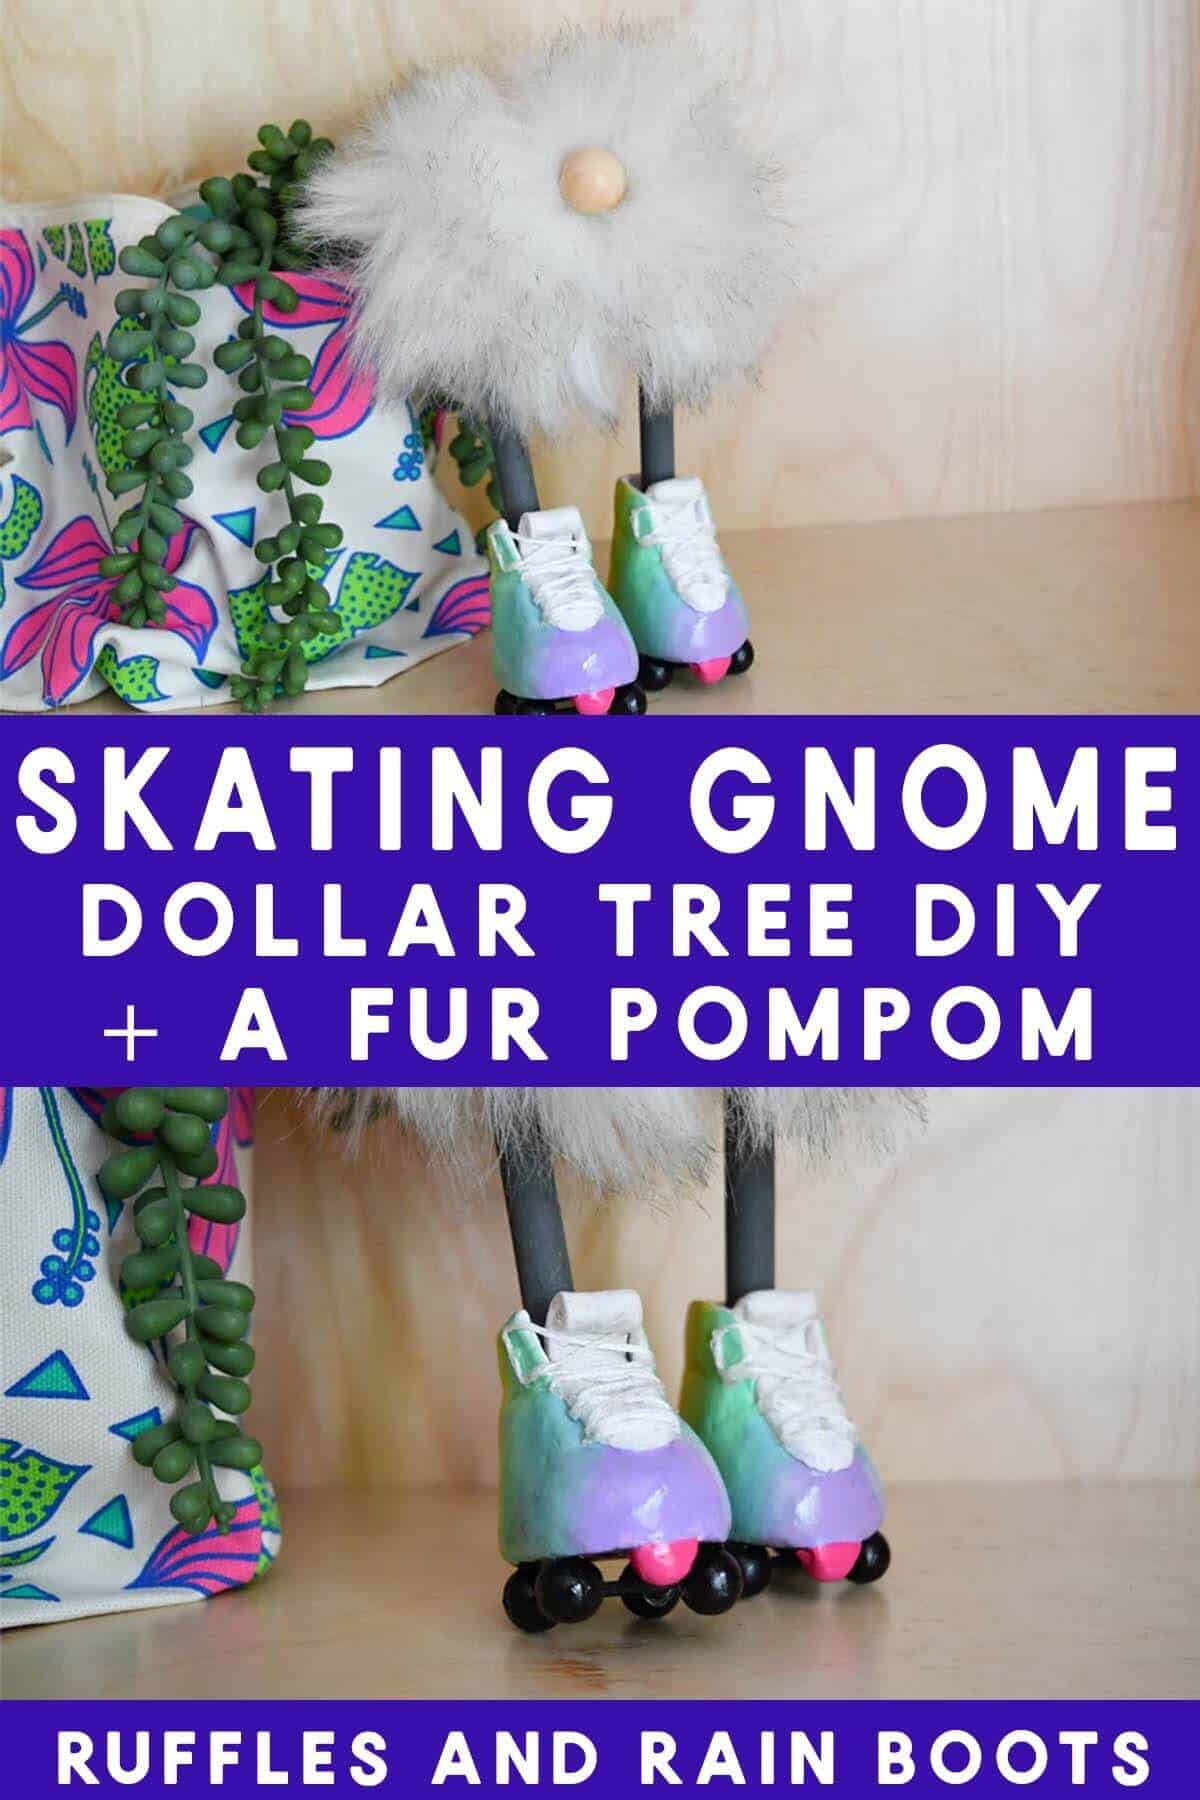
DIY Roller Skating Gnome Craft
I took a trip down memory lane to make this adorable roller skating gnome. In this set of tutorials, we’re going to make rainbow skates, a structured body, and a cute pompom gnome.
The dollar stores have a good base for the skates, but get creative: K cups, bottle caps, and even small yogurt canisters are all gnome boots. That means, they can work great for our roller skates, too!
RELATED READING: Easy Summer Pompom Gnome with Flip Flops
What You'll Find On This Page
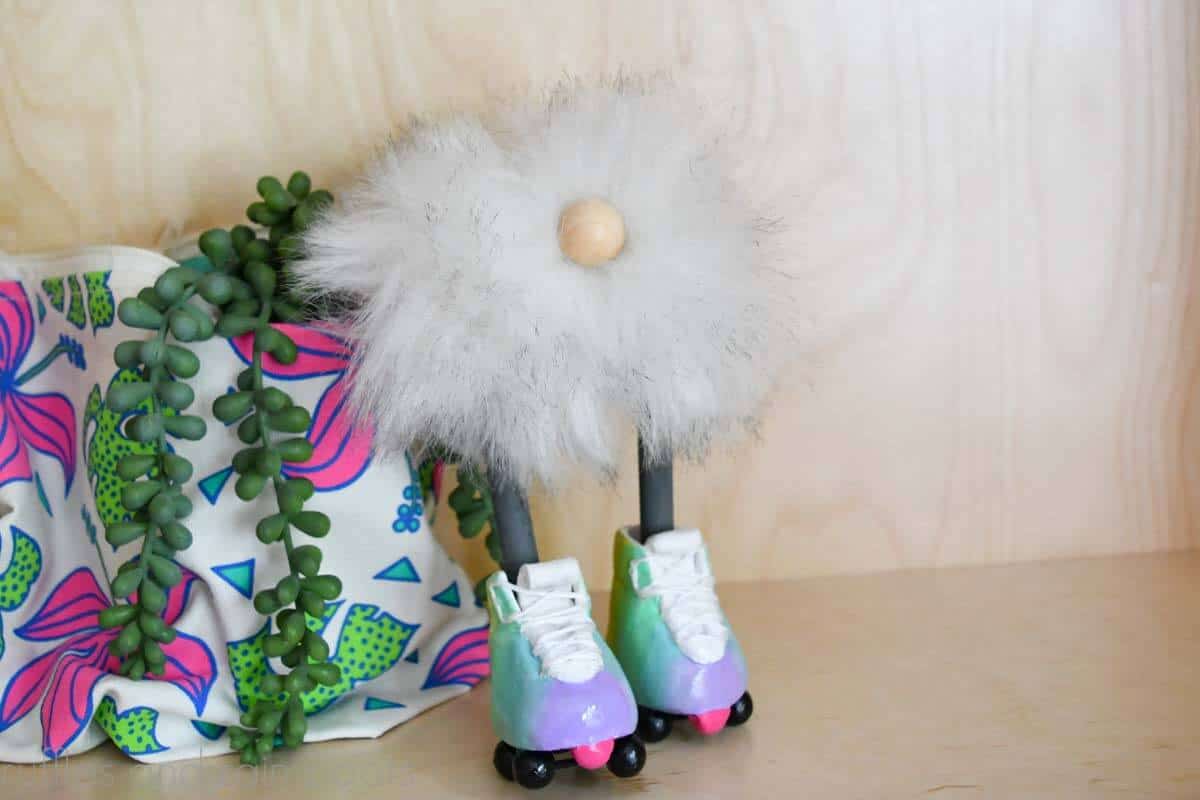
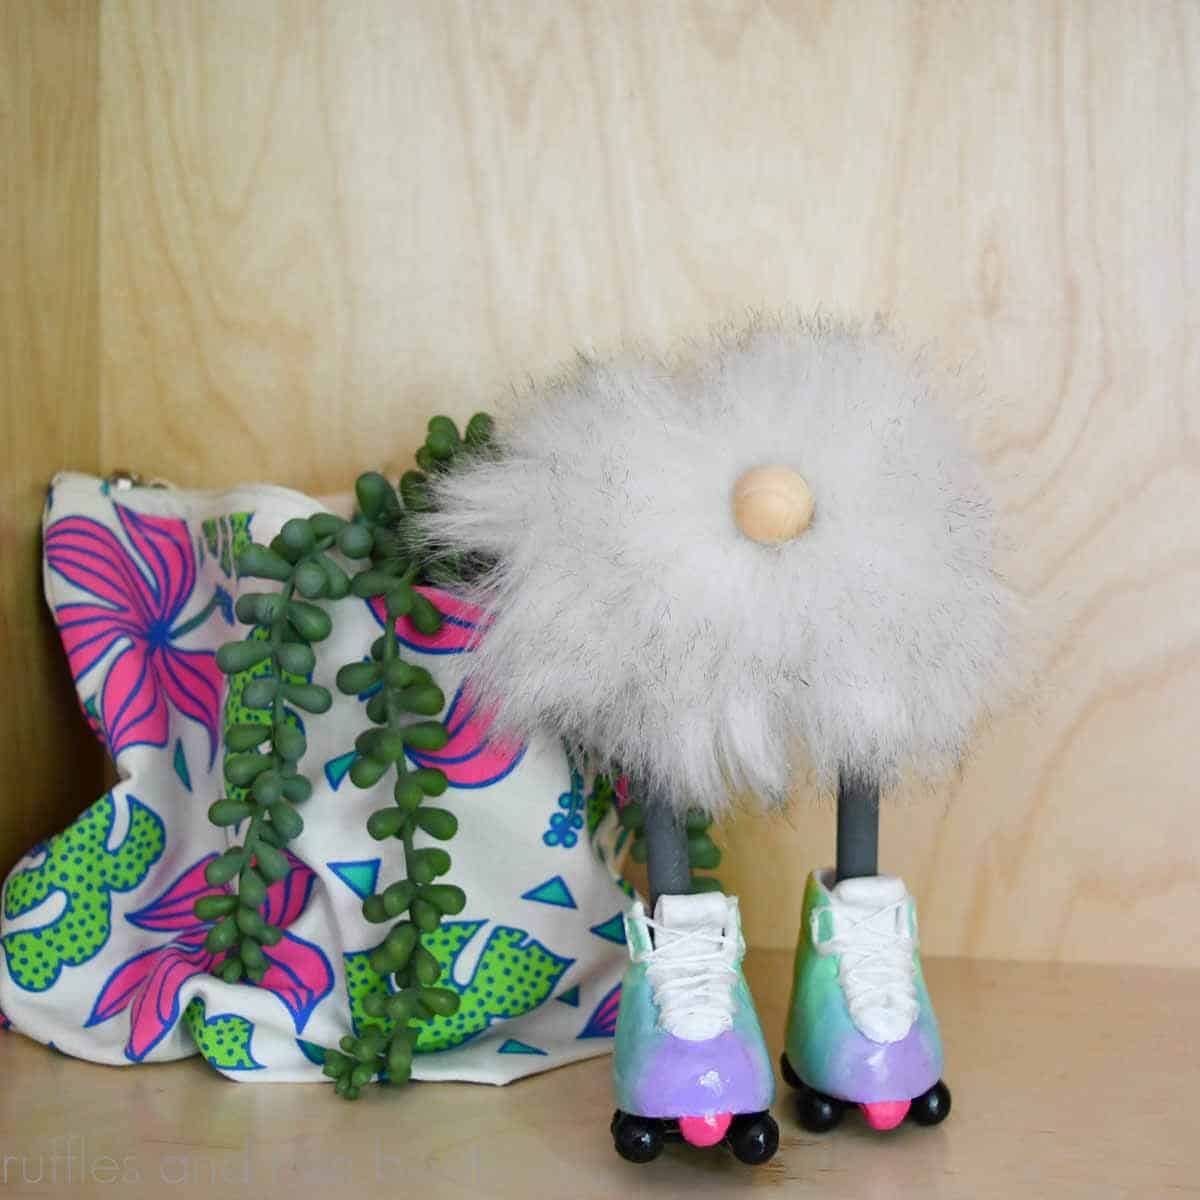
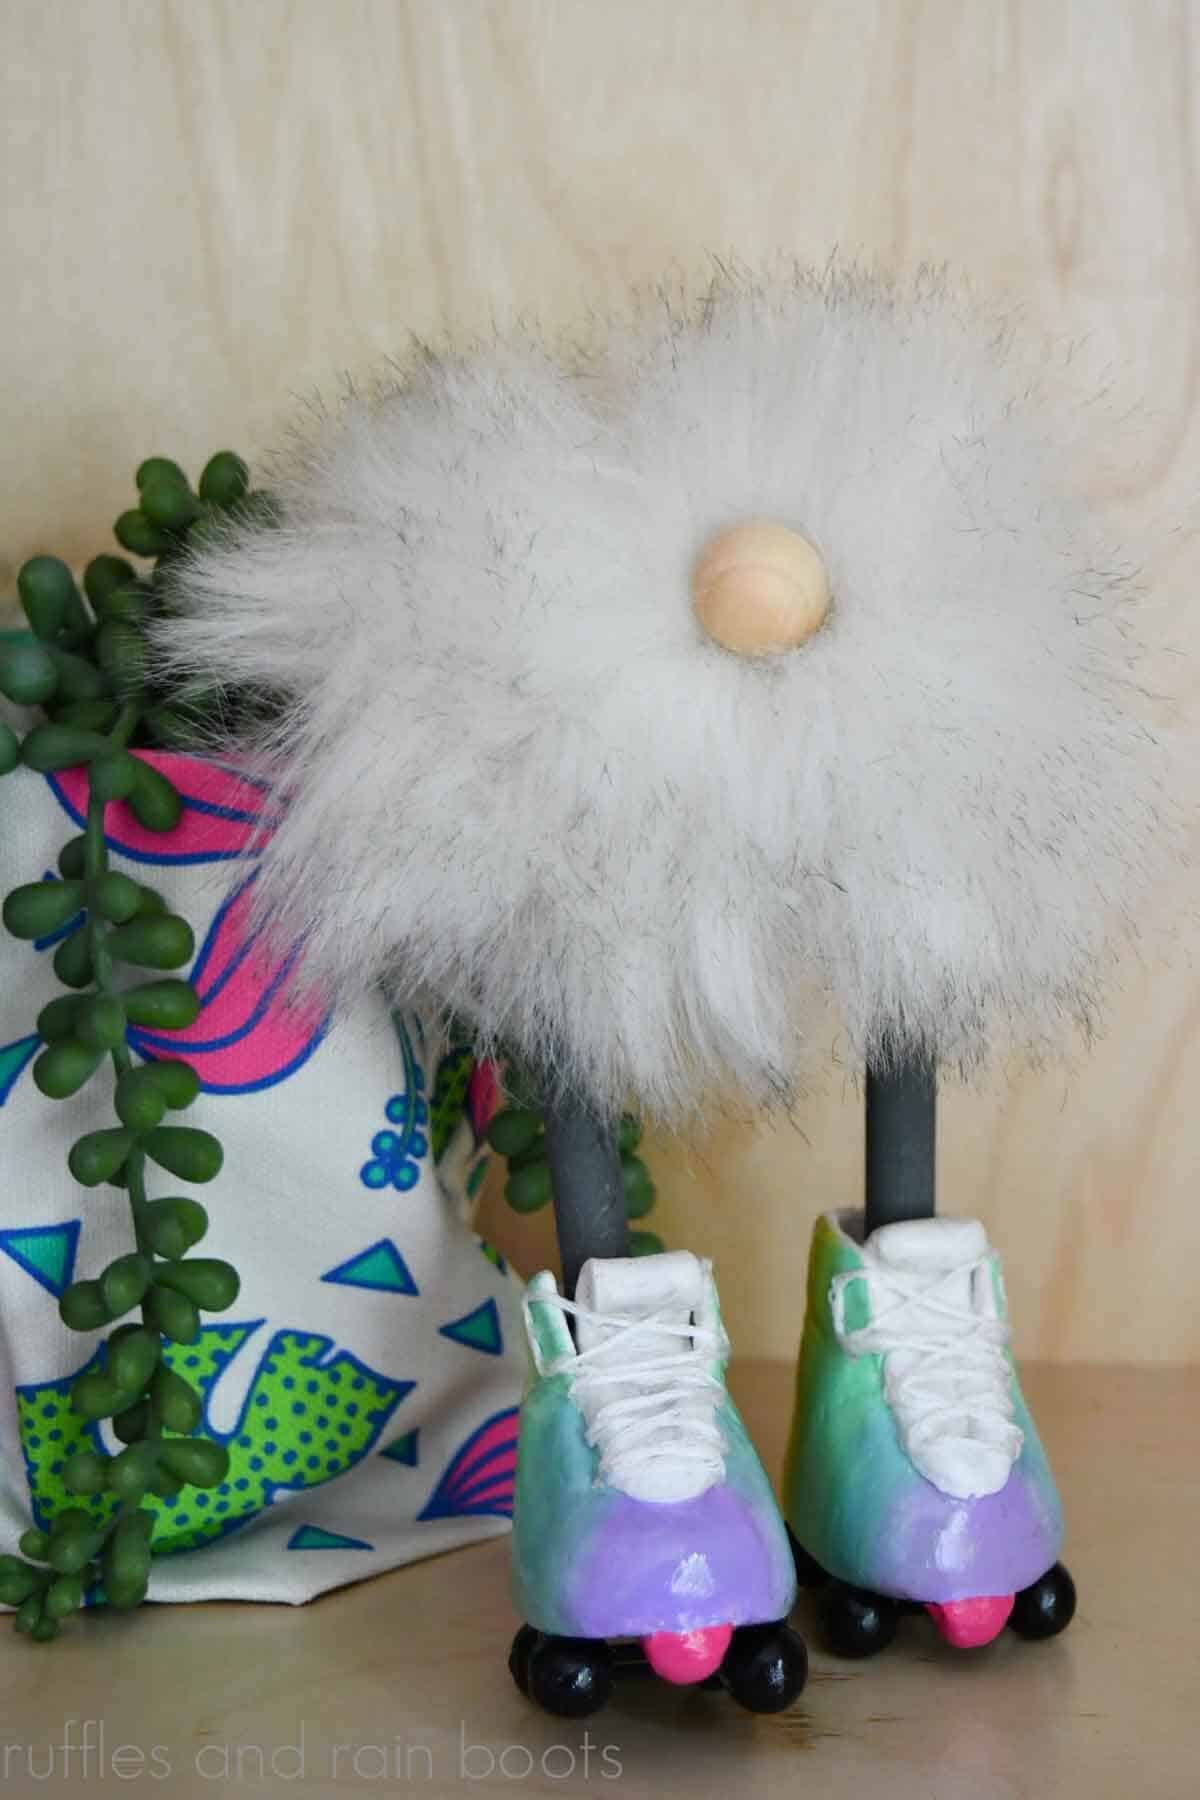
Gnome on Roller Skates
Here at Ruffles and Rain Boots, I’ve been sharing DIY gnomes for all seasons. These Christmas gnomes are the most popular, sure, but the community is having fun creating a ton of themed gnomes, as well. We’ve made:
- DIY biker gnome (very popular!)
- flower pot gnomes (a.k.a. pot head gnomes)
- pirate gnome DIY
Honestly, we’ve been having so much fun you should take a look around. It’s likely you’ll find a few tutorials you would love to recreate.
Please Save or Share This Fun DIY Gnome Tutorial
Before we get too far into this, can I ask a favor? Your shares are how this site grows and I would be sincerely grateful if you shared this tutorial. Use the sharing buttons to save this to a DIY pin board or share it with a crafty group on Facebook.
As an Amazon Associate, I could earn from qualifying purchases. There could be affiliate links within this article.
RELATED READING: Barefoot Pompom Gnome (He’s My Favorite with That Hat)!
Read Before You Start Making a Skating Gnome
This is a tutorial you’ll want to watch the videos to make. It’s a lot easier to show the steps (especially on the roller skates), so I’ll link both of the videos below (one for shoes, one for gnome assembly).
If you would like this craft as a printable gnome DIY, scroll down. Each step will be listed out below without pictures).
- Make the roller skate bases first. As shown in the video, the boots are actually made over the course of two days. Everything is less frustrating when you have a solid base.
- If you’re making gnomes to sell, use E6000 in addition to hot glue on the structure of the gnome and the roller skate “wheels.”
- I used a pre-made fur pompom, however, to create this no-sew gnome body, you can cut a square piece of fur and start there.
- The gnome nose I used was a wood ball, however, you can use a pompom, clay gnome nose, or a flat back.
- Take note of the tips about the wire I use when constructing gnomes. A sturdy wire will provide structure and NOT BREAK when moved around.

How to Make a Gnome on Roller Skates (Skate Tutorial)
Below are the steps I used to create the roller skates. They need to be made in advance, so set aside at least 45 minutes to create these. I recommend to watch the how to make clay roller skates video tutorial.
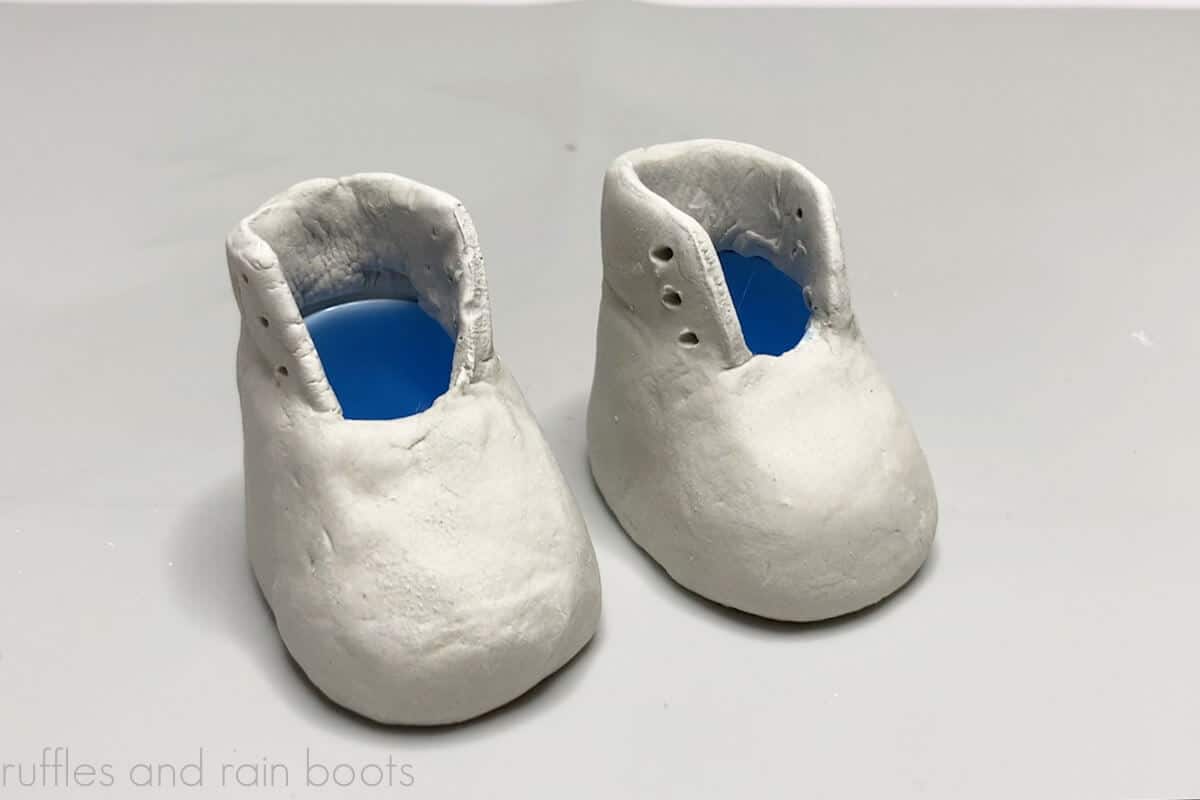
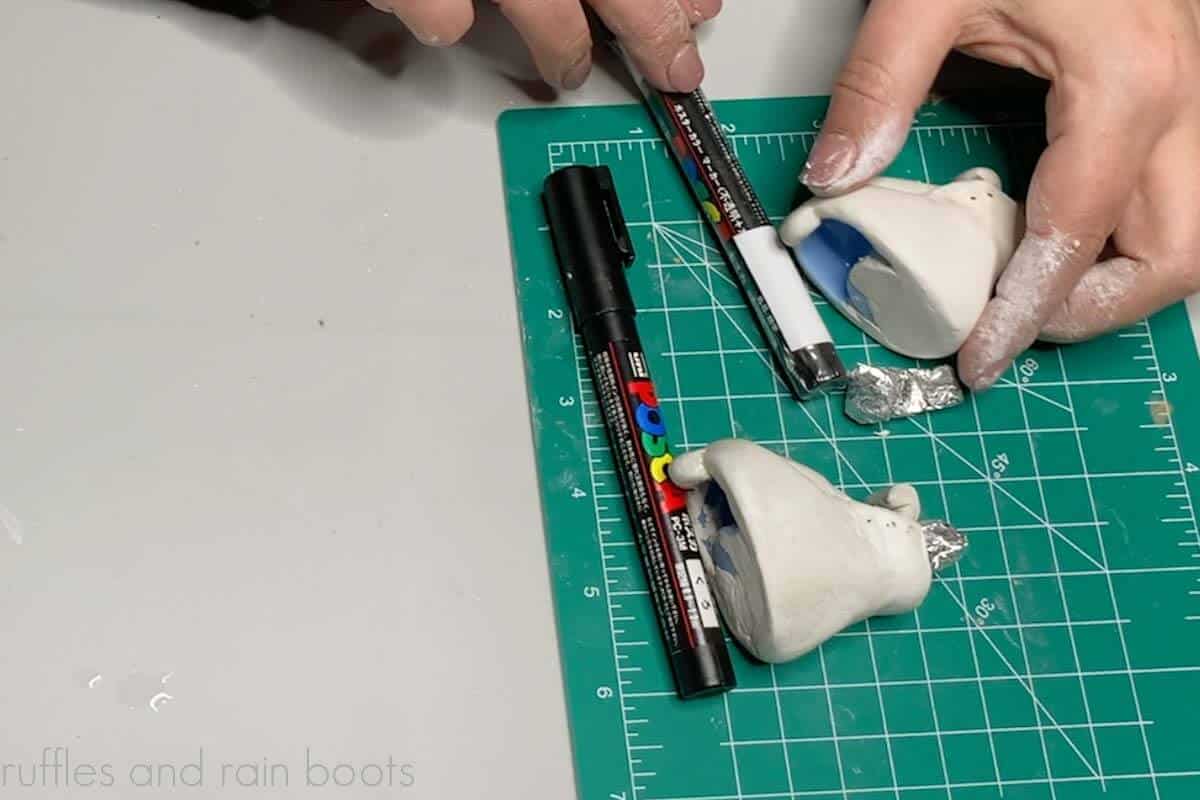
First, sand the booties or whatever base you’re using so the clay will better adhere. Cut off 1 inch across the entire block of clay. Split it in half and work with only one section (put the other in a sealed plastic zip top bag to preserve it).
Roll out the clay into a thin, flat portion and wrap the entire bootie, adding about 1/2 inch above the edge around the back. I did it in two sections (around the back and the front piece).

Use a needle or dowel to create eyelets in the top portion of the bootie. Set the booties aside to dry for at least 24 hours. Store any leftover clay back in the bag.
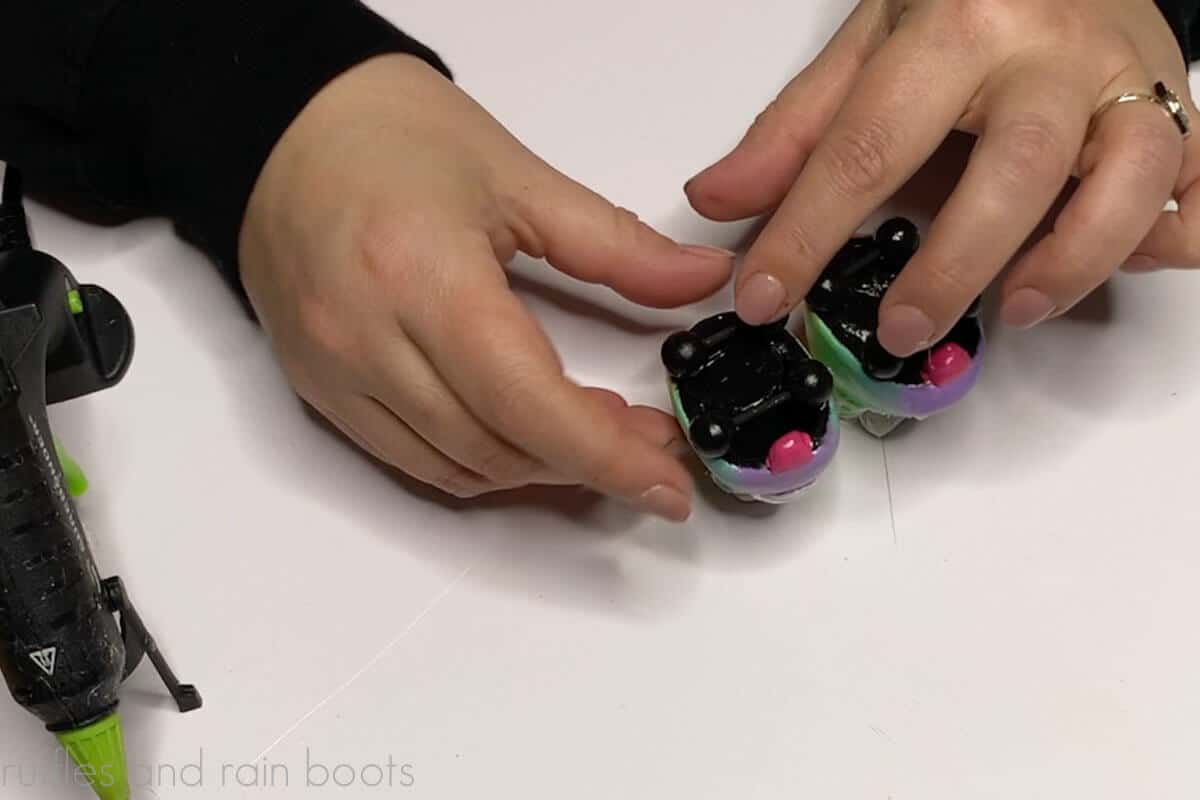
Next, paint 8 of the small wood beads black and coat with a protective sealant. These will be the wheels. You can also cut and paint the dowels for the skates now.

After the entire boot portions are dry, create a front stopper and tongue out of clay for each. I used a thicker piece of clay for the tongue to avoid cracking and to dig out the center. Attach both and set the skates aside to dry again.
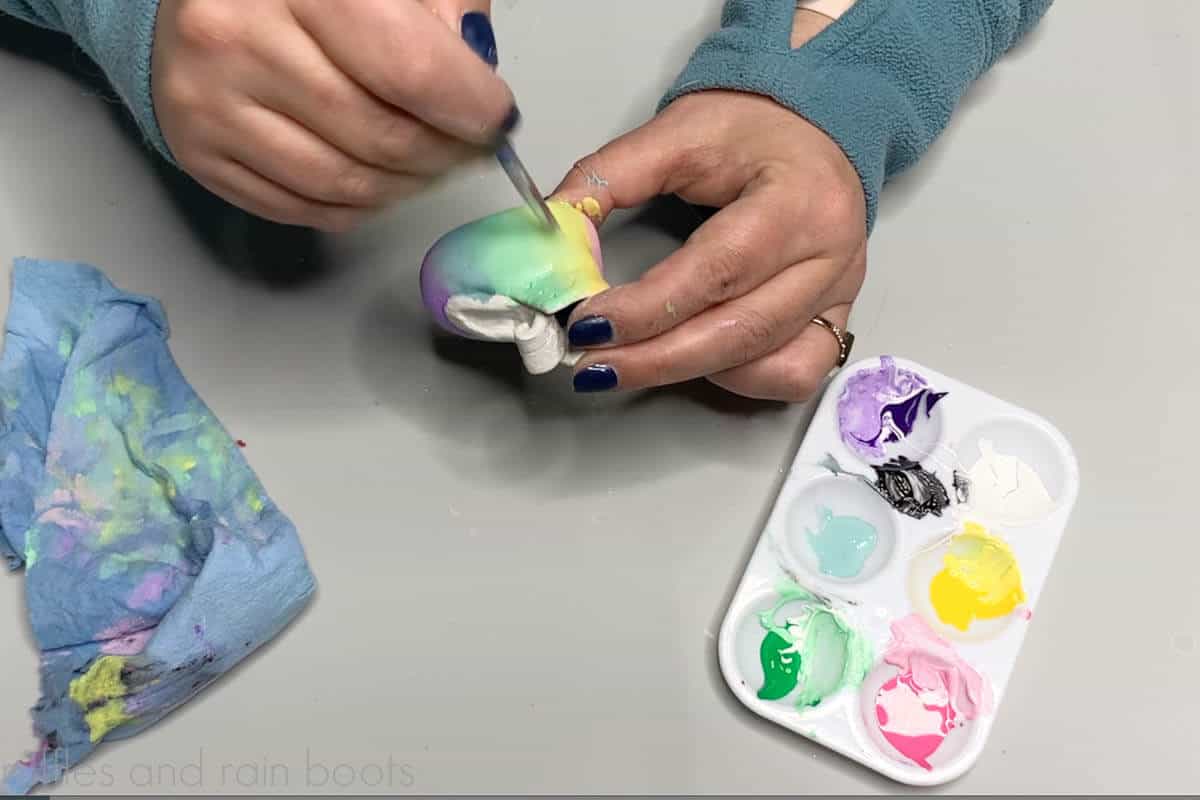
Once everything has dried, gently sand the booties and wipe away the dust. Paint to your preference (I obviously love rainbows) and seal.
Use my favorite detail tip glue gun and embroidery thread to create shoe strings for the roller skates. This was much easier than stringing them (but feel free to do so).

Create the wheel assemblies by threading a bead onto a dowel, pushed to the end, and then threading another on at the other end. Attach two sets of the wheel assemblies to the bottom.
How to Make a Roller Skating Gnome (Pompom Gnome Style)
The good news: this part is done in about 15 minutes! And again, this is so much easier to show than to write out and I suggest to watch the DIY roller skating gnome video tutorial before starting.
If using dowels or paintbrush sticks, paint and seal them. Glue them into the roller skates (add a generous amount of hot glue or hot glue plus E6000).
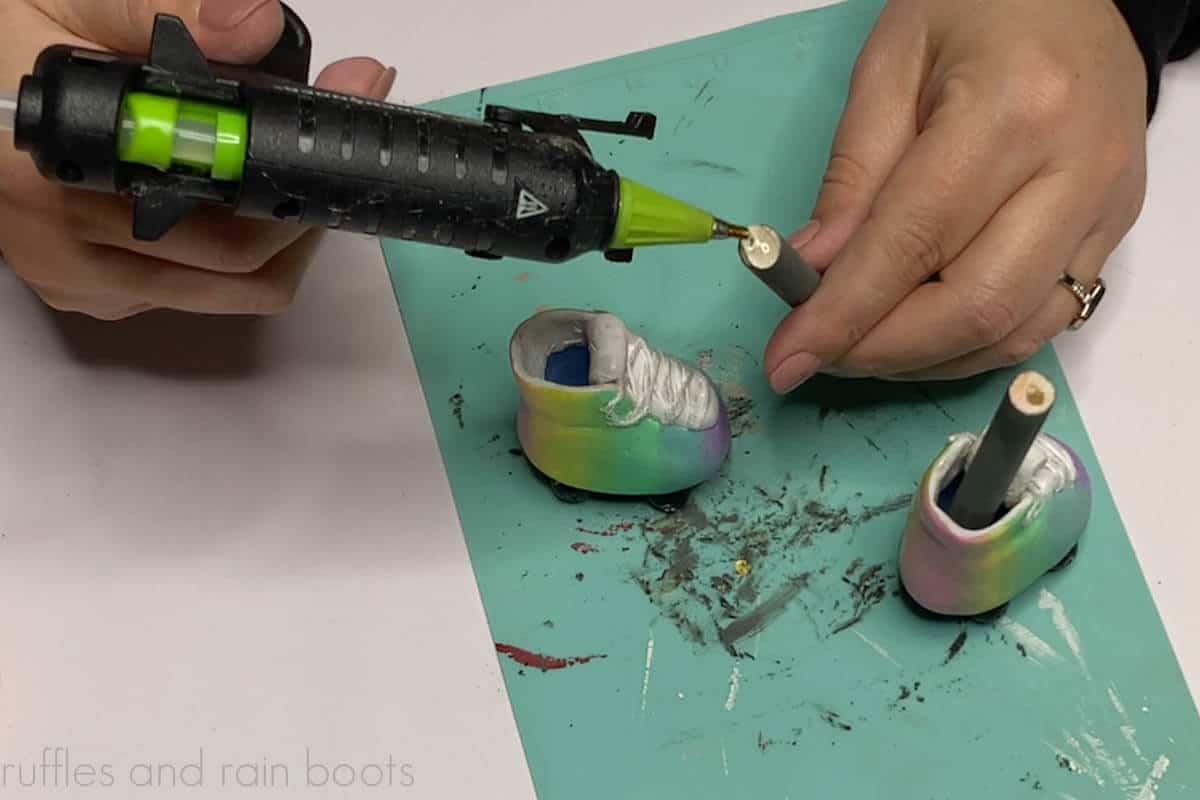
Cut a piece of sturdy wire (I used 14 gauge) that is about 3/4 inch larger than what you need. As shown in the pom pom gnome video tutorial, the ends will go into the paintbrush head (or attached to the dowel) and need bending to secure the posed legs into place. Glue the wires into place.

Open a faux fur pompom and remove the stuffing. Glue each corner down (on the fabric backing side) and then mount the wire assembly for the legs about 1/2 to 3/4 inch from the bottom edge of the fur.

Add a small amount of stuffing to the center of the pompom and then glue the pompom edges together.

The final step is to add the gnome nose. Split the fur to the fabric backing, add hot glue, and press in a wood ball, pompom, or clay nose.
Need a Quick DIY Gnome Idea? Try These
- 3 Minute Gnome – Yes, this really comes together in three minutes and you just need to go to a dollar store for the supplies.
- Adorable Farmhouse Sock Gnome – Another fast gnome to make, this cutie will fit any rustic, farmhouse, or laid back style (that fabric can be found anywhere).
- Easy Cone Gnomes – You will look like a professional when you make these but they’re SO easy. Grab a few cones from the craft store and follow these simple steps.
Love This DIY Gnome Craft Idea? Please Save or Share
Your shares are how this site grows and I am sincerely grateful. Please share this with a crafty group on Facebook or save it to a fun craft ideas pin board.
Roller Skating Gnome DIY

This roller skating gnome is a fun project that requires NO sewing at all. Use some air dry clay and wood beads to create the roller skates and a faux fur pom pom to create the gnome body. Learn how to create this pompom gnome idea with a little wire to create a strong structure for the standing gnome body. This summer gnome idea is a fun way to spend some time creating a custom gnome for a gift or decor without having to use a gnome pattern.
Materials
- air dry clay
- base for boots (I used Dollar Tree baby party favors)
- wood dowels (I used foam paintbrush handles)
- wood skewers
- 8 x 1/4 inch wood beads
- embroidery thread
- paint and sealant
- 14 gauge wire
- fur pompom
- 1/2 inch wood bead (or larger)
Tools
- hot glue gun and glue sticks
- sanding sponge or paper
- wire snips
- X-Acto knife
- paintbrush
Instructions
How to Make Gnome Roller Skates
- First, sand the booties or whatever base you're using so the clay will better adhere. Cut off 1 inch across the entire block of clay. Split it in half and work with only one section (put the other in a sealed plastic zip top bag to preserve it).
Roll out the clay into a thin, flat portion and wrap the entire bootie, adding about 1/2 inch above the edge around the back. I did it in two sections (around the back and the front piece). - Use a needle or dowel to create eyelets in the top portion of the bootie. Set the booties aside to dry for at least 24 hours. Store any leftover clay back in the bag.
- Next, paint 8 of the small wood beads black and coat with a protective sealant. These will be the wheels. You can also cut and paint the dowels for the skates now.
- Once the booties are dry, create a front stopper and tongue out of clay for each. I used a thicker piece of clay for the tongue to avoid cracking and to dig out the center. Attach both and set the skates aside to dry again.
- After the entire boot portion has dried, gently sand the booties and wipe away the dust. Paint to your preference (I obviously love rainbows) and seal.
- Use a detail tip glue gun and embroidery thread to create shoe strings for the roller skates. This was much easier than stringing them (but feel free to do so).
- Create the wheel assemblies by threading a bead onto a dowel, pushed to the end, and then threading another on at the other end. Attach two sets of the wheel assemblies to the bottom.
Make the Pompom Gnome
- If using dowels or paintbrush sticks, paint and seal them. Glue them into the roller skates (add a generous amount of hot glue or hot glue plus E6000).
- Cut a piece of sturdy wire (I used 14 gauge) that is about 3/4 inch larger than what you need. As shown in the pom pom gnome video tutorial, the ends will go into the paintbrush head (or attached to the dowel) and need bending to secure the posed legs into place. Glue the wires into place.
- Open a faux fur pompom and remove the stuffing. Glue each corner down (on the fabric backing side) and then mount the wire assembly for the legs about 1/2 to 3/4 inch from the bottom edge of the fur.
- Add a small amount of stuffing to the center of the pompom and then glue the pompom edges together.
- The final step is to add the gnome nose. Split the fur to the fabric backing, add hot glue, and press in a wood ball, pompom, or clay nose.
Notes
- Make the roller skate bases first. As shown in the video, the boots are actually made over the course of two days.
- If you're making gnomes to sell, use E6000 in addition to hot glue on the structure of the gnome and the roller skate "wheels."
- I used a pre-made fur pompom, however, to create this no-sew gnome body, you can cut a square or circular piece of fur.
- The gnome nose I used was a wood ball, however, you can use a pompom, clay gnome nose, or a flat back.
- Take note of the tips about the wire I use when constructing gnomes. A sturdy wire will provide structure and NOT BREAK when moved around.
Recommended Products
As an Amazon Associate and member of other affiliate programs, I earn from qualifying purchases.


Meet the Creator
Hi there, I’m Sarah Nenni-Daher. I’m a crafty gal and always have at least 14 projects going at once. I am a crafter, designer, DIYer, and pattern maker. I share my creations here and in the Ruffles and Rain Boots® Shop.
Here at Ruffles and Rain Boots®, you’ll find DIY gnomes, crafts, gifts, cupcakes, laser crafts, and so much more. I love sharing video tutorials over on YouTube and chatting with other crafters in my Facebook groups. We’d love to have you!