
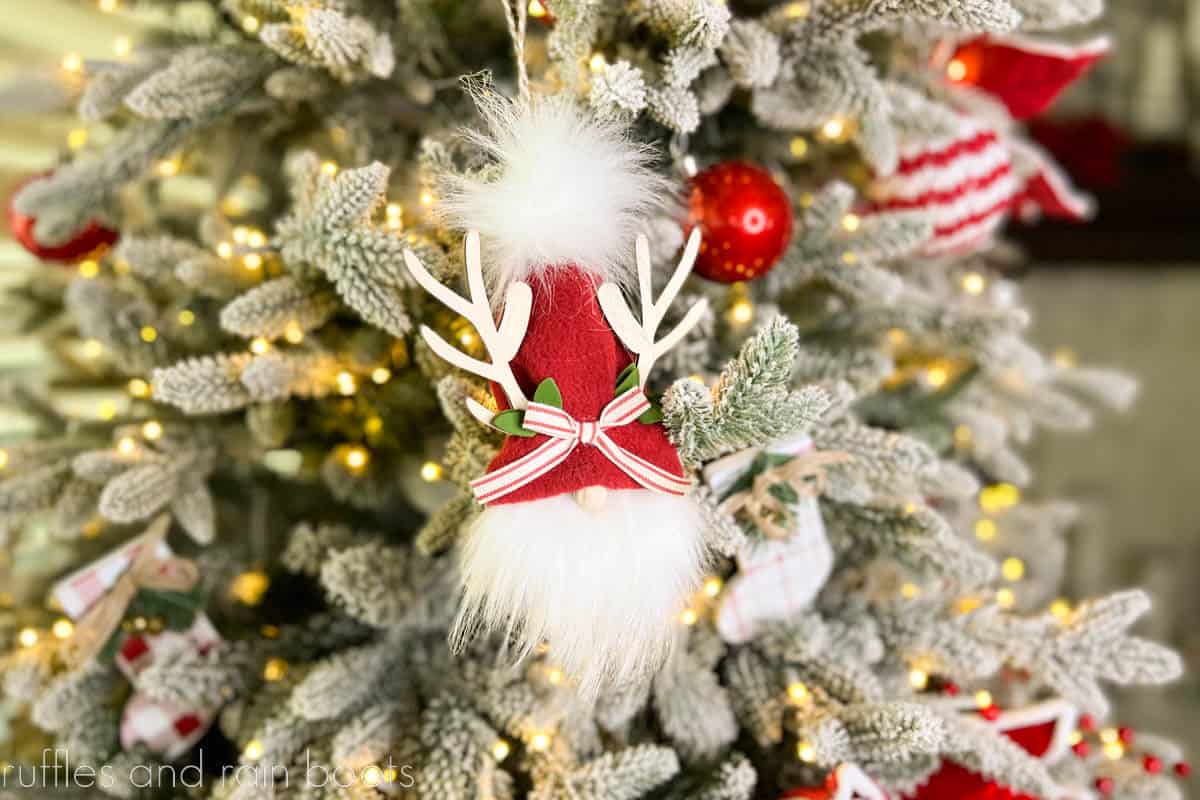
Adorable Reindeer Gnome Ornament
This reindeer gnome ornament is a show-stopping, easy Christmas craft you can make in less than 10 minutes! Use what you have on hand and turn this into a scrap-buster holiday DIY.
To create this gnome ornament idea, follow along with the step by step written and video tutorials. This is SO easy and fun for the holidays.
RELATED READING: Make a Few of the Internet’s Most Popular Gnome Ornaments
What You'll Find On This Page
Gnome Ornament DIY
Here at Ruffles and Rain Boots, I have been making gnome ornaments for years. From the most popular DIY gnome ornament on the Internet to quick and easy gnome Dollar Tree ornaments, I like to challenge myself each year.
I use these for ornaments, of course, but also use them as gnome package tags, to tie onto wine bottle bags as hostess gifts, and anything else I can tie them onto. I’ve used them in wreaths, swags, accents to Christmas decorations, and even as end decor for custom farmhouse bead DIYs. My point is that you have many ways to use these, so let’s get started.
Please Save or Share This Free Gnome Tutorial
If you want to spread the word about this fun gnome Christmas ornament idea, use the sharing buttons. Save this to an easy Christmas crafts pin board or share it with a crafty group on Facebook.

As an Amazon Associate, I could earn from qualifying purchases. There could be affiliate links within this article.
RELATED READING: Free Christmas Gnome Pattern
Tips for Making This Ornament Gnome
Starting with an ornament base is easiest, but is NOT necessary. I’ll share a few alternatives and tricks for making this easy holiday craft.
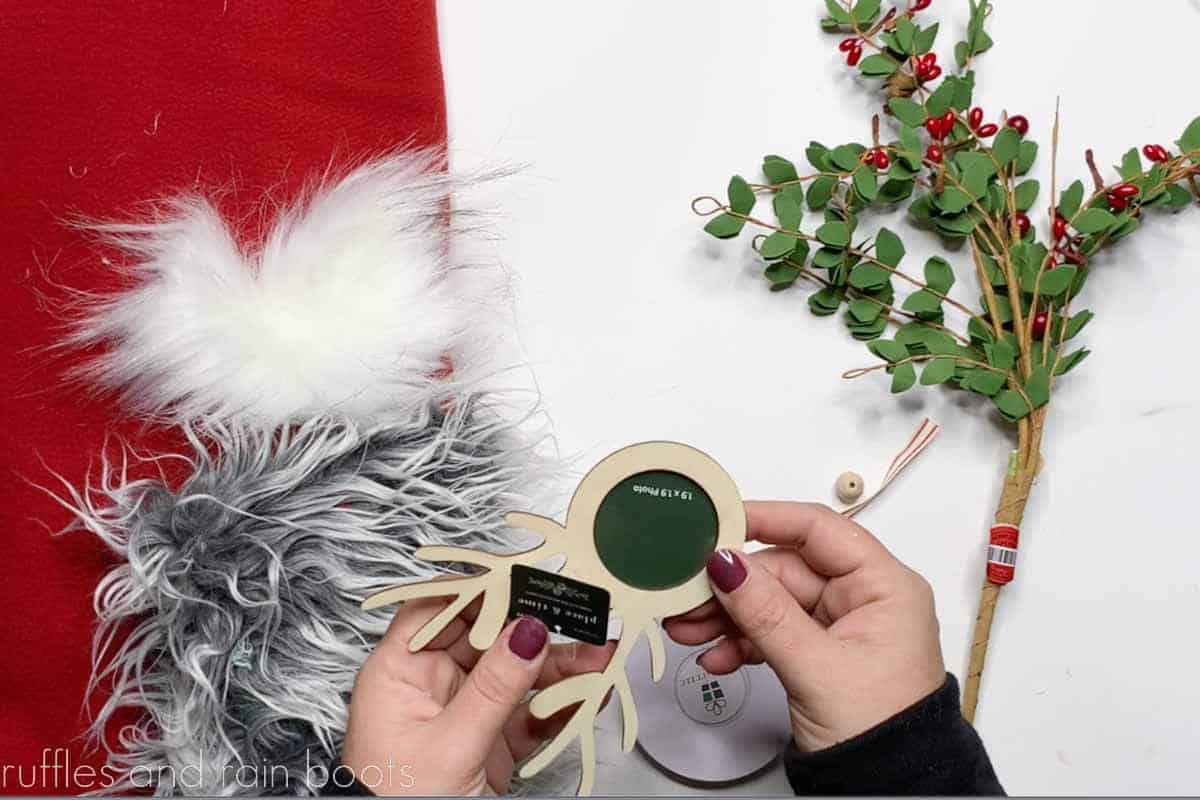
- The reindeer photo ornament is in stock year after year at Joann craft stores in their hanging ornament section AND in the holiday crafts areas.
- If you cannot find the ornament, you can use a wood round or even a cardboard circle.
- For antlers on a DIY ornament, use brown craft foam – it will last year after year and keep its shape better than cardboard or card stock. You can also use any cotton fabric with a stiffener (bonding or insert) or buckram / canvas.
- Use yarn (brushed out or as-is) as an option to the faux fur.
- If using faux fur, cut the fabric backing only. I like to use an X-Acto knife or blade for this and show you how to cut faux fur in this quick tutorial.

RELATED READING: Make Your Own Christmas Gnomes (DIY)
Supplies for This Easy Holiday Ornament Craft Idea
Below are the items I used, however, check what you have on hand. Always check the remnants bin (and clearance sections) at the craft stores. They are perfect for small crafts like these.
- ornament (see tips above for ideas)
- fleece
- wood bead or wood ball (can use a pompom, too)
- faux fur (can replace with yarn)
- twine or string for hanging
- decorations (I used ribbon and greenery)
- hot glue, scissors and X-Acto knife
RELATED READING: How to Make a Gnome Beard
Instructions to Build a Reindeer Gnome Ornament
Keep this page open and use the images and instructions below to follow along with the written tutorial. For a printable version without images, scroll to the bottom of this post.
If you are a visual learner, watch the reindeer gnome ornament video tutorial. While you’re there, please subscribe – we have a lot of fun in that community.
Step 1: Create a Gnome Hat
Wrap the fleece around the base at the widest part of the gnome body (the photo portion). To measure the width, add about 1.5 inches onto the width of the widest part of the “body” of the ornament to allow for overlap. Make it at least 6 inches tall.

Step 2: Make a Brim
To create a brim for the easy gnome hat, I turned up the bottom on the wrong side of the fabric (the back) about 1/2 inch. You could add a yarn, ribbon, or even sew a trim accent on yours.

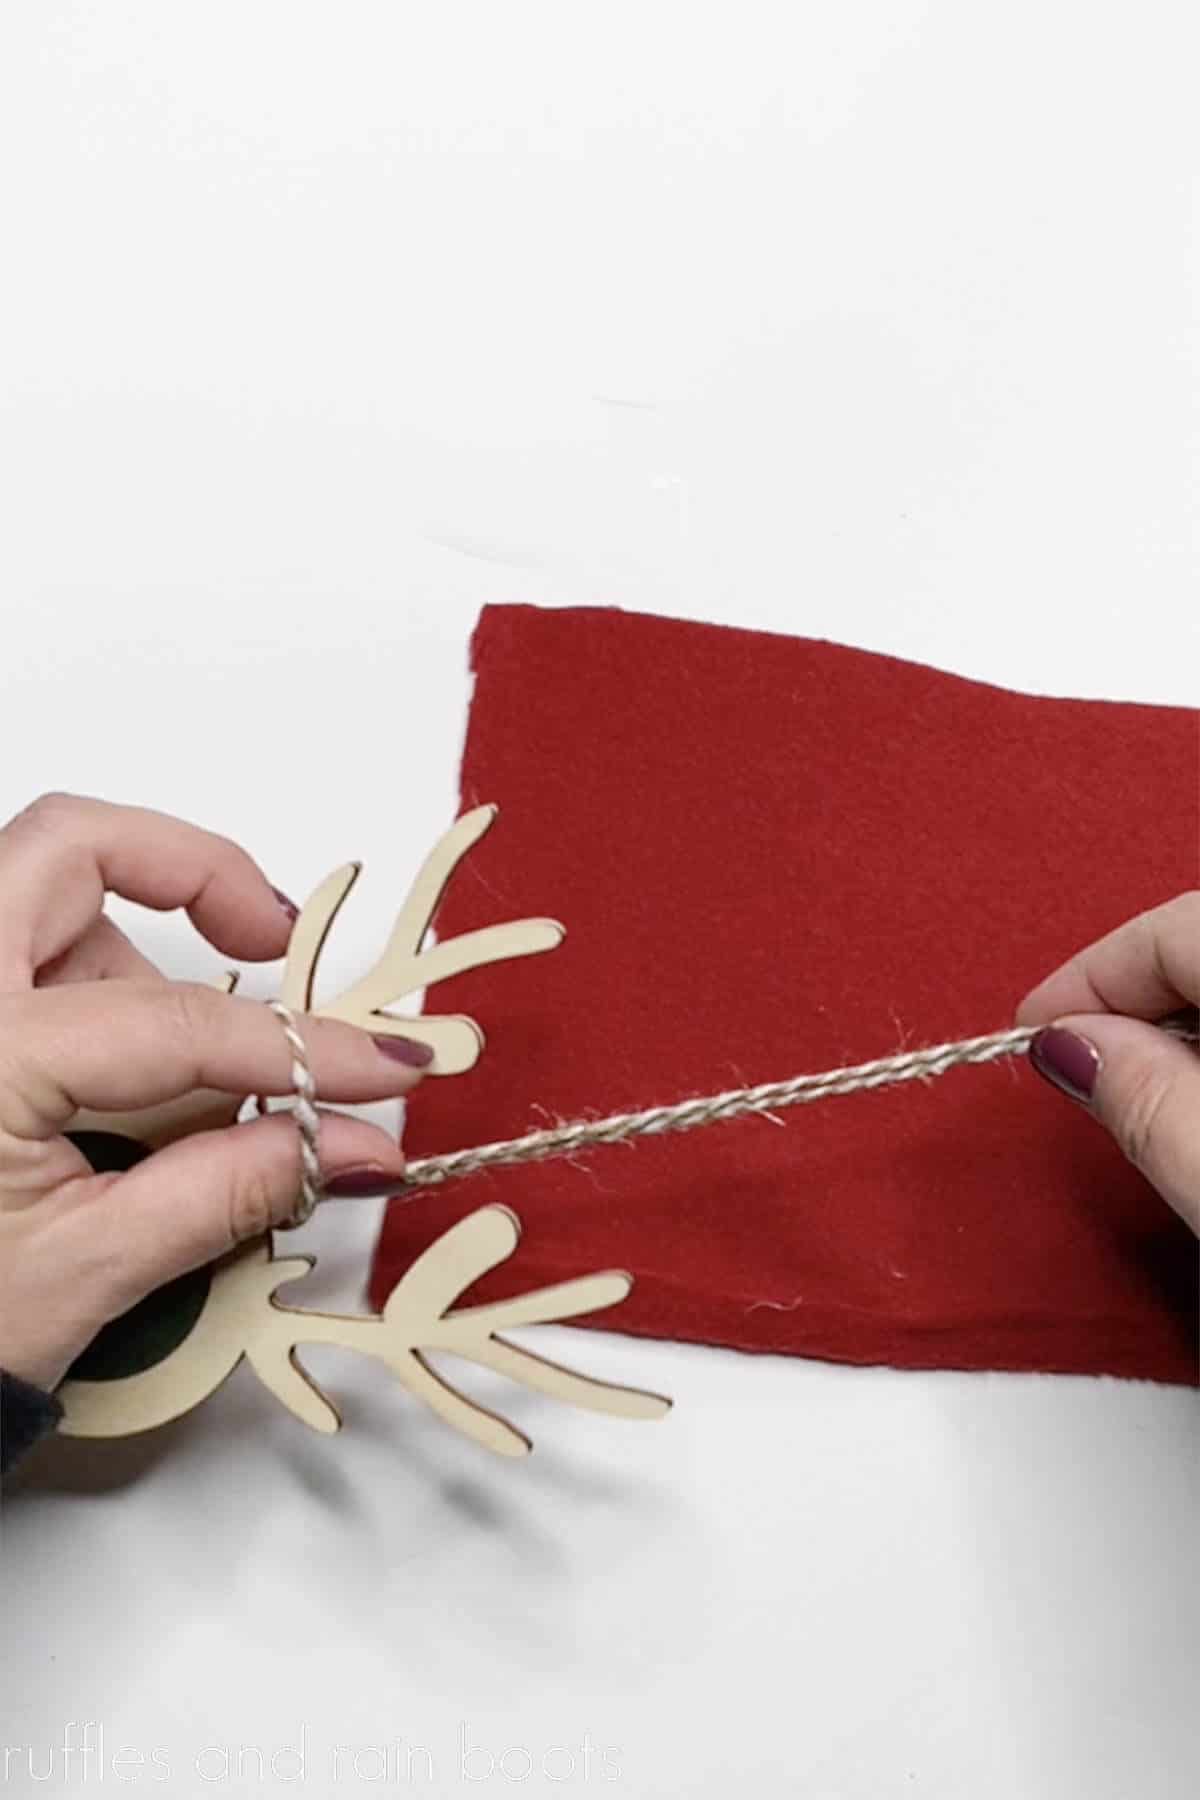
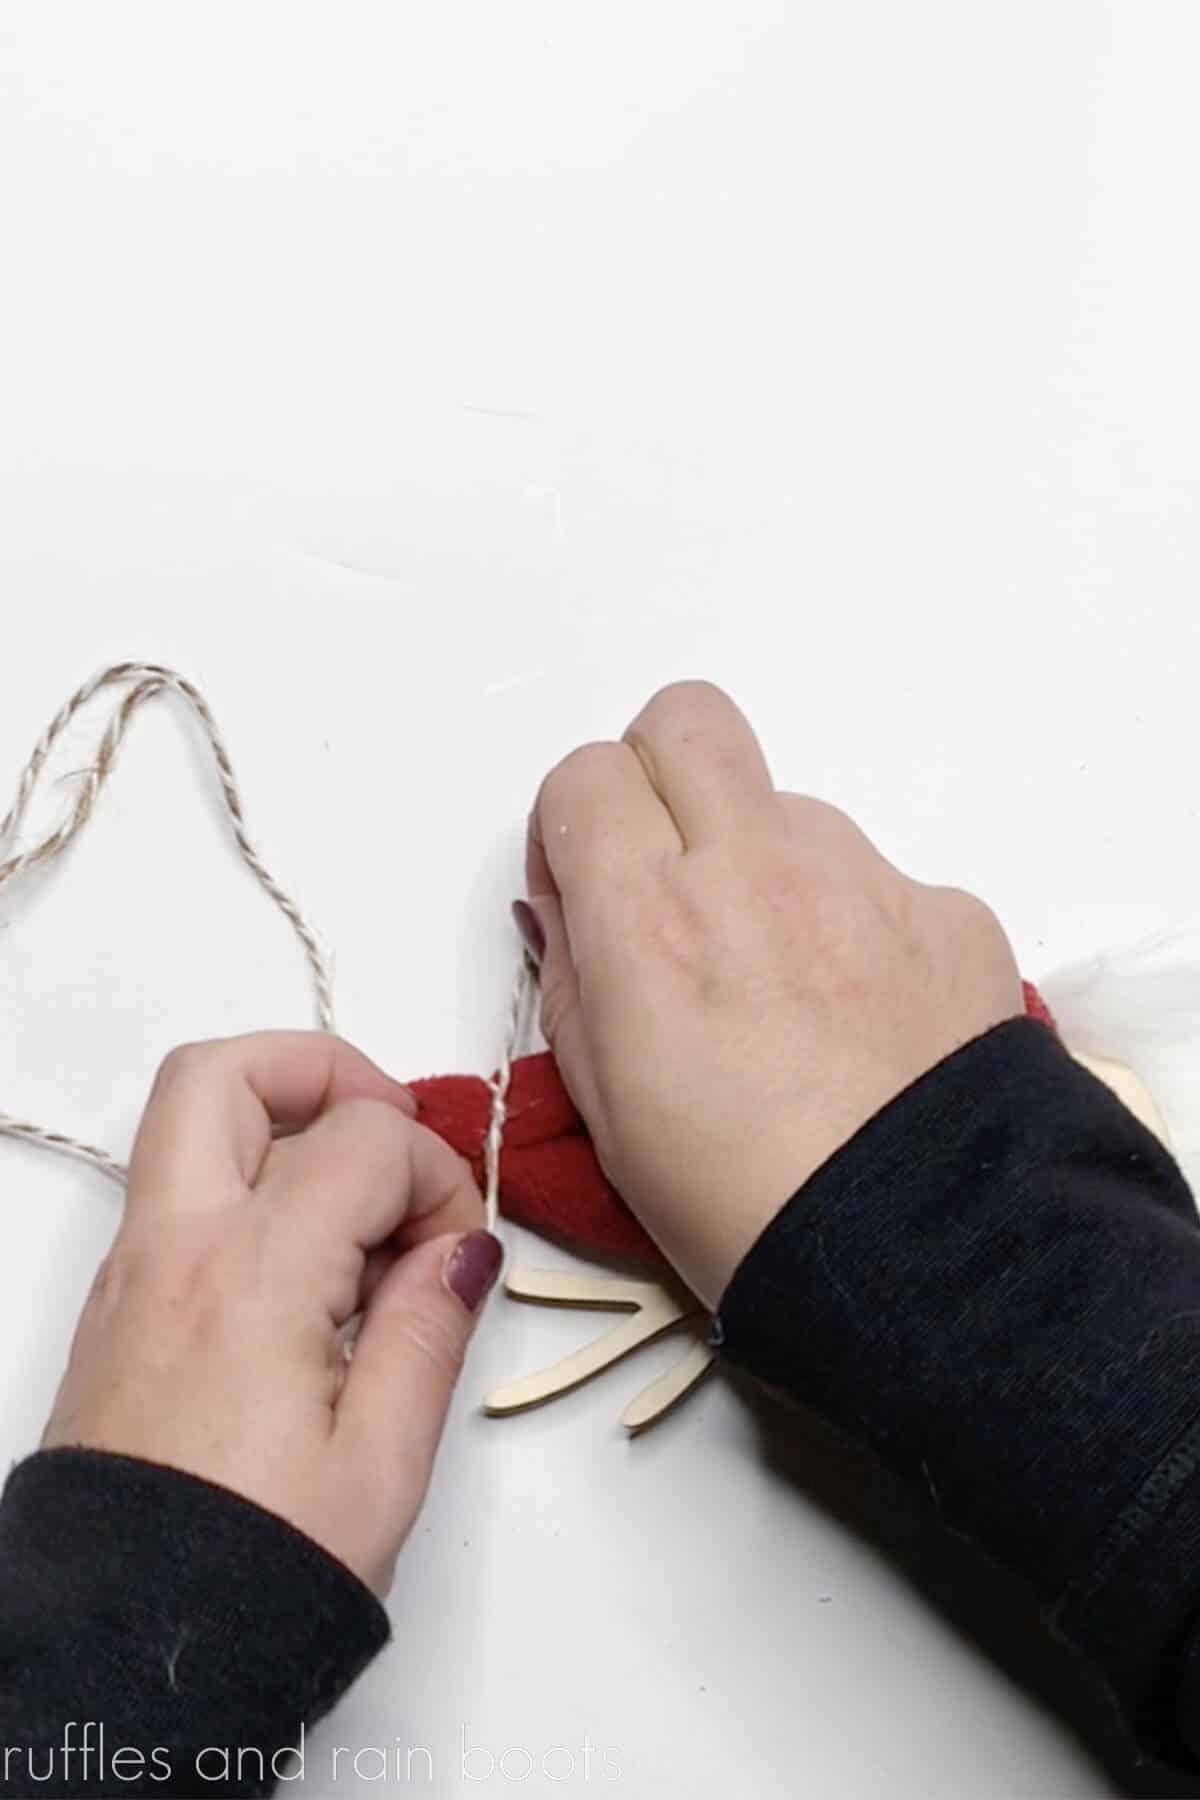
Step 3: Add an Ornament Hanger
Because the original hanger will be too short, remove it and cut a piece of baker’s twine (or string) about 18 inches long. Create a loop, push it through the hanger opening, and pull the ends through that loop. Leave it untied and determine the length later.
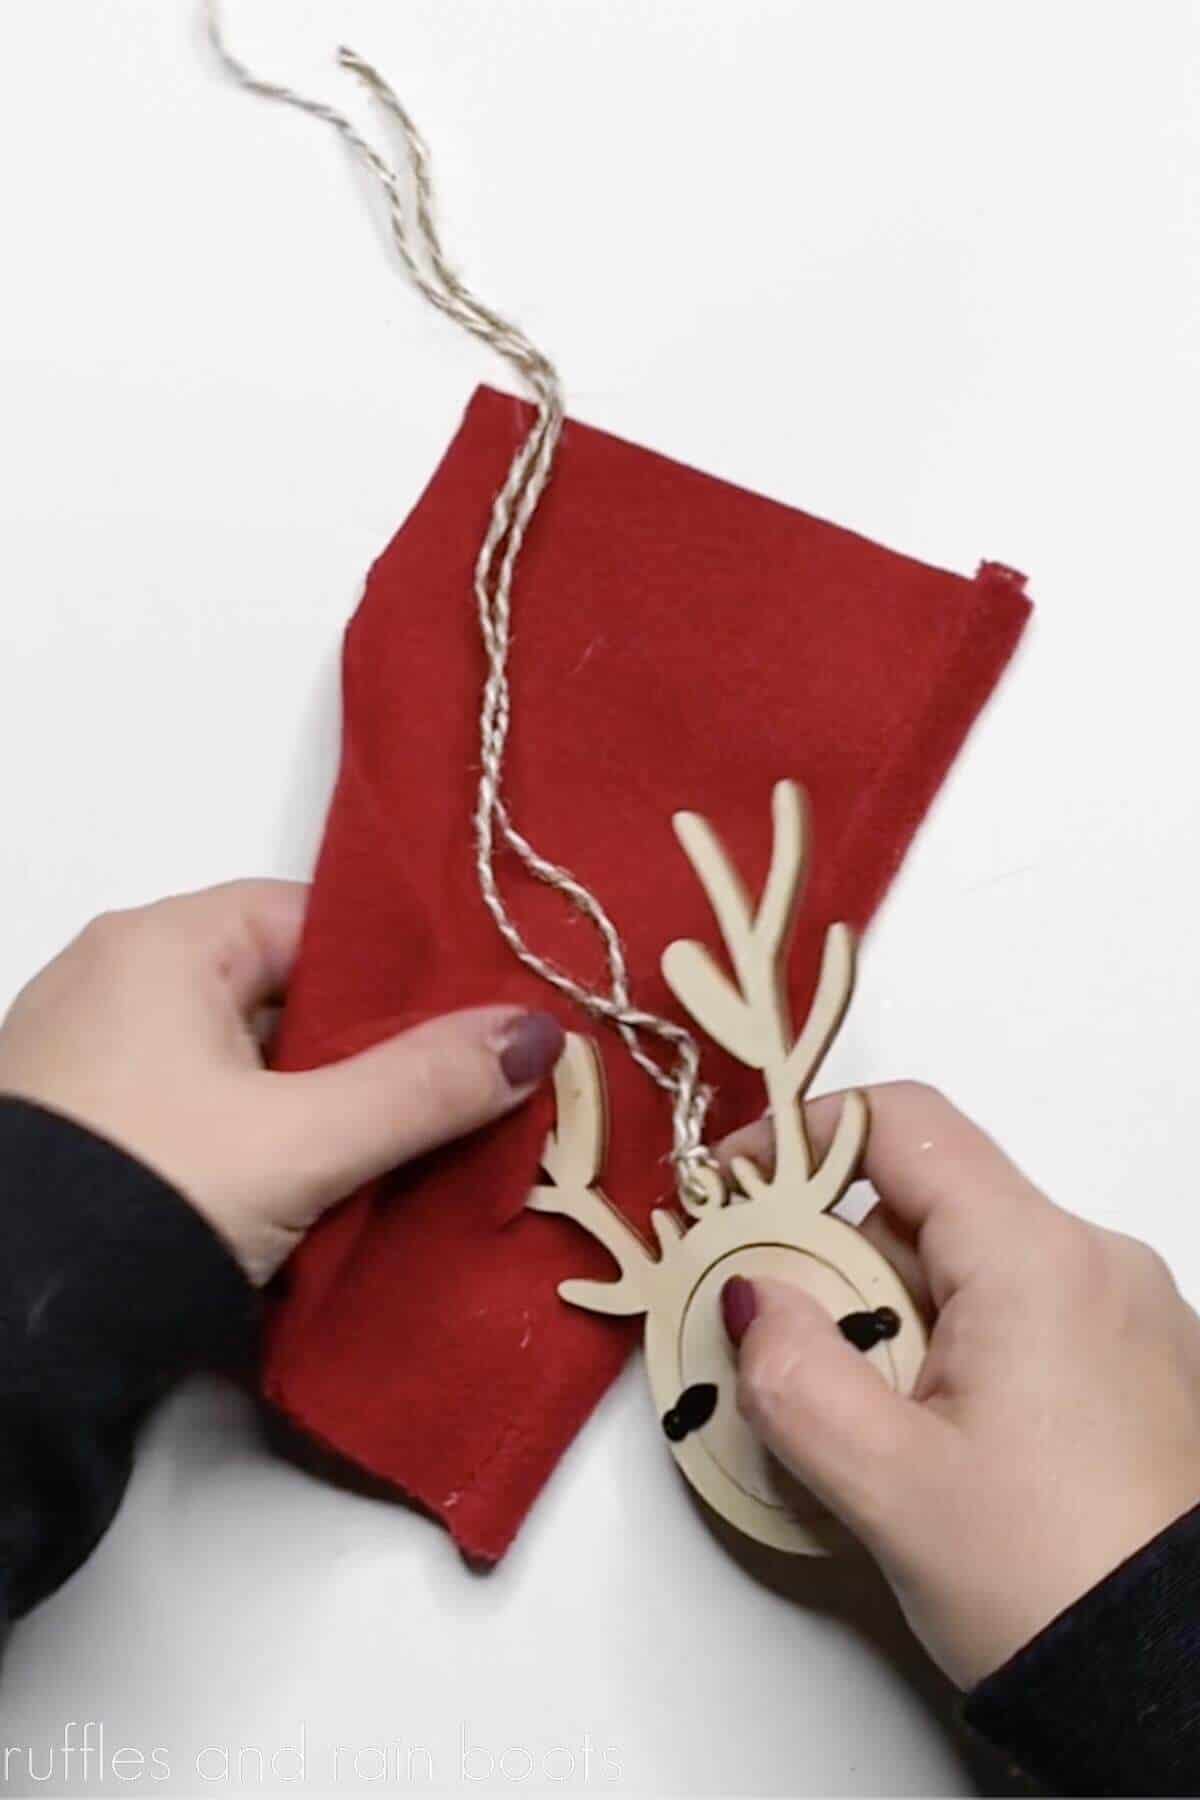
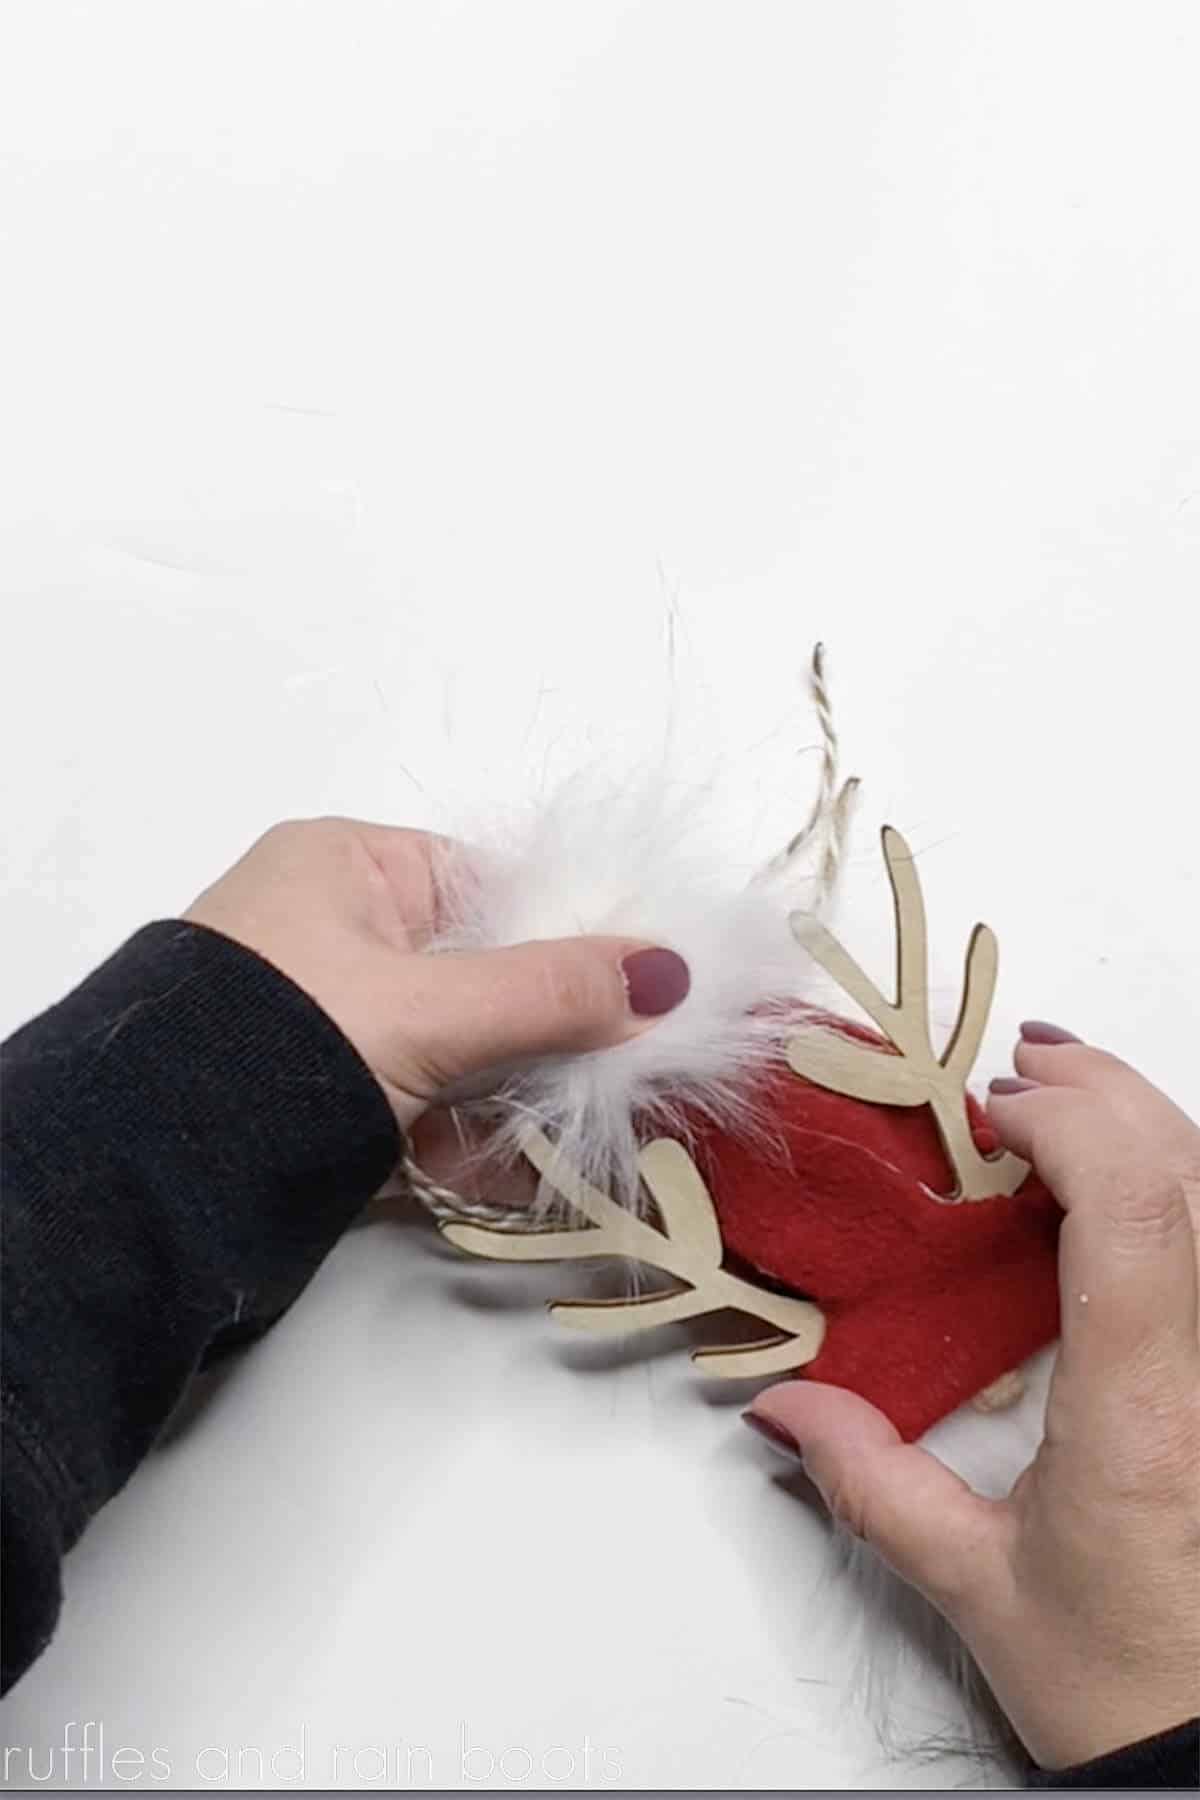
Step 4: Create Initial Cut for the Reindeer Antlers
Cut a slit into the fleece where the antlers meet the body of the ornament. We will use this to push one side of the antlers through.

Step 5: Cut Other Side
Once the first side has been pushed through, position the hat and cut the other side. Pull the antler through so that both are now protruding from the hat.
Step 6: Assemble Gnome Hat Base
Fold over the hat around the back and trim any excess fabric to leave a 1/2 inch hangover. Glue the back of the hat straight, leaving the top inch un-glued for tying and scrunching.

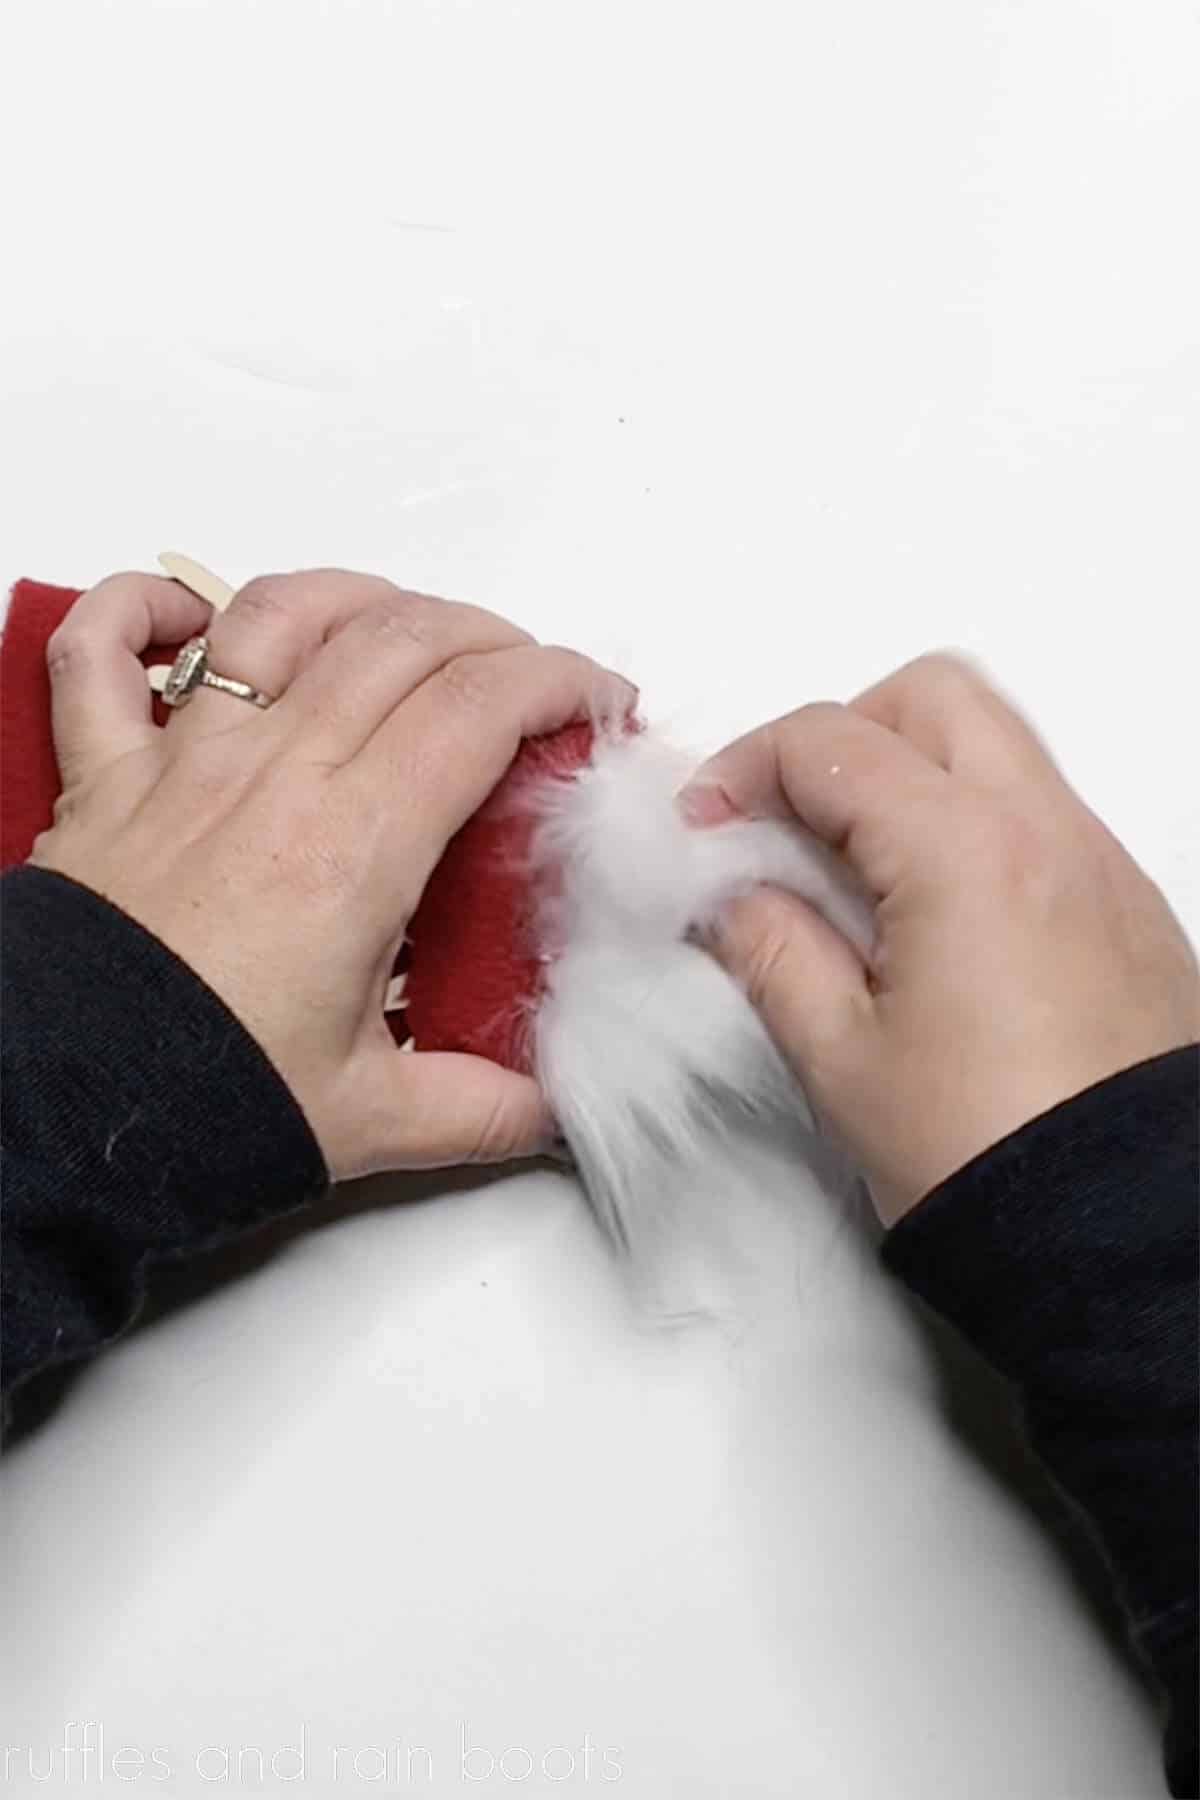
Step 7: Create a Gnome Beard
Cut the backing fabric of the fur into a triangle shape the width of your ornament body (from side to side). Cut the height of the fur triangle from just under the brim of the hat to below the ornament body and glue the beard to the ornament.
Step 8: Finish the Hat Assembly
Glue the hat to the ornament near the antlers and around the back, securing it in place and tie up the top of the hat with matching twine from the hanger.
Step 9: Gnome Nose
Glue the wood bead to the underside of the hat. It should sit on top of the gnome beard.

Step 10: Create a Faux Fur Pompom
Cut a smallish (1 inch) piece of fur and glue down each corner point to the center. This will create a fur pom pom to glue to the top of the hat (I put mine in front).
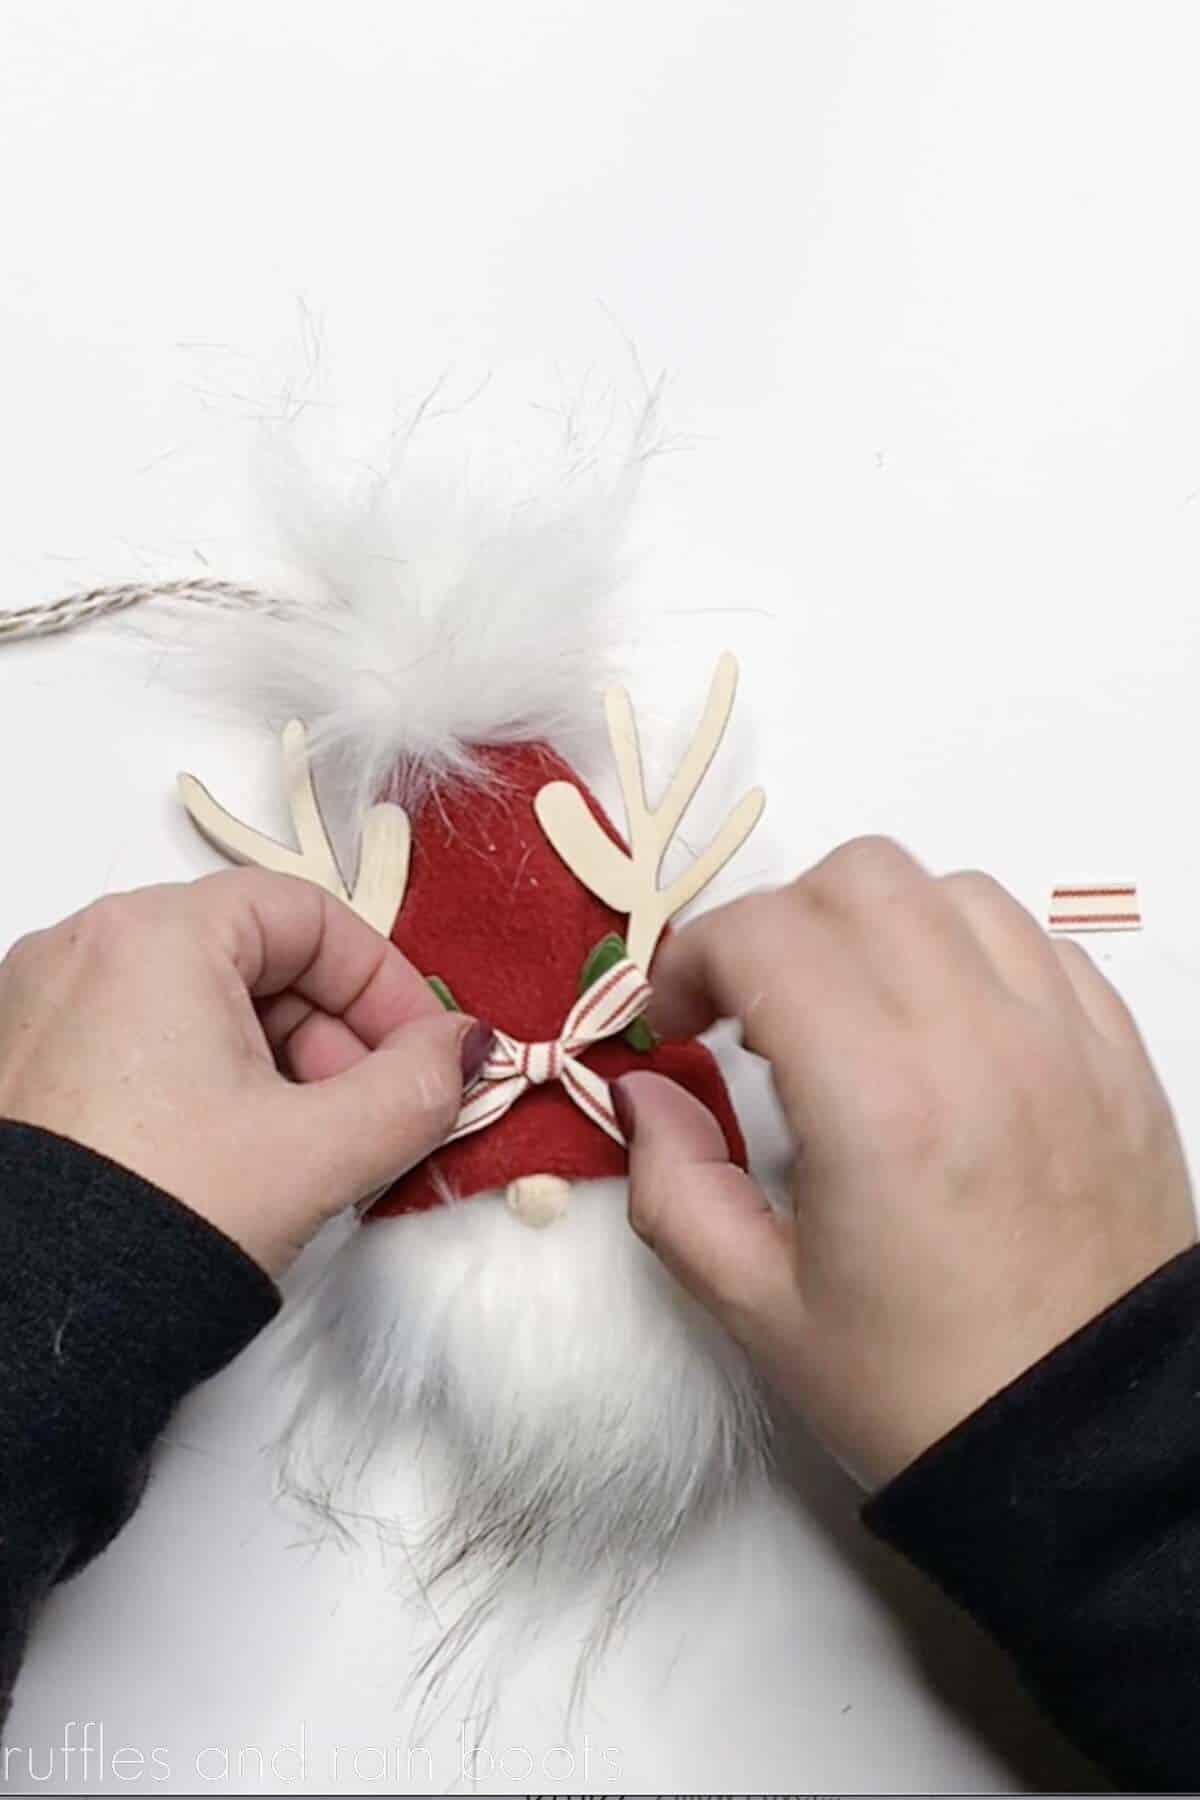
Step 11: Decorate the Reindeer Gnome Ornament
Tie a small ribbon bow and glue to the center of the hat in the middle of each antler and add greenery pieces to either side. It’s time to hang your cute gnome ornament on the Christmas tree.
More Gnome Crafts You Might Like
- Adorable Gnomes for Christmas (No Sew) – Find some Scandinavian inspired fabric and use a hot glue gun to create these beautiful holiday gnomes.
- Reindeer Gnome DIY – These are one of my favorite all-time holiday gnomes I’ve put together. I even share two ways to make them.
- Reindeer Gnome Garland – Oh, this is a fun one to make for a themed holiday. Look at their tiny little antlers!
Please Save This Fun Gnome Craft idea
I really appreciate any shares on my creations, as it is how this site grows. Thank you so much for being here with me and for saving this to a pin board or sharing onto Facebook.

Reindeer Gnome Ornament

A pre-made ornament from the craft store is the base for this quick reindeer gnome ornament made in under 10 minutes. This is a great gnome craft for a way to use faux fur scraps from other projects, too. Learn how to cut the gnome hat around the antlers and the rest is easy going.
Materials
- Reindeer Gnome Base
- Fabric for Hat (Fleece or a Stretchy Fabric)
- Faux Fur Scrap
- 1/4 inch Wood Bead or Ball
- Twine Cord (for Hanging)
- Ribbon
- Small Greenery Decoration
Tools
- Hot Glue Gun and Glue Sticks
- Scissors
- X-Acto Knife or Box Cutter (for fur)
Instructions
- Cut a rectangle of fleece for the gnome hat. To measure the width, add about 1.5 inches onto the width of the widest part of the "body" of the ornament. Make it at least 6 inches tall.
- Hot glue a brim along one long edge of the hat piece, folding the bottom 1/4 inch up on the wrong side of the fabric to create a tailored look.
- Remove the ornament hanger and add a piece of twine in its place (I cut mine to 18 inches, but if you're creating a package tag, cut to 12-15).
- Cut a small slit into the fleece where the antlers meet the body of the ornament. We will use this to push the antlers through.
- Slip on the hat over the antlers and measure the other side. Make a small cut in the gnome hat the same way and slip the other antler through.
- Trim excess fabric so you have only about a 1/2 inch hangover. Glue the back of the hat straight, leaving the top inch un-glued for scrunching.
- Cut the backing fabric of the fur into a triangle shape the width of your ornament body from side to side. Cut the height of the fur triangle from just under the brim of the hat to below the ornament body. Glue to the ornament.
- Glue the hat to the ornament near the antlers and around the back, securing it in place and tie up the top of the hat with matching twine from the hanger.
- Add the wood bead under the brim of the hat and over the fur in the center of the ornament to create the gnome nose.
- Cut a small (1 inch) piece of fur and glue down each point to the center to create a fur pom pom to glue to the top of the hat (in front).
- Tie a small ribbon bow and glue to the center of the hat in the middle of each antler. Add greenery pieces underneath to either side and it's time to hang your cute gnome ornament!
Notes
Craft stores often have these photo ornaments in the kid's or ornament sections.
You can easily create a reindeer ornament by glueing cardboard or foam antlers to a wood round ornament.
Meet the Creator
Hi there, I’m Sarah Nenni-Daher. I’m a crafty gal and always have at least 14 projects going at once. I am a crafter, designer, DIYer, and pattern maker. I share my creations here and in the Ruffles and Rain Boots® Shop.
Here at Ruffles and Rain Boots®, you’ll find DIY gnomes, crafts, gifts, cupcakes, laser crafts, and so much more. I love sharing video tutorials over on YouTube and chatting with other crafters in my Facebook groups. We’d love to have you!