
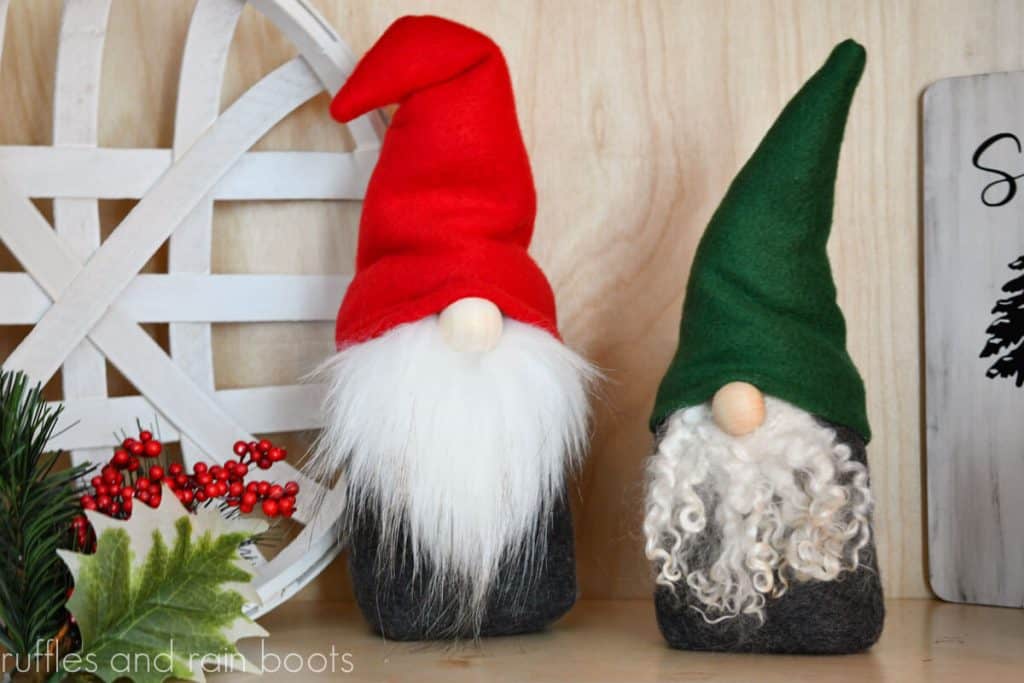
Free Gnome Pattern for Traditional Gnomes
Use this free gnome pattern to make the most adorable traditional gnomes. You can use fur or wool locks for the beard – I show you both ways in this free tutorial!
What You'll Find On This Page
Gnome Pattern – Make Gnomes in Minutes
Here at Ruffles and Rain Boots, I’m known for gnomes – shocker, I know. I have shared more gnomes than any other site on the Internet and that is because I absolutely love these guys.
I share a ton of patterns (free and premium) but wanted to say Happy Holidays to everyone and make a free gnome pattern to produce a tall, traditional gnome. These work up in just minutes – I made a ton of them for a charity fundraiser this year.
The real fun with these gnomes is the decoration – I give you the pattern but if you need some inspiration with styles, materials, colors, or decorations, join the DIY Gnomes and Crafts with Friends Facebook Group here. Let’s get started.
RELATED READING: Christmas Gnomes on Ruffles and Rain Boots
No Time to Make Right Now?
If you need to gather supplies or get some inspiration, be sure to share this to your favorite Facebook crafting group or save it to a Pinterest board.

As an Amazon and Etsy Associate, I could earn from qualifying purchases.
Tips to Making This Free Gnome Sewing
- The free pattern is below inside the instructional card. Cut the measurements and follow the tips below.
- If you want the same luscious wool locks, get them from Mike, the sheep, here.
- Get the full free gnome pattern video tutorial here on the YouTube channel – I do share tips for those new to sewing.
- If you want to add arms, just cut two rectangles, sew along the long edge, flip, and add wood rounds to the ends. Pompoms or little fleece mittens would work great, too.
- I use fleece for this pattern but you can use most materials. Please use a material with STRETCH for the hat so that everything aligns nicely.
THERE IS NO PRINTABLE REQUIRED FOR THIS PATTERN
In order to cut this pattern yourself, please follow the instructions in this section. To cut the hat (using the small gnome measurements):
- cut a piece of fleece which measures 11 inches wide and 7 inches high (rectangle)
- fold it in half (left to right) and you have a piece of material that is 5.5 inches wide along the bottom and 7 inches high (open side at right)
- cut that rectangle into a triangle (from the non-folded bottom right point to the top left point at the folded edge of the rectangle)
- that material is now a triangle with the measurements as indicated in the tutorial and you can sew it from there.
To cut the body (for the small gnome):
- cut a piece of fleece which measures 9 inches wide by 7.5 inches high
- fold in half (left to right) and you have a piece of material that 4.5 inches wide along the bottom and 7.5 inches high (open side at right)
- that material is now ready to create the box bottom.

How Do I Make This Cute Christmas Gnome?
I’m so glad you asked. Below is the written tutorial. Please subscribe and watch the full gnome pattern video tutorial here.
Free Gnome Pattern - Box Bottom Gnome

Use this free gnome pattern to make Christmas gnomes, farmhouse gnomes, or gnomes for year-round displays. The free pattern comes in two sizes - read through the instructions and watch the full gnome video tutorial.
Materials
- fleece for body and hat
- faux fur for beard
- wood round or bead for noses
- Poly Pellets
- Poly Fill
- optional, wool locks
- optional, floral wire for bendable hat
- optional, flock HTV for gnome tag
Tools
- sewing machine and coordinating thread
- sewing pins or clips
- hot glue gun and glue sticks
- Exacto knife or straight blade
- optional, needle felting tools (only for wool locks)
- optional, mini press for flock HTV
Instructions
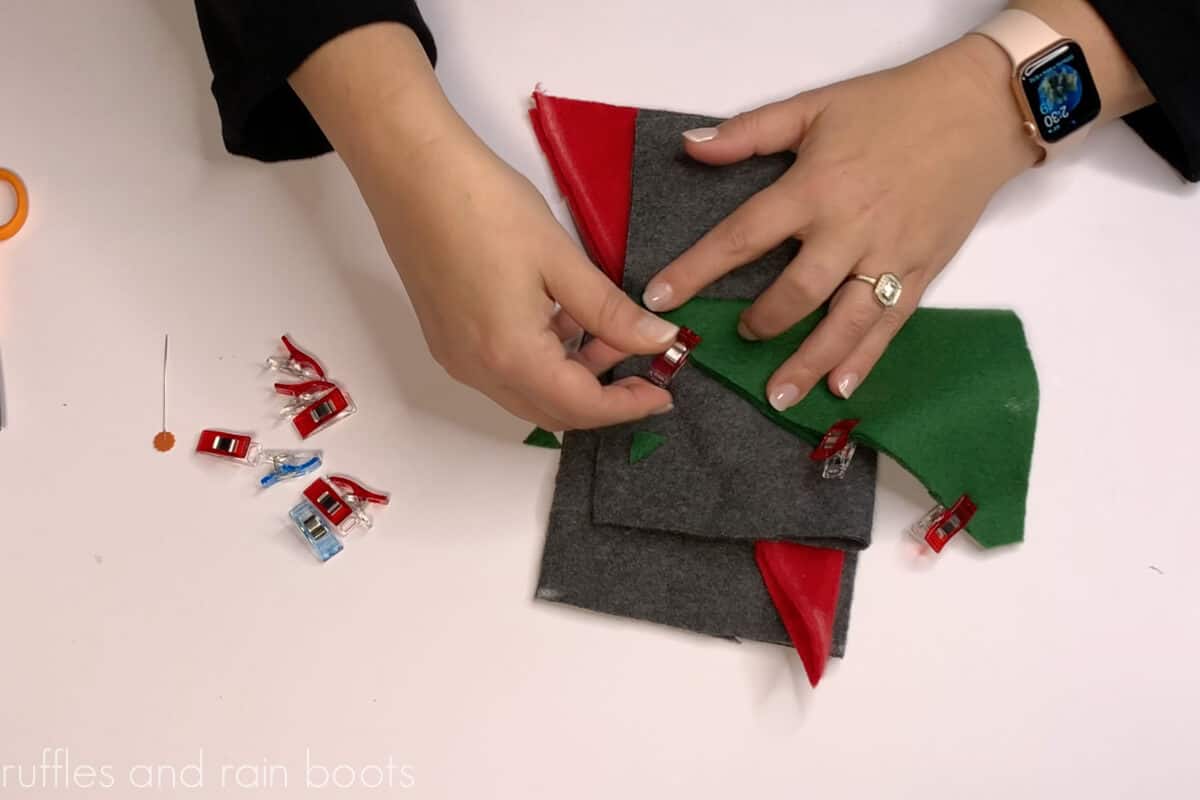
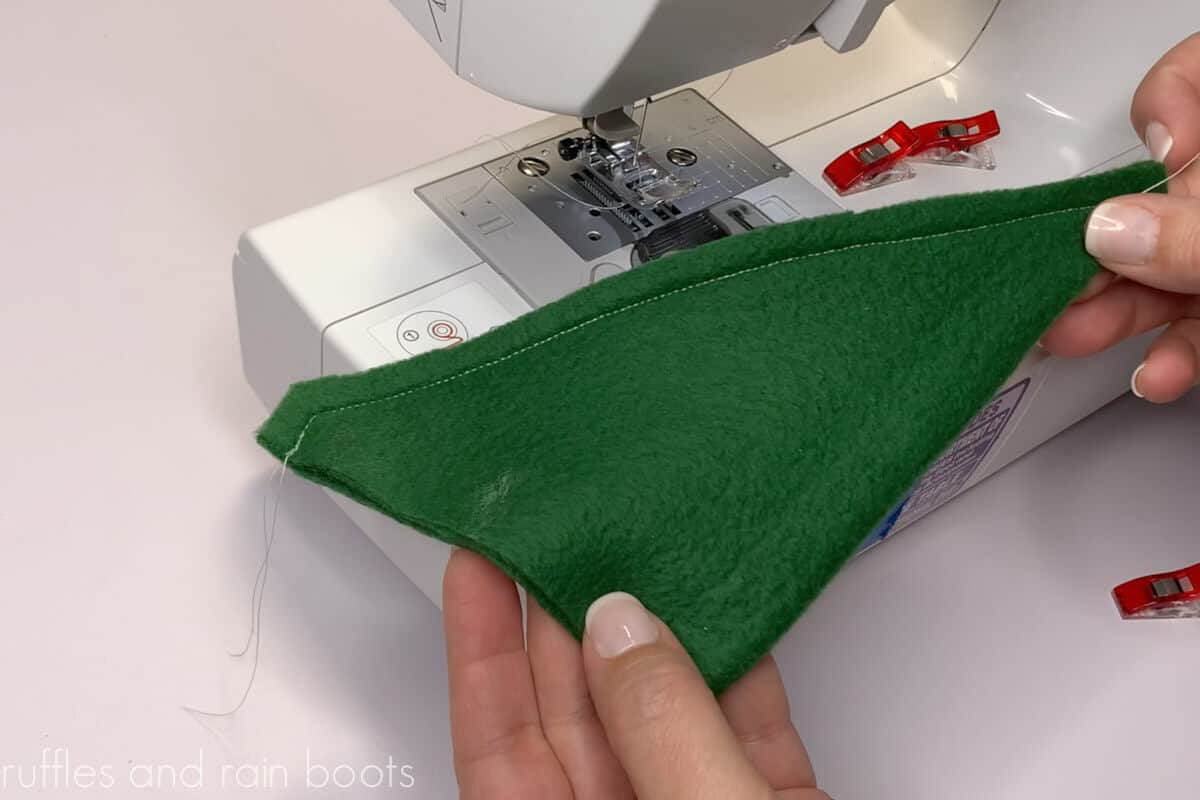
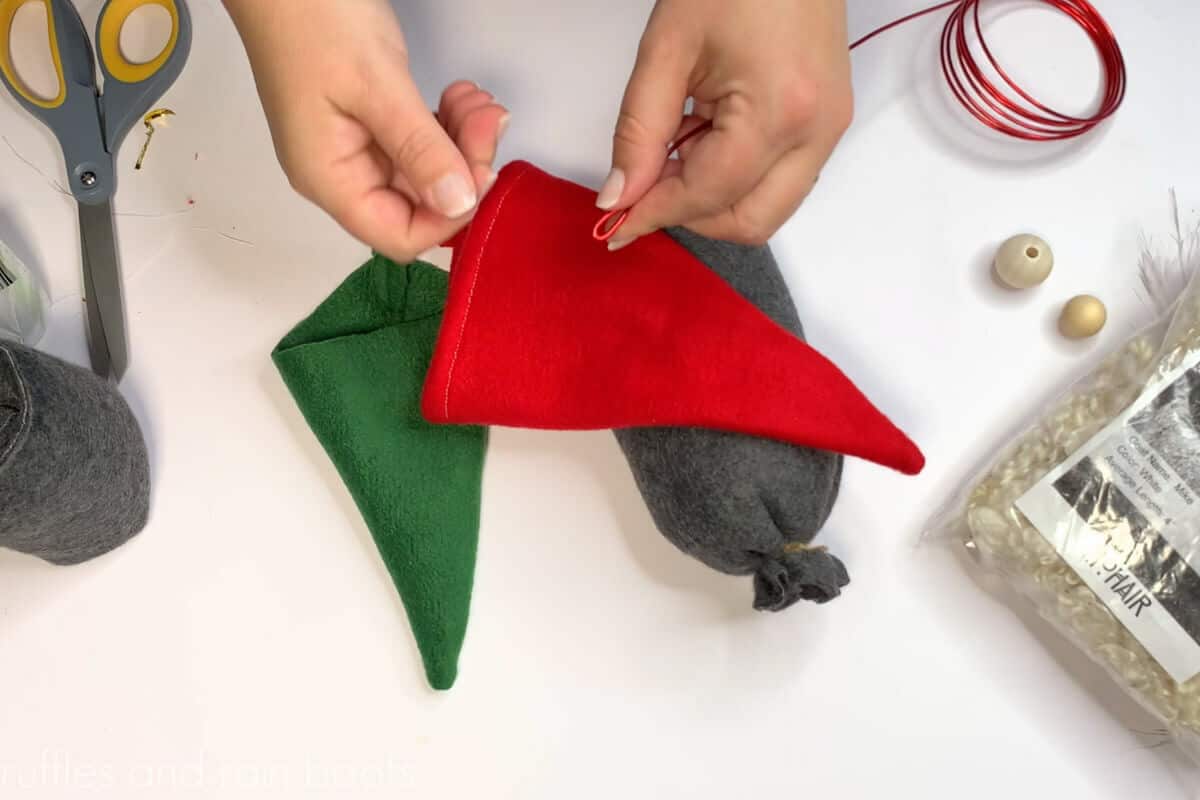
- See notes for cut measurements based on the desired gnome size. Cut triangle hat and rectangle from fleece. Note all seam allowances are the width of a normal presser foot.

- Pin the hat right-sides together and trim off the half inch of the brim (a small triangle) and the top half inch at the tip (a small triangle). If you opt for a brim, on the wrong side of the fabric, fold up the bottom of the hat a half inch and pin in place to sew.

- Sew along the long edge of the hat. If you opted for a brim, align the edge of the brim with the presser foot and sew along the entire bottom edge of the hat. Then, sew along the long edge of the hat. Put aside.
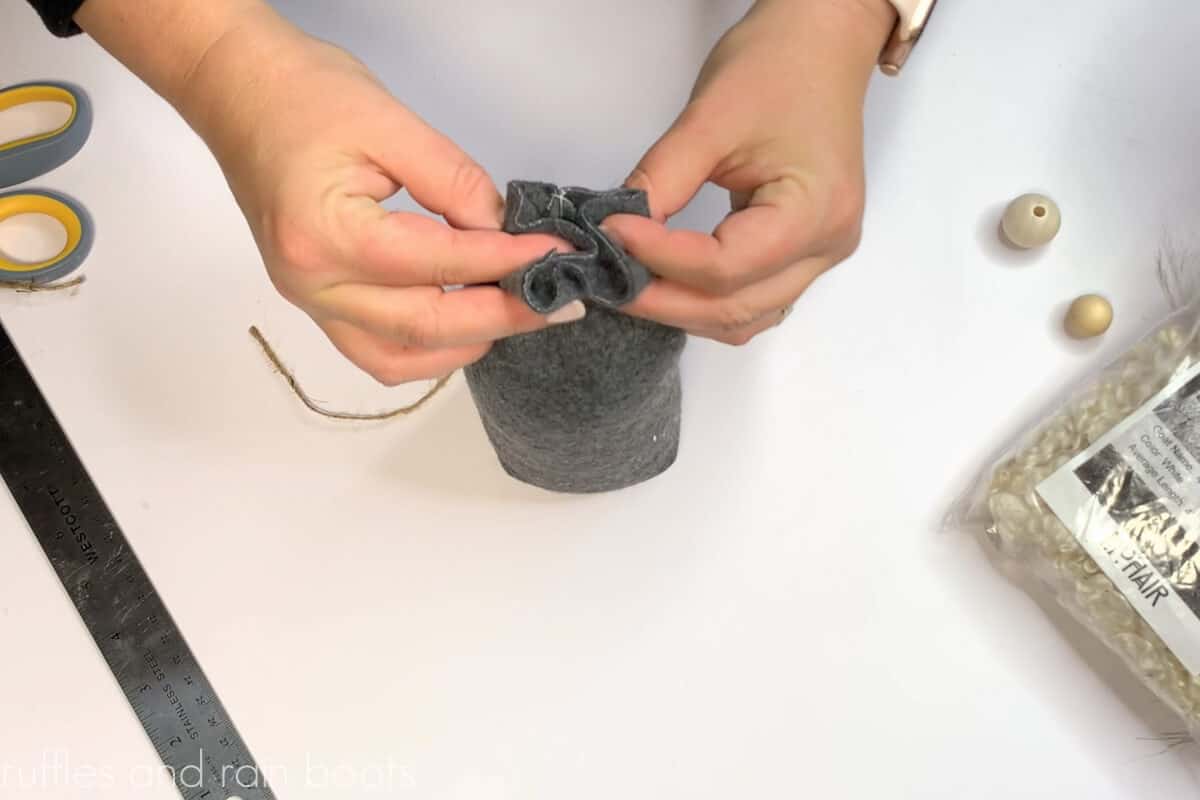
- Put the right sides of the body rectangle together. Sew along the long edge, turn to short side without removing needle and sew one short edge.
- Once sewn, flatten opposite of the vertically sewn edge (the seam should be in the middle).
- Box pleat about 1.5” from the point (be sure to line up the seams well). See video for detailed explanation. Trim the triangles and turn the body right-sides out.
- OPTIONAL: cut flock HTV with cutting machine into a shape or your business logo and apply per package instructions using heat tape, a teflon sheet, and a heat press.
- Fill body with 1.5 cups of poly beads or until the body is about one third of the way full. Stuff to where you can tie off the top (at least one inch) securely with thick embroidery thread or twine. Do not use only a rubber band if you decide to use one; reinforce with string so they do not snap and undo all of your hard work.
- OPTIONAL: tuck wire into the body and extend into the hat before stuffing so that the gnome hat will be posable and the wire won’t come loose. Be sure to round both edges of the wire so it doesn’t poke through.
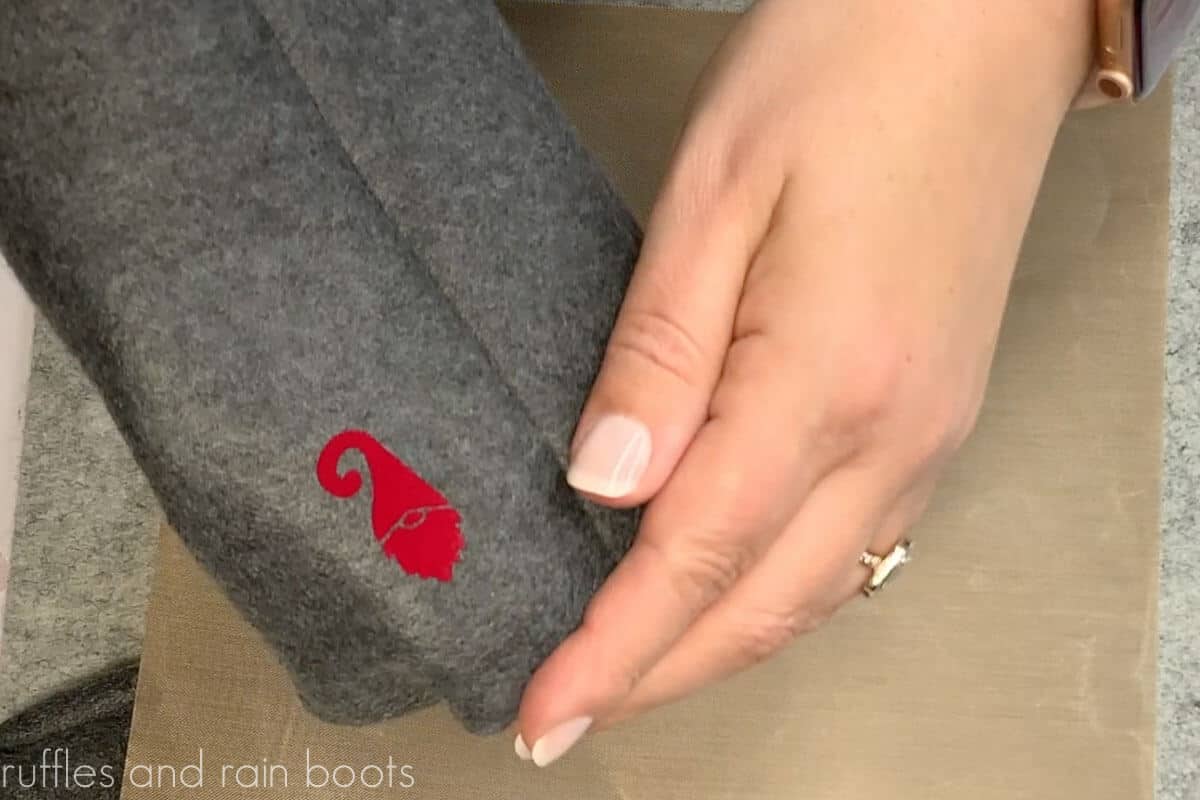
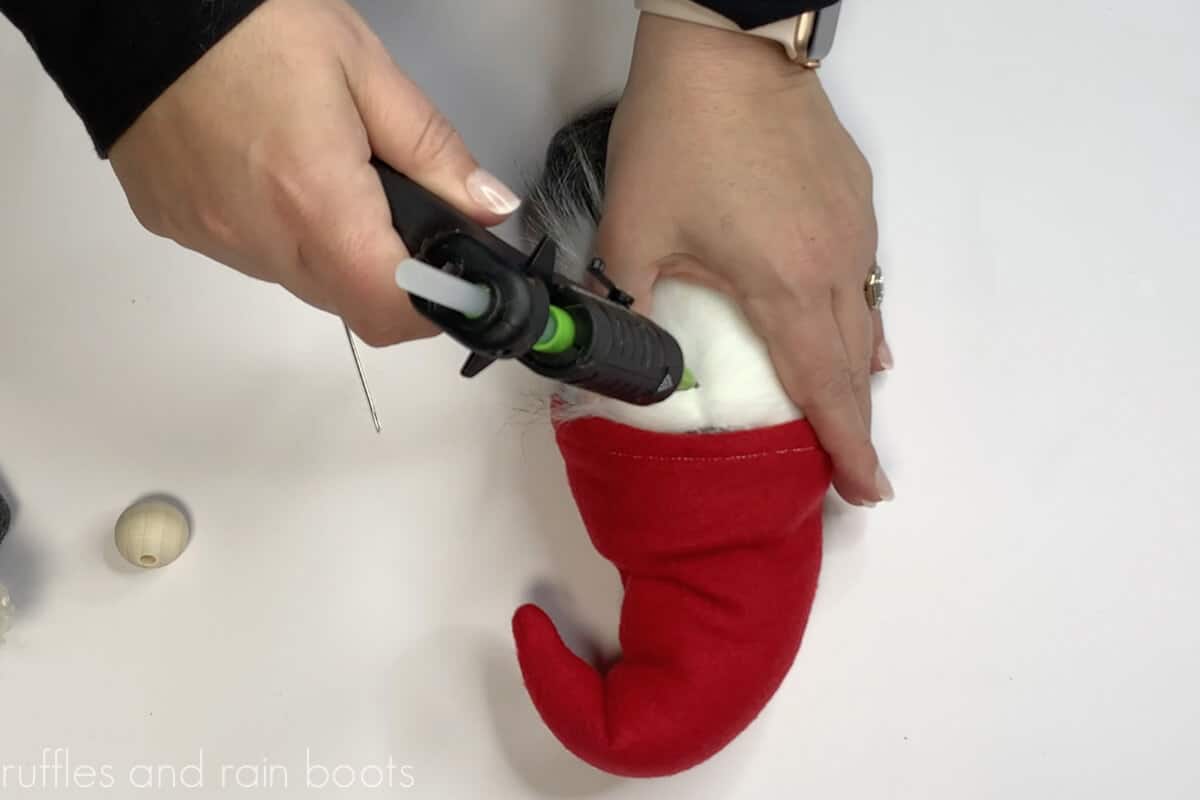
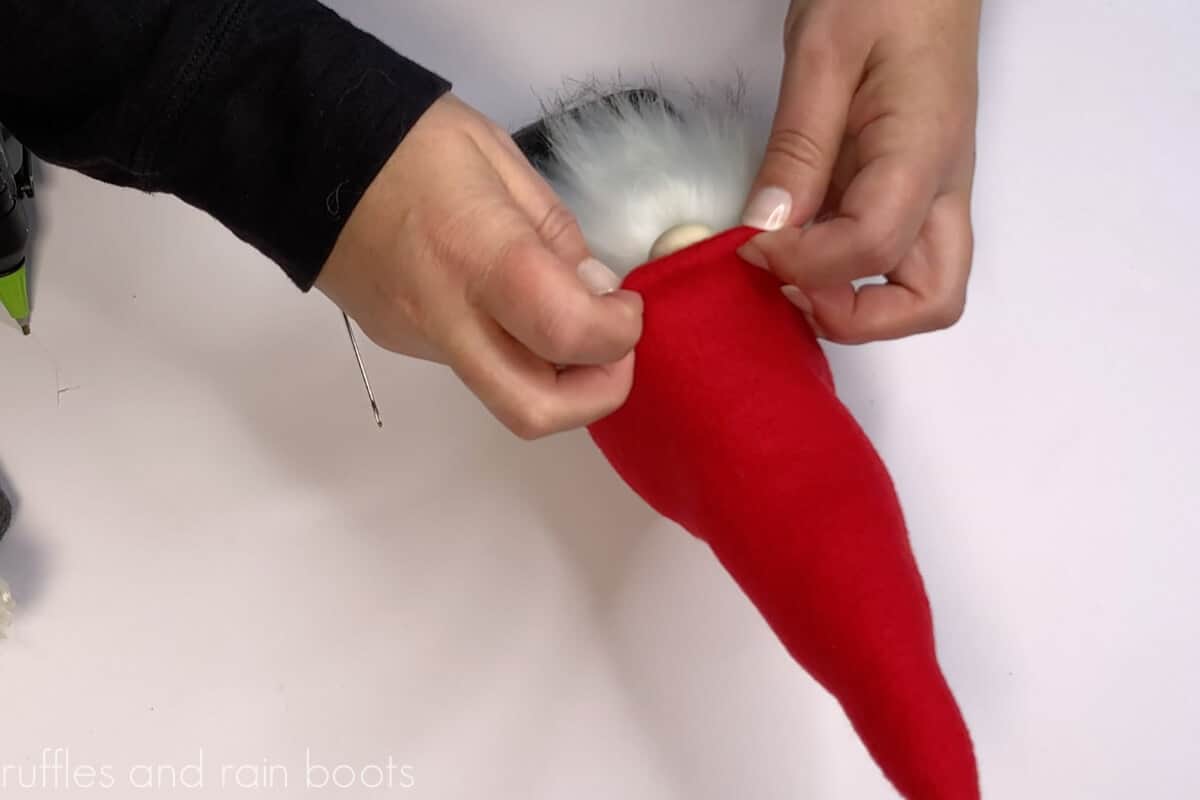
- Cut fur beard or stab wool locks into the body of the gnome just under the brim of where the hat rests. Glue on beard, split the fur, and glue on a wood round or bead for the nose.
- Secure the hat onto the top of the nose and around the entire outside brim of the hat, taking care not to get glue into the fur or wool locks.
- Decorate and display your gnome!


Notes
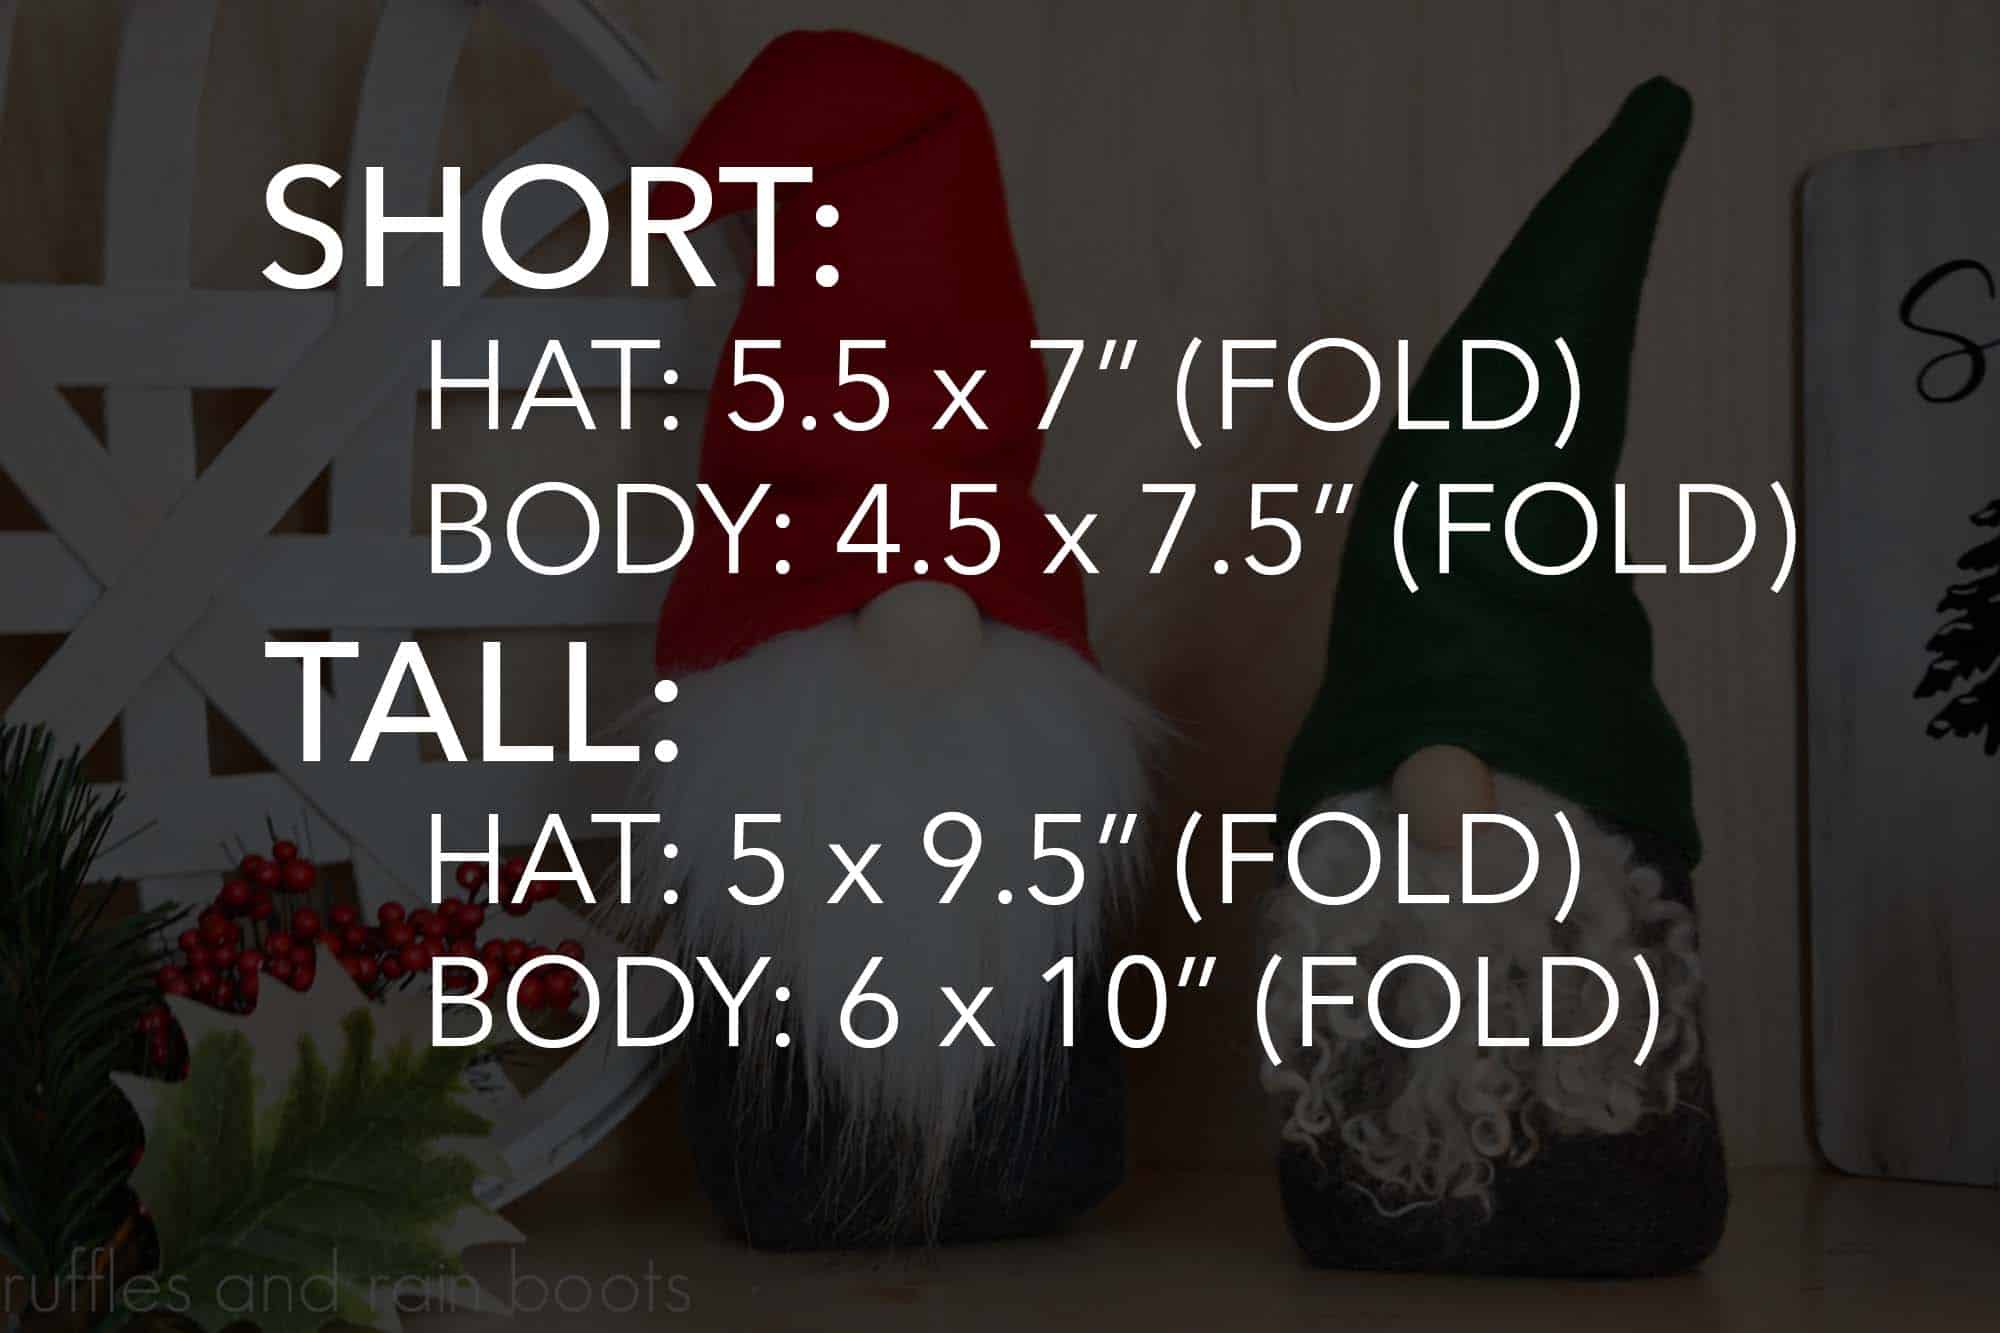
The Free Gnome Pattern Measurements:
LARGE
- Hat: 5 x 9.5" (on the fold side)
- Body: 6 x 10" (fold)
SMALL
- Hat: 5.5 x 7 (fold)
- Body: 4.5 x 7.5" (fold)
If you are not familiar in cutting pieces for patterns, here is how to cut the hat (using the small gnome measurements):
- cut a piece of fleece which measures 11 inches wide and 7 inches high
- fold it in half (left to right) and you have a piece of material that is 5.5 inches wide along the bottom and 7 inches high
- cut that rectangle into a triangle (from the non-folded bottom right point to the top left point at the folded edge of the rectangle)
- that material is now a triangle with the measurements as indicated in the tutorial and you can sew it from there.
To cut the body (again for the small gnome):
- cut a piece of fleece which measures 9 inches wide by 7.5 inches high
- fold in half (left to right) and you have a piece of material that 4.5 inches wide along the bottom and 7.5 inches high
- that material is now ready to create the box bottom.
More Christmas Gnomes You Might Like
- Scandinavian Sweeties Holiday Gnome – The most popular gnome pattern from Ruffles and Rain Boots includes multiple mittens, arms, shoes and a TON of extras.
- Dollar Tree Grinch Gnome – Everyone’s favorite grump is on full display using Dollar Tree items! It’s a no-sew gnome so it works up quickly.
- One-Sock Sock Gnome for Christmas – Using a single Dollar Tree sock, learn how to make this adorable fellow.
Please Share This to Facebook or Pinterest
Your shares are how this site grows and I am sincerely grateful. Please consider passing on the holiday spirit and share this into your favorite craft group on Facebook.


On the video it doesn’t show how to add legs, boots, arms or hands. Do you have a video showing how to do that.
Arms and hands are like any other (rectangles of fabric) and mittens or other hands attached at the ends. The top of the arm is tucked under the hat and attached by sewing or gluing.
I have not done any legs or boots with this style as it’s a box bottom. That said, if you added a brace inside the bottom before adding weight and stuffing, you could easily place this on top of pre-made boots.
Hi. I’m sorry but I just don’t get the hat. I’m cutting a rectangle, that i guess ends of 6″ x 20″ for a hat right? But it’s a rectangle, not a triangle. Do I cut across the fabric diagonally? or fold it back so it 6″ x 10″ and then cut a triangle?
Karen, For that size, you would cut out a rectangle of 11 inches wide by 7 inches high. Fold it along the 7 inch side (so it stays 7 inches tall) and cut from the bottom open side to the top point for the hat. When you unfold it, it will be 11 inches along the bottom and 7 inches high. When folded, the hat is 5.5 inches wide by 7 inches tall.
These look adorable!So, let me see if I got it right…the measurements are for the finished folded material right? We should make the pattern on a folded piece of material using your measurements and then open it up?
Yes, Vivi, when you cut the pattern, you fold the material and those are the measurements (the video will show you the completed cuts).
I don’t see any free pattern for a gnome
The free pattern measurements are spelled out for both sizes in the instructional card. They are also shared in the linked full video tutorial. As these are rectangles and triangles, the patterns do not require a download, only measurements.
@Sarah Nenni-Daher, i just don’t understand the hat measurement…..you call it a triangle but I just can’t quite understand how it turns into a triangle with the cut of 4.5 by 7 and also not sure of what (fold) means. It is so cute I really want to make it!!
When you cut pattern pieces, there is usually a fold side (you fold the fabric right-sides together). So, unfolded would just be double the base, leaving the height the same. So, fold a piece of square fabric at least 9 inches wide by 7 inches tall so that the right sides are together and you’re looking at the back of the fabric. Cut from the base side that is OPEN up to the top and that triangle is the hat.
@Sarah Nenni-Daher, What you didn’t show in your video is once the hat and body pieces are cut by the dimensions you listed you didn’t show how you made the hat into a triangle. Had you opened up the fabric hat piece and showed how to cut it into a triangle to sew up the sides that would have been easier for some of us to understand. I’m assuming you go from the open edge and mark or cut straight up to the top near the fold to make the triangle shape? I love the tutorial, but all of the steps should be shown for cutting this out. I’m not trying to be a jerk because I love your videos, but some people need to be shown what you did instead of jumping right into the sewing of the hat…I get what she is asking because that step was not shown. I am a sewer so I pretty much understand, but those who do not would benefit with the full instructions shown. I don’t know if you could add to this video or maybe make a short video on how you cut the hats? I apologize, and hope this doesn’t offend you…
It doesn’t offend me at all and I appreciate the feedback. I honestly didn’t think anyone would need instructions showing to fold the fabric as I went through the folded measurements on the hat in the video, but I will definitely keep it in mind for future videos.