
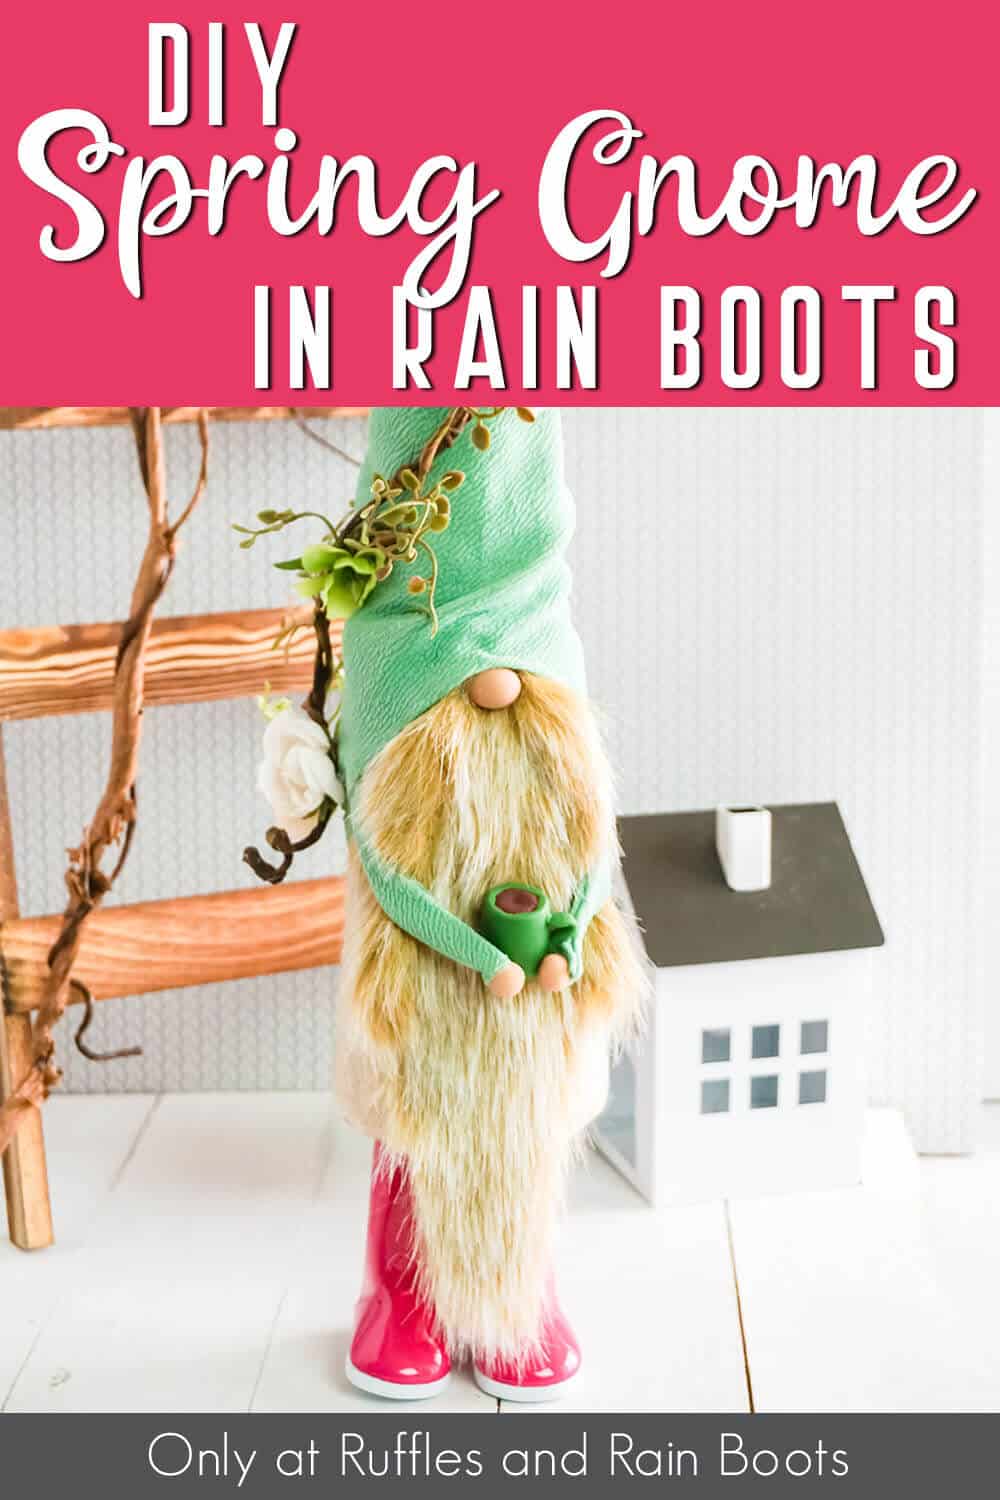
Make This Spring Gnome with Rain Boots in Minutes!
I am seriously loving this spring gnome with rain boots. It’s the easiest cone gnome tutorial that you can make. Did I mention he’s wearing PINK RAIN BOOTS!
Joking aside, this is an easy DIY gnome to whip up in an afternoon. Accent it with vines, flowers, or even a cute little umbrella. Let’s get to it.
What You'll Find On This Page
Spring Cone Gnome with Rain Boots
Here at Ruffles and Rain Boots, a reader challenged me to use a craft supply and friends, challenge accepted! This isn’t really an April showers gnome but it works for that and spring, which is why I had to throw in oodles of flowers as a hat accent.
RELATED READING: HOW TO MAKE A GNOME WITH BOOTS
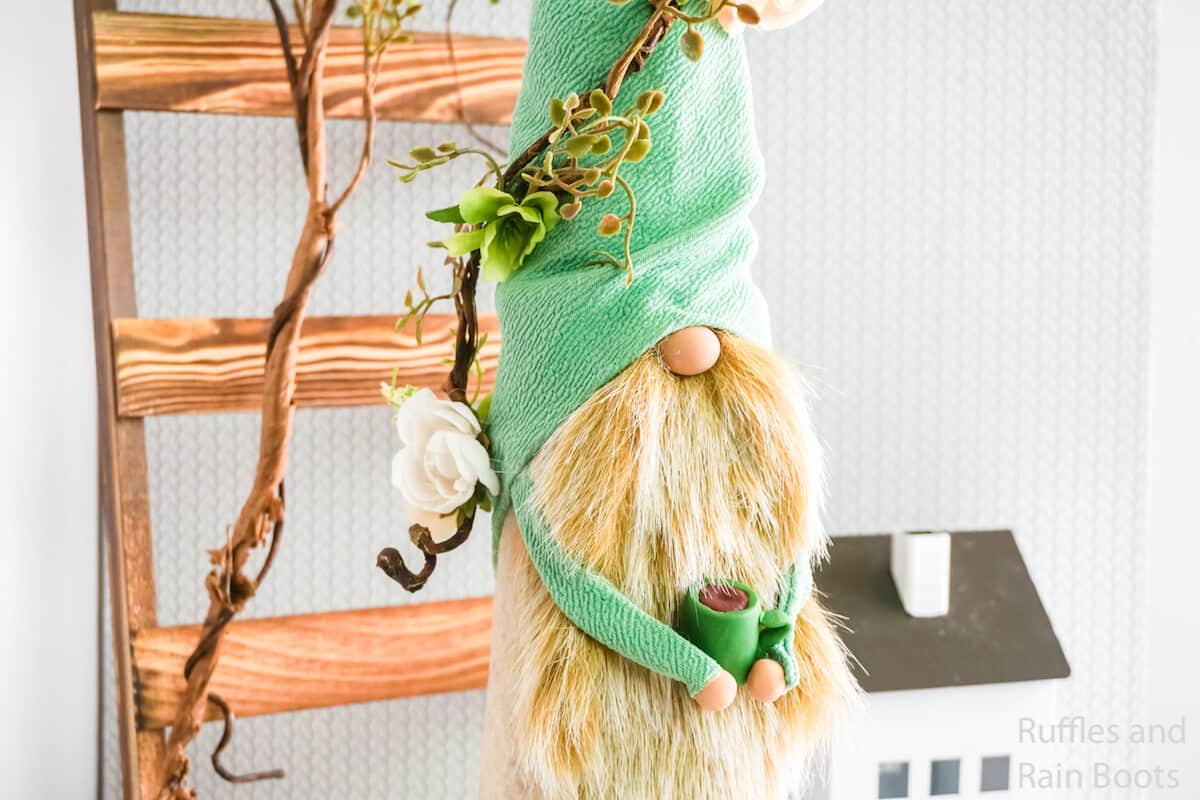
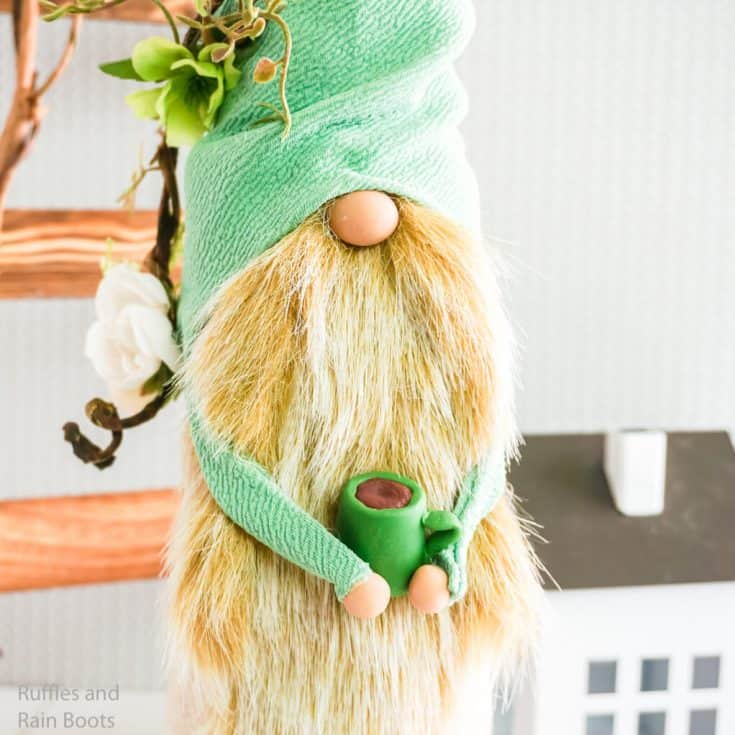
He’s a cozy little cone gnome with rain boots and a nice wrinkly hat built with legs on the bottom of the cone. If you’d like, I show you how to use polymer clay to create a coffee cup to help him get through all of the April showers he’s anticipating, too. Is it weird I just came up with an entire back story for this DIY gnome with legs?
No Time to Make This Now? Save or Share for Later
If you love this little guy but can’t make him right now, save this to your favorite easy DIY ideas pin board or share it on Facebook. It will be here when you’re ready.
As an Amazon Associate, I can earn from qualifying purchases. There could be affiliate links within this article.
Tips to Make a Spring Gnome
- First, you have to HAVE to grab these rain boots here. They are RIDICULOUSLY cute. Note: when they sell out, there might be another boot which shows up.
- If you’re looking at the fabric of his little hat, it is unique. This is an up-cycling project and that green fabric is actually an old pencil skirt that I used to wear in the corporate world occasionally.
- This tutorial shows a gnome too big for a tiered tray, but there is nothing stopping you from using a smaller cone and much smaller doll boots. Search for 9 inch doll rain boots.
- I found this fur on the big bolts of faux fur at my local craft store, but I can’t really find it’s replacement online for you. I do share a lot of faux fur for gnome options here.
- Speaking of gnome beards…If you have never cut faux fur before or you’ve hated how it turned out, I have a treat for you! You can’t just whip out your scissors and start cutting as that will leave a sharp edge on the fur. Instead, flip over the fur and, with a razor blade or Exacto knife, cut only the fabric and then pull the cut piece away from the whole. This will leave you with a beautiful drape on the beard and you’ll love it. I show you how to cut faux fur in the video below.
- I made this entire gnome a no-sew pattern by using hot glue to make all my hems. That said, you could absolutely use a sewing machine.
- To make the little coffee cups, and the noses, I used polymer clay. I like using wood beads for gnome hands and noses, but when I’m already going to get the polymer clay out to make coffee cups, it just makes sense to roll a few balls of clay and bake them at the same time as the cups.
- If you want to make your own coffee cup like I did, the good news is that my YouTube video of making this nisse will have a tutorial of how to make the cup. You can also check out my tutorial for how to make a sock gnome with a coffee cup for a different style coffee.
- You can opt for a little bee gnome with this tutorial – just add pre-made wings and pipe cleaner antennae stuck into the hat.

Make a Spring Cone Gnome with Rain Boots
Below is the written and printable tutorial – read through and let me know if you have any questions. You can find the full video tutorial for this adorable cone gnome with rain boots here on my YouTube channel.
Spring Gnome with Rain Boots
I've been waiting for a while to make the perfect gnome with rain boots. And this spring gnome made with a cone is so ridiculously perfect--those pink rain boots just make it!
Materials
- 1 9-inch Foam Cone
- 1/4 yd Light Green Fabric of Choice
- 1/4 yd Beige Craft Felt
- 2 18-inch Doll Rain Boots
- 2 Thin Wood Dowels or Bamboo Skewers
- Dark Green, Dark Brown, Light Brown and White Polymer Clay
- Light Brown Craft Fur
- Small Amount of Polyfill
- Small Amount of Polyfill Beads, Dry Rice, Dry Beans, or Rocks
- Faux Floral Vine and Flowers
Tools
- Scissors
- Hot Glue Gun & Glue
- Xacto Knife
- Oven
Instructions
- Make your gnome nose and hands by combining a portion of light brown and white polymer clay until you have the color you want. Roll a quarter-sized portion of this clay into a neat ball. This is the nose. Set aside. Roll two nickel-sized portions of this clay into two neat balls. These are the hands. Set aside.
- Make the coffee by thoroughly combining dark brown and a small amount of light brown clay together to form a mostly dark brown clay. Roll this into a cylinder about 3/4-inch thick. Set aside.
- Make a coffee cup by rolling a 1-inch by 1/2-inch section of green clay into a cylinder and, press a small depression into the top of the cylinder, making it slightly wider at the top with a depression. Press a 1/8-inch slice of the coffee into the depression in the cup. Using your Exacto knife (the backside of the blade), make a lip on the top edge of the cup. Smooth the coffee cup and coffee to your heart's content.
- Make a very tiny snake of green clay about 1/2 inch long and form into a "u" shape and press into the side of each cup. Bake the coffee cup, nose and hands per the clay package's directions. Allow them to cool fully.
- Fill the rain boots about 3/4 full of your filler (polyfill beads, rice, beans, pebbles, etc.). Fill the remaining portion of the rain boots with polyfill. Slip a dowel into each rain boot all the way to the bottom. Hot glue the entire top of the rain boots, creating a solid surface that will hold the dowel in place well. Set aside.
- Use your cone to mark a circle of beige felt that will fit the bottom of the cone. Cut out the beige felt circle and set aside. Roll the cone in the beige felt to determine how wide and what angle to cut the felt at. Mark this with a pencil, if desired.

- Cut the felt in a straight line on the back of the cone (whatever you decide the back is). Hot glue the cone in place, leaving the felt around the bottom open. Trim the bottom of the felt in a straight line about 1-inch from the bottom of the cone. Cut this loose felt in slits separated about 1-inch all the way around the cone bottom, creating tabs.
- Fold these tabs over onto the cone bottom and hot glue them in place. Hot glue the circle of felt onto the bottom of the cone.
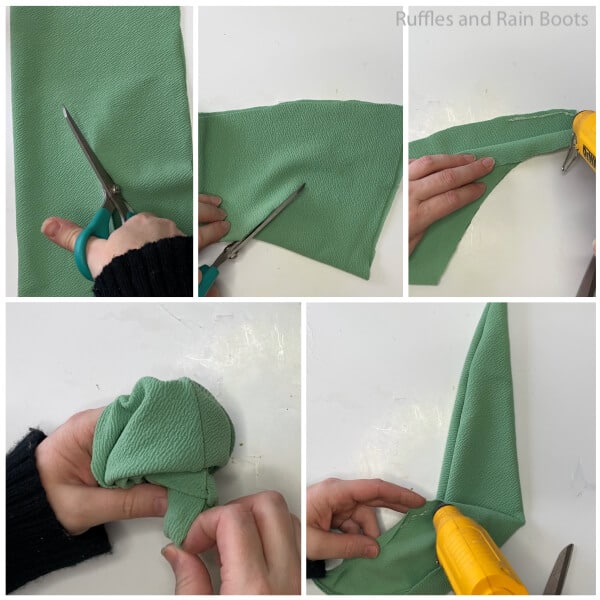
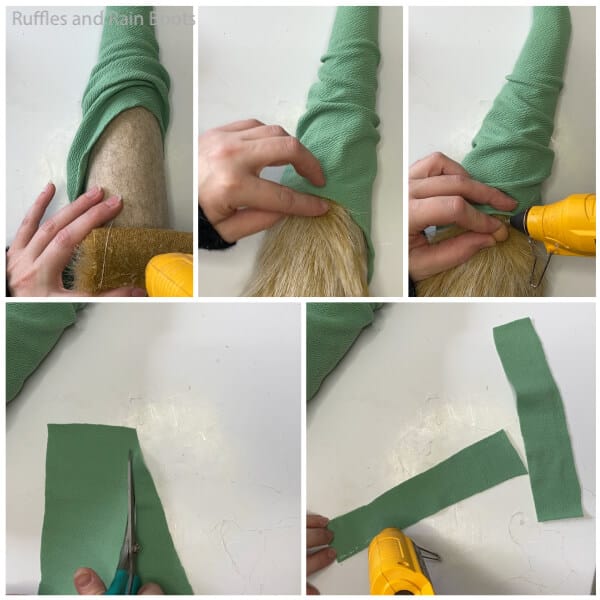
- Roll the green fabric around your felt-covered foam cone and mark a minimum shape. Cut a triangle of the green fabric at least the minimum shape you need to cover the cone. I made mine about 3 inches bigger than my minimum shape so I'd have plenty of room for hem and for wrinkles in the finished hat. Fold the triangle of green fabric in half with the right sides facing.
- Cut a large semi-circle from the green fabric, leaving a long tail about 1-inch wide on the side of the fabric where the two edges of the triangle come together. Hot glue the two edges of the triangle together in a hem. Allow the hot glue to dry/cool completely. Turn the gnome hat right side out.
- Fold the edge of the hat opening over forming a hem and hot glue it in place.
- Tuck the hat over the top of the gnome's head so you have an idea of where you're going to want the beard. Lay the gnome face-down on the back of the beard fabric (faux fur) and mark with a pencil about the size you want the beard to be).
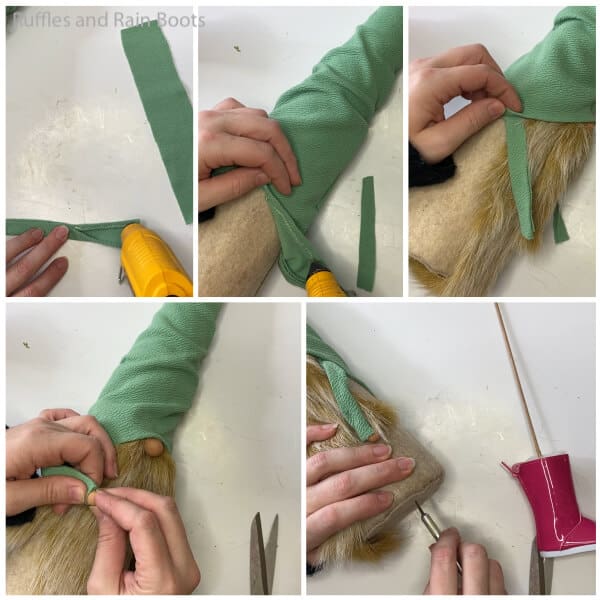
- Cut the beard shape from the faux fur, using the Xacto knife, cutting the fabric on the backside of the fur only. Cut a 12-inch long, 1 1/2-inch wide section of faux fur. Cut this section of fur in half making two 6-inch long sections of fur. Fold each of these shorter sections of fur in half on the fabric side and hot glue them in place.
- Hot glue the beard in place, tucked up under the hat by at least 1/2 inch. Affix the mustache onto the beard at the top center only. Glue the nose in place just above the beard. Hot glue the hat in place right above the nose, creating a little wrinkle.
- Pull the hat down in the back of the gnome and hot glue just the back in place. Leave the sides of the hat open to place the arms in a moment.
- Cut a 4-inch long, 3-inch wide section of green fabric, then cut this in half along the centerline. Fold the edges of each section of green fabric and hot glue in place to form a hem. Fold each of these hemmed rectangles of green fabric in half and hot glue in place, creating the arms.
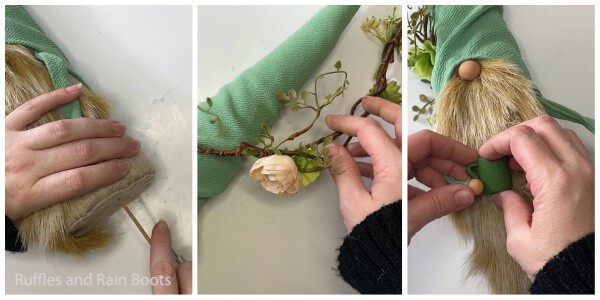
- Slide the arms up into the hat behind the beard and hot glue them in place. Hot glue the sides of the hat down to the body of the gnome. Hot glue the hands in place on the ends of the arms and the coffee cup in between them.
- With the Exacto knife, cut a small X in the bottom of the cone on each side about 1 inch from the center. Slide each of the dowels up into each hole all the way to the top of the rain boots and hot glue in place.
- Wrap the faux vine and flowers in place around the hat and hot glue in place then enjoy!


Notes
For more fun gnome tutorials (so very many), visit Ruffles and Rain Boots!
More Spring Gnome Tutorials You Might Like
- Clay Pot Gnome – Ever wondered if you could turn a clay pot into a gnome? And now you know it’s adorable and so EASY!
- Home Gnome Interchangeable Seasonal Sign – I love having a new look every few months for this easy-to-make home gnome sign!
- Garden Gnome Story Stones – This is a super fun activity to do with the kids and make a fun addition to the garden!
- Spring Wood Base Gnomes – I used a vinyl from the dollar store to make these gorgeous, elegant floral wood gnomes.
Please Save or Share This
Your shares are how this site grows and I am sincerely grateful. Know a friend who’d like this? Please share it with a crafty group on Facebook or save it to your favorite DIY gnome pin board.


Can you use a bakers clay to make the Gnome hands, feet and nose balls instead of regular craft clay?
Hi my name is Sheri Smith, I love following you on pinterest. I’m from Woodstock Ontario Canada. My question how you got the tags on the gnomes with you name and you place it at the end on the gnomes on their side near ther tosh. Lol did you order them or did you make them?
You follower.
Sheri
I got the tags from ArtiFox on Etsy (they will make whatever you want). I sewed them on with just a little bit of embroidery thread once the gnome is done.