
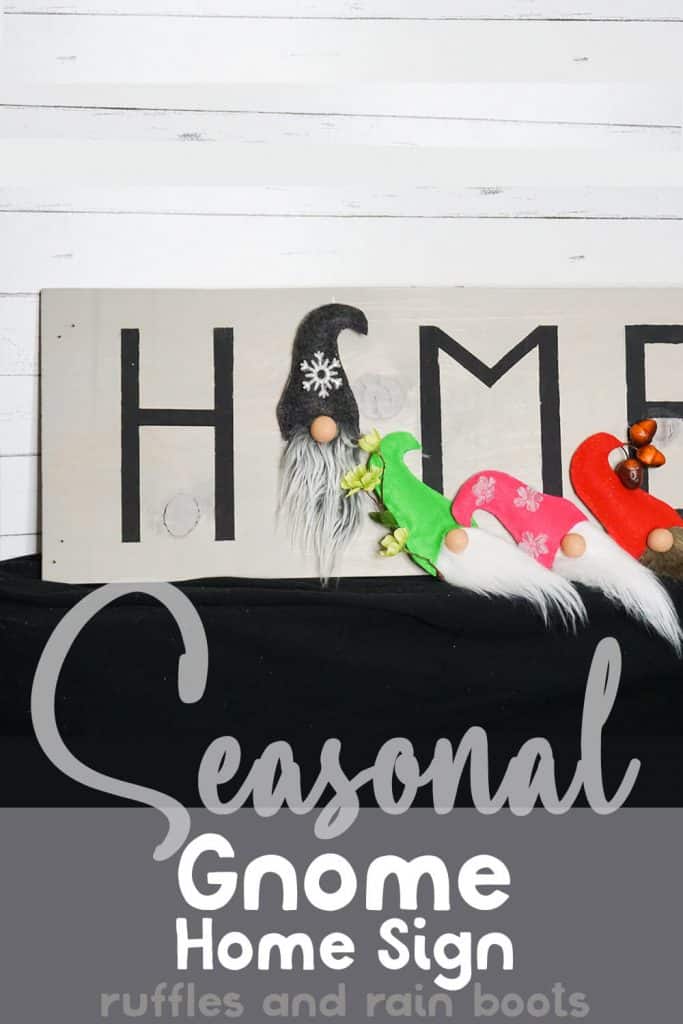
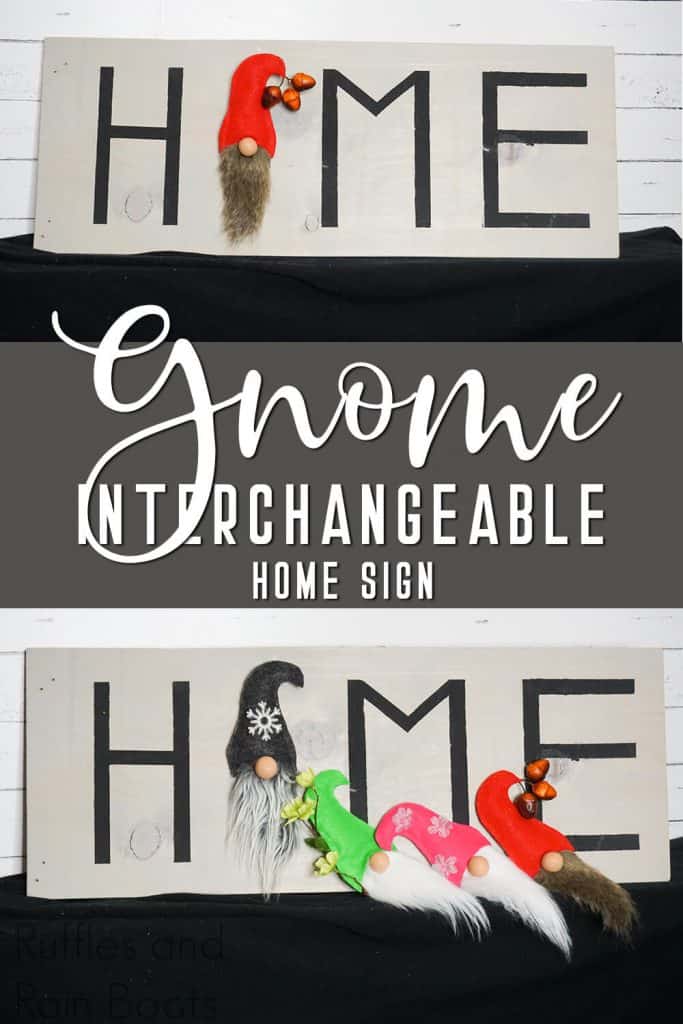
Make this Awesome Home Gnome Interchangeable Seasonal Sign!
This is the cutest seasonal sign ever! It’s so adorable. And I made this home gnome seasonal interchangeable sign in just minutes!
Gnome Interchangeable Seasonal Sign
Here at Ruffles and Rain Boots, we are a little in love with making nisser for all my seasonal decorations, but the most epic gnome interchangeable seasonal sign is definitely one of my favorites! It was so easy and is such a fun little tomte project that I couldn’t wait to share it.
RELATED READING: CHRISTMAS WELCOME SIGN WITH SHELF
I won’t tell you that this was exactly how I envisioned this project, but I really wanted to try and see if I could find a way to paint lettering that looks sharp and nice without my Cricut–or even a template. Definitely worth the time to try out, and though I’ll probably use my Cricut for most project, it was fun to do once.
So, if you want to make letters with a Cricut, feel free, but if you want to follow my tutorial, I feel that I have made it quite detailed enough that you can totally follow along without any problems. If you’re ready to make a gnome sign for yourself, let’s get started.
No Time to Make This Now? Pin it for Later
You’re busy, I get it. Pin this to your favorite farmhouse crafts board on Pinterest and it’ll be here for when you’re ready.
Tips to Make a Seasonal Sign
- Click here to get the gnome template for each of the seasonal gnomes.
- Be absolutely sure that the paint is dry between layers. You don’t want to peel off any paint when you’re taping off the next layer.
- You don’t have to make the gnome noses from clay. You can certainly use a wooden bead or a wine cork even. But I liked the look of the big fat nose from clay for these adorable little gnomes.
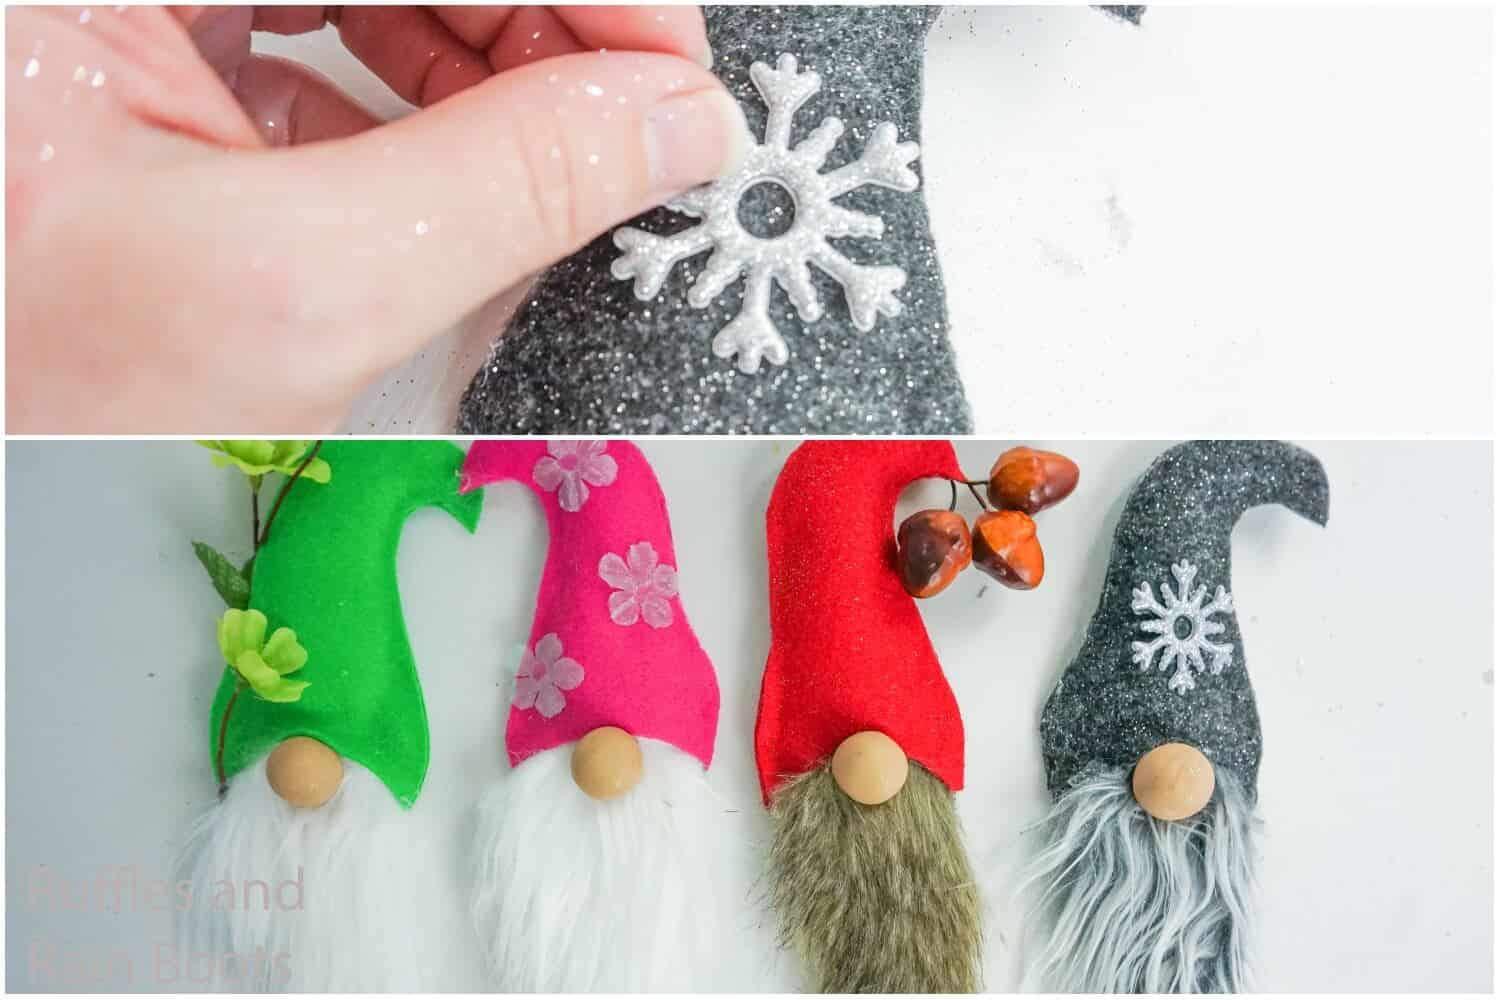
- For decorations on each of the gnome faces, I just used some supplies I had around the craft room. The snowflake for the winter gnome is a scrapbooking sticker, the acorns for the fall nisse came from an old fall centerpiece, the flowers for the pink summer tomte are from a scrapbooking flower set and the greenish-yellow flowers for the spring nisse were from a floral bouquet I had for other projects. Simple and sweet!
How Do I Make this Gnome Interchangeable Seasonal Sign?
I’m so glad you asked. Below is our written tutorial.
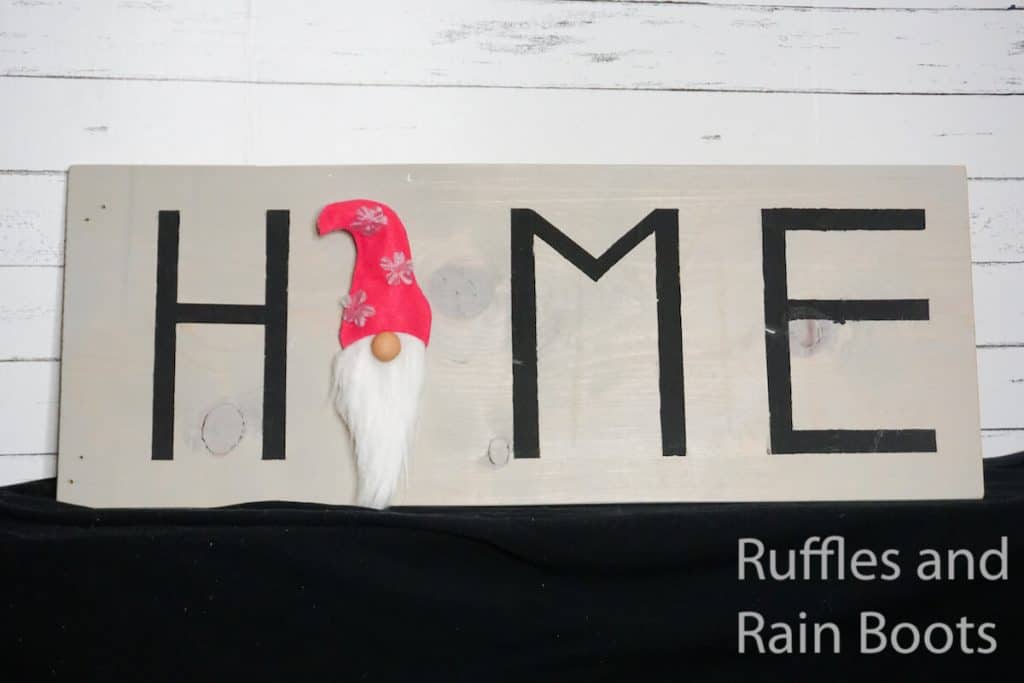
Home Gnome Seasonal Interchangeable Sign

This is the cutest seasonal sign ever! It's so adorable. And I made this home gnome seasonal interchangeable sign in just minutes!
Materials
- Scrap Wood Approximately 29-inches by 8-inches
- Grey Wood Stain
- Black Craft Paint
- 1-Inch Wide Painter’s Tape
- Mounting Tape
- Wipe-on Polyurethane to Seal (optional)
- Craft Felt: Hot Pink, Red, Charcoal, Bright Green
- Cardboard or Foam Core Board
- Craft Fur, Mongolian Fur or any fur
- Velcro
- Small Amount of Polyfill
- Polymer Clay (for EACH gnome nose--you can alternatively use a ½-inch wooden bead per gnome):
- 1 small, dime-sized portion of brown
- 1 quarter-sized portion of white
- Gold Glitter
- Silver Glitter
- Snowflake Accent Sticker
- 3-4 Mini-Tulle Flowers
- Acorn Bunch Accent
- Green Floral Accent
- Printable Template for the Gnomes
Tools
- Sand Paper
- Pencil
- Hot Glue Gun and Glue
- Screw Driver
- Paintbrushes
- Scissors
- Exacto Knife
Instructions
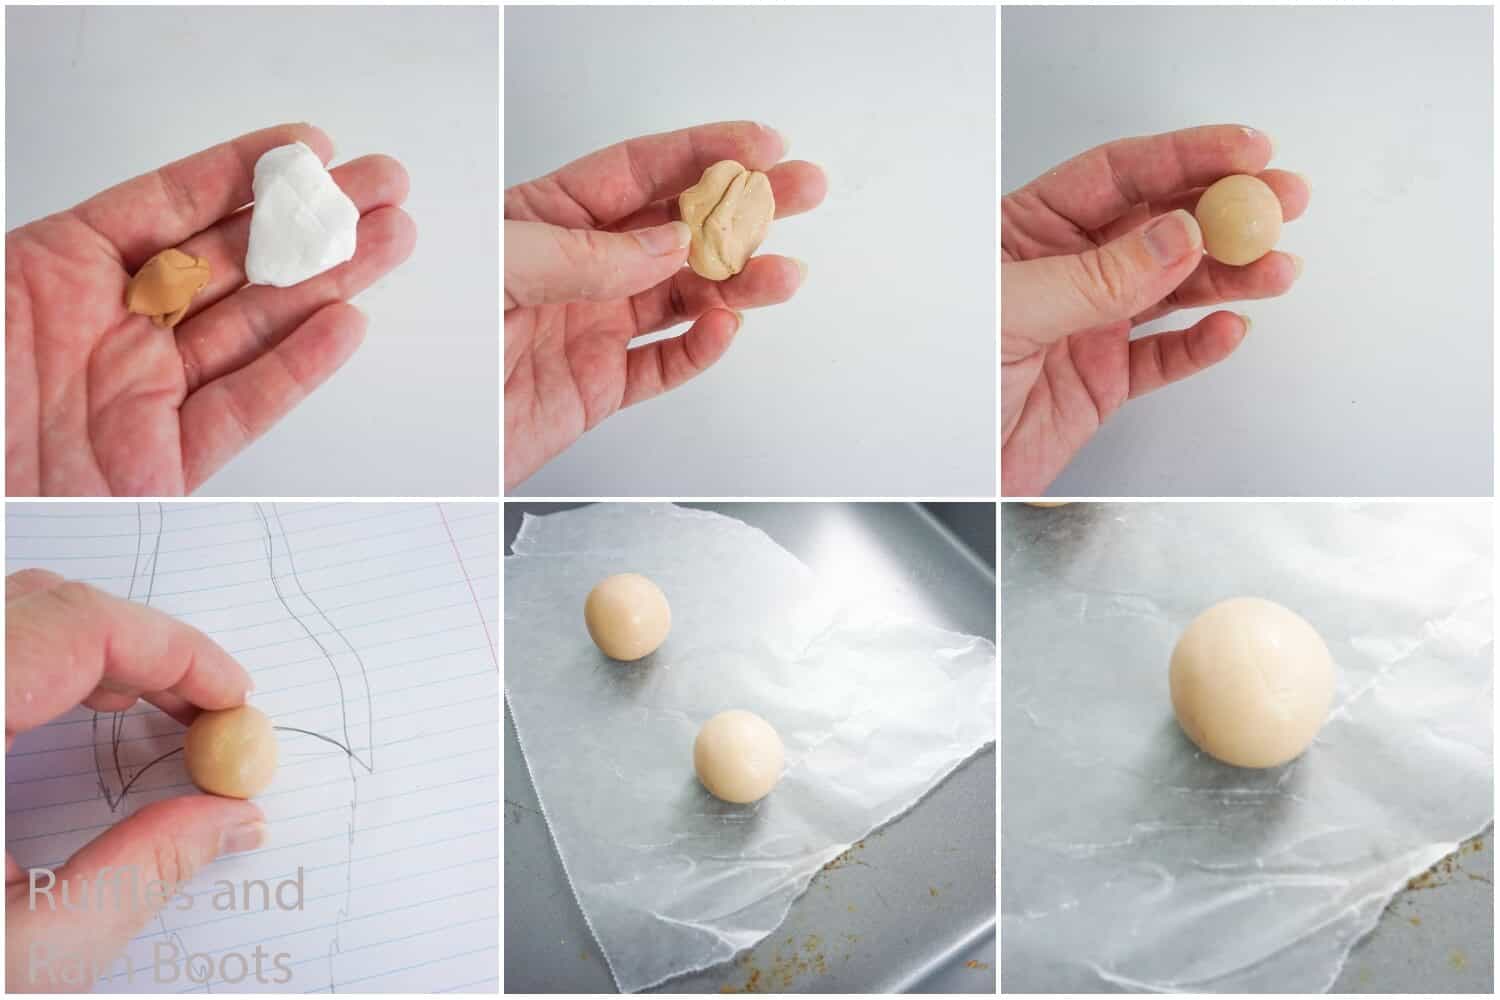
- Start making your gnome noses by combining the brown and white polymer clay until a flesh-color is consistent throughout.
- Roll clay into a 4 neat balls, making sure they are smooth all the way around.
- Bake in the oven per the polymer clay package directions. Allow to cool before touching. Set aside.

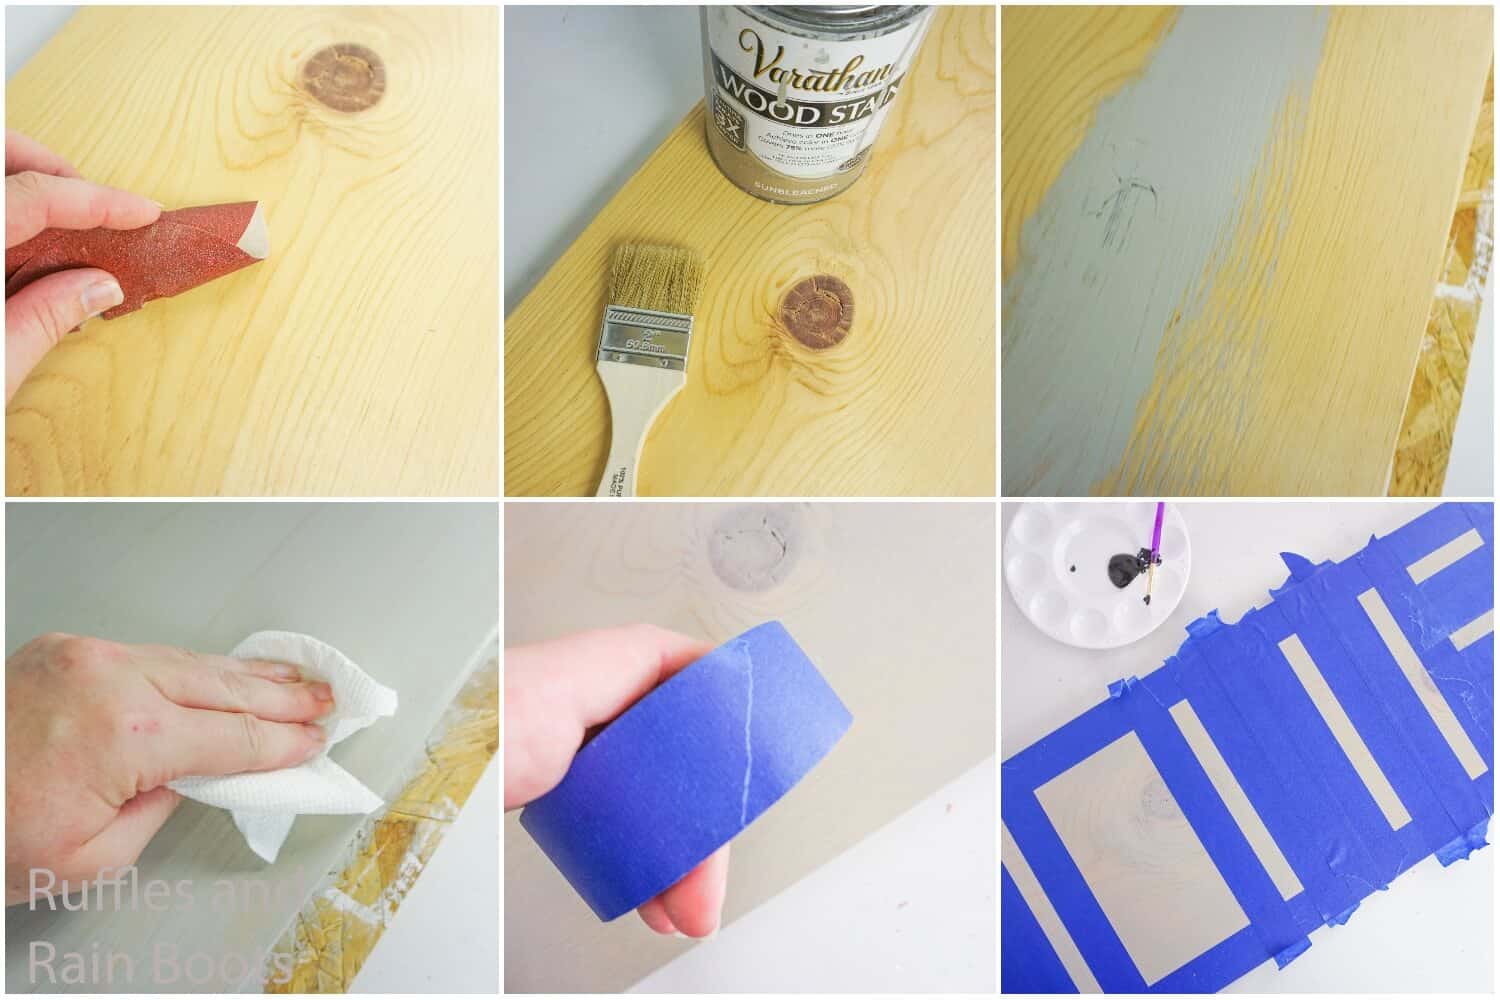
- To make the sign, start by lightly sanding the scrap wood.
- Paint sides and front with the grey wood stain.
- Immediately wipe as much of the wood stain off to get the desired finish.
- Allow to dry fully.
- Place a strip of 1-inch wide painter’s tape along all edges of the face of the sign. These create your straight lines from which your letters will be based, so you want these tape lines to be straight, so take care.
- Lay a piece of tape beside the tape along the left edge of the face of the sign.
- Skip a ½-inch gap.
- Place another piece of tape parallel to the others.
- Place another piece of tape parallel to the last.
- Skip a ½-inch gap.
- Place another piece of tape parallel to the others. This created the vertical lines in the “H” in “HOME”.
- Skip a 4-inch gap. This is the space for the “O” in “HOME” that will have the gnome face.
- Place another piece of tape parallel to the others.
- Skip a ½-inch gap.
- Place another piece of tape parallel to the others.
- Place another piece of tape parallel to the last.
- Place another piece of tape parallel to the last.
- Skip a ½-inch gap.
- Place another piece of tape parallel to the others. This created the vertical lines in the “M” in “HOME”.
- Place another piece of tape parallel to the last.
- Skip a ½-inch gap.
- Place another piece of tape parallel to the others. This created the vertical line in the “E” in “HOME”. There should be an approximately 3-inch wide gap between the last piece of tape and the tape on the edge of your wood.
- Working from the top in the 3-inch wide gap you just created, skip a ½-inch gap from the top edge tape.
- Place another piece of tape parallel to the edge tape.
- Place another piece of tape parallel to the last.
- Skip a ½-inch gap.
- Place another piece of tape parallel to the others.
- Place another piece of tape parallel to the last.
- Place another piece of tape parallel to the last.
- There should be a ½-inch wide gap between the last piece of tape and the tape on the bottom edge of your wood. This created the horizontal lines for the “E” in “HOME”
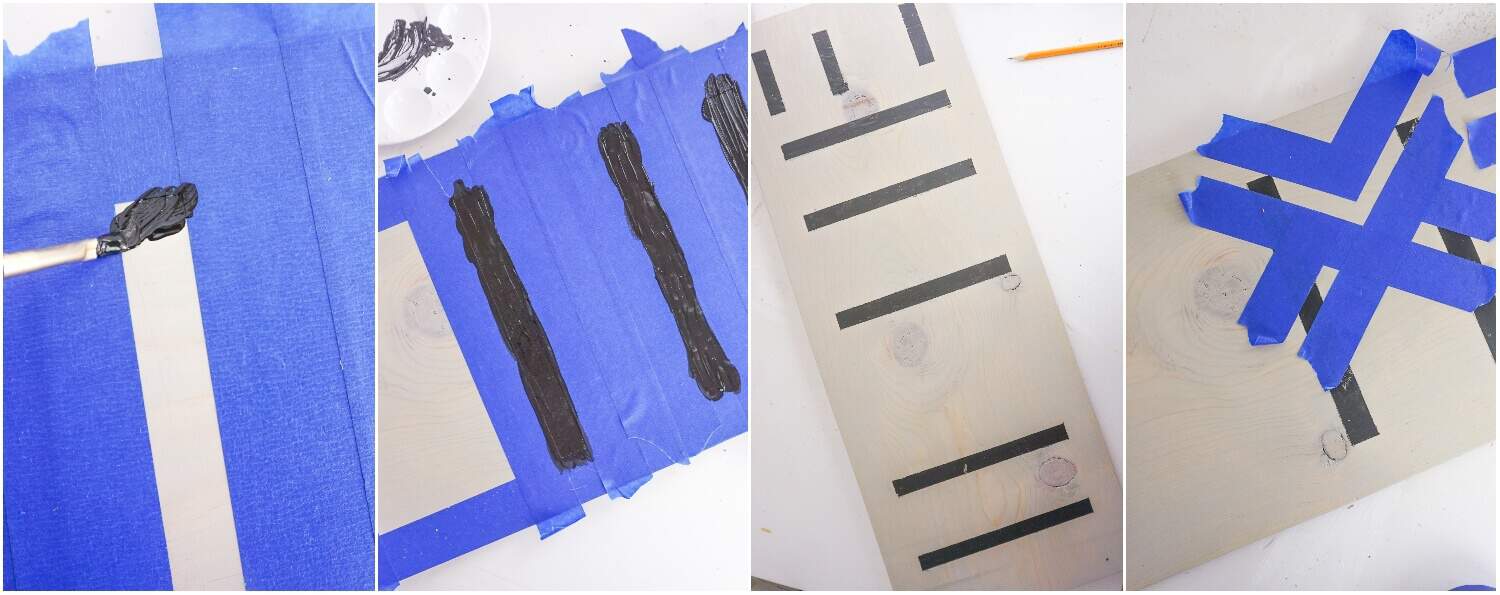
- Paint all gaps (except for the large 4-inch wide gap where the “O” in “HOME”) with the black craft paint.
- Allow paint to dry.
- Remove painter’s tape.

- Place 2 pieces of painter’s tape horizontally, with a ½-inch wide gap between, in the center of the two vertical lines for the “H”.
- Place 4 pieces of painter’s tape diagonally, creating the outline of a “V” with a ½-inch wide gap between, in the top of the two vertical lines for the “M”. Using an exacto-knife, trim the painter’s tape that overlaps within this area, as shown on the photo, to create the “V” cleanly.
- Place painter’s tape along edges of horizontal lines of the “E” to connect the horizontal lines and the vertical lines.
- Paint all ½-inch wide gaps that complete the “H,” “M” and “E” with the black craft paint.
- Allow paint to dry.
- Remove painter’s tape.
- Touch-up any areas that the painter’s tape may have pulled up.
- Seal with wipe-on polyurethane, if desired (I didn’t desire).
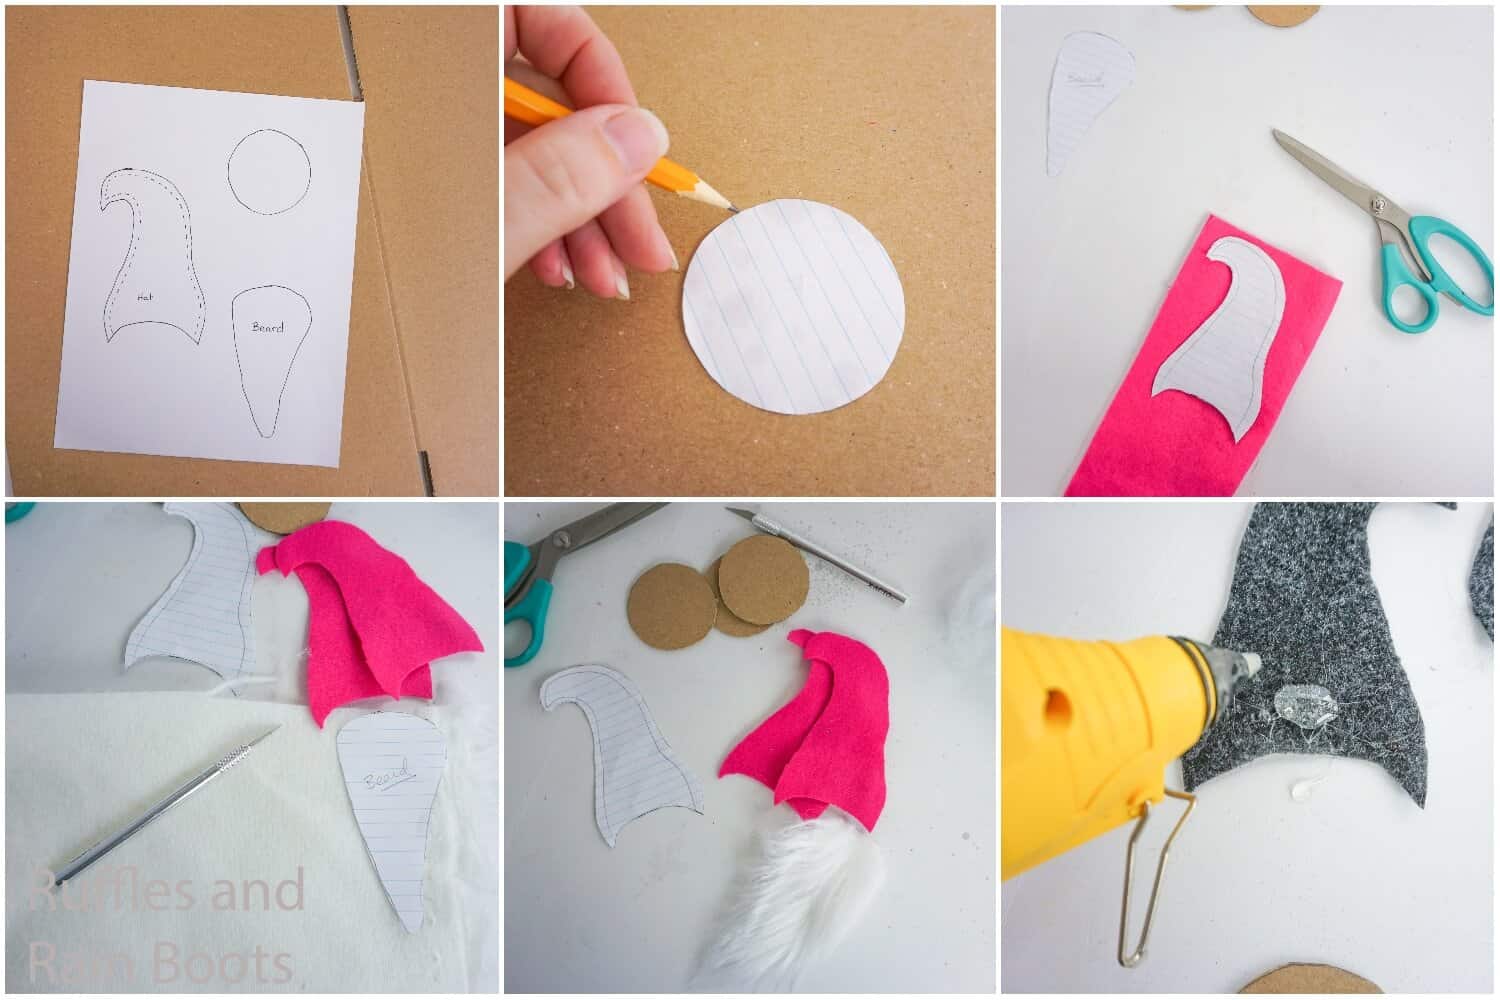
- To make the gnomes, cut 4 circle shapes provided in the pattern out of the cardboard.
- Cut 2 hats shapes provided in the pattern out of each of the colors of craft felt.
- Cut 1 beard shape provided in the pattern out of each type of craft fur, mongolian fur, or other you might be using.
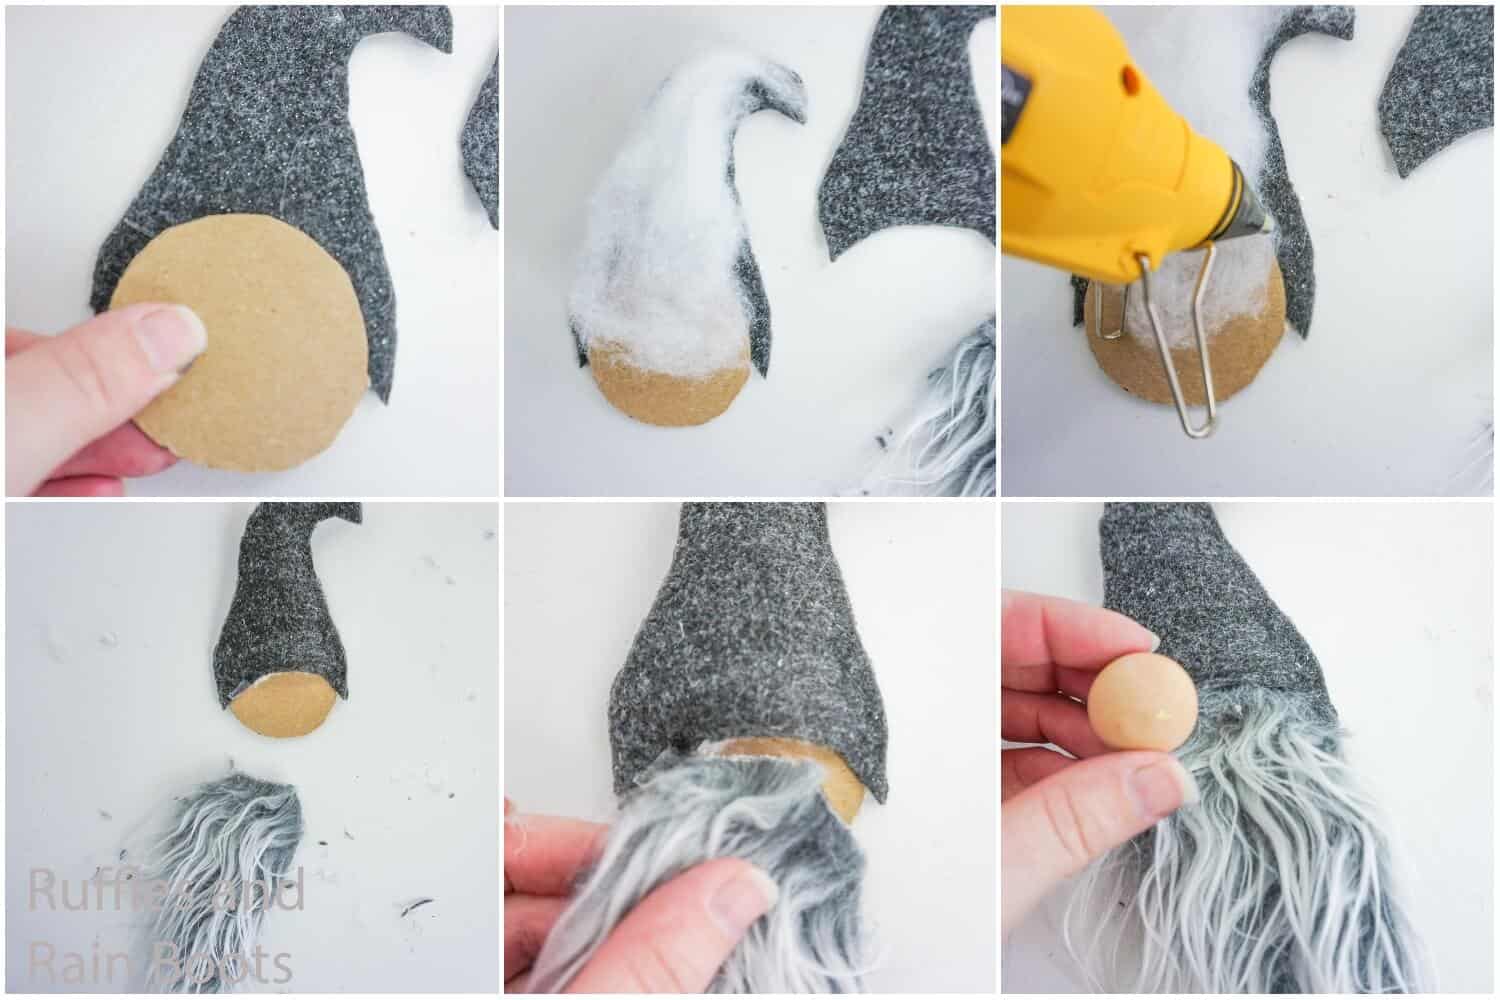
- Hot glue a cardboard circle to one of the hat cut-outs, overhanging the bottom edge. Repeat for each color hat.
- Hot glue the side edges of each of the two matching pieces of each color of craft felt together, with a small amount of polyfill and the cardboard circle between.
- Hot glue a beard to each of the cardboard circles, tucked up under the edge of the hat a little.
- Hot glue each nose in place.
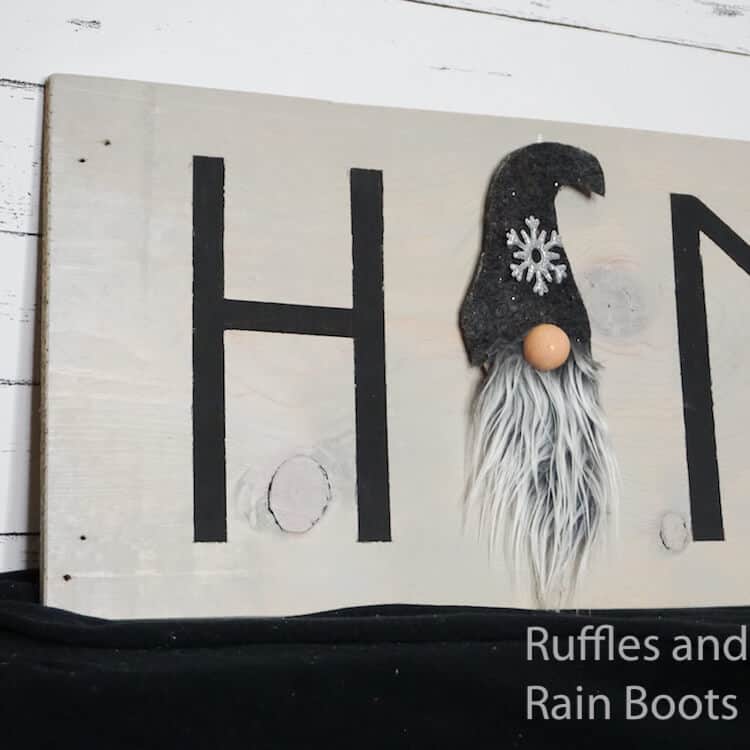
- Sprinkle silver glitter on the charcoal hat and glue the snowflake accent sticker in the center of the hat. This is the winter gnome.
- Sprinkle gold glitter on the red hat and glue acorn accent to the tip of the hat. This is the fall gnome.
- Glue tulle flowers onto the pink hat. This is the summer gnome.
- Glue flowers onto the side of the green hat. This is the spring gnome.
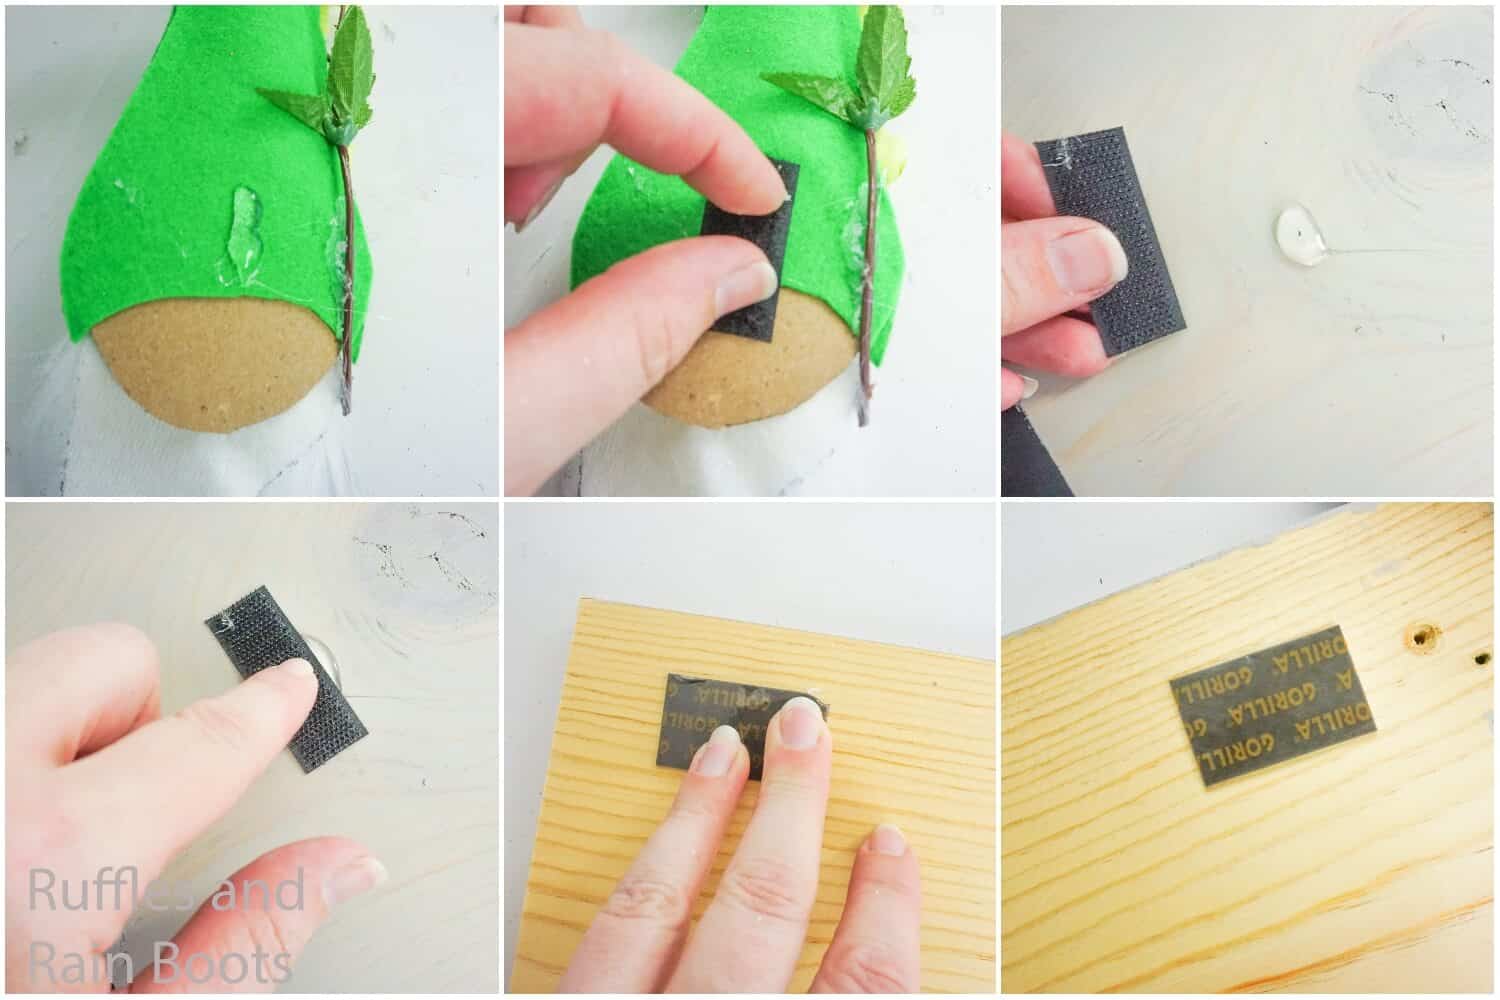
- Glue a piece of the soft-side velcro to the back of each of the cardboard circles, in the center, on each gnome face.
- Glue a piece of the spiky/sharp side velcro to the center of the space where the “O” would be in “HOME” on the sign.
- Place mounting tape in each of the top corners on the back of the sign.
- Mount to the wall.
- Swap out gnome faces with each season!
Notes
For more fun gnome tutorials, visit RufflesandRainBoots.com
More Gnome Tutorials You Might Like
- Christmas Gnome Ornaments – By far, my most popular gnome tutorial–and with good reason. It’s cute as all get-out!
- DIY Gnome Tutorials – So many gnome tutorial ideas, you are sure to find one (or more) that you have to make today.
- Nordic Viking Gnome – This is one of the cutest gnomes I’ve ever made. Super fun–and just a bit this side of silly!
Please Save This to Pinterest
Your shares are how this site grows and I am sincerely grateful. Know a friend who’d like this? Please share it on Facebook or save it to your favorite farmhouse crafts board on Pinterest.
Meet the Creator
Hi there, I’m Sarah Nenni-Daher. I’m a crafty gal and always have at least 14 projects going at once. I am a crafter, designer, DIYer, and pattern maker. I share my creations here and in the Ruffles and Rain Boots® Shop.
Here at Ruffles and Rain Boots®, you’ll find DIY gnomes, crafts, gifts, cupcakes, laser crafts, and so much more. I love sharing video tutorials over on YouTube and chatting with other crafters in my Facebook groups. We’d love to have you!