
Sanderson Sisters Wooden Spoons Craft
If you are a fan of the Hocus Pocus movies, you will love this Sanderson Sisters wooden spoons craft. They are the perfect balance between spooky and silly!
With Halloween around the corner, it is the perfect time to snuggle up and watch one (or both!) of the Hocus Pocus movies. The kids can play with their wooden spoons while watching the movies. How fun is that?

RELATED READING: DIY Sanderson Sisters Bookmarks (Free Template)
What You'll Find On This Page
Hocus Pocus Themed Wooden Spoons Craft
Here at Ruffles and Rain Boots, we absolutely love a simple craft that the whole family can make on a budget. These Sanderson Sisters wooden spoons are so easy to create that kids of all ages can make them. The older kids can make them on their own and the little kiddos may need some help with cutting and drawing the facial features.
We made our Sanderson Sisters Halloween wooden spoons with simple supplies from our craft bin and found the wooden spoons at the Dollar Store. You can put together a trio of wooden spoons for less than $3. We love to share a craft with you that is so affordable you can make extras and share.
If you need time to gather the supplies for this craft, bookmark this page to make it easier when you are ready to make this wooden spoons painting craft for kids.

As an Amazon Associate, I could earn from qualifying purchases. There may be affiliate links within this article.
Why These Wooden Spoons are the Perfect Craft
The younger kiddos will absolutely love this Sanderson Sisters craft! They can be used as puppets for hours of imaginative play.
They would make the cutest Halloween gift. Any Hocus Pocus fan would be tickled pink to have a set for themselves.
They would make a cute craft for kids at a Hocus Pocus or Halloween-themed party. They can make them on their own and then take them home to keep.

RELATED READING: DIY Black Flame Candle Hocus Pocus Craft (Free Pattern)
Tips for Making Painted Wooden Spoons
- Because the wood used to make these spoons tends to be porous, it is suggested to paint two coats in Step 1 and Step 3.
- If the kids are going to play with their painted wooden spoons outside, giving them a coat of sealant is a good idea. This will keep them safe when taken out into the elements.
- If you don’t want to draw on the lips and beauty marks freehand, we have a suggestion. Turn the face pattern over and pencil across the lip and beauty mark area. Flip the pattern over and fit it onto the spoon. Using the pencil, trace the lips and beauty marks onto the spoon. The graphite will leave behind a pattern for you to follow. Perfection!

Supplies for Sanderson Sisters Wooden Spoons
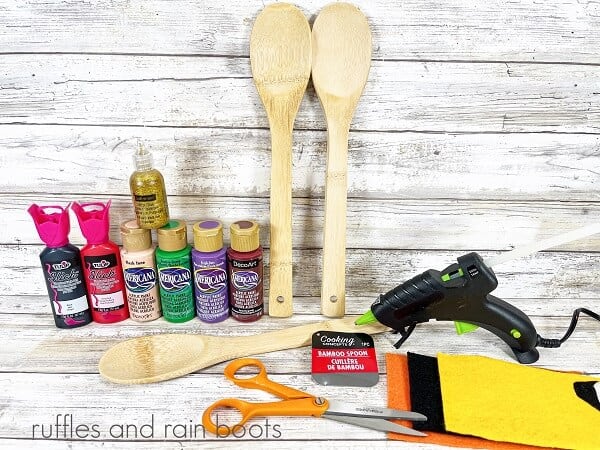
Below are the supplies we used to create our painted wooden spoons craft. Before you head to the Dollar Store, check your craft bin or kitchen to see what you have on hand. For information on properly painting a wooden spoon, read the tips section above.
- Wooden Spoons
- Flesh Tone, Purple, Green, and Burgundy Acrylic Craft Paint
- Gold Glitter Glue
- Red and Black Dimensional Fabric Paint
- Orange, Gold, and Black Craft Felt
- Glue Gun and Glue Sticks
- Paintbrush
- Scissors
- Pencil
- Straight Pins
- Wooden Spoon Sanderson Sisters Patterns
How to Make Sanderson Sisters Woode Spoons
Each step for this craft is detailed below to make it easy to follow. Keep this page open while you create your Sanderson sister’s spoons. If you would rather have a printable how-to, scroll down and select the print button.

Paint the top one-third of three wooden spoons with flesh-tone acrylic craft paint. Allow to dry.

Download and print the Wooden Spoon Sanderson Sisters patterns. Draw the three collars onto the spoons with a pencil, using the pattern sheet as your guide.

Paint Mary’s dress with burgundy acrylic craft paint. Paint Winifred’s dress with green acrylic craft paint and paint Sarah’s dress with purple acrylic craft paint. Let dry.

Cut out the hair patterns from the wooden spoon Sanderson Sisters patterns. Using straight pins, attach Mary’s hair to the black felt, Winifred’s hair to the orange felt, and Sarah’s hair to the gold felt.

Cut out all three hair patterns with scissors.

Attach each sister’s hair to the top edge of the wooden spoon using a glue gun.

Using the patterns as a guide, use a pencil to draw the lips and beauty marks on each spoon.

Paint the lips with the red dimensional fabric paint and make the beauty marks with the black dimensional fabric paint. Set aside to dry.

Using gold glitter glue, draw the lacing on the three dresses. Do this by drawing a series of simple “X” marks linked vertically together. Set aside to dry.
Notes for Making Sanderson Sisters Wooden Spoons
- To make the cutting easier for the younger kiddos, use the marker to trace the hair pattern. It is often easier for the littles to cut around that black line than around the pattern itself.
- Depending on how thick the glitter glue is on the stitching on the dresses, it may take a bit longer to dry than the paint did.
- You can use white school glue for this project but give additional drying time. Be sure not to go on too thick with the glue or it will seep through the felt.
More Halloween-Themed Crafts and Recipes You May Like
- No-Sew Zombie Gnome for Halloween: This easy-to-make zombie gnome was asked for by one of my readers. We made the most gruesome and spooky gnome around.
- Halloween Gnome Garland: This no-sew gnome garland is incredibly easy and they are perfect for your farmhouse Halloween-themed decor.
- Halloween Cupcakes: These Halloween cupcakes are much easier to make than they look. Learn how to make these stunning cupcakes and have everyone think a professional made them.
- Candy Corn Marshmallows: This easy party snack will have everyone asking for seconds. They are so easy to make that the kiddos can even help.
Please Save or Share
Your shares are how this site grows and I sincerely appreciate it. Please save this Halloween-themed project to your favorite craft pin board or share it on Facebook.

Sanderson Sisters Wooden Spoons Craft

If you are a fan of the Hocus Pocus movies, you are going to love this Sanderson Sisters wooden spoon craft. You can make these spoons from simple Dollar Store supplies, your craft bin, or even your kitchen! What a great way to repurpose those spoons from your utensil jar that you aren’t using. This is a great craft project for tweens and teens to create independently or help the younger kids.
Materials
- Wooden Spoons
- Flesh Tone, Purple, Green, and Burgundy Acrylic Craft Paint
- Gold Glitter Glue
- Red and Black Dimensional Fabric Paint
- Orange, Gold, and Black Craft Felt
Tools
- Glue Gun and Glue Sticks
- Paintbrush
- Scissors
- Pencil
- Straight Pins
- Wooden Spoon Sanderson Sisters Patterns
Instructions
- Paint the top one-third of three wooden spoons with flesh-tone acrylic craft paint. Allow it to dry.
- Download and print the Wooden Spoon Sanderson Sisters patterns. Using the pattern sheet as your guide, draw the three collars onto the spoons with a pencil.
- Paint Mary’s dress with burgundy acrylic craft paint. Paint Winifred’s dress with green acrylic craft paint and paint Sarah’s dress with purple acrylic craft paint. Let dry.
- Cut out the hair patterns from the paper pattern. Using straight pins, attach Mary’s hair to the black felt, Winifred’s hair to the orange felt, and Sarah’s hair to the gold felt.
- Cut out all three hair patterns with scissors.
- Attach each sister’s hair to the top edge of the wooden spoon using a glue gun.
- Using the patterns as a guide, using a pencil, draw the lips and beauty marks on each spoon.
- Paint the lips with the red dimensional fabric paint and make the beauty marks with the black dimensional fabric paint. Set aside to dry.
- Using gold glitter glue, draw the lacing on the three dresses. Do this by drawing a series of simple “X” marks linked vertically together. Set aside to dry.
Meet the Creator
Hi there, I’m Sarah Nenni-Daher. I’m a crafty gal and always have at least 14 projects going at once. I am a crafter, designer, DIYer, and pattern maker. I share my creations here and in the Ruffles and Rain Boots® Shop.
Here at Ruffles and Rain Boots®, you’ll find DIY gnomes, crafts, gifts, cupcakes, laser crafts, and so much more. I love sharing video tutorials over on YouTube and chatting with other crafters in my Facebook groups. We’d love to have you!