
DIY Zombie Gnome for Halloween
A very dear reader asked for a fun and “scary” zombie gnome for halloween. I was so inspired, I made this no-sew zombie gnome and I’m a little in love.
It’s a great way to work with clay without having the pressure of perfect – everything needs to look a bit wonky for this guy.
RELATED READING: Dollar Tree Halloween Bat Gnome (So Easy)
No-Sew Zombie Gnome
Here at Ruffles and Rain Boots, we are always so inspired by the folks that come here to travel with me on this journey for the craziest gnomes. And when someone reached out for help in creating a gory gnome with a zombie theme, I was so excited to just take off and make it.
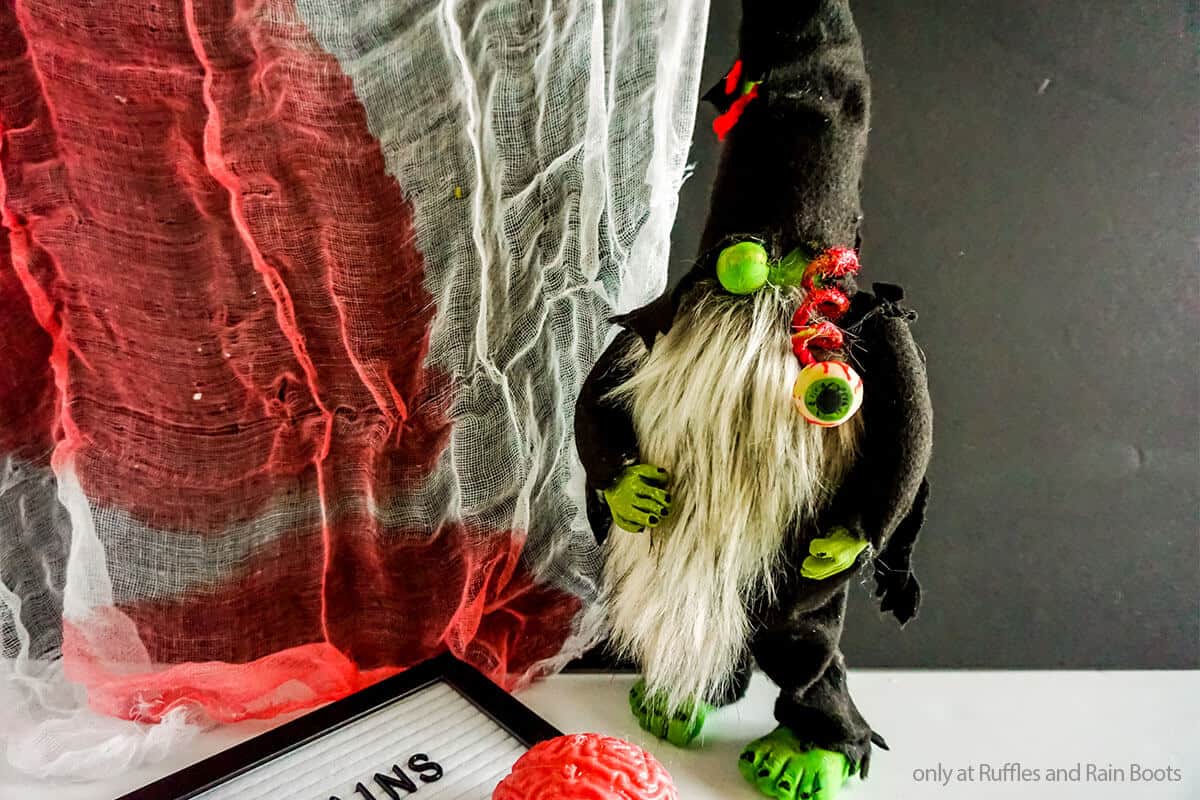
This zombie gnome was so fun to make. So far from my more traditional Scandinavian gnomes, it’ wild. Kind of like a zombie should be, right?! If you’re ready to make a fun and gruesome zombie gnome for halloween, let’s get started.
No Time to Make This Now? Save or Share for Later
Save this to a favorite DIY gnome tutorials pin board or share it to Facebook. It will be easy to find when you’re ready to begin this fun Halloween gnome.

RELATED READING: THE BEST HALLOWEEN GNOME PATTERNS AND TUTORIALS
As an Amazon Associate, I can earn from qualifying purchases. There could be affiliate links within this article.
Tips to Make a Gnome for Halloween
- First, start by grabbing the Cozy Gnome pattern here. I know it says it’s a sewing pattern, but I made this no-sew zombie gnome without sewing a stitch. You can even check out my video on YouTube. Not. A. Stitch.
- Next, if you want your zombie gnome to have some pants and a jacket, you’re going to need the Swanky Jacket and Fancy Pants pattern here. I know, I know, making you grab a second pattern, but trust me, it’s worth it.
- Let’s talk about gnome beards… If you’re not sure about cutting faux fur, watch my how to cut faux fur video tutorial (it’s only a couple minutes and the technique is worth it).
- I don’t often make gnomes with eyes, but this one seemed like he really needed it. I made this eyeball from a little bit of polymer clay, a piece of floral wire, and a tiny bit of paint. I’m no clay artist – you can definitely do this (and have fun).
Get the Zombie Pattern Here
Click below to add this fun pattern to your cart. So many gnomes can be made with this!

More Halloween Gnomes You Might Like
- Easy Mummy Gnome – This mummy gnome will put you in stitches. Fun, easy, whimsical and very cute on your entryway table!
- No-Sew Witch Gnome – If you are all about those spooky vibes, you can make this awesomely fun no-sew witch gnome in just a few minutes.
- Halloween Gnome Garland – A little bit of every monster in halloween gnome fashion! It’s perfect for a little farmhouse halloween decor and oh so fun to make.
Please Save or Share This Fun, Handmade Halloween Gnome
Your shares are how this site grows and I am sincerely grateful. Know a friend who’d like this? Please share it on Facebook or save it to a halloween crafts pin board.

How to Make a No-Sew Zombie Gnome
Below is the written tutorial for this fun Halloween gnome DIY. If you’re a visual learner, watch the DIY zombie gnome video tutorial. Be sure to subscribe.
No-Sew Zombie Gnome

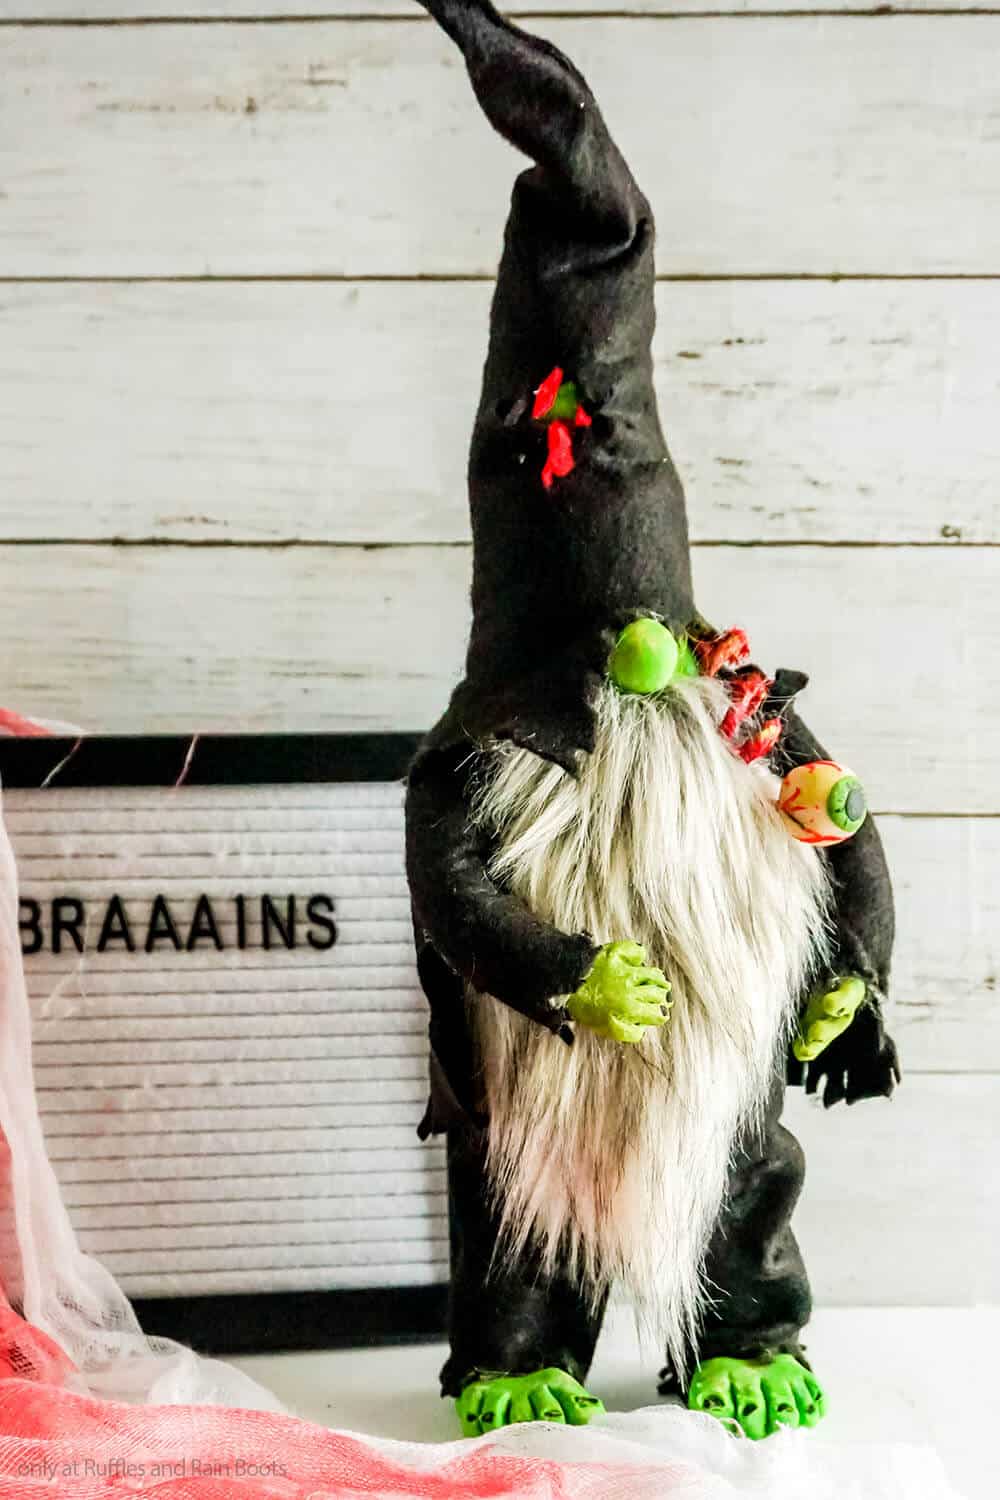
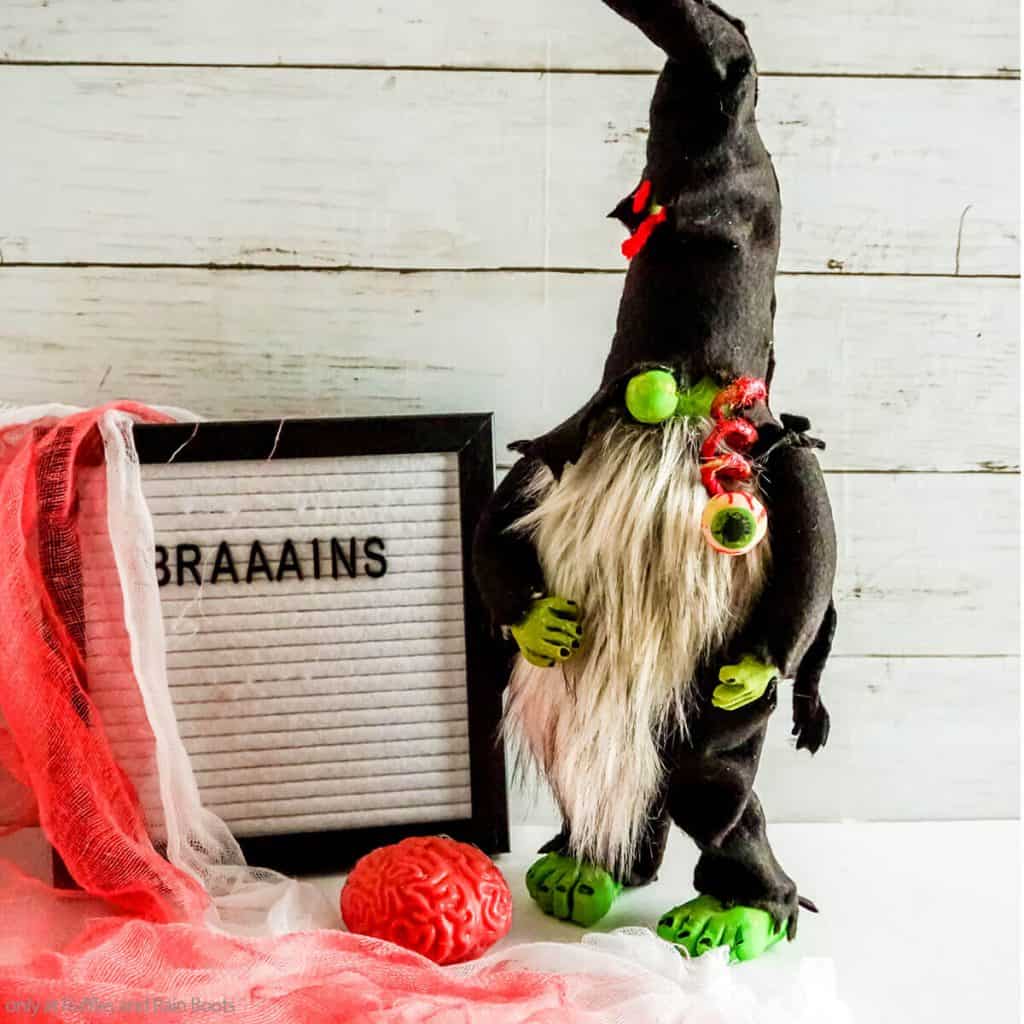
You're going to love making this fun and kind of gory no-sew zombie gnome for halloween. It's so simple, but it's really detailed and fun.
Materials
- 1/3 yd Black Craft Felt
- 1/3 yd Bright Green Craft Felt
- Scraps Red Craft Felt
- 4-5 inches Raffia-Wrapped Floral Wire
- Polyfill
- Floral Wire
- 3 Foam Hair Curlers
- Polymer Clay in Black, Bright Green, Dark Green, White and Red
- Black Acrylic Paint
- Red Acrylic Paint, optional
- Watercolor Paint, optional
Tools
- Scissors
- Hot Glue Gun & Glue
- Wire Cutters
- Oven
- Exacto Knife (or other thin blade)
- Paintbrush
Instructions
- Make your gnome eye, nose, hands and feet by combining a portion of bright green and dark green polymer clay until you have the color you want. I used an entire 2oz brick of bright green clay and a bit of the dark green.
- Pinch off a tiny bit (just a pinch) of this green clay and set aside for making an eye in a moment.
- Roll a quarter-sized portion of this clay into a neat ball. This is the nose. Set aside.
- Make the feet by breaking off about 2/3 of the clay, then breaking that in half. Form each into similarly sized rectangles about 3-inches long and an inch wide. Widen the toe end (which ever end you decide is the toe) and, with your exacto knife, cut 5 slots into that end about 1/8 of the way through the rectangle. These form the toes. Using your finger or a flat-sided tool, round over the edges of each toe. With the exacto knife, flatten and scrape a little bit on the top of each toe to form a toenail. Ensure you like the size of your gnome feet. Set aside.
- Roll out the remaining lump of clay, split it in half and repeat making the feet shapes, but make the cuts deeper and slimmer to form the fingers. Set aside.
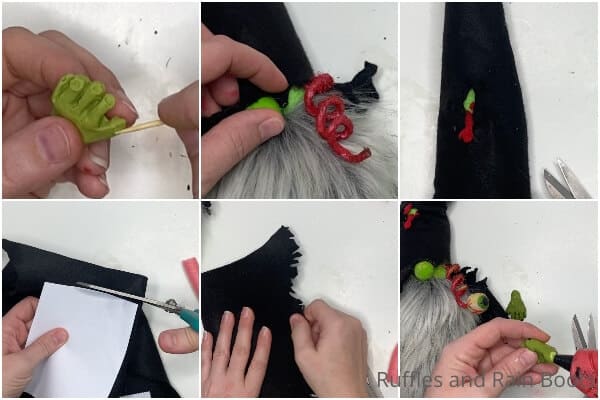
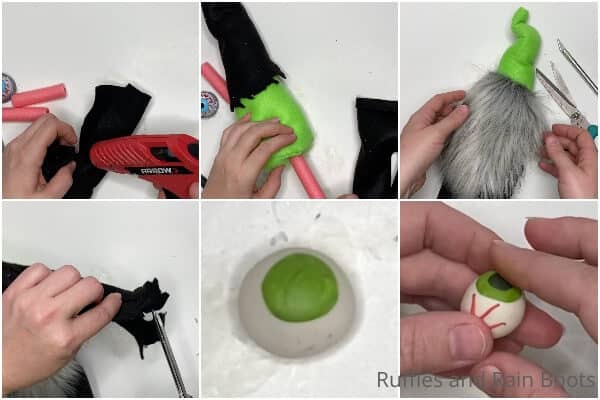
- Make the eye by rolling a quarter sized portion of white clay into a neat ball. Roll the remainder green clay into a ball, then flatten it into a disk. Place this green disc onto the white ball and press it down firmly. Repeat with a smaller disk of black clay and place it in the center of the green disk. Roll a dozen red, very thin snakes about 1 inch long, then press them into the white part of the eyeball in random patterns, creating veins. Press the end of your raffia-wrapped floral wire into the back of the eye, creating a hole perfectly sized for the wire. Remove the wire and set aside.
- Bake the eye, nose, hands and feet per the clay package's directions. Allow them to cool fully.
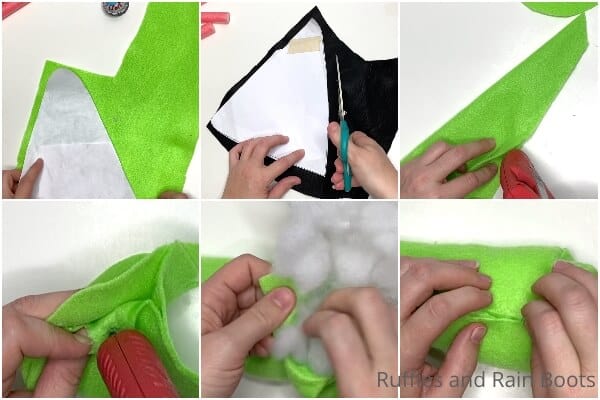
- Trace and cut out the gnome body shape and bottom circle shape from the green craft felt and the hat shape out of the black craft felt, per the Cozy Gnome pattern.
- Fold the gnome body shape in half and run a hot glue hem along the open side, being sure to leave the last 2 inches of seam un-glued for use in turning the gnome body in a moment. Attach the bottom circle shape by gluing it in place, leaving the last 4-5 inches open. Allow the glue to cool completely, then turn the body of the gnome right side out.
- Fill the gnome body with the polyfill. Tuck a small portion of polyfill into the top of the gnome body to fill out the cone shape of the head, tuck the floral wire inside and glue-hem the body closed.

- Roll the hat into a cone and glue it in place. Using the scissors, shred the bottom 1/2 inch of the open cone, pulling on the felt to make it look torn and raggedy.
- Paint the nails on the toes and fingers black and allow that to dry.
- Cut out the beard shape from the faux fur by turning the fur over and cutting only the fabric with the exacto knife. Hot glue the beard to the body.
- Hot glue the nose in place about 1-inch below the top of the beard. Place the hat on top of the gnome's head, tucking it down over the top of the nose. Cut a jagged rip into one side of the hat, reaching just above the beard. Make the edge raggedy.
- Using your wire cutters, curl the raffia-wrapped floral wire into a spiral, then hot glue the eyeball to the end. If desired, paint the raffia-wrapped floral wire red and allow that paint to dry. Hot glue the loose end of the spiral just under the edge of the hat at the ragged hole above the nose.
- Make the legs by gluing two of the hair rollers to the bottom side of the gnome, in position where you'd like the feet to be.
- Cut the pant leg shape from the pattern and make the pants per the pattern directions. Hot glue the pants in place on the bottom of the gnome and shred the bottom edge of the pants to make them look torn.
- Hot glue the bottom of the hair curler legs to the top of the feet toward the back. Wrinkle the pant legs over the top of the feet.
- Cut the jacket shape from the pattern and make the jacket per the pattern directions, wrapping it around the gnome and hot gluing the jacket body and collar in place.
- Cut the remaining hair curler in half, roll each half in the black felt. Be sure to leave it about 1/4 inch longer than the hair curler, then shred the loose end. Hot glue the felt in place around the hair curler creating arms, then hot glue each arm under the edge collar of the jacket, creating arms.
- Hot glue the hands to the end of the arms inside the raggedy edge of the sleeve.
- Cut a raggedy hole in the top of the hat, then add random bits of scrap red felt into the hole created to look like a wound.
Notes
This gnome stands 17-18 inches (ish, depending on how twisty you make your hat, of course).
For more fun gnome patterns and tutorials, visit Ruffles and Rain Boots (we have lots...).
Recommended Products
As an Amazon Associate and member of other affiliate programs, I earn from qualifying purchases.


Meet the Creator
Hi there, I’m Sarah Nenni-Daher. I’m a crafty gal and always have at least 14 projects going at once. I am a crafter, designer, DIYer, and pattern maker. I share my creations here and in the Ruffles and Rain Boots® Shop.
Here at Ruffles and Rain Boots®, you’ll find DIY gnomes, crafts, gifts, cupcakes, laser crafts, and so much more. I love sharing video tutorials over on YouTube and chatting with other crafters in my Facebook groups. We’d love to have you!