
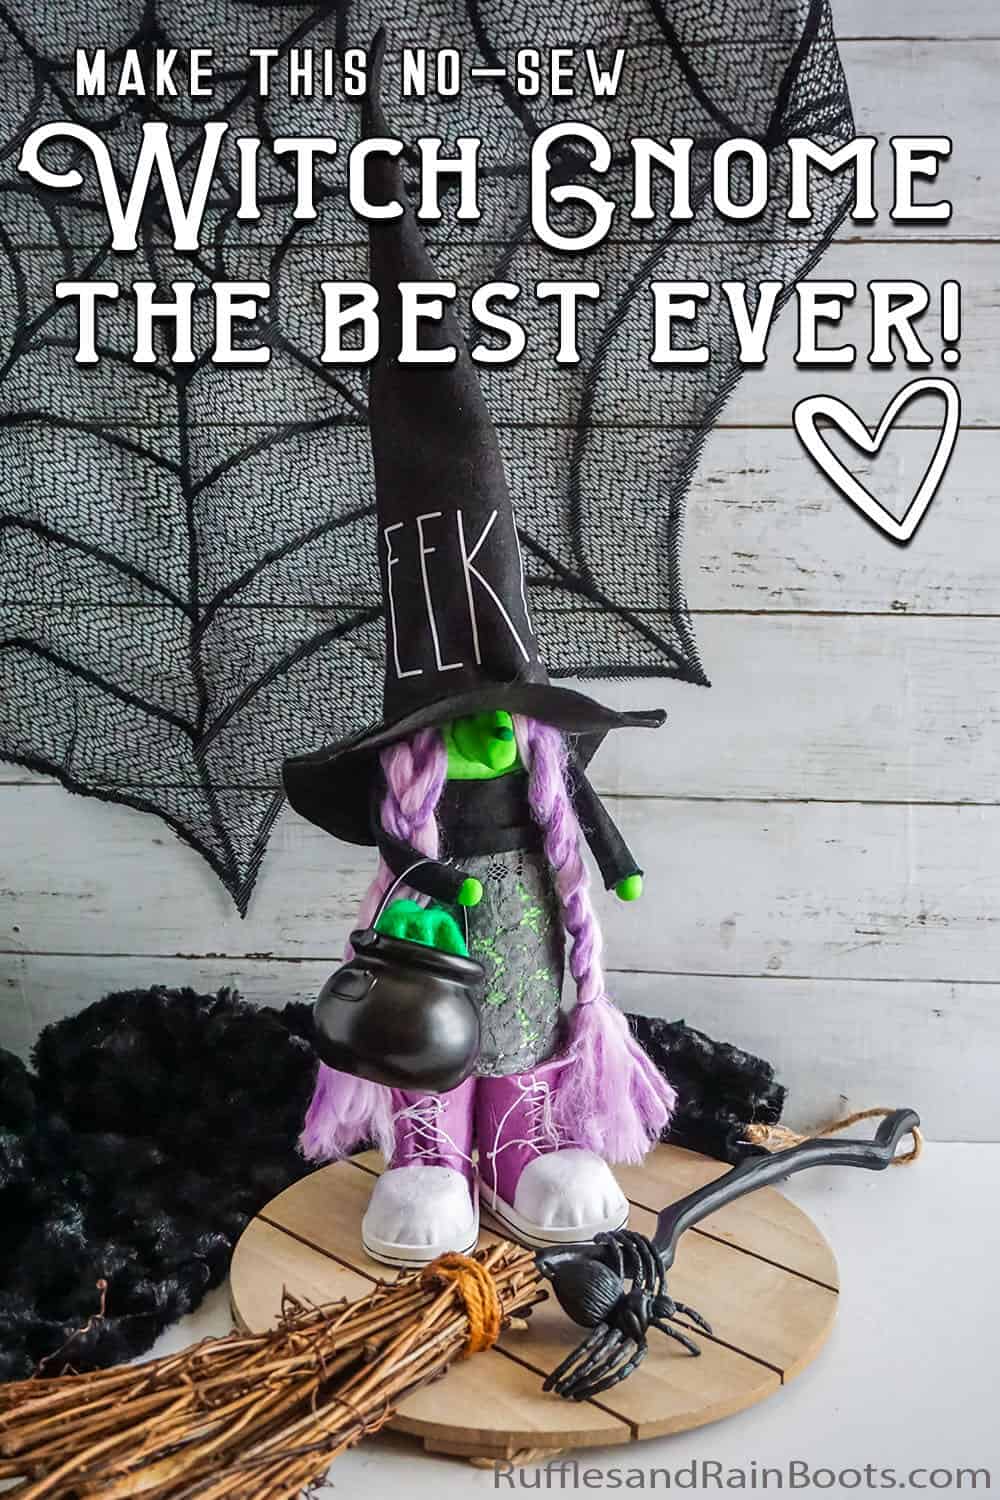
DIY No-Sew Witch Gnome
This no-sew witch gnome is a fun and easy DIY to make for the spookiest holiday. It’s such a fun halloween gnome.
Use felt to create the easiest witch hat pattern, clay for the creepiest gnome nose, and some other fun details like tennis shoes. Can’t you just see her trick or treating?

RELATED READING: DIY Devil Gnome with Horns and Tail
What You'll Find On This Page
No-Sew Witch Gnome for Halloween Decor
Here at Ruffles and Rain Boots, we are all about starting Halloween a little early this year. I mean, why not, right?! So, in a bid to make my house as whimsically fun and wickedly silly, I made this super fun no-sew witch gnome. I mean, you can have a million other halloween gnomes, but you HAVE to have a witch gnome. Come on.
So, green fleece in hand, I whipped up this incredibly fun little witch gnome. She’s got some really unique and fun details like her sneakers, the little apron with lace and then, of course, that nose. If you’re ready to make a little halloween witch gnome, let’s get started.
RELATED READING: EPICALLY FUN PIRATE GNOME

No Time to Make This Now? Save or Share It for Later
If you can’t get started on this DIY Halloween witch gnome right now, save this to your favorite Halloween crafts pin board or share it with a crafty group on Facebook. Either way will make it easy to find when you’re ready to begin.
As an Amazon Associate, I can earn from qualifying purchases. There could be affiliate links within this article.
Tips to Make this Halloween Gnome
- First, start with the awesome no-sew gnome pattern here. It’s my favorite gnome pattern and I use it to make a TON of the best little gnomes.
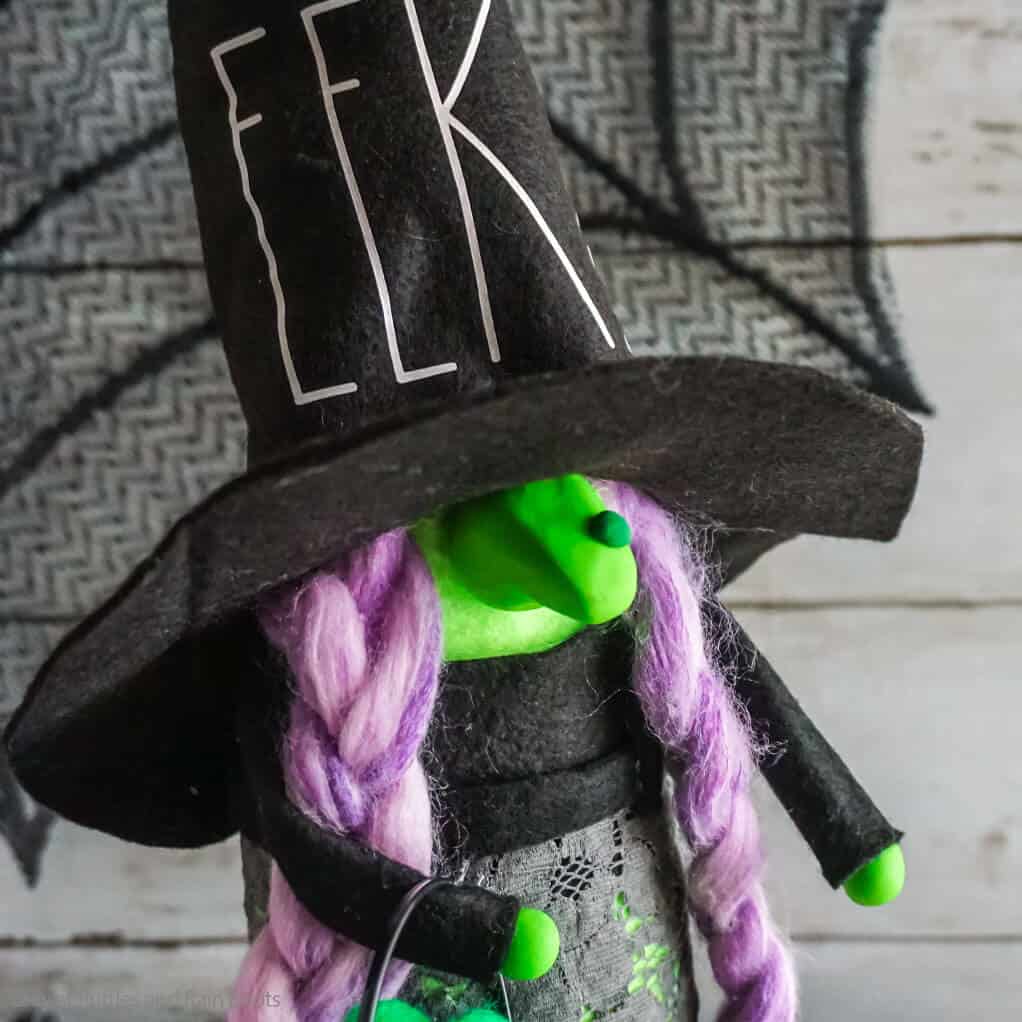
- If you’ve seen any of my other gnomes, you’ll notice the nose on this gnome is markedly different than I normally do. It’s clay. Bright green polymer clay formed into a long, witchy nose with a big-ole dark green wart on the end. If you’ve never used polymer clay, it’s super easy. Take it out of the package, mold it in the shape you want, smooth it a little, then bake per the package directions.
- Oh, you want to know about those high top sneakers? They’re so adorable and I made them as part of this fun set of gnome shoe and boot patterns.
- I made this entire gnome a no-sew pattern by using hot glue to make all my hems. It’s my recommendation that you use fabric glue sticks, but regular ones will work.
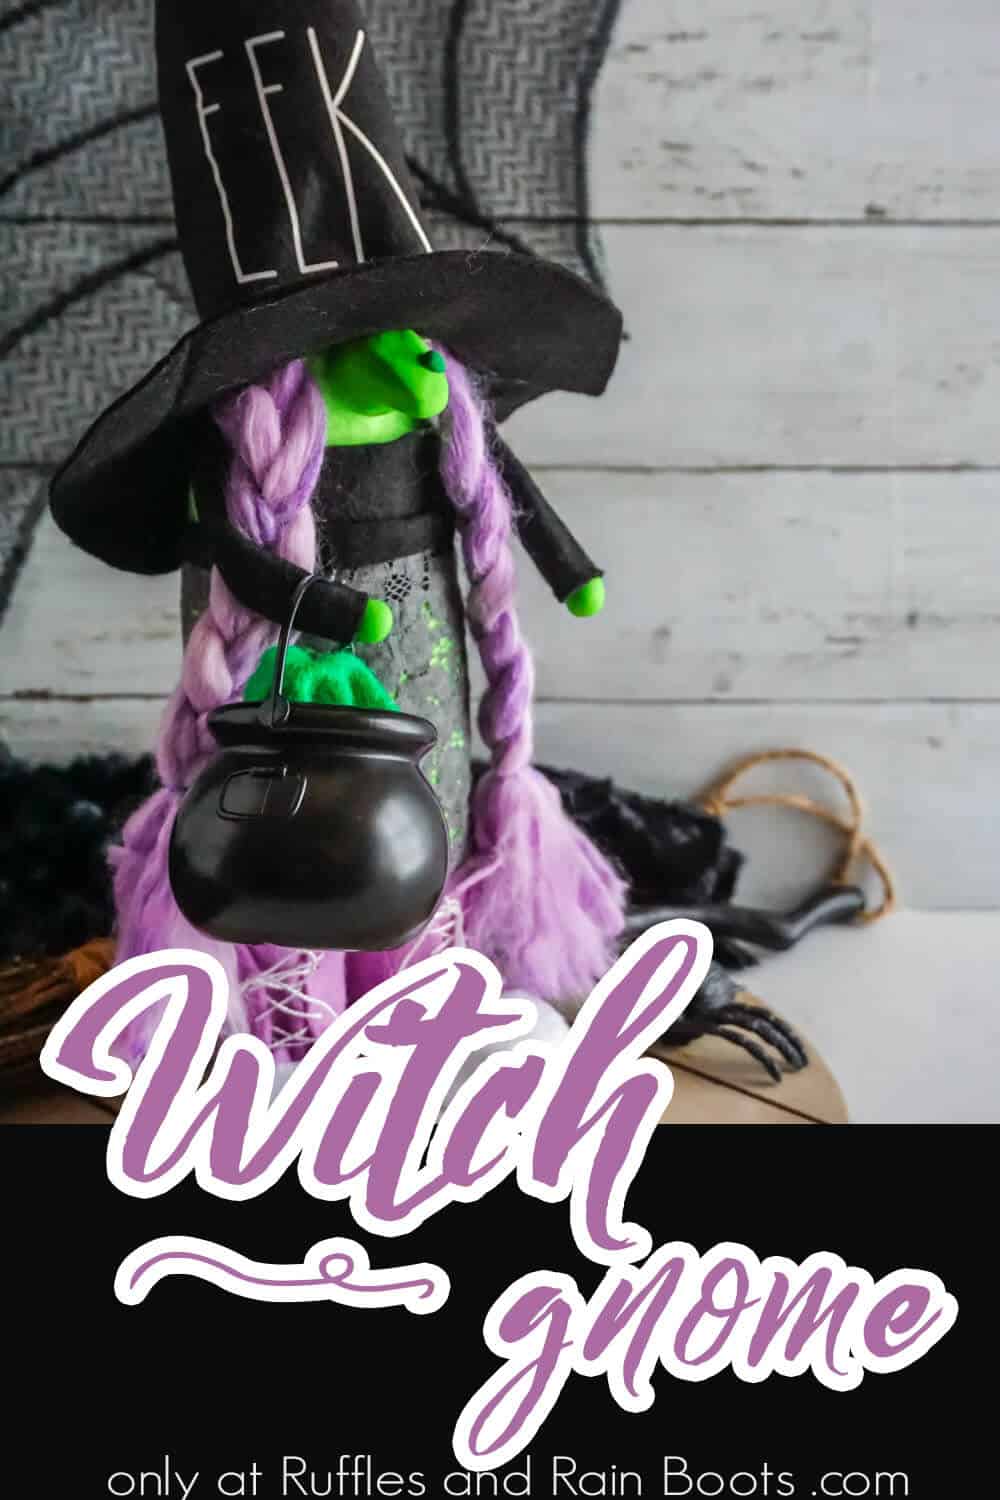
- Last little tip: I made my lovely purple braids with some white roving like this. I laid it out, painted it purple with some watercolor paint and let it dry overnight. And like that I had perfectly witchy purple roving for some wicked braids.
Get the Pattern Here
Click below to add this fun pattern to your cart. So many gnomes can be made with this!
DIY Witch Gnome Video Tutorial
As people have turned to video more and more over the past few years, I’ve begun an entire channel for fun crafts like this. If you’re a visual learner, watch the DIY witch gnome video tutorial.

More Halloween Crafts You Might Like
- Halloween Sock Gnomes – I can’t tell you how fun these sock gnomes are with the free SVG on top and those fluffy beards. So spooky cute.
- Halloween Pumpkin Mickey Ears – To add a little fun to your kiddo’s pre-halloween activities by making a fun set of Mickey ears together for the big day!
- Huge Halloween SVG Bundle – If you’re into digital crafting at all, you can find some really awesome halloween cut files here for the taking.
Please Save or Share This Fun Halloween Gnome DIY
Your shares are how this site grows and I am sincerely grateful. Know a friend who’d like this? Please share it with a crafty group on Facebook or save it to an easy Halloween crafts pin board.
How to Make a Witch Gnome
Below is the written tutorial with step by step instructions. Keep this page open while you create this fun Halloween gnome or print it out to take with you.
No-Sew Witch Gnome

Making this no-sew witch gnome was a fun and super cute farmhouse gnome that I just don't know how to express. She's like a spooky little bit of fun on my tiered tray for halloween!
Materials
- 1/8 yd Bright Green Fleece
- Polymer Clay in Bright Green and Dark Green
- White Roving (about 18 inches)
- Purple and Black Watercolor Paint
- Polyfill Beads
- Small Amount of Polyfill
- 1/8 yd Black Premium Felt (the thick stuff, not the craft felt)
- 1 Pair Purple High-Top Gnome Sneakers
- Free Cut File for "EEK!"
- White Heat Transfer Vinyl
- 1/8 yd White Lace
- Purple Embroidery Thread
- Bauble (I used a tiny cauldron I found at the Dollar Tree)
Tools
- Hot Glue Gun and Glue
- Oven
- Exacto Knife
- Scissors
- EasyPress Mini
- Cricut Explore Air2 or Cricut Maker or Cricut Joy
- Chip Clip or Clamp
Instructions
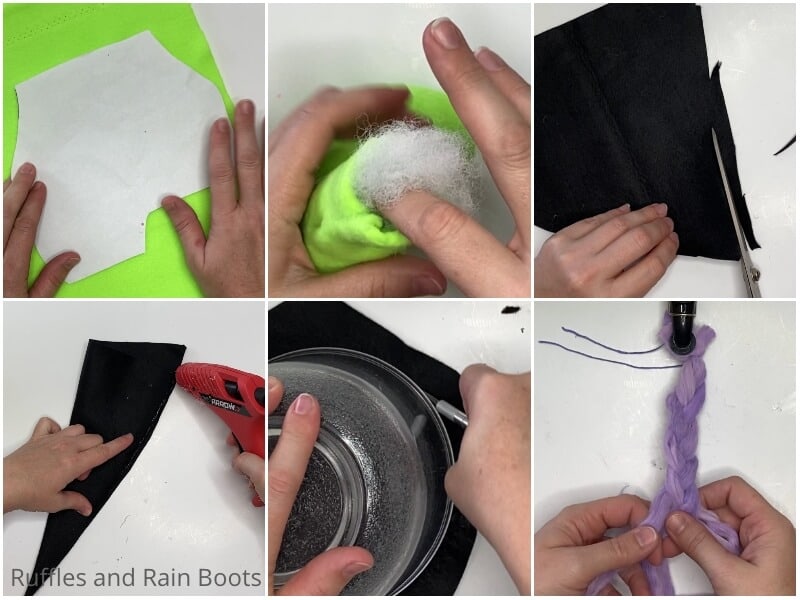
- Make your purple roving by painting the white roving with your purple watercolor. Allow the roving to dry completely.
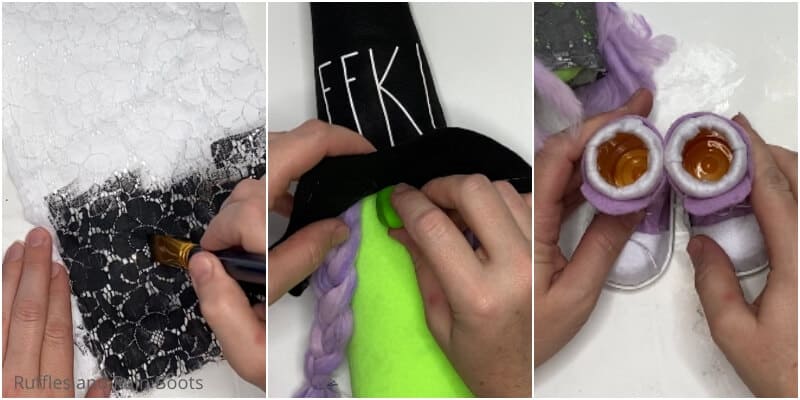
- Make your "old lace" by painting your white lace with black watercolor paint. Allow the lace to dry completely.
- Roll a quarter-sized portion of bright green clay into a neat ball then form it into a big honking hooked honker, AKA nose (make sure the back where it will affix to the face is flat). Take a teeny tiny ball (or a big one) of dark green polymer clay and stick it firmly onto the end of your hooked nose. Set aside.
- Roll two nickel-sized portions of the bright green clay into two neat balls. These are the hands.
- Bake the nose and hands per the clay package's directions. Allow them to cool fully.
- Trace and cut out the large gnome body shape out of the green fleece fabric.
- Fold the gnome body shape in half and run a hem along the open side with your hot glue or your sewing machine.
- Fold the flap of the gnome body shape over and close the bottom of the gnome with hot glue or a seam. Allow glue to dry fully.
- Turn the body of the gnome right side out.
- Fill the gnome body with the polyfill beads.
- Tuck a small portion of polyfill into the top of the gnome body to hold the beans or rice inside.
- Cut a single hat shape from the black felt. I know the pattern calls for 2 of these shapes, but because you're not making a scrunched-up hat and you're wanting a pointy witch hat, just cut out one. Fold this large triangle in half and hot glue the two sides together neatly, bring the hat to a very pointy point. Allow the glue to dry completely.
- Cut out a 5 to 6-inch circumference circle from the black felt. I used a large mixing bowl for a form, but anything with a large circumference will work. Carefully hot glue the pointy hat to the center of this circle of felt, then cut an "x" into the center of the circle of felt, about 2-inches wide. Fit the hat onto the witch gnome body, to make sure you like the fit.
- Cut out the EEK! cut file on the white heat transfer vinyl, with your cutting machine. Weed the design, then place it on the front of the hat, using the EasyPress Mini to join the vinyl to the felt. I used a piece of parchment paper inside the hat to help protect the hot glue seam of the hat on the backside from melting when the EasyPress Mini was doing it's thing.
- Cut the roving in half, then gently pull apart each of the roving hanks into 3 strands. Bundle 3 of the strands together on one end and tie them together with a piece of purple embroidery thread. Then secure that to the table by clipping that end with the chip clip, then taping the chip clip to the table. Braid the strands together, then tie the end securely with another piece of purple embroidery thread. Repeat with the second set of 3 strands to make two braids. Place the two braids on either side of the "front" of your gnome body, making sure they will sit where you want, then hot glue them in place.

- Tuck the hat over the braids and hot glue the nose squarely between the two braids, about just below the brim of the hat. Do not hot glue the hat in place yet.
- Cut a 3-inch square piece of black felt and hot glue it in place onto the front of your gnome, about 1/2 inch below the nose. Place your lace onto the front of your gnome, on the lower line of the black felt square, wrapping the lace around to make a skirt. If you want to hem your lace, do so now before hot gluing the lace in place on the gnome. Cut a 1/4 inch wide strip of black felt about 7 to 8-inches long. Hot glue this length of felt to the gnome, where the square of black felt and the lace meet, making a belt. Cut two 1/4-inch wide strips of felt, about 3 inches long and hot glue them on either side of the square of black felt, over the belt and lace skirt, tucking them under the braids or hat on the other end as shoulder straps for the dress.
- Cut out two arm shapes from the pattern out of the black felt.
- Place a line of hot glue down one long side of the arms and then fold the fabric over onto itself twice to make a thin arm.
- Slip the arm up into the hat on the side and hot glue it in place.
- Trim arm as desired (make sure your bauble--cauldron--will fit nicely before trimming).
- Hot glue the hands in place on the ends of the arms.
- Attach the bauble to the back sides of the hand(s).
- Hot glue the hat in place above the nose and in the back, pulled down snugly to open-up the face.
- Place the two shoes next to each other, taking note of where they touch when pressed side to side. Hot glue the shoes together in those spots. Add a line of hot glue to the top of each shoe, then place the gnome on top, pressing it down to make a clean join. Then just enjoy!

Notes
For more fun no-sew gnome patterns, visit Ruffles and Rain Boots!
Recommended Products
As an Amazon Associate and member of other affiliate programs, I earn from qualifying purchases.


Hello
I’ve been through your site and cannot figure out which pattern you use for the witch. Can you let me know please. I just purchase the Vest and boots for the biker.
I really like your site and the gnomes
Roxanne
Hi there, Roxanne, and thank you for the kind words. The pattern for this fun little witch is linked in the post and here: https://shop.rufflesandrainboots.com/product/no-sew-gnome-pattern-tucked/