
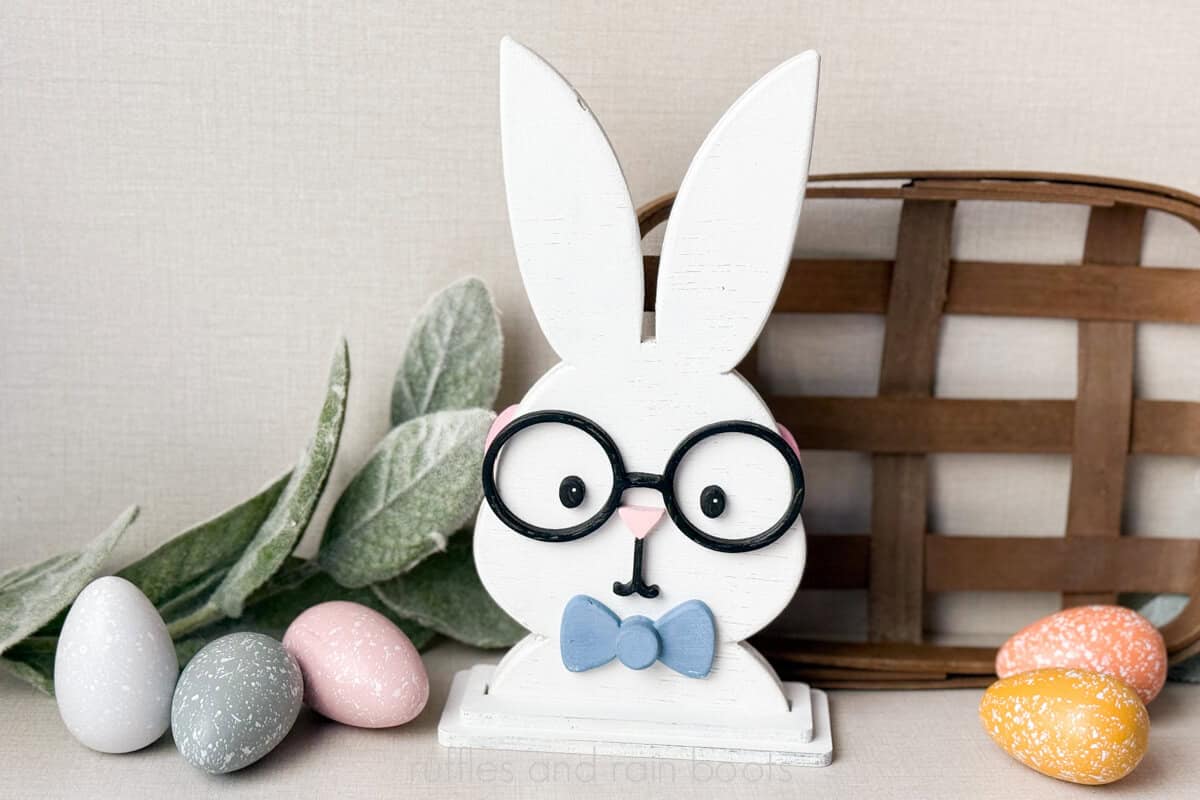
Laser Cut Easter Two Sided Bunny Display
Make this laser cut Easter bunny display with my free laser template. Make a boy and a girl bunny – one can be shared on either side!
RELATED READING: Laser Masking 101 – Why You Should Be Using It
What You'll Find On This Page
Laser Cut Easter Bunny Display
Here at Ruffles and Rain Boots, I’ve been rounding out my collection of adorable Easter decor and drew this up on the iPad. I had a hard time deciding on making a little boy bunny or a little girl and then I decided, “Why not both?”
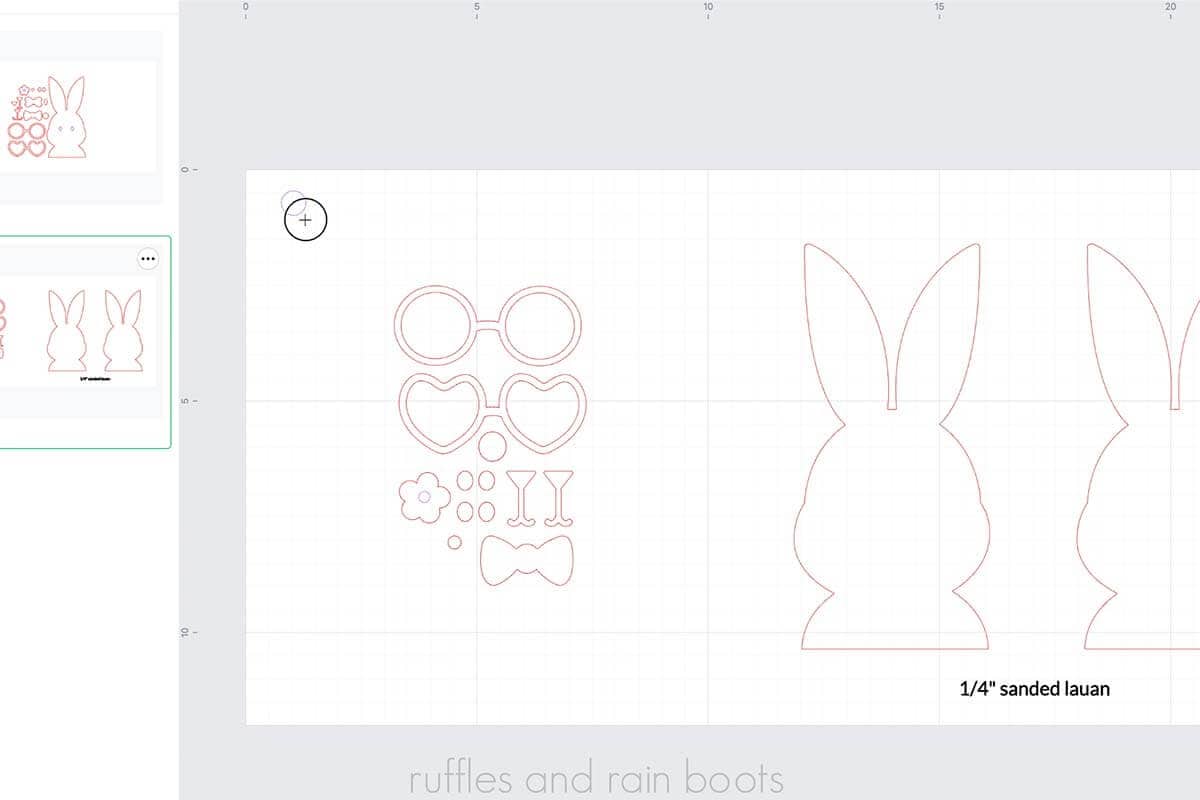
The glasses and accessories can line up for this piece, making all of the extras a ton of fun and pretty from both sides. Included accessories in the free laser template:
- Round glasses
- Heart glasses (with conversation heart cut outs)
- Bow tie and center
- Hair bow and center
- Flower (can be duplicated for a flower crown)
- Three “faces:” nose only, nose with smirk, nose with large smile
RELATED READING: Easter Laser Project Ideas to Make and Sell
Materials You Will Need
I used a CO2 laser for this, but it’s definitely diode compatible. You can also use 1/8th or 1/4 inch for this – just make sure the layers work for the base.
As always, I’ve included a ton of file types so you can use it with any cutting machine or laser. File types: SVG, EPS, PNG, DXF, PDF, and XCS.
- free laser cut two-sided Easter bunny decor templates
- 1/4 Lauan Plywood (or other)
- Glue
- Clamps
- Paint
- Sealant
- Calipers (for the most accurate fit; can use a slot sizer)
How to Make This Bunny Shelf Sitter
Load material into the laser, making sure it is level and secure. Open the file or import the SVG. The bunny shape is designed to measure 8.75 inches (225.25mm).
Determine if you want one layer or two. I cut two 1/4” bunnies and finished them differently (one sanded / shaped boy, one unshaped girl).
Choose the desired accessories and turn off all layers you do not want to cut. Enter parameters. My settings were cut 80 power, 18 speed, and 1 pass and process. Clean, if necessary.
NOTES:
- If you want the “pretty side” of something duplicated, be sure to FLIP the copy horizontally. These pieces are drawn by hand, so they are not always drawn symmetrical.
- You can opt to score the eyes for placement. I however, don’t. :)
- You can set the inside of the flower to score or cut.
- Find the stand that fits your project (remember, if you used two layers, it’s NOT the material width).
- If you’re using a stand AND you’re sanding, for the tightest kerf, measure after the piece is assembled.
- The inside of the heart glasses can be used as conversation hearts.
- Be sure to wipe all edges of all items to remove any soot before you begin painting.
You can opt to use a sanding sponge, sand paper, or a sanding tool (Dremel) to shape all pieces of this design EXCEPT the very bottom flat portion where it fits into the stand or sits on the table.
For reference, I sanded the boy and shaped each of the pieces. The girl is not shaped at all.

Paint, sand, and seal each piece (or seal everything at the end).
PAINTING AND ASSEMBLY NOTES:
- Paint the back of the outer edges of the glasses (they can hang over the edge, so they might be seen).
- Paint a layer, sand lightly with a high grit sand paper (180-220), and paint again for the smoothest layers.
- If using glasses on two sides, make sure those are lined up on both sides.
- Be sure not to put the bow tie too low (if using) the stand.
Glue the bunny shapes together, if using two, and clamp. Once the bunny shape is secure, glue on all of the accessories. Seal all pieces.
If you’re using only one layer, select the appropriate stand size, measure kerf, and the offset the kerf before cutting. Paint, glue, and seal the stand.
To find kerf, cut the square included in the stand file. Measure what it is exactly after cut (with calipers). Divide the amount in half and that is the kerf for this material and your laser. Mine: 25.17, so 25.4 – 25.17 = .23 / 2 = .115
More Laser Cut Projects You Might Like
- Free Easter Bunny Profile Laser Bundle – Use this free set to create an adorable bunny in a “chocolate bunny” style.
- Bunny Napkin Holder Free Laser Cut File Set – This is a free Easter laser project that is a great way to learn (kerf and tabs / slots).
- Laser Cut Carrot Easter Basket Tags – Oh, the cuteness cannot be contained with these Easter tags!
Please Save or Share This Fun Easter Laser Project Idea
Your shares are how this site grows and I am sincerely grateful. Please save this to a DIY projects board or share it with a laser group on Facebook.

Laser Cut Easter Two Sided Bunny Display
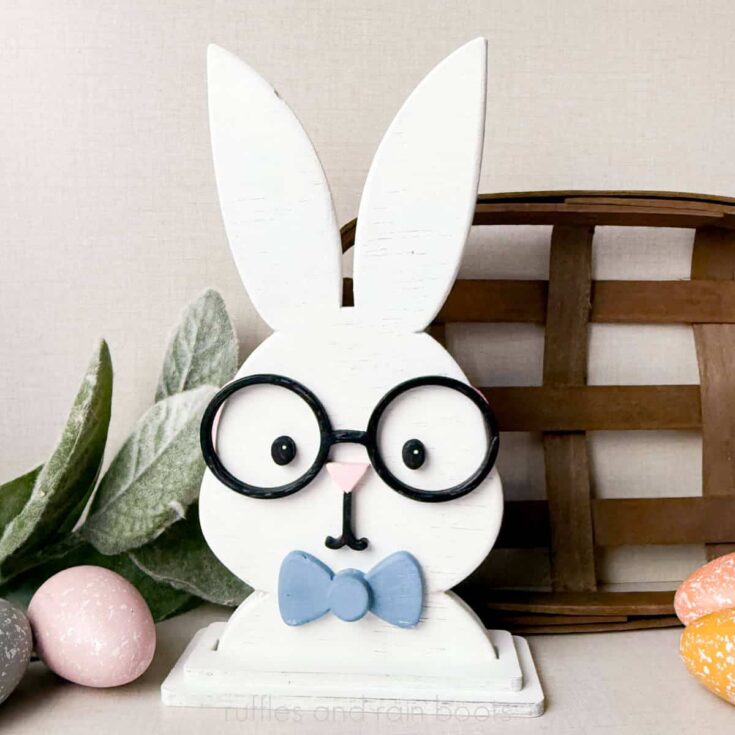
This adorable Easter shelf sitter has a surprise: it has a little boy or a little girl bunny! The free Easter laser template also comes with a ton of accessories for you make, kit up, or sell.
Materials
- 1/4 Lauan Plywood (or 1/8th or 1/4 any material)
- Glue
- Paint
- Sealant
Tools
- xTool P Series Laser
- Clamps
- Calipers
Instructions
Material and File Set Up
Load material into the laser, making sure it is level and secure. Turn on the laser.
Open the file or import the SVG file. The bunny shape is designed to measure 8.75 inches (225.25mm).
Determine if you want one layer or two. I’m going to cut two 1/4” bunnies and finish them differently (one sanded / shaped boy, one unshaped girl).
Choose the desired accessories and turn off all layers you do not want to cut (set the output toggle to off).
DESIGN NOTES:
- If you want the “pretty side” of something duplicated, be sure to FLIP the copy horizontally. These pieces are drawn by hand, so they are not always drawn symmetrical.
- You can opt to score the eyes for placement. I however, don’t. :)
- You can set the inside of the flower to score or cut.
- Find the stand that fits your project (remember, if you used two layers, it’s NOT the material width).
- If you’re using a stand AND you’re sanding, for the tightest kerf, measure after the piece is assembled.
Enter parameters. My settings were cut 80 power, 18 speed, and 1 pass.
Process and clean, if necessary.
CUT NOTES:
- The inside of the heart glasses can be used as conversation hearts.
- Be sure to wipe all edges of all items to remove any soot before you begin painting.
Sand and Paint
You can opt to use a sanding sponge, sand paper, or a sanding tool (Dremel) to shape all pieces of this design EXCEPT the very bottom flat portion where it fits into the stand or sits on the table.
For reference, I sanded the boy and shaped each of the pieces. The girl is not shaped at all.
Paint, sand, and seal each piece (or seal everything at the end).
PAINTING NOTES:
- Paint the back of the outer edges of the glasses (they can hang over the edge, so they might be seen).
- Paint a layer, sand lightly with a high grit sand paper (180-220), and paint again for the smoothest layers.
Add Accessories Bunny
Glue the bunny shapes together, if using two, and clamp.
Once the bunny shape is secure, glue on all of the accessories.
ASSEMBLY NOTES:
- If using glasses on two sides, make sure those are lined up on both sides.
- Be sure not to put the bow tie too low (if using)
Seal.
Measure and Cut the Stand
If you’re using only one layer, select the appropriate stand size, measure kerf, and the offset the kerf before cutting. Paint, glue, and seal the stand.
To find kerf, cut the square included in the stand file. Measure what it is exactly after cut (with calipers). Divide the amount in half and that is the kerf for this material and your laser. Mine: 25.17, so 25.4 - 25.17 = .23 / 2 = .115
Notes
Settings P2 (55 watt CO2) - Cut 80 power, 18 speed, 1 pass
Meet the Creator
Hi there, I’m Sarah Nenni-Daher. I’m a crafty gal and always have at least 14 projects going at once. I am a crafter, designer, DIYer, and pattern maker. I share my creations here and in the Ruffles and Rain Boots® Shop.
Here at Ruffles and Rain Boots®, you’ll find DIY gnomes, crafts, gifts, cupcakes, laser crafts, and so much more. I love sharing video tutorials over on YouTube and chatting with other crafters in my Facebook groups. We’d love to have you!