
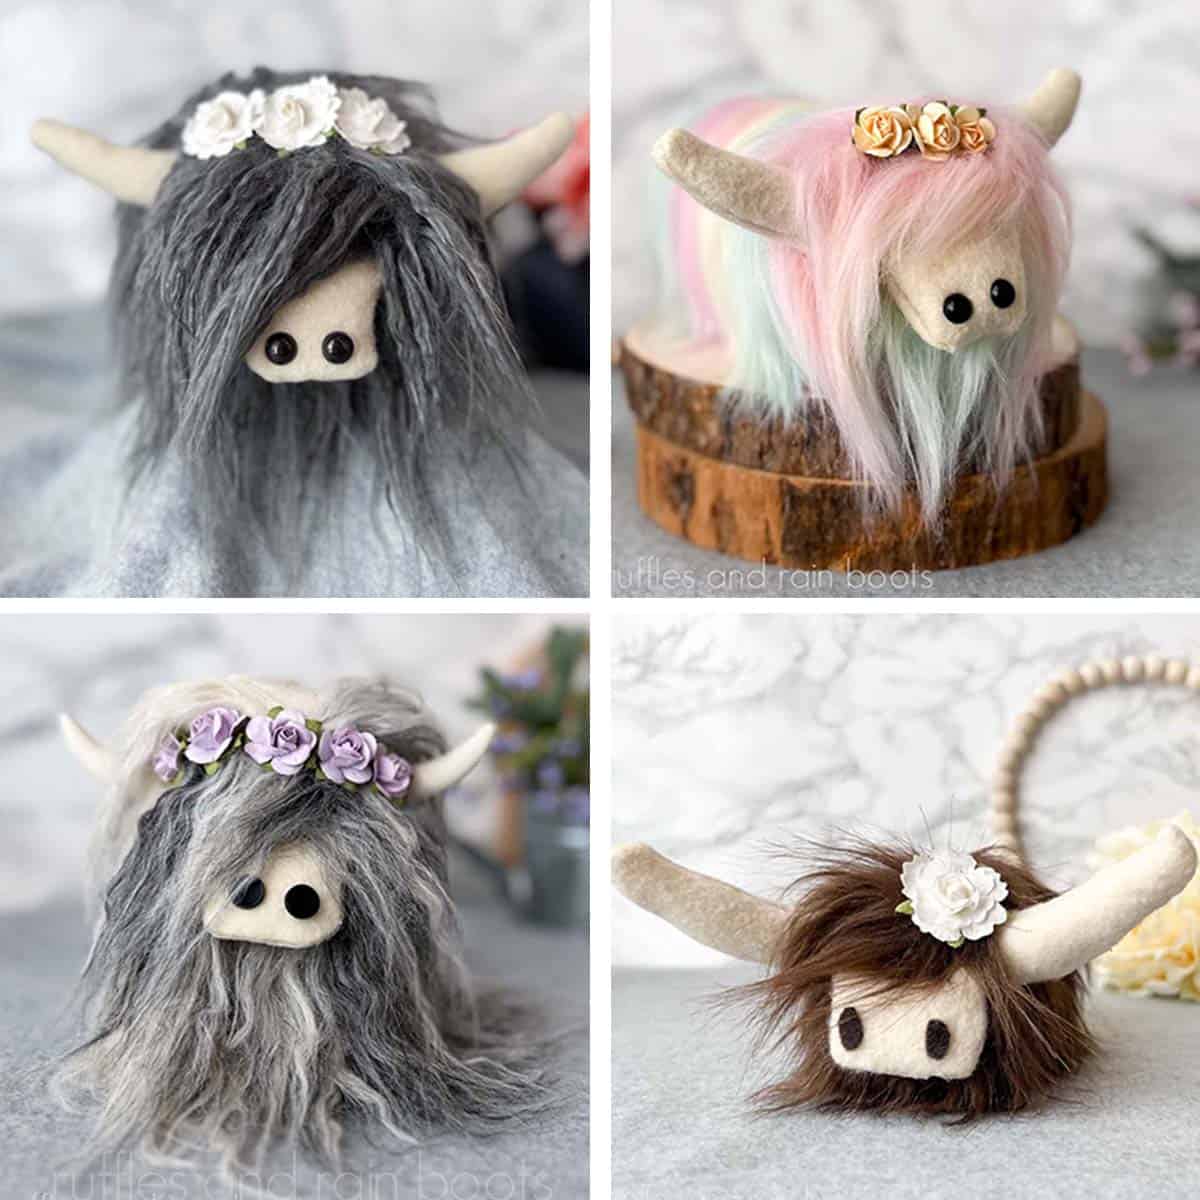
How to Make a Highland Cow (Free Pattern)
This no sew highland cow project idea is a fun way to spend a rainy day! The size can be adjusted, making it a perfect decor piece for a tiered tray, tucked into a bookcase, or placed on full view in an entry.
The free highland cow pattern includes the horns and snout made with hot glue, a body style choice (pool noodle or sock), and a full-length video tutorial. Friends, I cannot wait to share this fun DIY with you!

RELATED READING: This Easy Farmhouse Gnome is Done in Minutes Using Hot Glue!
What You'll Find On This Page
How to Make a Highland Cow Gnome DIY
Here at Ruffles and Rain Boots, I am so in love with the group we manage on Facebook. I. know the platform changes all the time and can be frustrating, but the group of crafters I get to spend time with are the best!
Over the past few months, highland cow DIY projects have hit a resurgence and are soaring again in popularity. And I have had no less than 100 requests to create a pattern and tutorial for a highland cow made with faux fur!
So here is me, delivering not one but two styles to create your own. But first… this is not a plush toy or stuffed animal; this is a decor DIY. Please do not give these to young children or pets.
RELATED READING: Pool Noodle Christmas Highland Cow Tutorial
Can’t Start This Easy Highland Cow DIY? Save or Share This for Later
If you need to check your stash or gather some fur, use the sharing buttons to make this easier to find when you’re ready to begin. Save this to a DIY craft pin board or share it with a crafty group on Facebook.
Your shares are how this site grows and I am sincerely grateful.

As an Amazon Associate, I could earn from qualifying purchases. There could be affiliate links within this article.
Is This a Highland Cow “Gnome?”
Because I make a ton of gnomes, I know I’m going to get this question so I want to let you know: I don’t see this as a gnome but there are SO many similarities, I can see where any confusion arises.
If you wanted to turn this into a gnome, use an upright body, a nose (as opposed to a snout), and add in the horns. I think that would be adorable and would love to see if it you make it. Come share it in the Facebook group here.

How to Use This Free Pattern
Click the link below and download the pattern to your device. Create the print at 100% to scale (in your printer settings). There is an inch marker included; please check the inch marker measurement before transferring patterns to the material.
Included in this pattern are two snout styles and one horn style. Both have the “stop” indicators which should be followed during construction. You CAN enlarge or decrease the pattern, however, note that when decreasing, turning the horns can be difficult.
Please note: this is a copyrighted pattern created by Sarah Nenni-Daher of Ruffles and Rain Boots, under the SND Developments LLC. All rights remain with the creator and the pattern may NOT be shared, distributed, or posted on any platform without express written permission from the creator.

DIY Farmhouse Cow Craft: Two Ways
In the full length, detailed DIY highland cow video tutorial here on YouTube, I show two different ways to create this cutie. Both are made only with hot glue – yay, no sewing! – and are easy to put together.
Highland Cow Pool Noodle Body (Standing Cow)
The first – and quicker and easier – body type is to create a standing cow using a piece of a pool noodle. The dollar stores carry them and they can be found at most big box stores.
That said, this style can be anything, so if you don’t have a pool noodle, use a mason jar, a plastic tube, a weighted sock stood upright – anything. If you want to add ‘hooves,’ use a heart-shape cutout as the base, paint them black, and secure the body to it.

Sock Body Highland Cow Plush
This is my preferred body type for this project because it is easy, quick, and has enough heft not be blown over. The sock can be placed horizontally (to resemble a cow) or with a vertical orientation to create the standing highland cow style.
Either way, choose your favorite – or make one of both. Let’s get started with the materials you’ll need.

Materials Needed for This Sock Cow Craft
Below are the materials I used, along with some alternatives. Use what you have in your stash – we have to work down these crazy craft supply totes! To keep this short, I’ll list the pool noodle supplies in the tutorial card at the end of the article.
- Detail Tip Glue Gun – This is my favorite (and I’ve tried many).
- Sock (children’s, women’s, or men’s) – I picked them up at the dollar store.
- Weight (I use Poly Pellets)
- Fill / Stuffing (I use Poly-Fil)
- Faux Fur – I recommend using a 2″ pile, but both shorter and longer will work. I have A LOT of fur on this list that I use and have tested the quality. The pool noodle cow’s fur is here on Etsy.
- X-Acto Knife – This is the easiest way I’ve found to precision-cut faux fur.
- Needle Nose Pliers – I’ve found these to be the easiest to use, but hemostats will work as well.
- Paper or Silk Flowers – I picked up two sizes fro the craft store.
RELATED READING: Make an Elegant Farmhouse Centerpiece for the Holidays
How to Make a Highland Cow with a Sock Body
Below, I’ll go step by step through the process with a full photo tutorial making this cute farmhouse decor idea. That said, I strongly urge you to watch the video because I include more detail. Sometimes, it’s easier to show you than tell.
Keep this page open while you craft through this project. Use the comments section and ask me any questions – I try to get to them quickly.
First, add 1 1/4 cup of weight (Poly Pellets) to the adult sock. Use 1 cup for a woman’s and 1/2-3/4 cup for a child’s sock. Lay the sock down and add stuffing on top of the weight. Tie it off and set it aside.

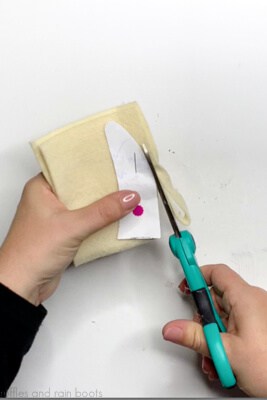
Next, print and cutout the patterns for the cow horns and snout. Fold over the felt (or thin fleece) with right-sides together, pin on the pattern, and cut out (2 sets of horns, 1 snout).
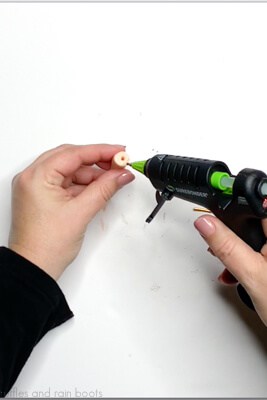
Use a detail tip glue gun and glue the horns and snout together. Let them set completely before handling.

Once set, use the pliers to grab the tip of the horn. Pull the unattached flaps over the horn and pull the tip through to turn. Stuff the horns with a small amount of fill and set aside.

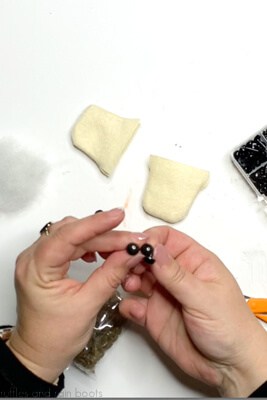
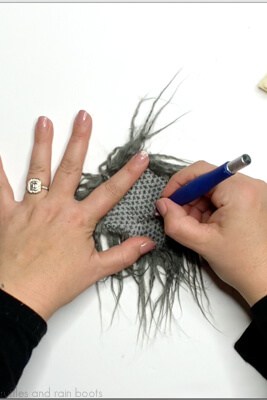
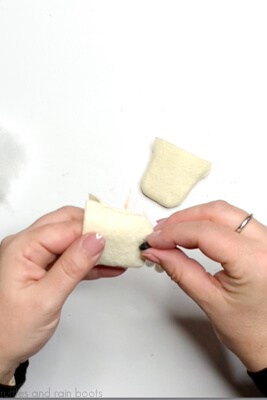
Turn the snout right-sides out and add the teddy bear safety eyes. Use an X-Acto knife to create a hole, insert the stud, and attach the fastener. Add a small amount of fill and set aside.
Wrap fur around the sock body, starting the attachment in the bottom center (to hide the seam). There are two ways to create the face and backside of the cow, so please see the full video tutorial for options to affix a piece of fur to the back. Leave the front face open.

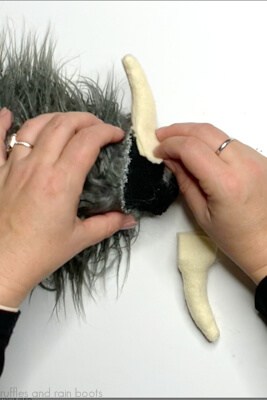
Use hot glue to close up and attach the horns onto the face of the cow. Use hot glue to glue them securely to the body.
Cut a piece of fur 1/2 inch wider around than needed to cover the cow’s face. Fold over all edges to hide the fabric backing and secure with hot glue.
Cut the bottom 1/3 off of the face piece and glue it to the cow’s face. Glue on the snout just above that, and then the final hair piece at the top of the cow’s head. Note: cover the edges of the horns.
If adding legs, turn the cow over, cut two corks in half, and glue just to the right and left of the body center. The placement is pretty close to center, as opposed to wide – the video shows where.

Decorate the cow plush with paper or silk flowers. Start at the center between the horns and create a flower crown or just add a charm or flower to one side.

RELATED READING: Easy Spring Farmhouse Wreath in Just Minutes
DIY Highland Cow with a Pool Noodle (Upright)
If you want to create a different style, the standing cow is TOO cute! It was a favorite in the Facebook group for sure.
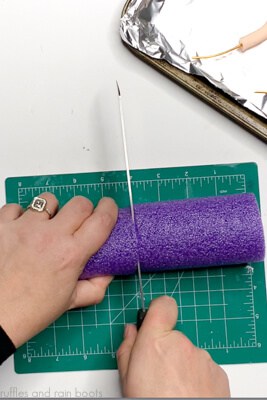
First, cut a 4 inch piece of pool noodle and affix it to a base of some kind. I used a thin wood round from the craft store, but wood ornament slices, cardboard circles, and so many other items will work to create a base.
Create the horns from clay (or use the pattern for the felt / fleece option). Work 1/4 of a small package of polymer clay into a log and point the ends. Cut the log in half, insert a wire about a third of the way into the horns, and cut off 2 inches to attach to the cow.

Remove the wire and bake the horns per the package instructions (see the video for tips). Glue back in the wire.
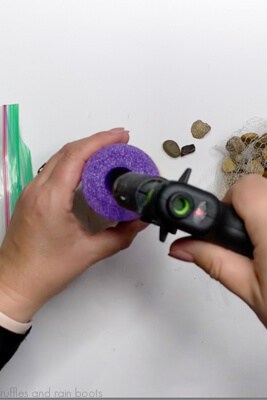
Add weight to the center channel of the noodle. I used small pebbles secured with glue.
Wrap the entire pool noodle in fur, overlapping the top by 1/2 inch (or so). Be sure to glue it securely along the bottom, join edge, and the top.

Print and cut out the pattern for the snout, fold the right sides together for felt or fleece, pin on the pattern, and cut out the snout.
Use hot glue to secure the snout, let dry, and turn right sides out. Glue on two buttons for the nostrils (or use felt or teddy bear safety eyes).
Brush the fur to the fabric backing and use an X-Acto knife to poke a hole in the pool noodle. Press in the wires for the horns vertically into the noodle and then bend to create the horn placement. Glue to secure.

Glue the snout closed at the open top. Split the fur to the fabric backing in the center front of the cow below the horns. Attach the snout with hot glue.

Cut a piece of fur that is 1/2 inch wider than the top of the pool noodle, glue down the edges, and secure with hot glue.

Decorate the flower crown using small paper or silk flowers. Start in the center of the horns and work outward.
For a printed version of these tutorials for highland cows, scroll down and select print in the tutorial box below.
More Crafts You Might Like to Make
- Farmhouse Gnome DIY – This ADORABLE, slouchy-hat gnome is easily made in minutes using a hot glue gun, some ticking stripe fabric, and gorgeous fur.
- Rustic Wood Round Tiered Tray – You don’t need to be a lumberjack to create this statement piece (just head to the craft store).
- Elegant Wood Round Door Sign DIY – Whether you have a cutting machine or not, this easy craft can be a profitable sign for side business.
DIY Highland Cow Plush

Use the free pattern to create a highland cow DIY without having to sew anything. This free highland cow pattern will have two snout styles and the cutest horns. Learn to make a full cow body or the popular stand up cow using socks or pool noodles - a full cow tutorial for both styles walks you through each step. The DIY highland cow craft also has a video tutorial detailing both styles, along with material ideas to create horns and the snout.
Materials
Sock Body Highland Cow Plush
- Crew Sock
- Faux Fur (I used a faux alpaca)
- Felt or Fleece for the Horns and Snout
- Poly Pellets
- Poly-Fil
- Teddy Bear Safety Eyes
- 12 gauge wire (if using clay)
- Optional, 2 Corks (for feet)
Pool Noodle Highland Cow
- 4 inches Pool Noodle
- Faux Fur
- Polymer Clay
- 12 Gauge Wire
- Flat Buttons for the Snout
- Circular Base (wood round, cardboard, or even a heart)
- Felt or Fleece for the Snout
- Optional, Wood or Cardboard Round
- Optional, Pebbles or Other Weight
Tools
- Detail Tip Glue Gun and Glue Sticks
- X-Acto Knife
- Cutting Mat (to protect surface)
- Needle Nose Pliers or Hemostats (for felt or fleece horns)
Instructions
Highland Cow Plush with a Sock Body
- Add 1 and 1/4 cups Poly Pellets to the sock and lay it down horizontally. Stuff with Poly-Fil to the desired fullness, tie off, and roll down the top of the sock. Lay it horizontally on the table.
- Print and cutout the patterns for horns and snout. Fold over the felt with right-sides together, pin on the pattern, and cut out (2 sets of horns, 1 snout).
Glue the horns and snout together with a fine detail tip glue gun, letting them set completely. - Use the needle nose pliers to grab the tip of the horn and pull down the flaps over the horn to turn. Please see the video for a detailed demonstration. Stuff the horns with a small amount of fill.
- Create the snout by first turning it right-sides out and adding the teddy bear safety eyes. I used the X-Acto knife to create a hole, inserted the stud, and attached the fastener. Add a small amount of fill and set aside.
- Use a piece of fur large enough to wrap around the sock body, starting the attachment in the bottom center (to hide the seam). Note that you can either cut one "front face" or two, so please see the full video tutorial for options on preparing the front and back of the cow.
Affix a piece of fur with either method to the back of the sock cow body, but leave the front face open. - Use hot glue to close up and attach the horns onto the face of the cow, securing them well to the body.
- Cut a piece of fur 1/2 inch wider around than needed to cover the cow's face. Use glue to fold over all edges to hide the fabric backing.
Cut the bottom 1/3 off and glue to the bottom of the cow's face. Glue on the snout just on top of that, and then affix the final hair piece at the top of the cow's head and front of the face. Note: there are other ways to do the face shown in the video. - If adding legs, turn the cow over, cut two corks in half, and glue just to the right and left of the body center. Please watch the video - the placement is much closer to center than one might think.
- Glue on paper or silk flowers to create a crown in between the horns and the highland cow plush is ready to display!
Pool Noodle Highland Cow
- Clay Horns
Work 1/4 package of the polymer clay into a log and point the ends. Cut in half, insert wire about a third of the way into the horns, and cut off 2 inches to attach to the cow. Shape the bend in the horn, remove the wire, and bake per the clay package's instructions.
Once the horns are baked and cooled, glue back in the wire (hot glue or E6000) and set aside. - Cut the pool noodle to 4 inches and secure to a round (cardboard, wood, ornament, etc.) with glue.
- Fill the center pool noodle channel with weight (I used small rocks) and glue to secure.
- Cut a piece of fur about 1/2 inch taller than the height of the pool noodle and attach (glue down the top as well as the body).
- Print and cut out the pattern for the snout. Fold right sides together for felt or fleece, pin on the pattern, and cut out the snout. Use hot glue to secure per the pattern, let dry, and turn right sides out. Glue on two buttons for the nostrils.
- Use an X-Acto knife to poke a hole in the pool noodle on either side of the "front," press in the wires vertically, and then bend to create the horn placement. Glue to secure.
- Glue on the snout by splitting the fur to the fabric backing and attaching with hot glue.
- Cut a piece of fur that is 1/2 inch wider than the open top of the pool noodle, glue down the center and edges with hot glue.
- Glue on paper or silk flowers to create a crown in between the horns and your highland cow DIY is ready to display!
Notes
Please watch the full-length video linked in the article - it's much easier to show some of the steps real-time than it is to write it out. Video here: https://youtu.be/Y2WVAgRC01A
The face is constructed quite a few ways, some are only shown in the video.
Most any size sock will work - I tested a children's, woman's, and men's crew sock. I have not tested the baby sized socks yet.
It is optional to weight the pool noodle, however, I do recommend it.
Recommended Products
As an Amazon Associate and member of other affiliate programs, I earn from qualifying purchases.


I love the little cow, I made the pool noodle one, first. I can’t wait to try the sock one. He is so cute. I added eyes to mine. I couldn’t handle a blind cow!!
I want to send a picture, but I dont know how!!
Could you use rice, corn or something else besides the poly pellets?
You can use rice, however, it can mold, sprout, or attract animals which is why I do not recommend it or other food items. Some alternatives to food products are aquarium rocks or clean play sand in a sealed bag.
I love your highland cow however I cannot find the link for the pattern.
The pattern link is at the very bottom in the instruction panel (the one you can print). It’s the last item in the materials listing.