
Christmas Shelf Sitter Gnome with Legs
Make an adorable memorial or Christmas shelf sitter gnome using this easy gnome pattern, a free gnome boot pattern, and a miniature tree decoration. This no sew gnome pattern goes beyond a simple sock gnome and looks like an heirloom piece.
You will need fleece, cotton, weight, stuffing, and a few more basic craft supplies to make this adorable holiday gnome. The dangling legs and adorable gnome booties will have everyone ooh-ing and ahh-ng over your craft.

RELATED READING: Scandinavian Christmas Gnome Sewing Pattern
What You'll Find On This Page
Christmas Gnome with Long Legs
Here at Ruffles and Rain Boots, it’s hard for me to NOT make a gnome a week. We have a lot of fun in the Facebook group and on the YouTube channel with them, so why not? I move them in and out of our home decor cycle, gift them, and even make a TON for charity this time of year.
This week, I found a striped cotton fabric I’d been missing since the move (go figure, I had used it to wrap a glass jar…) and knew what I wanted to make. This little Scandinavian gnome just popped into my head!
Save or Share This Adorable Christmas Craft Idea
If you need to gather supplies or grab the patterns, please use the sharing buttons to save this page. Whether on Pinterest or Facebook, either save will make it easy to find when you’re ready to begin.

As an Amazon Associate, I could earn from qualifying purchases. There could be affiliate links within this article.
RELATED READING: Free Crochet Pattern – A Scandinavian Gnome
Tips for Making a Scandinavian Gnome with Arms and Legs
- Get the no sew gnome pattern here and the free slopey gnome boot pattern here (psst: be sure to check out all of the free patterns I share).
- The Scandinavian gnome pattern I used to make this adorable gnome comes with a hat, gnome body and base, arms, multiple mitten styles, shoes, and even some fun extras. Feel free to change your cuts to fit your project.
- This Christmas gnome with legs is constructed with only a hot glue gun – there is no sewing machine involved. The best part of this pattern, however, is that in case you want to learn, this can be sewn, as well and I have many tutorials for you here on this gnome tutorial playlist.
- Check the miniature tree decorations sections for perfectly-sized items for gnomes to hold. Add a pom pom to the top of the hat, a fur trim on the brim, or anything else you’d like when making your DIY Christmas gnomes.
- I am using white Mongolian faux fur for this adorable Christmas gnome pattern, but you can use any fur, moss, or even yarn you have on hand. You don’t need a lot of it for this guy.
- This Nordic gnome shelf sitter’s body and hat measures between 12 and 14 inches, making it the perfect size for a shelf, tray, or even dangling his legs off the end of a table.

RELATED READING: Christmas Wine Bottle Bag – This is GORGEOUS!
How to Make a Gnome with Legs for Christmas Decor
Keep this page open while you read along and follow the step by step picture tutorial. If you have questions, use the comment section below and I’ll help.
If you’re a visual learner, I have the Christmas gnome with arms and legs video tutorial here on YouTube. While you’re there, subscribe to the channel – we have a lot of fun with easy crafts.
No Sew Christmas Shelf Sitter Gnome

Create an adorable Christmas shelf-sitter gnome using cotton and fleece fabric, a glue gun, and some fur. A few gnome-making supplies and an adorable little item for him to hold makes this DIY holiday gnome a quick crafting win.
Materials
- Scandinavian Sweeties Pattern
- Slopey Boot Pattern
- Fleece
- Cotton
- Faux Fur (no more than 4 inches wide)
- Poly Pellets
- Poly-Fil
- Wire (12-14 gauge or wrapped together to 1/8")
- 1-inch Wood Round
- Mini Decorations
- Optional, Embroidery Thread and Needle
Tools
- Scissors
- Pins
- Hot Glue Gun and Glue Sticks
- Ruler
Instructions
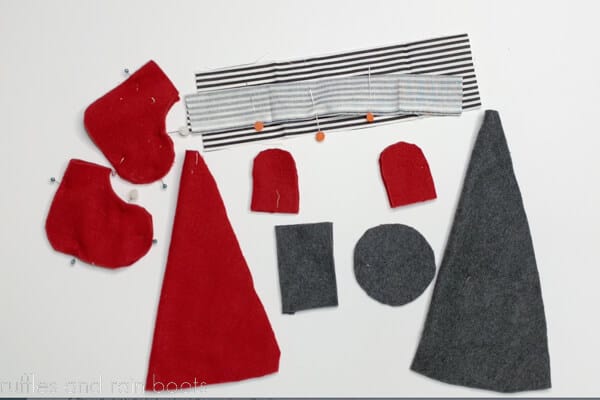
- Cut out the following pattern pieces from fleece: body, base, hat, 2 arms, 2 sets of long mittens, and 2 slopey boot pieces. Use the ruler to cut 2 legs at 3" W x 10" L from a cotton fabric (can use fleece, as well).

- Hot glue the following pieces per the pattern instructions with right-sides together: body and base, hat, arms, legs, boots, and mittens. Let all glue set and turn everything right-sides out.
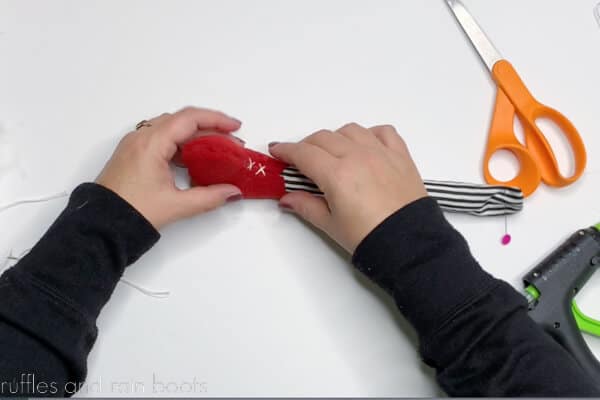
- Fill the body with one cup of weight and stuffing so that it bounces back when squeezed.
- Create a wire one inch longer than the body height, turn down the ends to avoid poking through the fabric, and add the wire into the body as structure. Secure the wire to the channel opening before closing the body.
- Slip on the hat to the body and mark the nose place with a pin.
- Create arms by adding stuffing to the mitten and gluing arms into the mitten with seams facing inward. Pin arms in place under the hat to the sides of the gnome body.
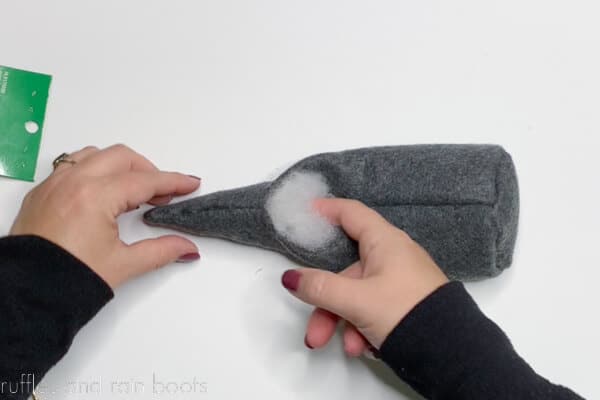
- Create the legs by stuffing each leg with fill, leaving the top 1.5-2 inches open (you can cut it down to size). Secure one end of the leg with hot glue by folding the fabric inward.
- Stuff the boots and add laces, if using. Slide in the leg and secure with glue.
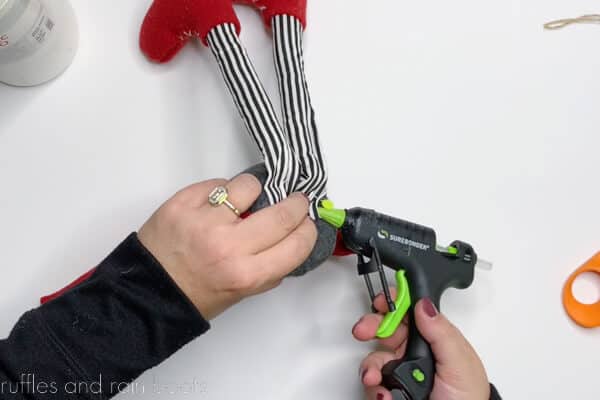
- Glue the top, unstuffed portion of the legs under the base of the body. Optional: you can cut another base piece to cover as I did or leave them as-is. You can also trim the legs down as I did.
- Measure the width of the gnome body between the arms and cut a piece of faux fur to fit. I used a one inch drop and a V-shape. Glue to the body above the brim line of the hat. Glue down the arms after sizing for whatever mini decoration it will hold.
- Split the fur to the fabric backing and use hot glue to add the one inch wood ball for a gnome nose. Secure the hat to the nose, over the arms, and around the back to the body.
- Glue on the mini decoration and display the Christmas gnome with legs.


Notes
It is optional, but you can do as I did and cut a second base piece and glue over the legs under the bottom of the gnome.
Miniature decorations from the craft and big box stores are great - just look for the small or miniature tree decor section.
Recommended Products
As an Amazon Associate and member of other affiliate programs, I earn from qualifying purchases.


More Christmas Gnome Crafts You Might Like
- Christmas Sock Gnomes – These went absolutely viral for a reason: they are easy. It sure doesn’t hurt they’re cute as can be, either!
- Easy Angel Gnome Pattern with Free Wings – Using this same pattern, you can make a beautiful, elegant angel or memorial gnome for the holidays.
- Make a Standing Sock Gnome – It can be done and I figured out the easiest way possible. Oh, and it has a free gnome boot pattern, too!
- Christmas Gnome Ornaments – Another viral sensation, these adorable gnomes make use of fur scraps, felt, and are a snap to put together.
Please Save or Share This Adorable Holiday Gnome Craft
Your shares are how this site grows and I am sincerely grateful. Please save this to a DIY gnome ideas pin board or share it with a crafty group on Facebook this holiday season.

Meet the Creator
Hi there, I’m Sarah Nenni-Daher. I’m a crafty gal and always have at least 14 projects going at once. I am a crafter, designer, DIYer, and pattern maker. I share my creations here and in the Ruffles and Rain Boots® Shop.
Here at Ruffles and Rain Boots®, you’ll find DIY gnomes, crafts, gifts, cupcakes, laser crafts, and so much more. I love sharing video tutorials over on YouTube and chatting with other crafters in my Facebook groups. We’d love to have you!