
xTool M1 Ultra Heat Transfer Vinyl Craft
The versatility of the xTool M1 Ultra is on full display today! Learn how to make a flock vinyl flour sack towel with the fine point blade, flock heat transfer vinyl and an engraved Easter wine bag.
RELATED READING: xTool M1 Ultra Review and Beginner Tutorials
What You'll Find On This Page
Easter Laser Craft Ideas: Engraved Wine Bag and Flour Sack Towel
Here at Ruffles and Rain Boots, I’ve shared that crafting for Easter is such a fun time. In fact, I’ve shared a TON of Easter crafts to make with a laser already, but I am not done yet.
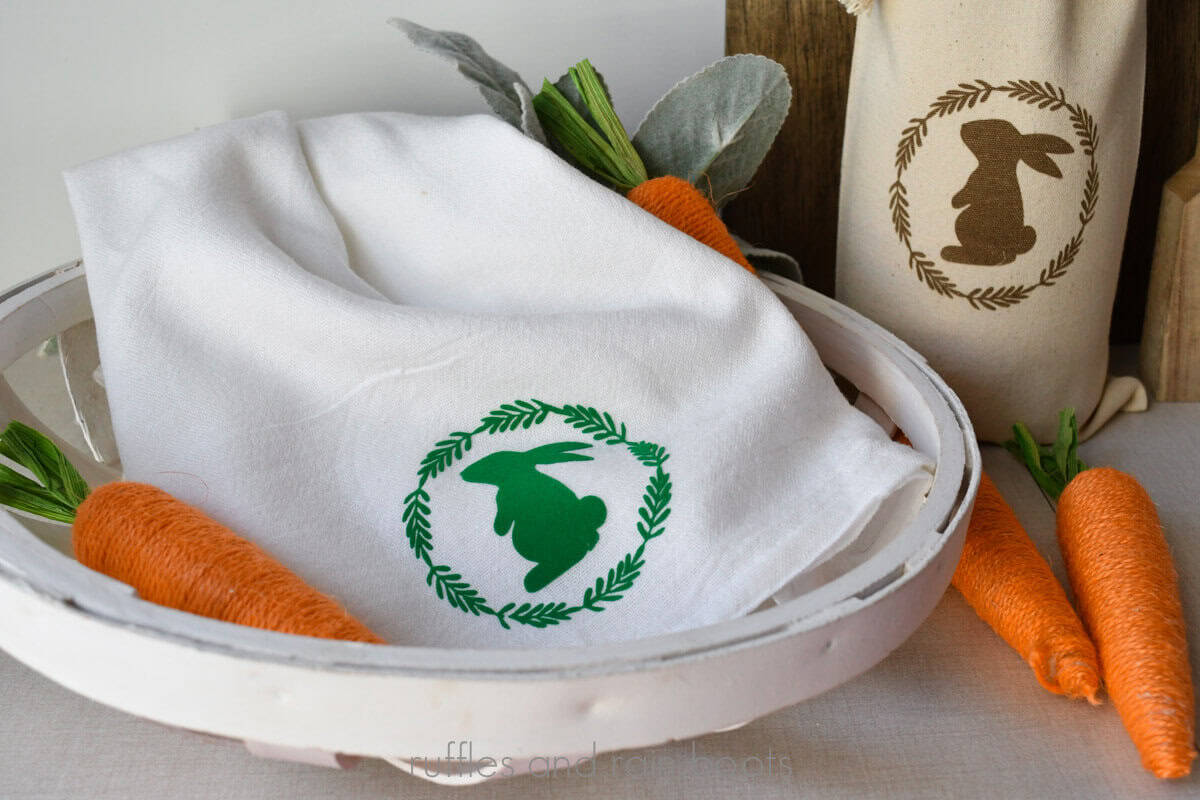
Today, I’m making a very popular item – an engraved wine bag – and this fun flour sack towel for a bread basket. I’ve shared how to engrave a wine bag with the xTool M1 Ultra already, however, I changed the settings on this one to 15 power, 55 speed, 1 pass and 140 lines per centimeter.

As an Amazon Associate, I could earn from qualifying purchases. There could be affiliate links within this article.
Materials Needed for This Craft
Below are the materials and tools I used to create this Easter laser craft idea. You can use any brand or style of heat transfer vinyl for this DIY, however.
- Flock Vinyl (Flock Heat Transfer Vinyl / Flock HTV)
- Flour Sack Towel
- xTool M1 Ultra
- xTool Mini Press
You will also need a weeding tool of some kind (a pick or pin pen) and a sticky mat. I used the light grip and a brayer tool to press the heat transfer vinyl onto the mat.

xTool M1 Ultra Heat Transfer Vinyl Video Tutorial
If you’re a visual learner, you can watch how to use flock vinyl with the xTool M1 Ultra in this quick video tutorial. It will also show you how to engrave onto canvas, including how to prepare material, measure for the design, and how to clean up the engraving.

How to Cut Heat Transfer Vinyl with the xTool M1 Ultra
- Insert the fine point blade into the basic housing (the small housing on the left side of the module).
- Import or drag in the desired SVG for the project into the free XCS software. Create a small rectangle around the SVG. I used a rabbit from this rabbit SVG silhouette set.
- Enter settings for the design as kiss cut and the rectangle for full cut. My settings for kiss cut were 150 pressure and 50 speed. My settings for full cut were 600 pressure and 10 speed.
- Mirror the design (reverse horizontally).
- Apply a light sticky mat to the laser bed and place the flock heat transfer vinyl face down (the shiny side down).
- Mark the area in a rectangle using the marking menu and the white button and then position the design and rectangle into the marked area.
- Process the design and weed out the excess material so you are left only with the design in the flock vinyl on the carrier sheet.

How to Press Flock Vinyl onto a Flour Sack Towel
- Place the flour sack towel on the pressing mat.
- Using the mini heat press, press out any moisture from the towel before applying the vinyl.
- Position the vinyl – the plastic carrier sheet sheet will be facing up – onto the towel and press per the vinyl’s instructions for time and heat level.
- Let the vinyl cool after pressing and slowly remove the carrier sheet. Go slowly and if any flock vinyl lifts, put the carrier sheet back down and press again.
- Fold up the towel and it’s ready for gifting or use.

Show it Off!
This laser craft Easter set is perfect for a fun way to personalize a hostess gift using the same design. I’d love to see what you make using this tutorial – or any other. Join our Laser Crafting Facebook Group.
More Crafts You Might Like
- Easter Pom Pom Bunny Laser Craft – Using felt or wood, use your M1 Ultra to create a cutie!
- Laser Cut Mini Rulers – This easy project is a great way to learn about your new laser.
- Christmas Laser Crafts to Make and Sell – Get some ideas for gifts or products to sell during the holiday rush.
Please Save or Share This Fun Laser Easter Craft Idea
Your shares are how this site grows and I am sincerely grateful. Please share this with a crafty group on Facebook or save it to a DIY Laser Ideas pin board.

xTool M1 Ultra Flock Vinyl Towel

This adorable Easter flour sack towel is made in just a few minutes with the help of the xTool M1 Ultra. It's a great craft for a beginner and has so many uses, such as a bread basket liner, as part of a gift set for a hostess, or to decorate the kitchen for the holiday.
Materials
Tools
- xTool M1 Ultra
- Sticky Mat
- Weeding Tool
- Heat Press and Pillow (or Auto Press)
Instructions
- Open the free XCS software and choose the M1 Ultra as the machine. Note that you can design and set up the file without being connected to the machine.
- Insert the fine point blade into the basic housing (the small housing on the left side of the module).
- Import or drag in the desired SVG for the project. Create a small rectangle around the SVG.
- Enter settings for the SVG for kiss cut and the rectangle for full cut. My settings for kiss cut were 150 pressure and 50 speed. My settings for full cut were 600 pressure and 10 speed. NOTE: your flock vinyl settings could be different, so please perform a Smart Materials Test using this video.
- Ensure the bed of the laser is installed, along with a light sticky mat. Place the flock heat transfer vinyl face down (the shiny side will be on the mat). Optional: brayer in place / press down thoroughly.
- As we are using the blade, there is no need to measure distance. Mark the area in a rectangle using the marking menu and the white button.
- Position the design and rectangle into the marked area.
- Process the design and weed out the excess material so you are left only with the design in the flock vinyl on the carrier sheet. NOTE: it helps to weed on a flat surface with a pick tool or pin pen.
- Place the flour sack towel on the pressing mat. Using a heat press, press out any moisture from the towel before applying the vinyl.
- Position the vinyl - the carrier sheet sheet will be facing up - onto the towel and press per the vinyl's instructions for time and heat level. These instructions will come with your vinyl.
- Let the vinyl cool after pressing and slowly remove the carrier sheet. NOTE: it helps to pull back the carrier sheet nearly parallel to the vinyl. Go slowly and if any flock vinyl lifts, put the carrier sheet back down and press again.
- Fold up the towel and it's ready for gifting or use.
Notes
Flock vinyl can be washed with a mild detergent in cold to warm water.
Meet the Creator
Hi there, I’m Sarah Nenni-Daher. I’m a crafty gal and always have at least 14 projects going at once. I am a crafter, designer, DIYer, and pattern maker. I share my creations here and in the Ruffles and Rain Boots® Shop.
Here at Ruffles and Rain Boots®, you’ll find DIY gnomes, crafts, gifts, cupcakes, laser crafts, and so much more. I love sharing video tutorials over on YouTube and chatting with other crafters in my Facebook groups. We’d love to have you!