
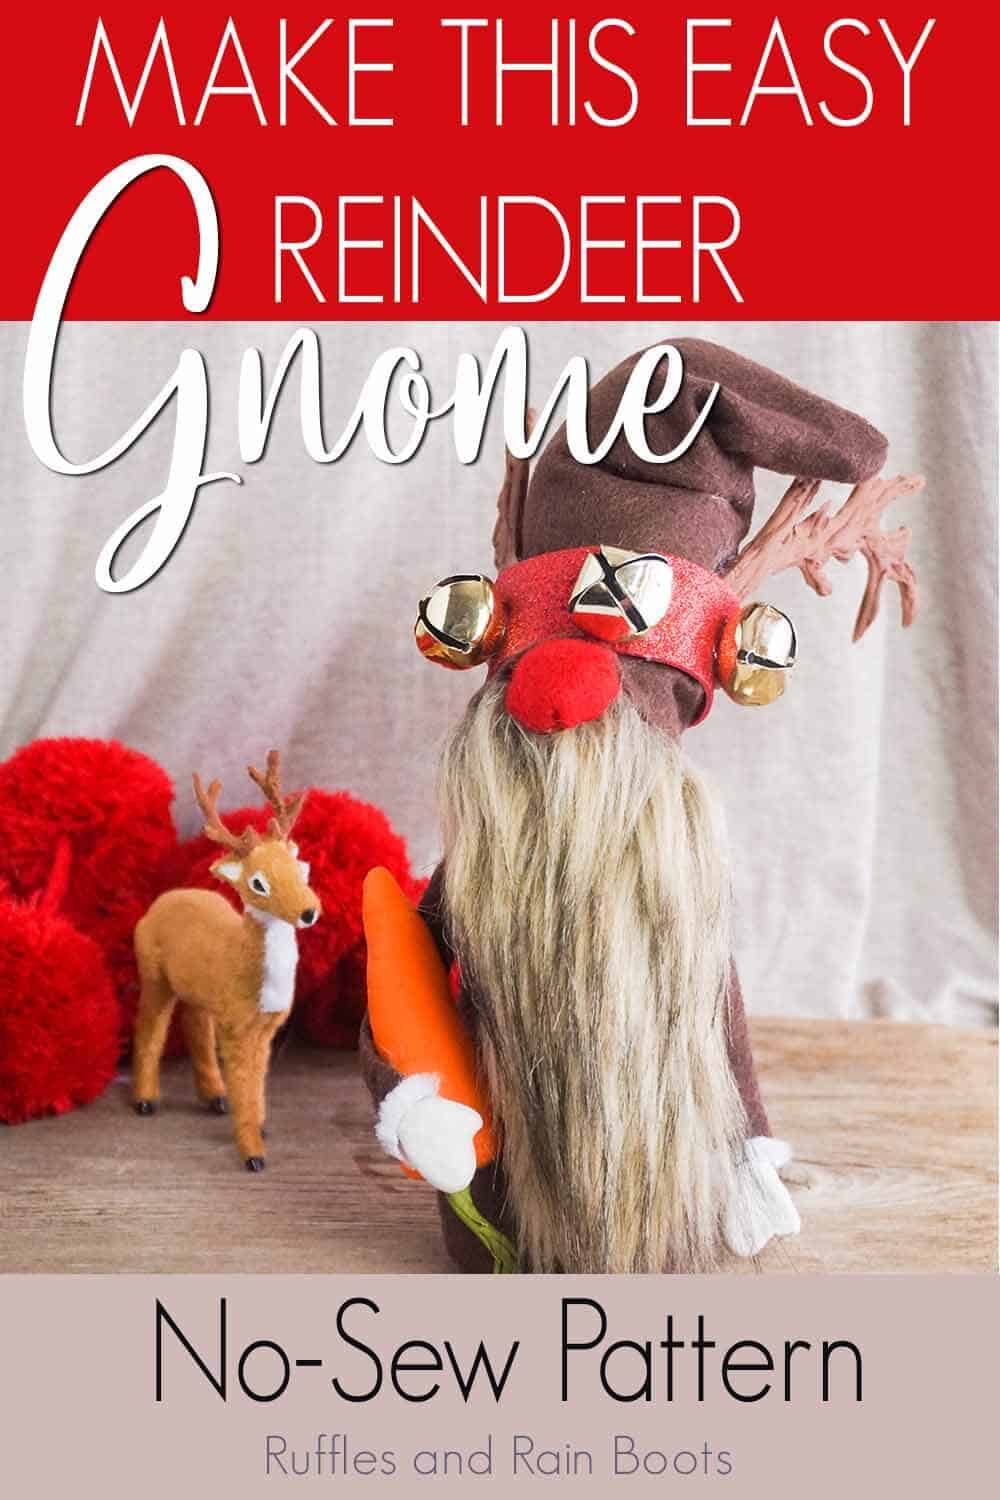
This Reindeer Gnome is so CUTE! Such a Simple Rudolph Gnome
When I started this reindeer gnome, I wasn’t entirely sure what my Rudolph gnome would end up looking like. But, this is definitely at the top of my list for Christmas gnome tutorials!
What You'll Find On This Page
Reindeer Gnome
Here at Ruffles and Rain Boots, we are quite possibly gnome-obsessed. And I don’t mean a little bit. We have Christmas gnome tutorials, farmhouse gnome tutorials and every holiday you can think of. All gnomes, all the time here. But, this little deer gnome has definitely skyrocketed to somewhere near the very tippy top of my adorable gnome list.
RELATED READING: DIY GNOME TUTORIALS
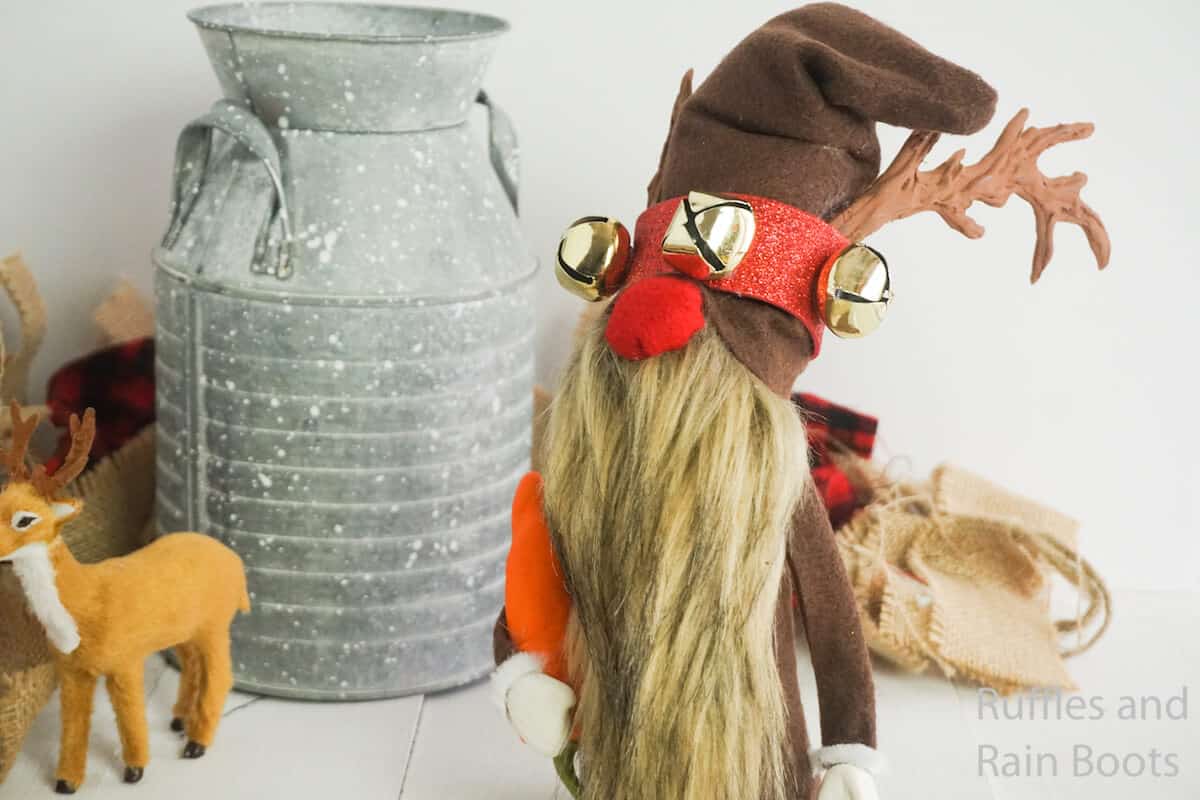
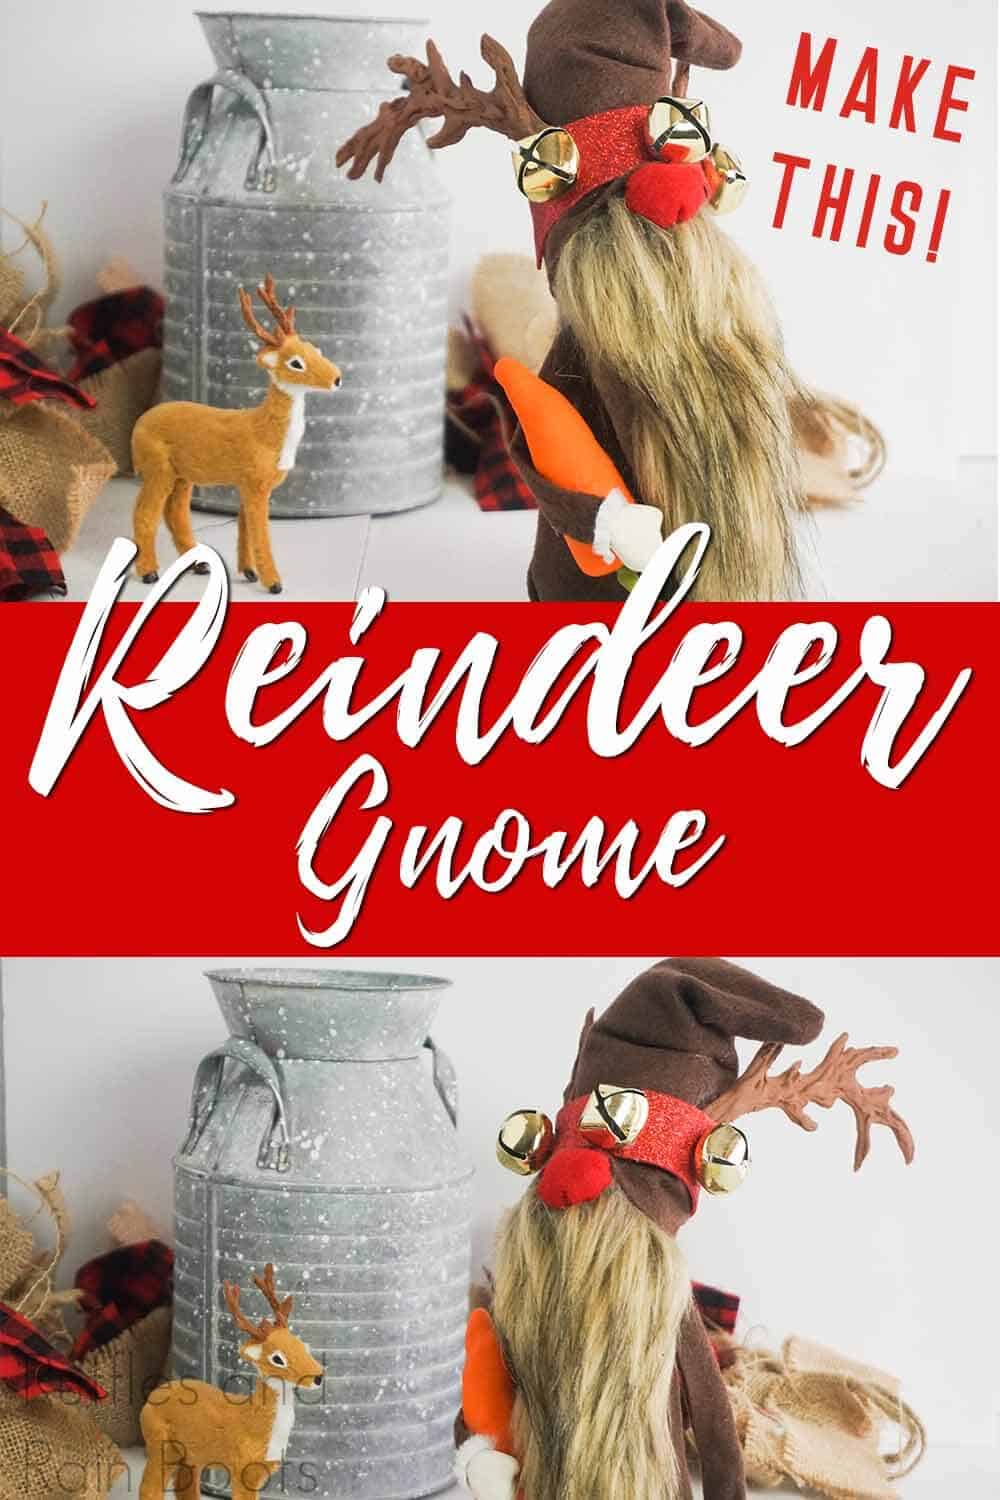
He’s brown, sure, but he’s got sass and a giant carrot, and a red nose to light the way. Only 20 minutes and this adorable Rudolph gnome is ready to help pack-up Santa’s sleigh. If you’re ready to make a little red nosed reindeer in gnome form, let’s get started.
DIY Christmas Gnome Tutorials
If you’re looking for the best DIY Christmas gnome tutorials, you have come to the right place. Check out all of my favorite tomte tutorials for the holidays!
No Time to Make This Now? Pin it for Later
You’re busy, I get it. Pin this to your favorite Christmas gnome tutorials board on Pinterest and it’ll be here for when you’re ready.
As an Amazon Associate, I could earn from qualifying purchases.
Tips to Make a Rudolph gnome
- Click here to get the free printable Rudolph gnome pattern. It’s possible you could make this on your own without it, but this reindeer gnome is so much easier with a pattern.
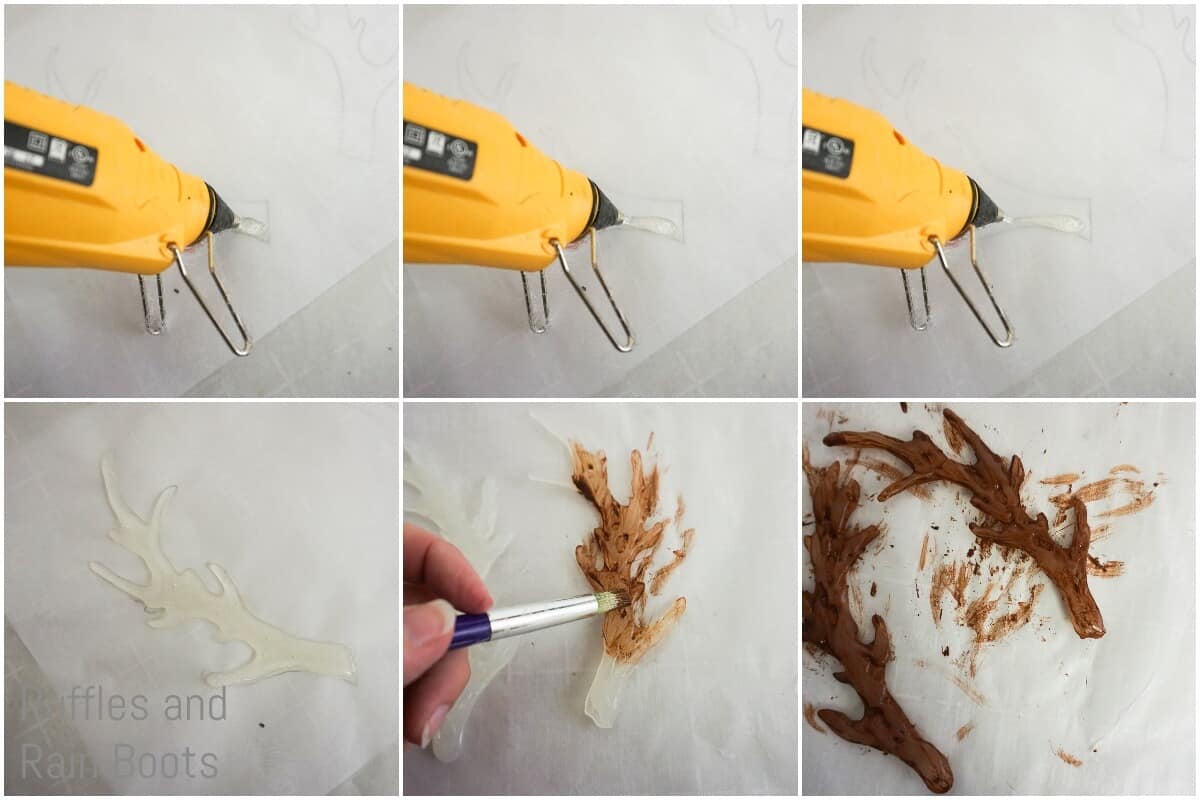
- Use parchment paper to make your antlers, not wax paper. I’ve tried wax paper and the hot glue does not separate as easily from it.
- I used fabric for the nose, but if you have a small stash of red polymer clay, it would look great. So would a red pompom with a little sparkle.
- If you need a tiny deer to go with your red nosed reindeer gnome, check out this tiny deer ornament!

How Do I Make this Reindeer Gnome?
I’m so glad you asked. Below is our written tutorial. If you are putting together a Christmas gnomes playlist on YouTube, here is our Christmas reindeer Rudolph gnome video tutorial.
Reindeer Gnome

When I started this reindeer gnome, I wasn't entirely sure what my Rudolph gnome would end up looking like. But, this is definitely at the top of my list for Christmas gnome tutorials!
Materials
- Free Printable Reindeer Gnome Pattern
- Dark Brown Craft Felt
- Light Brown Craft Felt
- Orange Polymer Clay
- Green Polymer Clay
- White Polymer Clay
- Red Glitter Foam Sheet
- 3-5 3/4-inch Gold Bells
- Brown Craft Paint
- Polyfill
- Uncooked Rice
- Red Craft Felt Scraps
- White Craft Fur Scraps
- Brown Mongolian Fur
- 1/2 Floral Wire
Tools
- Hot Glue Gun and Glue
- Parchment Paper
- Scissors
- Exacto Knife
- Oven
- Paintbrush
Instructions
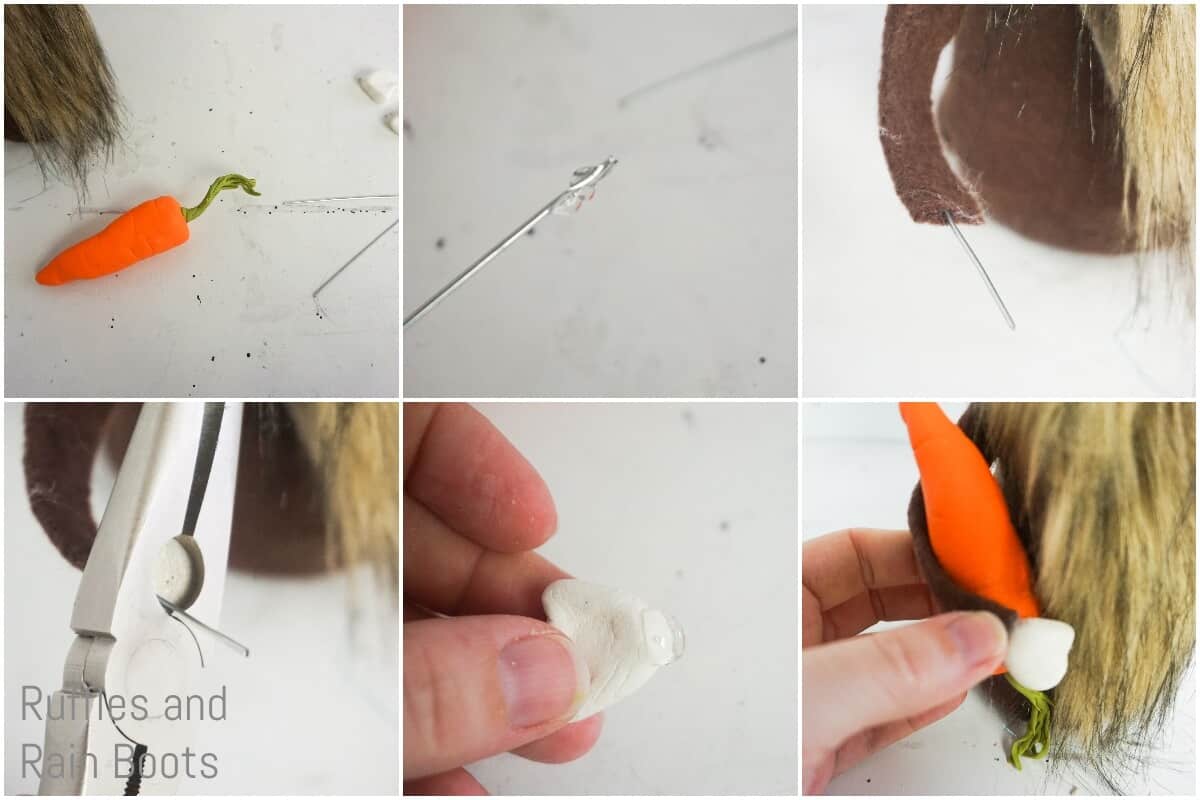
- Start by making your carrot by rolling your orange polymer clay into a ball, then working it into a large cone. Flatten one end, round all the corners and rub the sides with the floral wire to make little details of lines. Set aside.
- Make the carrot stem by rolling a very small portion of green polymer clay into a thin snake, then cutting the end about halfway up in horizontal strips to make feathery "leaves".
- Attach the carrot stem to the top of the carrot. Set aside.
- Make the mittens by breaking off two equal-sized portions of white polymer clay (about 2-dime-sizes) and forming them into a hand shape.
- Bake mittens and carrot per the directions on your polymer clay packaging. Allow to cool completely before handling.
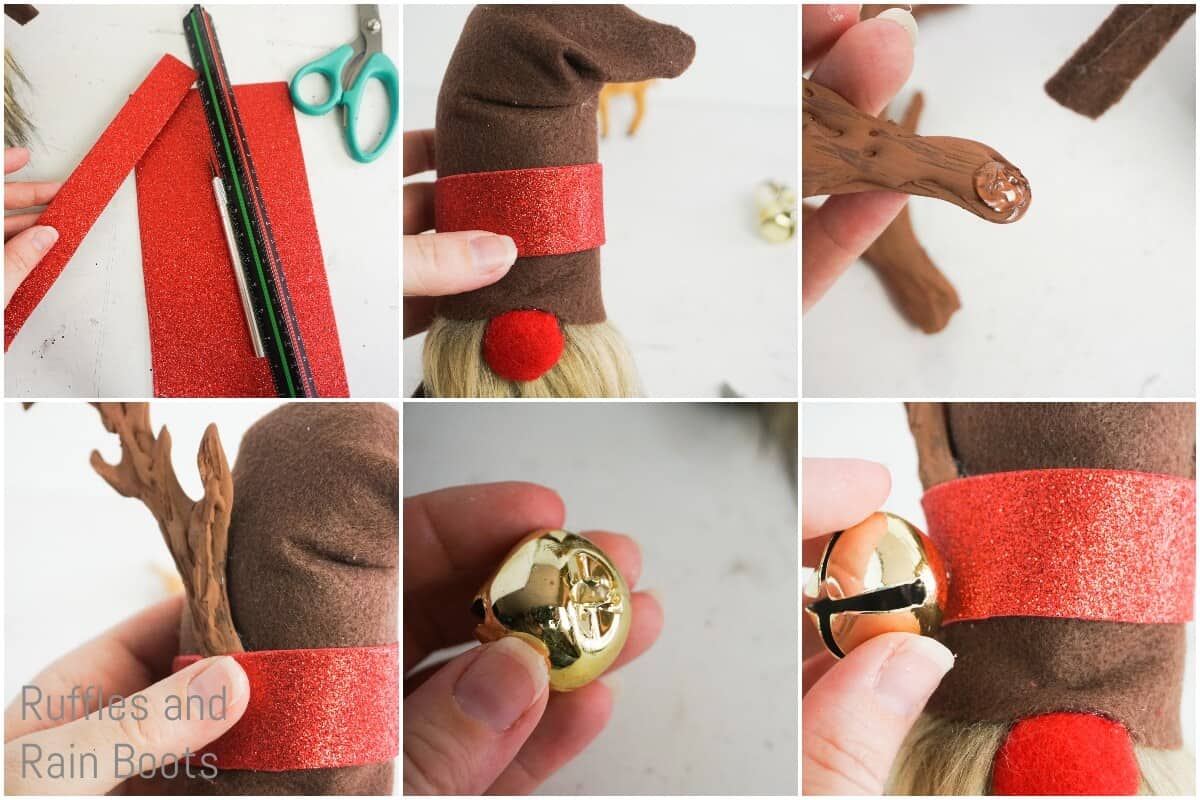
- Make the antlers by placing the printable antler template under a piece of parchment paper, then drawing the antler shape with hot glue. To give it texture, add layers of hot glue, blowing on it as you go. Be sure to flip the antlers and make both sides the same level of textured.
- Trim any straggly wisps of hot glue from the antlers.
- Patin the antlers with the brown craft paint. This required 3 coats for mine before I was satisfied that it no longer looked like hot glue. Set antlers aside.

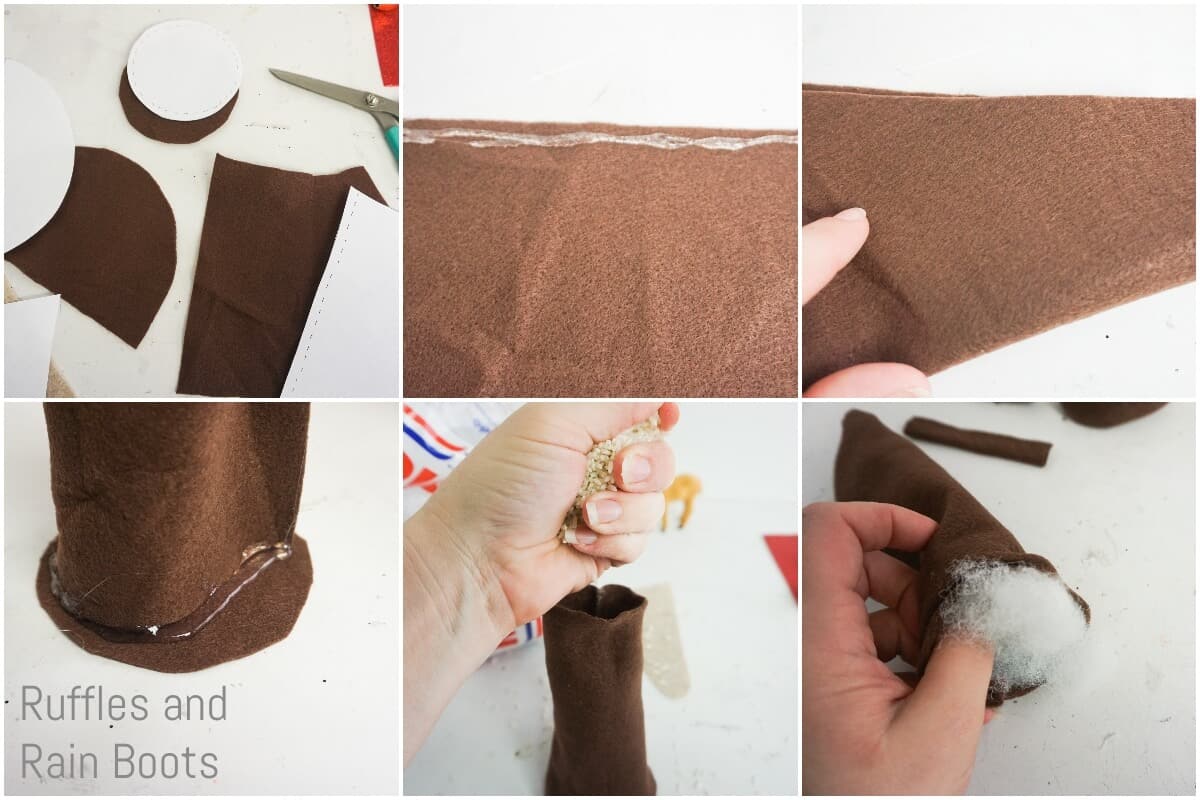
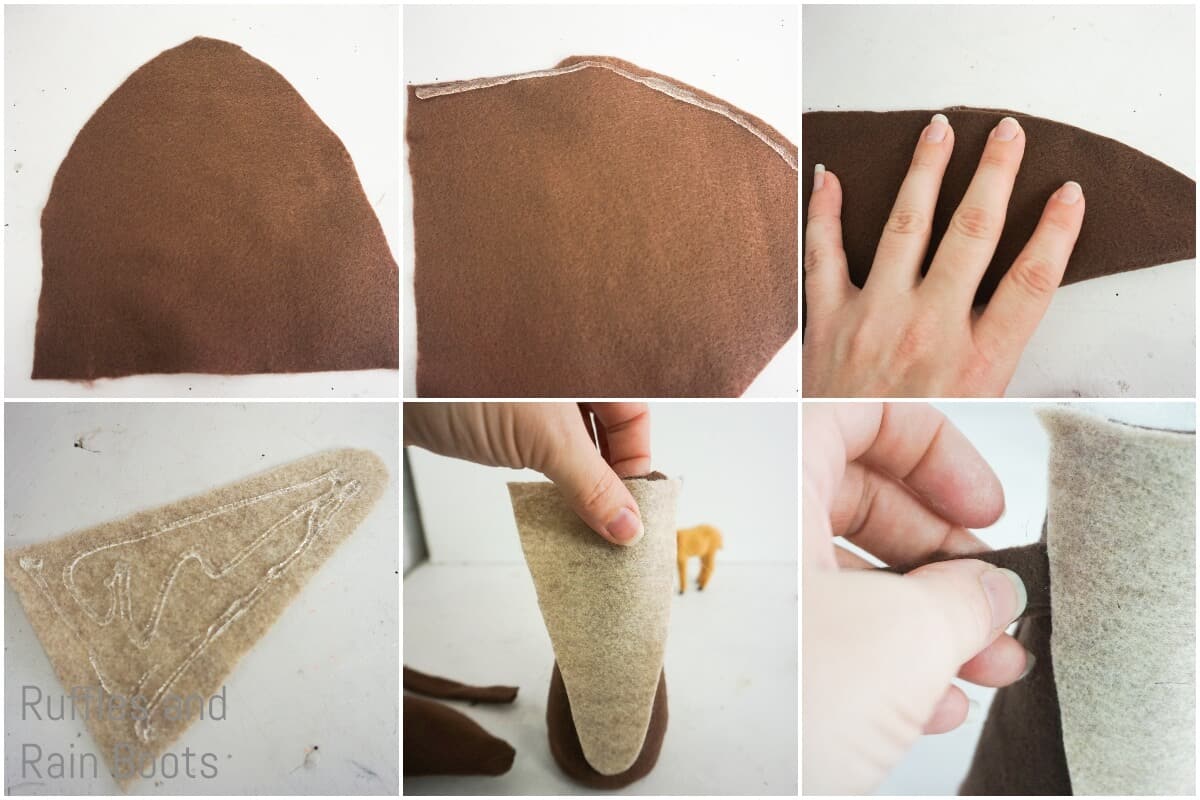
- Make the gnome by cutting out the beard-triangle shape from the light brown craft felt and all other shapes on the template in the dark brown craft felt.
- Roll the larger rectangle of dark brown craft felt into a tube and hot glue it in place.
- Hot glue the circle (the base of the gnome) onto the tube you just made. This is the gnome's body.
- Turn the gnome's body right-side-out.
- Fill gnome body with rice.
- Tuck a little polyfill in the top of the gnome body to keep the rice from spilling if it falls over in the next couple of minutes. Set aside.
- To make the gnome's hat, you can use the hat from the template, but I decided I wanted a more floppy hat, so I ended-up straying from the template and cutting out a large, fat triangle. But either will work.
- Fold your hat shape in half and glue the sides together along the edge.
- Turn the hat right-side-out.
- Tuck a small portion of polyfill into the bottom of the hat.
- Fold the hat over the polyfill area and hot glue the folds in place. Set aside.
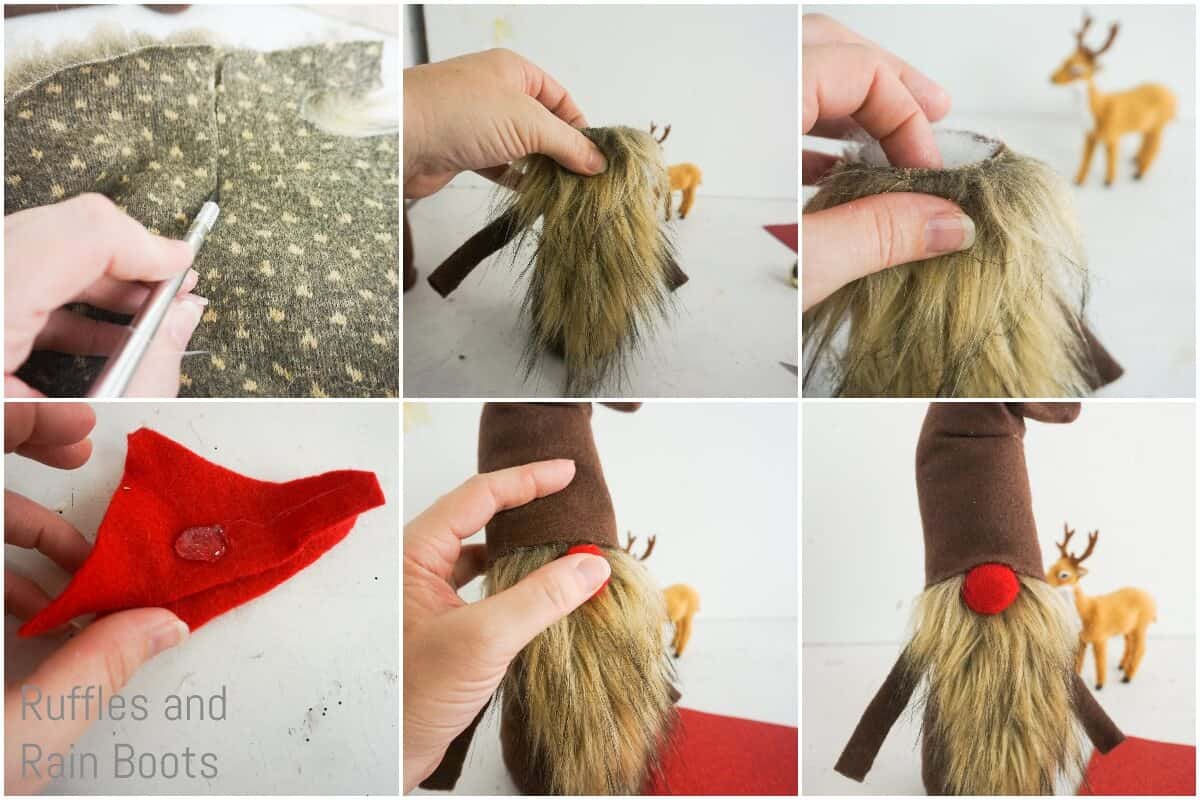
- Hot glue the light brown craft fur shape onto the tummy of the reindeer gnome body.
- Roll the two smaller rectangles of dark brown craft fur into tubes and hot glue them in that shape to make arms.
- Glue the arms to the sides of the gnome, just behind the panel of light brown craft felt.
- Cut out the beard shape from the Mongolian Fur, using the same shape you used to cut the light brown felt from the template.
- Hot glue this Mongolian Fur in place at the top of the gnome body, mostly covering the light brown tummy panel (it's ok, it's just part of this gnome's charm).
- Ball-up a scrap of red craft felt and hot glue it into a ball that's smooth on one side and glue in place on top of the beard, where you want the nose to be.
- Tuck the hat on top of the gnome and secure it in place on the back and sides of the gnome body. Then wrinkle the hat over the nose and hot glue that in place.
- To add the details to the hat, cut a 1-inch wide length of red glitter foam sheet, long enough to wrap around your gnome's head. Hot glue this in place near the base of the hat, leaving space on the sides for the antlers to be tucked in.
- Hot glue the antlers in place on either side of the gnome's hat, tucking the ends into the red foam sheet.
- Affix the bells, equally spaced, onto the red foam sheet.
- Cut the floral wire in half and fold each piece in half.
- Hot glue one folded floral wire inside each arm.
- Glue the mittens on the end of each arm.
- Cut a very very thin strip of white craft fur and glue it to the joint where the mitten and arm meet on each arm.
- Hot glue carrot in one arm.
Notes
For more awesome Christmas gnome tutorials, visit Ruffles and Rain Boots
More Christmas Gnome TuTorials You Might Like
- Peppermint Gnome – If this isn’t the world’s cutest gnome, I don’t know what is. But the Rudolph gnome is definitely giving it a run for it’s money.
- DIY Gnome Tutorials – If you need a few ideas for making gnomes, well, this is where you’ll find ’em all!
- Ugly Christmas Sweater Gnome – Need some snow-bunny-action in your life? This is the gnome for you.
Please Save This to Pinterest
Your shares are how this site grows and I am sincerely grateful. Know a friend who’d like this? Please share it on Facebook or save it to your favorite Christmas gnome tutorials board on Pinterest.
Meet the Creator
Hi there, I’m Sarah Nenni-Daher. I’m a crafty gal and always have at least 14 projects going at once. I am a crafter, designer, DIYer, and pattern maker. I share my creations here and in the Ruffles and Rain Boots® Shop.
Here at Ruffles and Rain Boots®, you’ll find DIY gnomes, crafts, gifts, cupcakes, laser crafts, and so much more. I love sharing video tutorials over on YouTube and chatting with other crafters in my Facebook groups. We’d love to have you!