
This Peppermint Gnome is so Cute I want to Eat it!
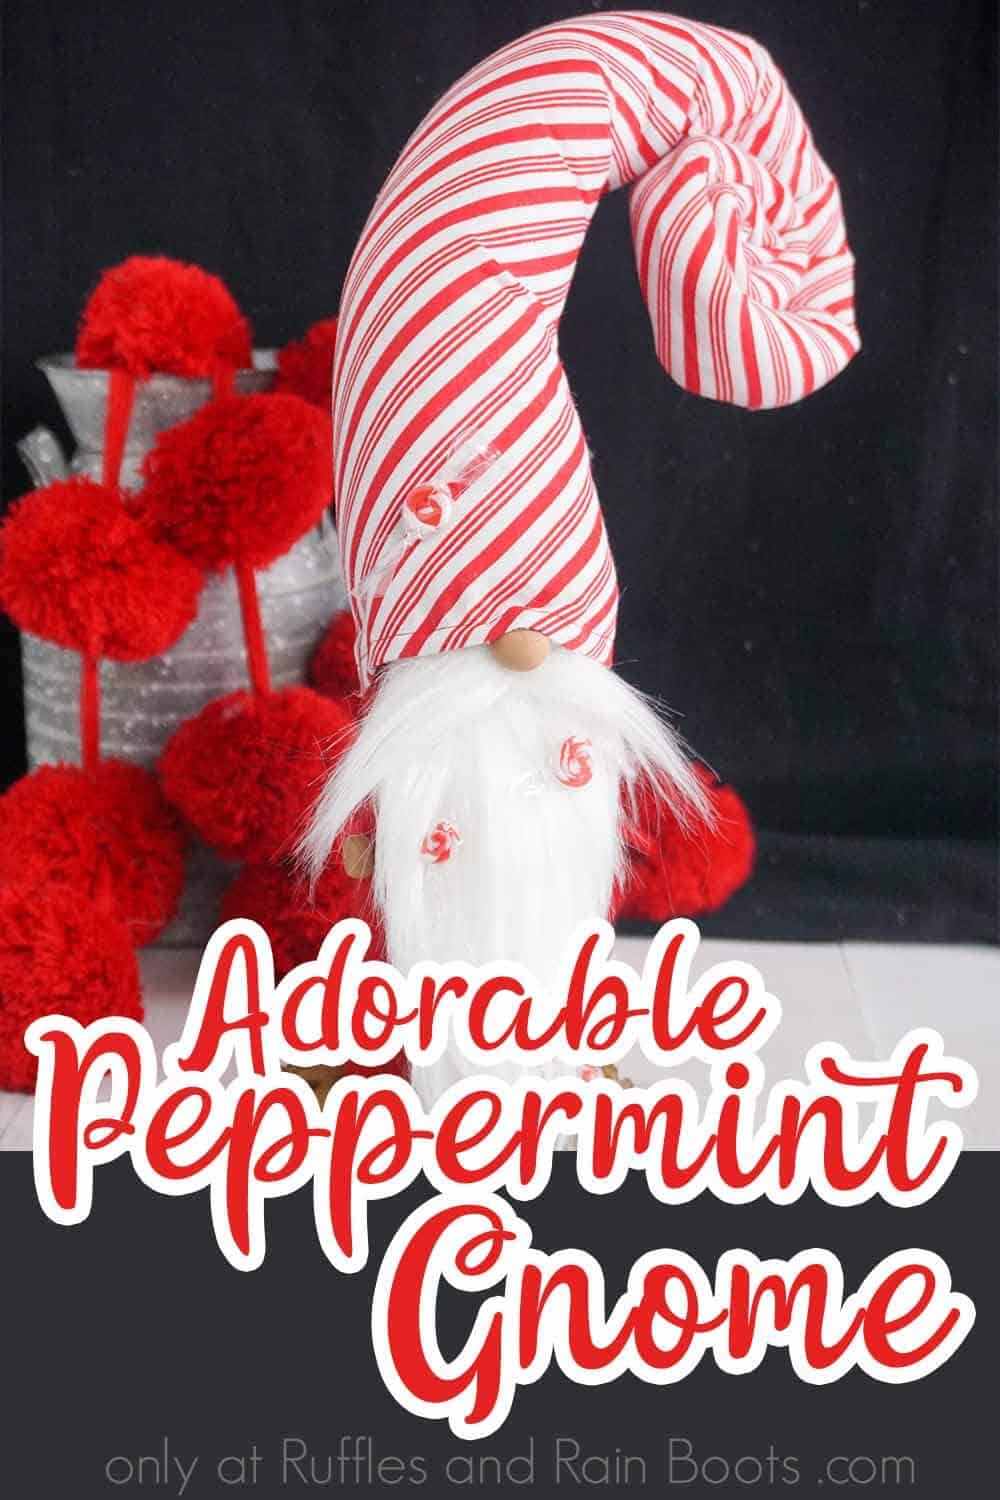
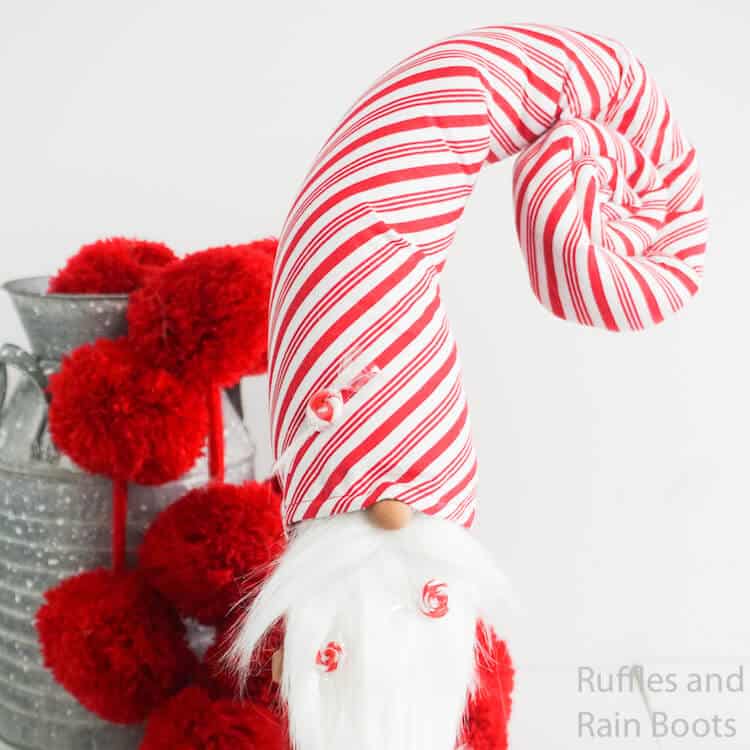
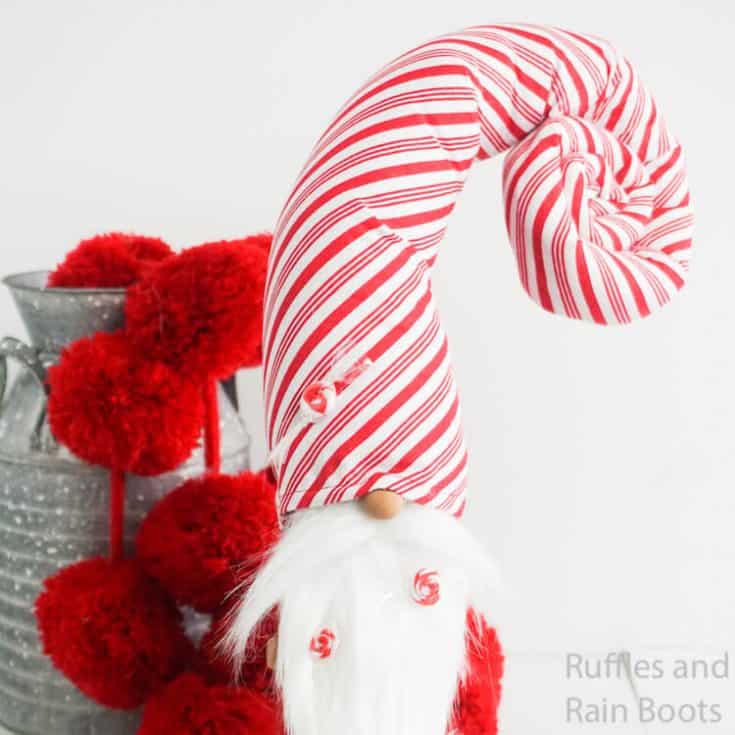
This peppermint gnome is just about the cutest Christmas gnome on the planet. Seriously, this candy can gnome is undoubtably the cutest I’ve ever made.

What You'll Find On This Page
Peppermint Gnome
Here at Ruffles and Rain Boots, we have succeeded in a dream of making a peppermint gnome. And, wow, is it impressive. Such a ridiculously cute Christmas gnome, I just feel like it’s amazingly ridiculous and I probably need ten. But, no really, I think I need ten. Because this little candy cane gnome would make an awesome handmade Christmas gift.
RELATED READING: DIY GNOME TUTORIALS
And, it’s not hard at all to make this fun Christmas gnome, so if you’re ready to make your own peppermint gnome, let’s get started.
DIY Christmas Gnome Tutorials
If you’re looking for the best DIY Christmas gnome tutorials, you have come to the right place. Check out all of my favorite tomte tutorials for the holidays!
No Time to Make This Now? Pin it for Later
You’re busy, I get it. Pin this to your favorite Christmas gnome ideas board on Pinterest and it’ll be here for when you’re ready.
Tips to Make a Candy Cane Gnome
- Go slow when you’re packing the polyfill into the hat. You don’t want to tear the fabric. But if you do, remember that you’re going to glue the hat in a big twist, so you can hide a little oopsie if you need to.
- If your gnome seems a little top heavy, you can add a second wood round, if necessary.
- Don’t have any polymer clay? That’s ok! You can use a wood bead for the nose and hands. I wouldn’t recommend using actual candy for the candies, though as that would mean leaving candy out.
- If you’re new to making gnomes, check out my basic gnome supplies list here.
How Do I Make this Peppermint Gnome?
I’m so glad you asked. Below is our written tutorial.
Peppermint Gnome
This peppermint gnome is just about the cutest Christmas gnome on the planet. Seriously, this candy can gnome is undoubtably the cutest I've ever made.
Materials
- Dime-Sized Portions of Light Brown and White Polymer Clay for the Nose
- Dime-Sized Portions of White and Red Polymer Clay for the Candies
- 1 Quarter-Sized Portion of White Polymer Clay for the Mittens
- 1/4-yard Red and White Striped Fabric
- 2 Quarter-Sized Portions of Black Polymer Clay for the Shoes
- 2 Floral Wires
- 4-inch Wood Round
- 1/8-yard Red Craft Felt
- Scraps White Craft Fur
- Pool Noodle
- Polyfill
- Tiny Amount of Transparent Wrapping Paper
Tools
- Hot Glue Gun and Glue
- Scissors
- Sewing Machine
- Exacto Knife
Instructions
- Make your gnome's nose by combining the white and light brown polymer clay until the color is consistent throughout.
- Roll your now light brown clay into a neat ball. Set aside.
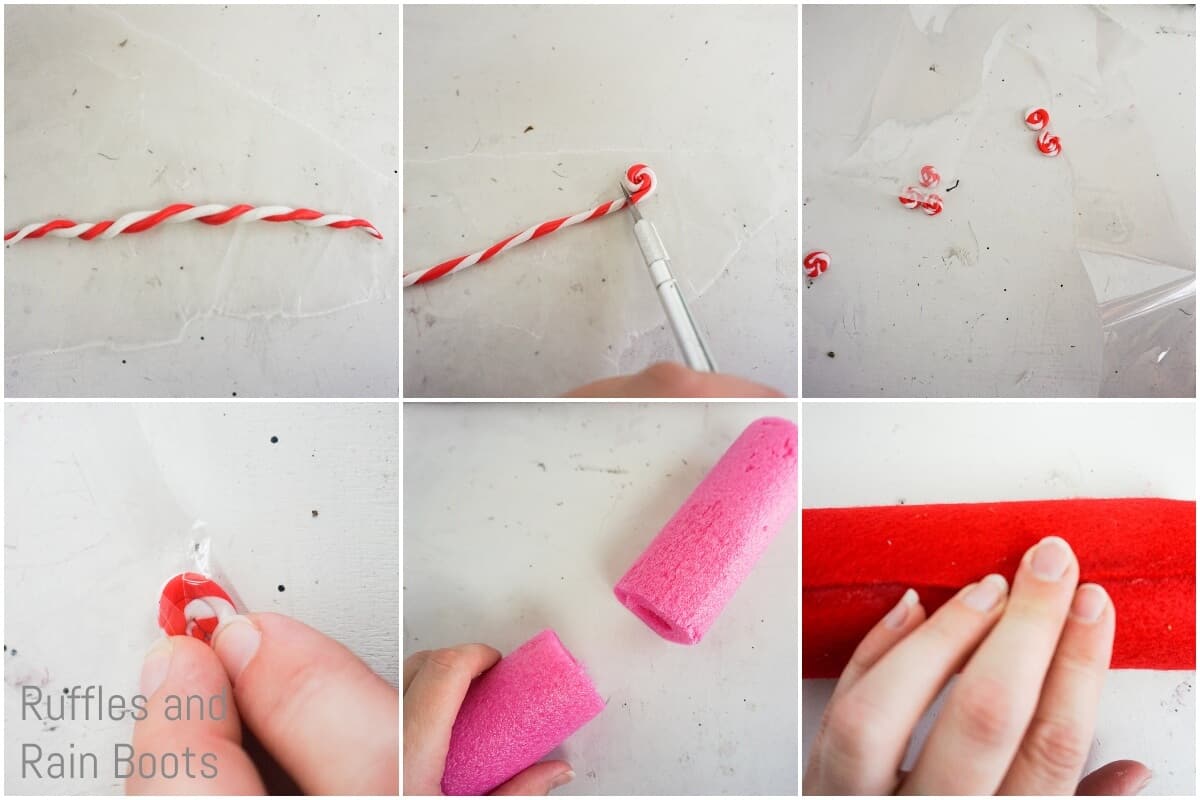
- Make the peppermint candies by rolling both the red and white clay into long, thin, tiny snakes.
- Twist the two different colored snakes together and roll them until they are flat on the exterior.
- Cut off one end with the exacto knife, then cut 10-12 sections about 1/8-inch thick. Set aside.
- Break the white clay for the mittens into two equal-sized pieces.
- Roll into balls, then flatten and shape into two mittens. Set aside.
- Break the black clay for the shoes into two equal-sized pieces.
- Roll into balls, then form and shape into two shoes.
- Bake the gnome nose, shoes, mittens and the candies in the oven per the instructions on your clay's package instructions.
- Allow to cool before handling. Set aside.
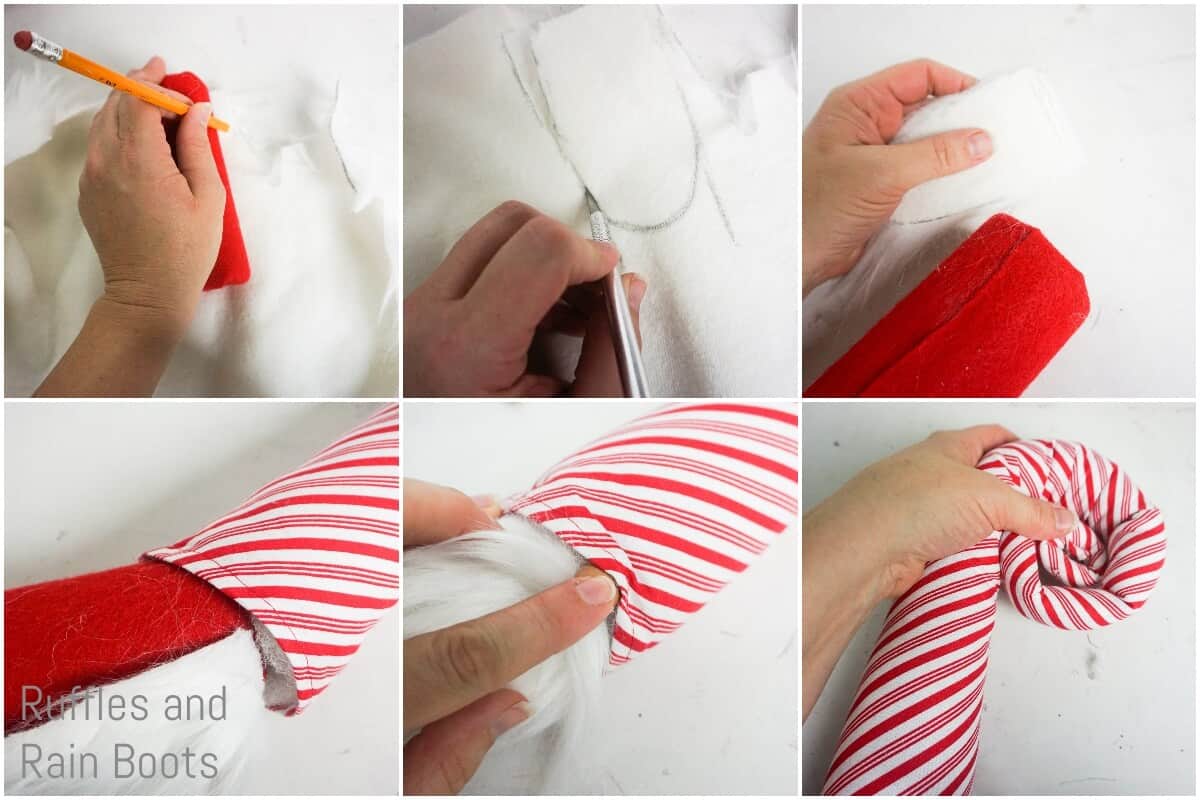
- Make the hat by cutting a very long, skinny triangle from your red and white striped fabric. I made mine as long as the fabric was, just gradually reducing the size as I went. The base I left at the same width as the 1/4-yard fabric would allow. This ended up being just wide enough to go around the pool noodle. Check this before moving on. If it is too wide, trim it down a little. But be sure to leave a seam allowance.
- Hem the bottom of the triangle.
- Fold the triangle face-to-face and hem the entire length of the triangle.
- Turn the hat right-side-out.
- Slide one floral wire all the way up into the end of the hat and hot glue it in place.
- Tuck polyfill up into the hat as far as you can get it--using a pencil to push it deeper, if possible.
- When you have reached the end of the first floral wire, add the second and hot glue it in place.
- Add polyfill to the hat and fill it to the end.
- Twist the end of the hat in a spiral, hot glueing it in place as you go. Only twist it up about halfway, then stop. You don't want to go too far and not be happy with it, so wait until you have your gnome further along to wind it up more. Set aside the hat for now.

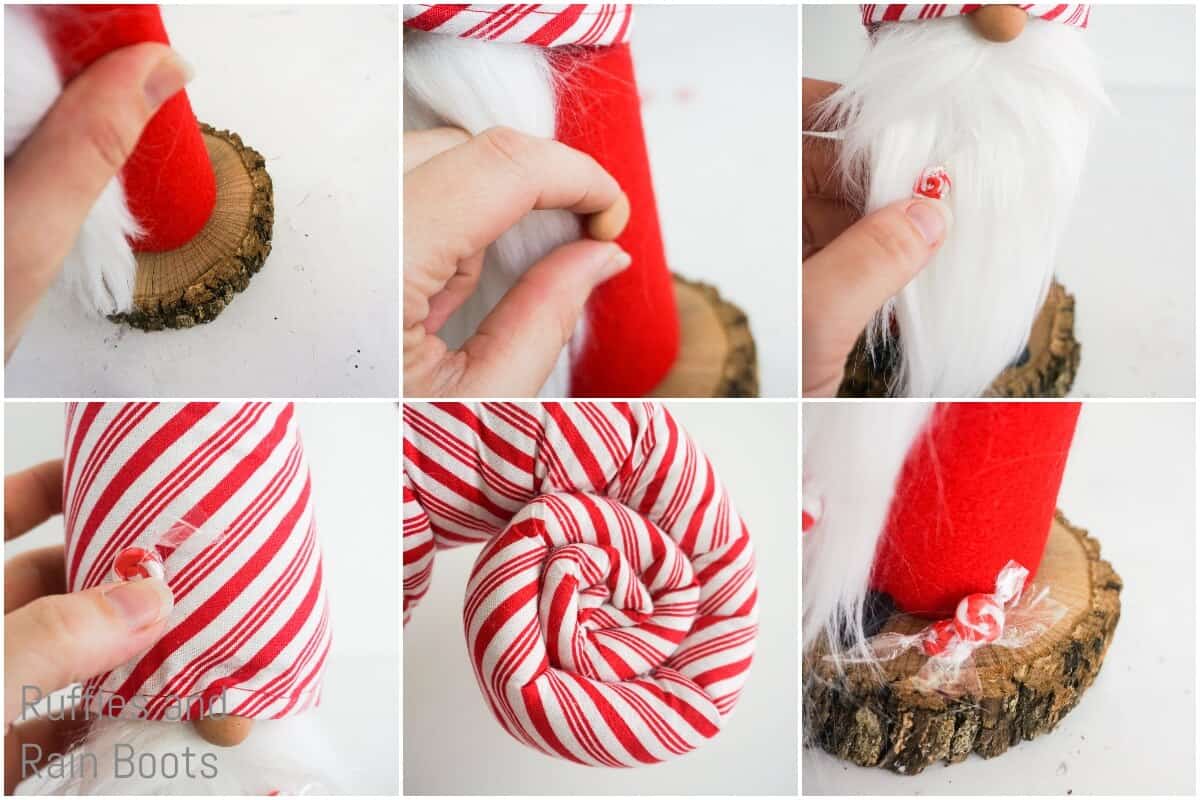
- Cut 6-inches off the end of your pool noodle.
- Cut a length of red craft felt that will wrap around the full length and width of the pool noodle, leaving about 1-inch hangover on each end.
- Hot glue this in place, covering the pool noodle piece.
- Use this felt-covered pool noodle body to gauge the size of your beard and trace this shape onto the back of your white craft fur.
- Cut out the white craft fur on the backside of the fabric with the exacto knife.
- Cut out a small rectangle of the white craft fur to make the mustache. Finger brush this in each direction outward to create the mustache shape.
- Attach the beard to the top of the gnome body.
- Place the hat on the gnome's body and hot glue in place on the back and sides.
- Hot glue the nose on the top of the beard.
- Wrinkle the hat over the nose and hot glue in place.
- Attach the mustache under the nose.
- Further twist the hat to the desired twistiness and hot glue in place.
- Affix the wood round to the bottom of the pool noodle with hot glue.
- Wrap each of the candies in transparent wrapping paper and twist the ends closed. Add a drop of hot glue to keep it closed, if necessary.
- Attach the mittens and shoes to the body, as appropriate.
- Glue the candies in place on the hat and beard and wood round, as desired.
- Enjoy!

Notes
For more Christmas gnome ideas, visit Ruffles and Rain Boots
More Christmas Gnome ideas You Might Like
- DIY Gnome Tutorials – If you need a few ideas for making gnomes, well, this is where you’ll find ’em all!
- Ugly Christmas Sweater Gnome – This is probably the cutest gnome I’ve ever made, after this peppermint gnome. The cutest snow bunny ever.
- Christmas Gnome Ornaments – If you need an ornament for a gift or just to deck out your tree, these are the gnomes, er, ornaments, for you!
Please Save This to Pinterest
Your shares are how this site grows and I am sincerely grateful. Know a friend who’d like this? Please share it on Facebook or save it to your favorite Christmas gnome ideas board on Pinterest.

Meet the Creator
Hi there, I’m Sarah Nenni-Daher. I’m a crafty gal and always have at least 14 projects going at once. I am a crafter, designer, DIYer, and pattern maker. I share my creations here and in the Ruffles and Rain Boots® Shop.
Here at Ruffles and Rain Boots®, you’ll find DIY gnomes, crafts, gifts, cupcakes, laser crafts, and so much more. I love sharing video tutorials over on YouTube and chatting with other crafters in my Facebook groups. We’d love to have you!