
Make This Grinch Gnome for a Merry Grinchmas!
I needed a Grinch gnome in my life to complete a fun and whimsical holiday display. In this tutorial, I’ll teach you how to color the inexpensive white craft fur and make an adorable holiday decoration.

What You'll Find On This Page
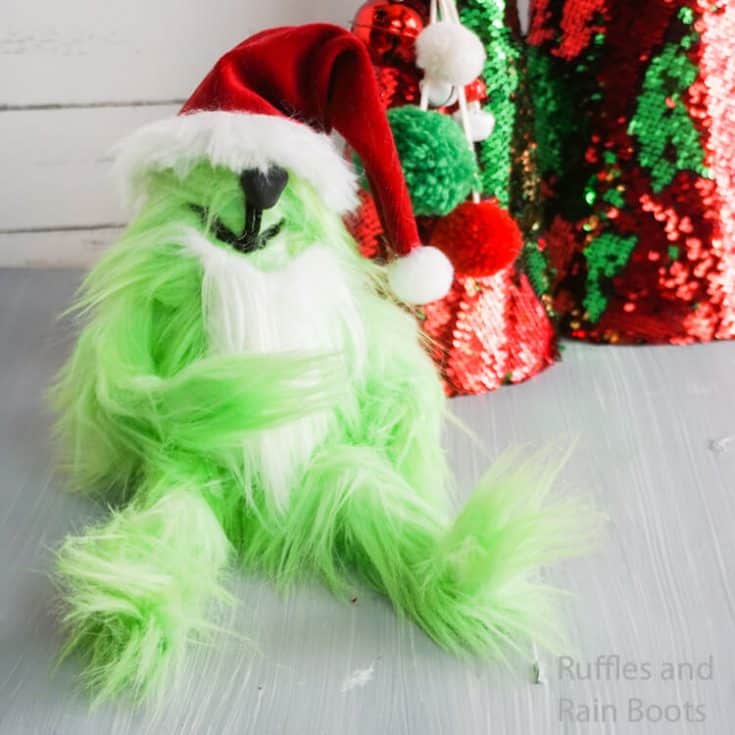
Grinch Gnome
Here at Ruffles and Rain Boots, The Grinch, Max, Whoville, and everything else about the classic story are a part of our holiday fun. My daughter loves the big green meanie because he’s crafty, loves to invent new things, and at the end of the day, he’s the sweetest, most wonderful grouch ever. I decided I needed a little Grinch tomte in my life.
RELATED READING: CHRISTMAS COWBOY GNOME
He is SO MUCH EASIER than he looks. The hardest part is painting the fur, and really, that’s very easy. So if you’re ready to make your own Grinch doll, let’s get started.
DIY Christmas Gnome Tutorials
If you’re looking for the best DIY Christmas gnome tutorials, you have come to the right place. Check out all of my favorite tomte tutorials for the holidays!
No Time to Make This Now? Pin it for Later
You’re busy. In case you can’t make this now, pin it to your favorite Christmas crafts board on Pinterest and it’ll be here when you’re ready.

As an Amazon Associate, I could earn from qualifying purchases.
Tips to Make a Grinch Doll
- Click here to get the free downloadable pattern.
- When I’m figuring out how to make a gnome body, I always start with identifying the fur I’m going to use. For this nisse, I picked the white fur you get at the craft store on the bolt, like this fur, NOT the stuff you get in the craft felt section. It’s a little higher quality and is longer, so it’s going to make the Grinch’s body, hands, and feet all furry.
- When you go to cut the fur fabric, be sure to flip it over and use a razor blade or an exacto knife to cut only the fabric. If you cut the fur, it will be short and choppy and won’t look like fur at all.
- Don’t worry about turning the body and arms inside-out to hot glue them together. Because the fur is so long and fluffy, the fur will cover the joins of the cone shape and sides of the arms.
- You can affix the hat with hot glue or a rubber band. I prefer hot glue because it stays in place better. If you choose to use a rubber band, tuck the rubber band down into the fur of the brim of the hat. You can put the rubber band on before you attach the fur brim, then put the brim on.
- When you glue on the nose and the beard, make sure to leave a sizable gap. The Grinch’s beard in the films and book is poorly fitted and way under the red hat. We want him to look the part!
- Because the arms and legs have floral wire in them, they’re posable. Don’t be afraid to give your Grinch a sack of toys, a small Christmas tree, or even a heart that he’s clearly stolen from the Whos down in Whoville.
- If you can manage it, add some red ornaments fit to the size of your Grinch. Wouldn’t it be perfect with a red ornament dangling from his Grinch hand?!

How Do I Make this Grinch Gnome?
I’m so glad you asked. Below is our written tutorial. If you have any questions, please let me know in the comments below.
Grinch Gnome
I needed a Grinch gnome in my life, to complete the crazy-whimsical holiday decor. Of course, I went overboard and now, I'm in love.
Materials
- 1/4 yd White Craft Fur
- Green and Yellow Water Colors
- 4 Floral Wires
- Black Yarn
- Black Polymer Clay
- 1/4 yd Red Velvet
- Rice
- Small Amount of Polyfill
- Free Printable Pattern
Tools
- Hot Glue Gun & Glue
- Embroidery Needle
- Red Thread & Needle (or sewing machine)
- Paintbrush & Water
- Exacto Knife
Instructions
- Start by painting your fur. You'll want to use the yellow and green water colors in alternating brush strokes, to give your grinch fur a variegated, natural look. Just paint it like you would anything else, getting the color as deep into the fibers as possible. Allow to dry completely.
- Make the Grinch's nose by mashing your polymer clay into a wide, flat triangle with rounded corners. Bake per your polymer clay package's instructions. Allow to cool completely.
- Brush the fur out gently to break apart the fibers and make it less clumpy.
- Cut out the pattern and, using the exacto knife on the back of the green fur, cut the fabric only of the craft fur, in the large body pattern.
- Also, from the green fur, cut out two each of the longest rectangles and two of the short/fat rectangles. These are the legs and arms.
- To make the body, hot glue the long straight sides together, forming a cone, then fold the flap over and hot glue it in place, forming the grinch's bottom. Make sure the bottom is sealed.
- Fill the bottom 1/2 of the grinch body with rice, then fill the remaining area with polyfill.
- Hot glue a floral wire in the center of the long rectangles of green fur.
- Fold the green fur over and hot glue in a tube, on each of the legs and arms.
- Trim any excess floral wire.
- Hot glue the arms and legs onto the gnome, spreading the fur to get the two fabrics to affix.
- Cut 2 of the hat shapes from the red velvet (I actually just folded my fabric in half and cut one, but you can do 2).
- Pin the hat shapes together with right-sides facing, and run a hem along the sides.
- Turn the hat right side out.
- Place a small amount of polyfill in the hat to add some "head".
- Tuck the hat over the Grinch's head and determine where you want it to sit.
- Based on where the hat sits, hot glue the nose in place, just below the brim of the hat.
- Remove the hat.
- With the black yarn and the embroidery needle, stitch a large smile and under-nose-line below the nose.
- Place the hat back on the Grinch's head and hot glue in place.
- Affix the pom pom to the tip of the hat.
- Cut out the beard shape and the long super thin rectangle from the pattern out of white craft fur, on the back of the fur.
- Tack the beard in place.
- Trim the fur on the long thin rectangle so that it is much shorter. Take care to be "messy" with your trimming so that it looks as organic as possible.
- Hot glue the long thin rectangle of trimmed fur in place on the brim of the hat.
- Enjoy!
Notes
For more fun gnome tutorials, visit rufflesandrainboots.com
More Fun Holiday Gnome Projects You Might Like
- DIY Chef Gnome – Probably one of the most adorable nisser I’ve ever made. That hat, though!
- Wooden Gnome Ornaments – If you need a way to make your Christmas tree even more whimsical, make these easy wooden gnome ornaments!
- Christmas Gnome Ornaments – By far and above, my most popular post, if you have 10 minutes, you have time to make these amazing ornaments.
Please Save This to Pinterest
Your shares are how this site grows and I am sincerely grateful. Know a friend who’d like this? Please share it on Facebook or save it to your favorite Christmas crafts board on Pinterest.


Is there a video tutorial on the grinch gnome?
Not yet. I do plan on doing one for the Grinch sock gnome and the ornament, but not sure I can fit this in anytime soon. Will try!