
How to Make Gnome Cookies for Christmas
I love a good sugar cookie and these gnome cookies make the best Christmas cookie exchange party cookies. They’re simple, festive, and so tasty, you’ll love them.
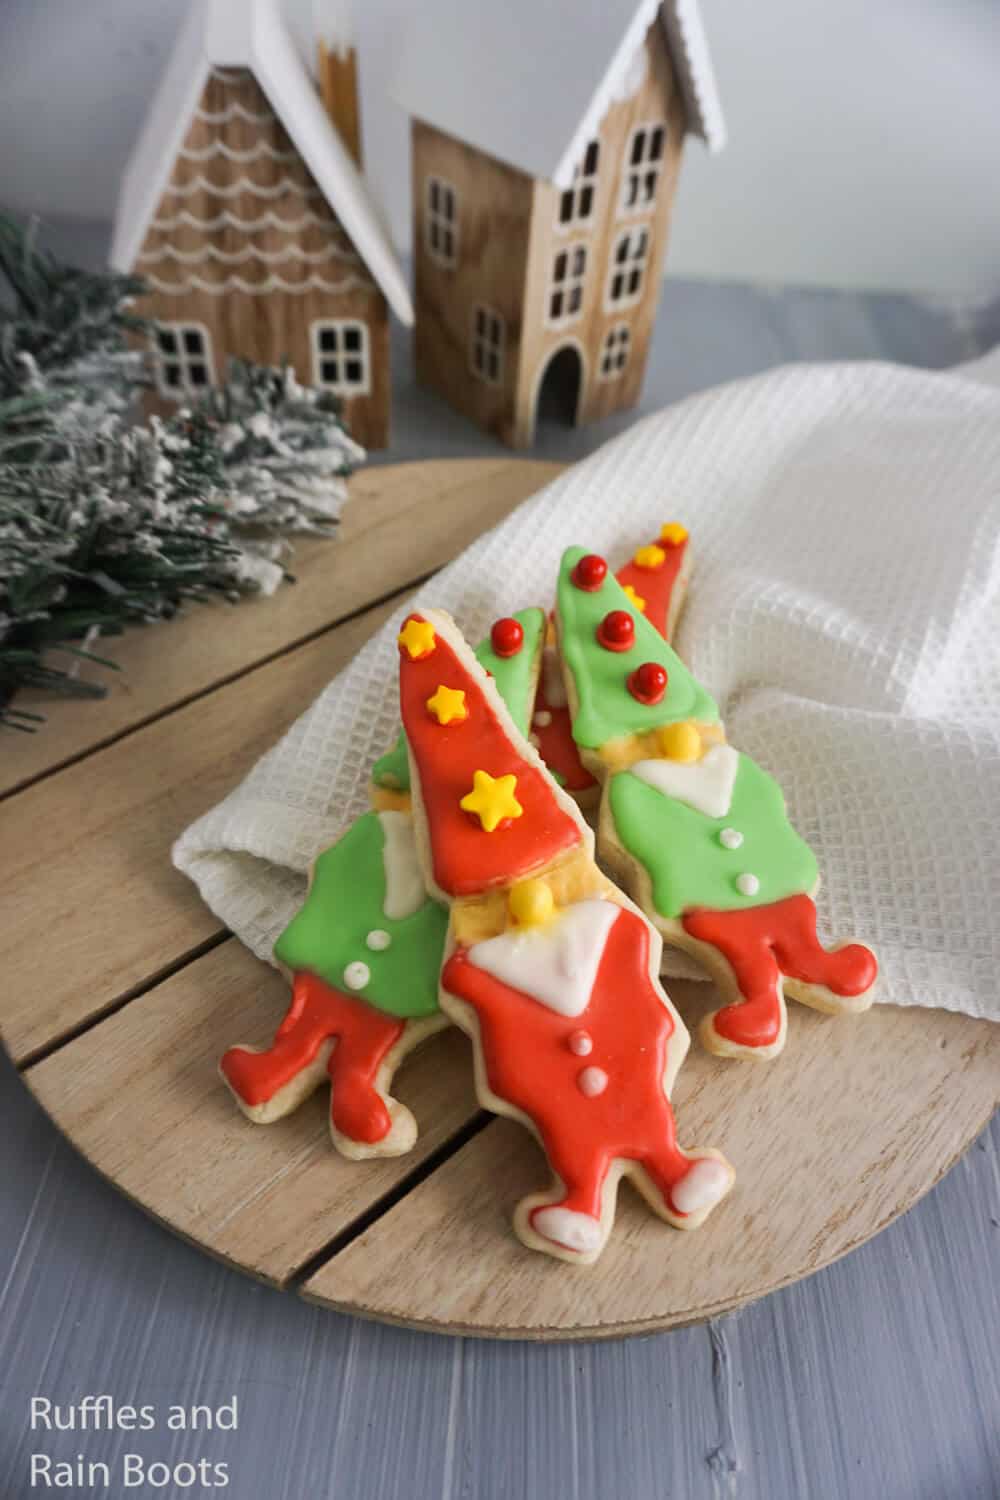
The kids can decorate these with any colors of icing, add decorations, and even play with them. They look great sitting next to a gingerbread house village, too.

What You'll Find On This Page
Gnome Cookies
Here at Ruffles and Rain Boots, I love decorating for the holidays and now start the day after Halloween. Getting all of the decorating out of the way early allows me to focus on making garlands for the kitchen, whipping up homemade eggnog, and of course, making a lot of Christmas cookies for exchanges.
RELATED READING: BEST CHRISTMAS CUPCAKE IDEAS
I’m known for my love of gnomes around the Internet and have been sharing tutorials to make your own for years.
RELATED READING: Impress Everyone with an Easy Peppermint Sandwich Cookie Recipe
DIY Christmas Gnome Tutorials
If you’re looking for the easiest DIY Christmas gnome tutorials, you have come to the right place. Check out all of my favorite gnome tutorials for the holidays.
No Time to Make This Now? Save or Share for Later
If you need to gather up supplies, use the sharing buttons to make this easier to find later. Save this to your favorite Christmas treats pin board or share it on Facebook. Either will make it easy when you’re ready to begin.

As an Amazon Associate, I can earn from qualifying purchases. There could be affiliate links within this article.
Tips to Make Gnome Christmas Cookies
- When you’re making iced Christmas cookies, start by making the icing just a little bit thicker than you think it needs to be. You can always put a dab more liquid to get it to the right consistency.
- I make all of my icing colors before I start baking the cookies. I use the time when the cookies are baking to clean up and let the kids think about their designs.
- When you’re doing the icing, use the smallest round decorating tip that you have. Or cut just the teeeniest tiniest tip off your decorating bag. Kids tend to squeeze things HARD and you need very small amounts of icing. It does spread easily.
- If you don’t mind the colors blending a bit, you can use one color after the other. But if you want nice clean lines between each color of icing, wait about 30 minutes between each – it forms a soft crust and that will prevent blending.
- To make these adorable gnome cookies, you should totally use this gnome cookie cutter.
- I grabbed some random sprinkles from my stash for the kids to decorate their gnome cookies, but you can pipe them, as well.

How Do I Make Gnome Cookies?
I’m so glad you asked. Below is our written tutorial
Gnome Cookies

I love how easy these gnome cookies are. They make for the most simple iced Christmas cookies and will absolutely wow everyone at your Christmas cookie exchange party!
Ingredients
Cookies
- 1 cup coconut oil, room temperature
- 1 cup aquafaba, about 1/2 cup or 2 eggs (I ran out of eggs so I used bean juice)
- 1 cup sugar
- 1 1/2 tsp vanilla extract, clear
- 2 tsp baking powder
- 3 cups flour
Icing
- 6 cups powdered sugar
- 1/2 cup aquafaba (or 2 egg whites)
- 1/2 tsp vanilla extract
- Red gel food coloring
- Green gel food coloring
Instructions
- Preheat the oven to 350-degrees.
- Cream together sugar and oil, then add aquafaba (or eggs--I was just out of them) and the vanilla extract. Set aside.
- Sift together the flour and baking powder in a separate bowl.
- Combine the dry ingredients with the wet in 1/3 increments, stirring between each. The cookie dough should be kind of crumbly, so don't panic.
- Turn the cookie dough out onto a sheet of parchment paper. Don't bother to dust the parchment paper with flour, as the cookie dough won't stick to it.
- Roll out the cookie dough to 1/4-inch thick.
- With your Christmas gnome cookie cutter shape, cut out your cookies.
- Remove all of the excess dough from around each of the cookies.

- Move the whole parchment paper sheet to the baking sheet. Do not move the cookies individually - they need to set.
- Bake for 10 minutes. They will not be browned at all, but you don't want them to. If they have even a hit of brown, the cookies will not be soft in the middle.
- Keeping the cookies on the parchment paper, transfer them to a rack to let the cookies to cool completely.
- Make the icing by combining all of the icing ingredients and beating until smooth.
- Separate out about 1/4 of the icing into a second bowl. Separate the remaining portion of icing into two bowls.
- With one of the larger icing portions, add 8-ish drop of green food coloring and stir it until the color is the green you want. Cover this and place in the refrigerator until you're ready to use it.
- With the other larger portion of icing, add 8-10 drops of red food coloring and stir it until the color is the red you want.
- Place the red icing in a decorating bag with your smallest round tip.
- Pipe an edge line all the way around the outer edge of the cookies along the hat or shirt or pants. If you're doing the shirts, be sure to leave a space for the beard. Immediately fill in the desired area, covering it completely. Allow this layer of icing to crust over and dry for 2-3 hours. DO NOT DISCARD THE RED ICING. Simply cover and place in the fridge
- With the green icing, pipe an edge line all the way around the outer edge of the next area, immediately filling in the entire space.
- Allow this layer of icing to dry for 2-3 hours.
- With the white icing, pipe an edge line all the way around the outer edge of the beard, immediately filling in the entire beard. DO NOT DISCARD THE WHITE ICING. Simply cover and place in the fridge
- Allow this layer of icing to dry for 2-3 hours.
- With 1/2 of the remaining white icing, add 1-2 drops of yellow food coloring to make a pale yellow/peach colored icing. Stir until the color is consistent.
- With this peach icing, pipe an edge line all the way around the outer edge of the face, immediately filling in the entire face.
- Add one round yellow sprinkle in the center of the face for a nose.
- Make dots on the shirts with the white icing.
- Make dots of any color icing on the hats, placing a star sprinkle or round sprinkle on the top of each of those dots.
- Allow this layer of icing to dry for 2-3 hours.
- Enjoy!


Notes
For more fun Christmas dessert ideas, visit Ruffles and Rain Boots.
Nutrition Information:
Yield:
18Serving Size:
1Amount Per Serving: Calories: 379Total Fat: 13gSaturated Fat: 10gTrans Fat: 0gUnsaturated Fat: 1gCholesterol: 21mgSodium: 63mgCarbohydrates: 64gFiber: 1gSugar: 47gProtein: 3g
All nutrition information is estimated. For accuracy, please calculate your exact brands and ingredients if accuracy is desired.
More Christmas Dessert Ideas You Might Like
- Peppermint Sandwich Cookies – These not only TASTE amazing, but they look like a million bucks (with not a lot of work).
- Farmhouse Truck Christmas Cookies – If you want a cute Christmas cookie that everyone will love, this easy flood cookie is all about that.
- Gingerbread Cupcakes – Classic winter and Christmas goodness, this is the best way to celebrate with a treat!
- Homemade Hot Cocoa – Want a tasty drink/treat? Here’s the winter drink you have got to try.
Please Save or Share This
Your shares are how this site grows and I am sincerely grateful. Know a friend who’d like this? Please share it on Facebook or save it to a Christmas dessert recipes pin board.

Meet the Creator
Hi there, I’m Sarah Nenni-Daher. I’m a crafty gal and always have at least 14 projects going at once. I am a crafter, designer, DIYer, and pattern maker. I share my creations here and in the Ruffles and Rain Boots® Shop.
Here at Ruffles and Rain Boots®, you’ll find DIY gnomes, crafts, gifts, cupcakes, laser crafts, and so much more. I love sharing video tutorials over on YouTube and chatting with other crafters in my Facebook groups. We’d love to have you!