
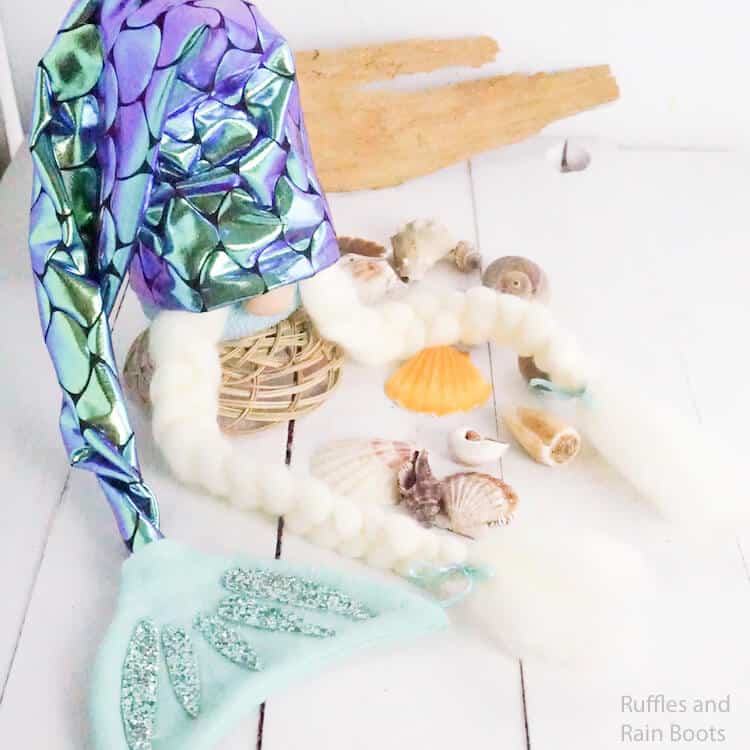
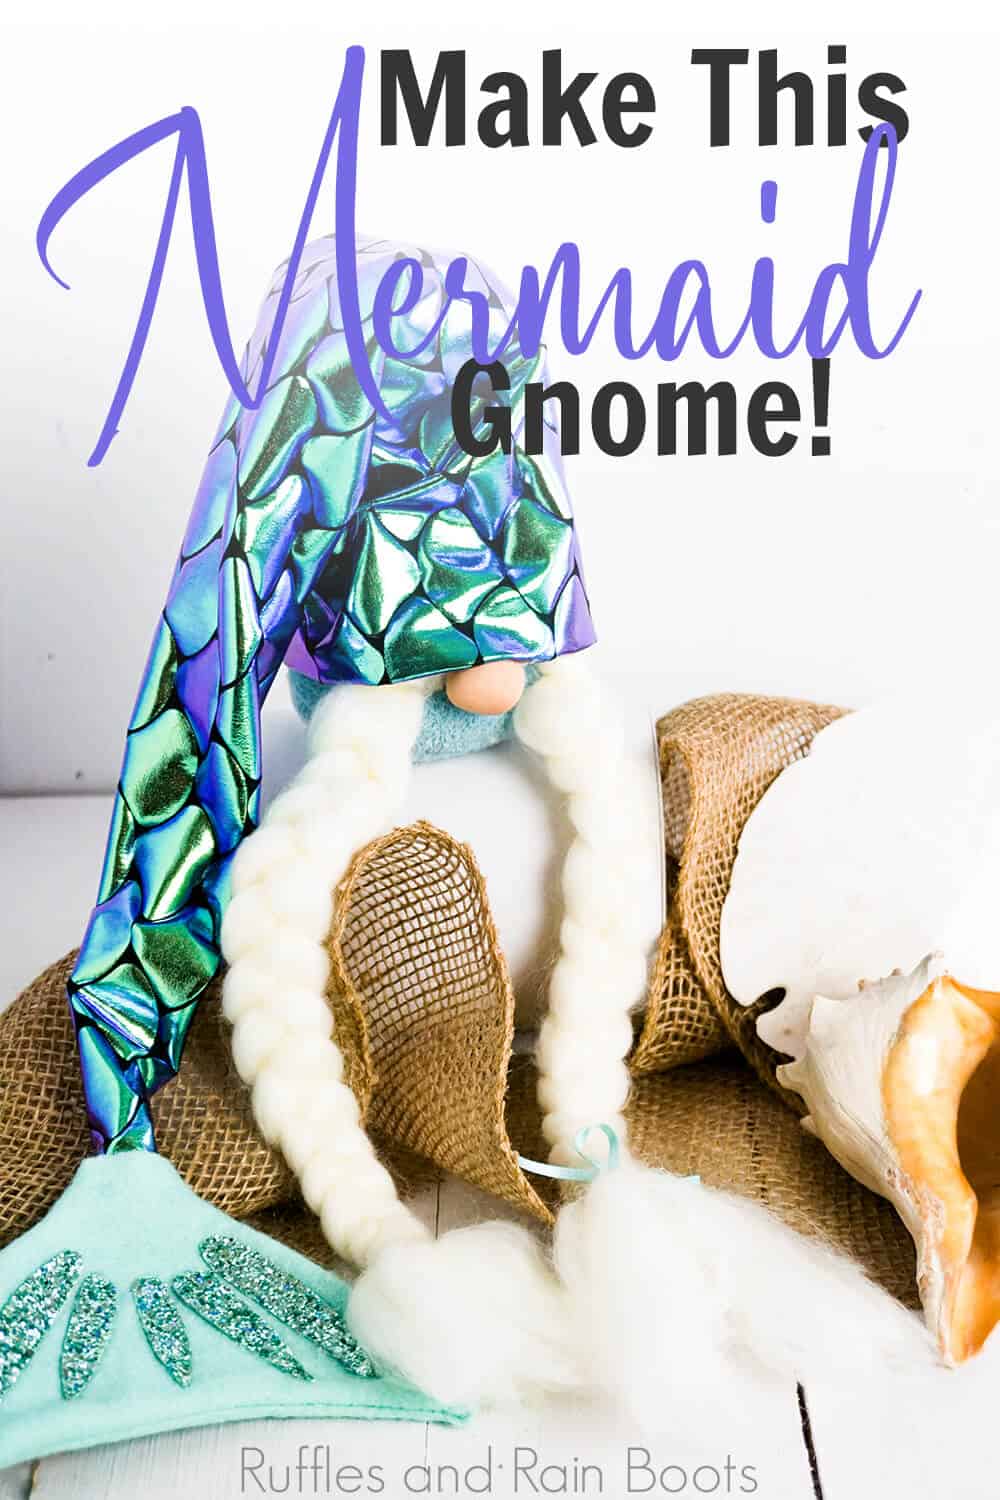
This Girl Mermaid Gnome is a Mermaid Hat Gnome Everyone Loves!
I love everything about this girl mermaid gnome. It’s one of the easiest DIY gnome tutorials and the result (a mermaid hat gnome) is just too cute!

Girl Mermaid Gnome
Here at Ruffles and Rain Boots, we are a little mermaid AND gnome obsessed. So, I thought…maybe I could bring those two lovely things together into a cute girl mermaid gnome? Maaaaybe? And YES! I did it. And, making this mermaid hat gnome was surprisingly easy.
RELATED READING: GUY MERMAID GNOME
It’s an easy mermaid sock gnome that anyone could do–even kids. But, I would like to note that if you do let the kids get involved, it’s a good idea to only use a low temp glue gun. Don’t want to burn little fingers. And the sewing will require some parental supervision, but still, very easy. If you’re ready to make a mermaid sock gnome for yourself, let’s get started.
No Time to Make This Now? Pin it for Later
You’re busy, I get it. Pin this to your favorite DIY gnome crafts board on Pinterest and it’ll be here for when you’re ready.

As an Amazon Associate, I could earn from qualifying purchases.
Tips to Make Mermaid Hat gnome
- Be sure to use a soft sock for this mermaid hat gnome. A stiff sock will not make for the same round shape for the body. I like these fuzzy socks, because they’re really soft and they have a fun texture.
- If you want to turn this girl mermaid gnome into a guy mermaid gnome, just don’t do braids and put on a beard. Easy peasy!
- Click here to download the free printable pattern for this cute gnome hat mermaid!
How Do I Make this Girl Mermaid Gnome?
I’m so glad you asked. Below is our written tutorial.
Girl Mermaid Gnome

I love everything about this girl mermaid gnome. It's one of the easiest DIY gnome tutorials and the result (a mermaid hat gnome) is just too cute!
Materials
- 2 Cups Dry Rice
- 1 skein Ivory or White Super-Chunky yarn
- Polymer Clay (for gnome nose):
- 1 small, ½ dime-sized portion of brown
- 1 quarter-sized portion of white
- ¼ yd Light Teal Blue/Green Craft Felt
- ¼ yd Dark Green & Purple Shimmer Fabric
- 1 Sheet Teal Blue/Green Glitter Canvas Paper
- Printable Template/Pattern
- Light Teal Blue Fluffy Sock (mine had polka dots)
- Light Teal Blue Ribbon ¼-inch wide
Tools
- Hot Glue Gun & Glue
- Scissors
- Wax Paper
- Oven
- Sewing Machine
- Aqua or Teal Thread
Instructions
Preparations
- Start making your gnome nose by combining the brown and white polymer clay until a flesh-color is consistent throughout.
- Roll clay into a neat ball, making sure it’s smooth all the way around.
- Bake in the oven per the polymer clay package directions. Allow to cool before touching. Set aside.
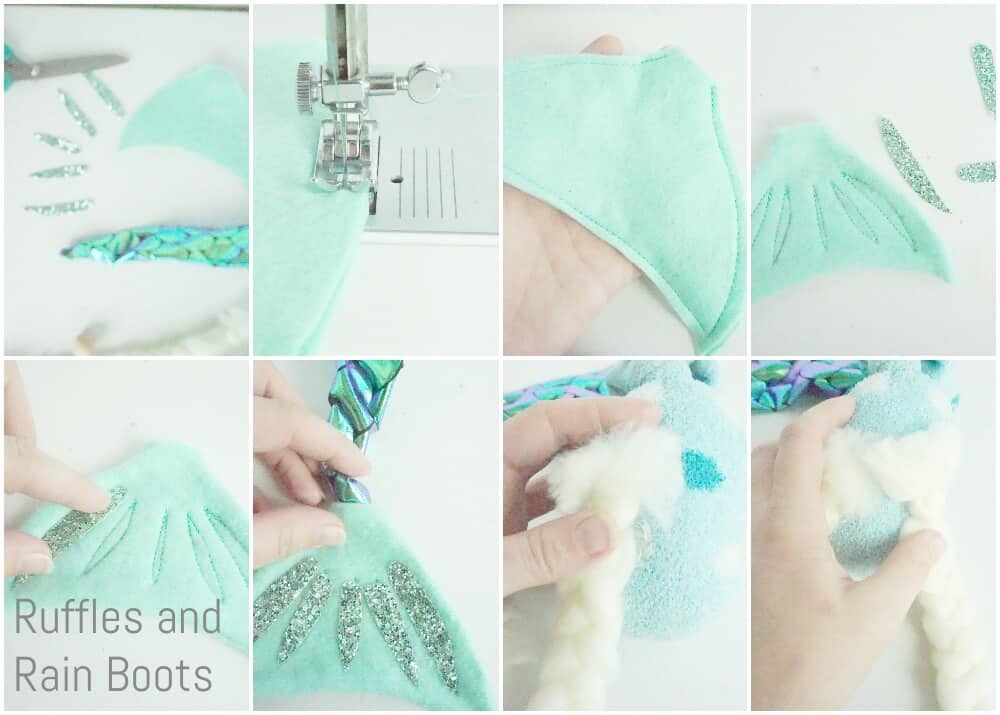
Fabric and Felt Cuts
- Cut 2 fins from printable pattern in light teal blue green craft felt.
- Cut 4 each of the two longest teardrop shapes from printable pattern in teal blue green glitter canvas paper.
- Cut 2 of the shortest teardrop shapes from printable pattern in teal blue green glitter canvas paper.
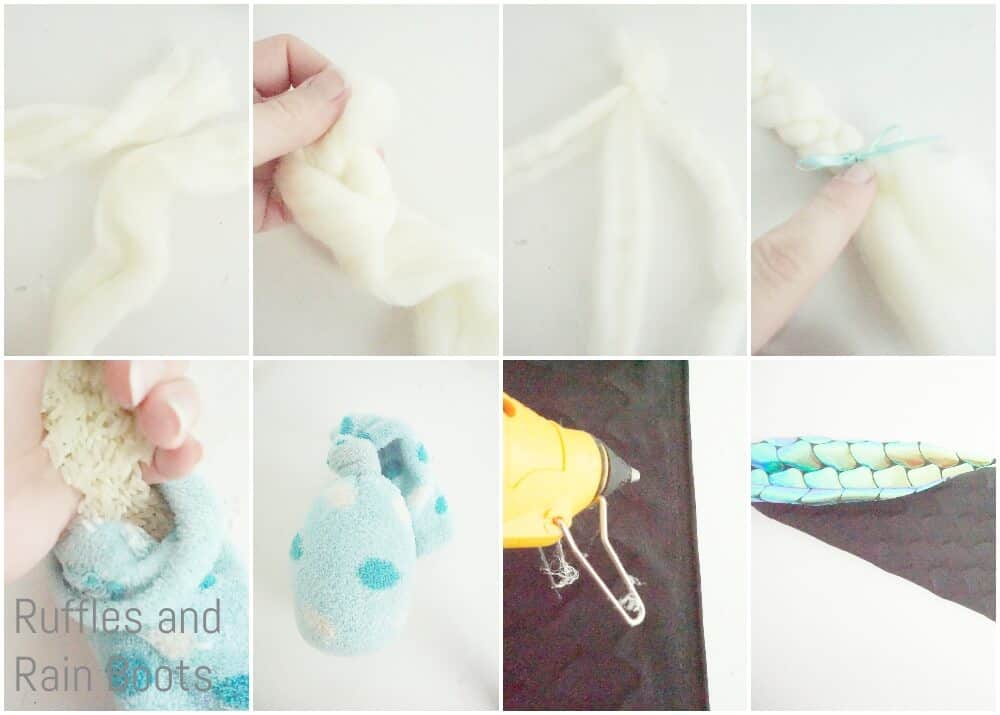
- Cut 2 lengths of chunky yarn approximately 18-inches long.
- Cut 2 lengths of light teal blue ribbon approximately 4-inches long.
- Cut 1 long thin triangle approximately 24-inches long with a base of 8-inches wide in the shimmer fabric.
Assemble the Gnome Body
- Fill the lower ½ of the sock with rice. Tie knot in sock top just above rice fill and seal with hot glue. Set aside.
- To make the braid, work with one length of yarn at a time. Tie a knot as close to one end as you can manage. Split the remaining yarn into 3 parts and braid for the majority of length.
- Tie in place with ribbon and trim remaining yarn not braided to be neat. Set aside.
Make the Mermaid Tail Gnome Hat
- Fold the bottom side of the long thin triangle in shimmer fabric toward the inside. Sew or glue this hem in place.
- Place a bead of hot glue along one side of the inside of the long thin triangle and fold the other side of the hat shape over. You just made a cone but allow the hot glue to dry completely (you can sew this seam).
- Once the glue has dried, turn the hat right side out. Set aside.
- To create the fin, place the two fin cutouts back-to-back and pin them in place. Glue or sew the fin cutouts together along the edges, leaving the top edge open (where the fin meets with the shimmer fabric). Note: if you are gluing, you will need a small, detail-tip glue gun to ensure the corner points work.
- Trim the felt back at the fin tip corners as close as you can without breaking the thread or glue so that you can get a sharp tip when the fin is turned right side out. Turn the fin right side out, using a pencil or some other thin implement like needle nose pliers to get the tips pointed sharply outward.
- Place one set of glitter canvas teardrop cutouts on fin and sketch locations on one side, as shown on the printable pattern. Move glitter canvas teardrop cutouts off of fin and sew general locations and shape in place, to create a space for the cutouts to sit down inside the fin.
- Hot glue glitter canvas teardrop cutouts onto fin in places as sewn, on both sides of the fin.
- Tuck end of hat into the top of the fin and hot glue or whip-stitch in place.

Assemble the Gnome Mermaid
- Place the two braids on the front of the filled sock, low toward the bottom, where you would like them to permanently lay. Hot glue or whip-stitch in place.
- Tuck the knotted portion of sock and tops of the braids into the hat and hot glue the back of the hat in place on the body
- Tuck the nose in place between the braids, just above where the hat’s bottom sits and hot glue into place on the sock. Scrunch the hat down on the nose and hot glue hat in place in that wrinkle.
- Hot glue the remaining sides of hat in place, leaving area around braids loose so they can move freely. Your gnome is ready to display.
Notes
For more fun gnome tutorials, visit RufflesandRainBoots.com
More DIY Gnome Crafts You Might Like
- Bunny Gnome – If you’re into seriously cute gnomes, you need to check out this adorable gnome DIY.
- The Best Gnome Tutorials You Can Find – You won’t find a more comprehensive set of fun gnome tutorials for all sorts of holidays, seasons, and just for fun!
- Viking Gnome – Yes, yes, you too can make a viking gnome. So cool. And way more fun than just a plain ‘ole gnome,
- Love-Bug Gnomes – If you’re into cute DIY gnome crafts, these little love-bugs are just about the sweetest you’ll find!
Please Save This to Pinterest
Your shares are how this site grows and I am sincerely grateful. Know a friend who’d like this? Please share it on Facebook or save it to your favorite DIY gnome crafts board on Pinterest.
Meet the Creator
Hi there, I’m Sarah Nenni-Daher. I’m a crafty gal and always have at least 14 projects going at once. I am a crafter, designer, DIYer, and pattern maker. I share my creations here and in the Ruffles and Rain Boots® Shop.
Here at Ruffles and Rain Boots®, you’ll find DIY gnomes, crafts, gifts, cupcakes, laser crafts, and so much more. I love sharing video tutorials over on YouTube and chatting with other crafters in my Facebook groups. We’d love to have you!