
These Felt Fruit Coasters Are a Fun Summer Craft
I had this brilliant idea to make fruit coasters from felt and they came together so fast and they look so cute, I was squirming in my seat to share them!
Use the free felt coaster template and gather some craft felt, glue or sewing supplies, and scissors. Let’s get started with this cute summer craft idea.

RELATED READING: Summer Craft Idea – Make This CUTE Book Stack Craft
Felt Fruit Coasters – Summer Coasters DIY
Here at Ruffles and Rain Boots, I am so excited to be headed into the summer. The backyard parties, a 4th of July pool party, and even friends coming to visit have me creating easy summer craft ideas for decor AND use.
We’re going to use these on the table near the pool, but they would make fun hostess gifts, too. No matter where you use them, the free coaster template makes it easy to make these fruit coasters.
Easy and fast, the whole set of coasters comes together in less than 15 minutes. It takes less than the time it takes to get my child’s socks and shoes on in the morning! If you’re ready to make a little felt coaster set of fruit, let’s get started.
RELATED READING: HOW TO MAKE DIY FARMHOUSE BEADS FOR EVERY OCCASION

If you need to gather some supplies, share this to a crafty group on Facebook or save it to a summer pin board. It will make it easy to find when you’re ready to whip up your own set.
As an Amazon Associate, I can earn from qualifying purchases. There could be affiliate links within this article.
RELATED READING: DIY Sunflower Coasters Using a Napkin
Tips to Make Sliced Fruit Coasters
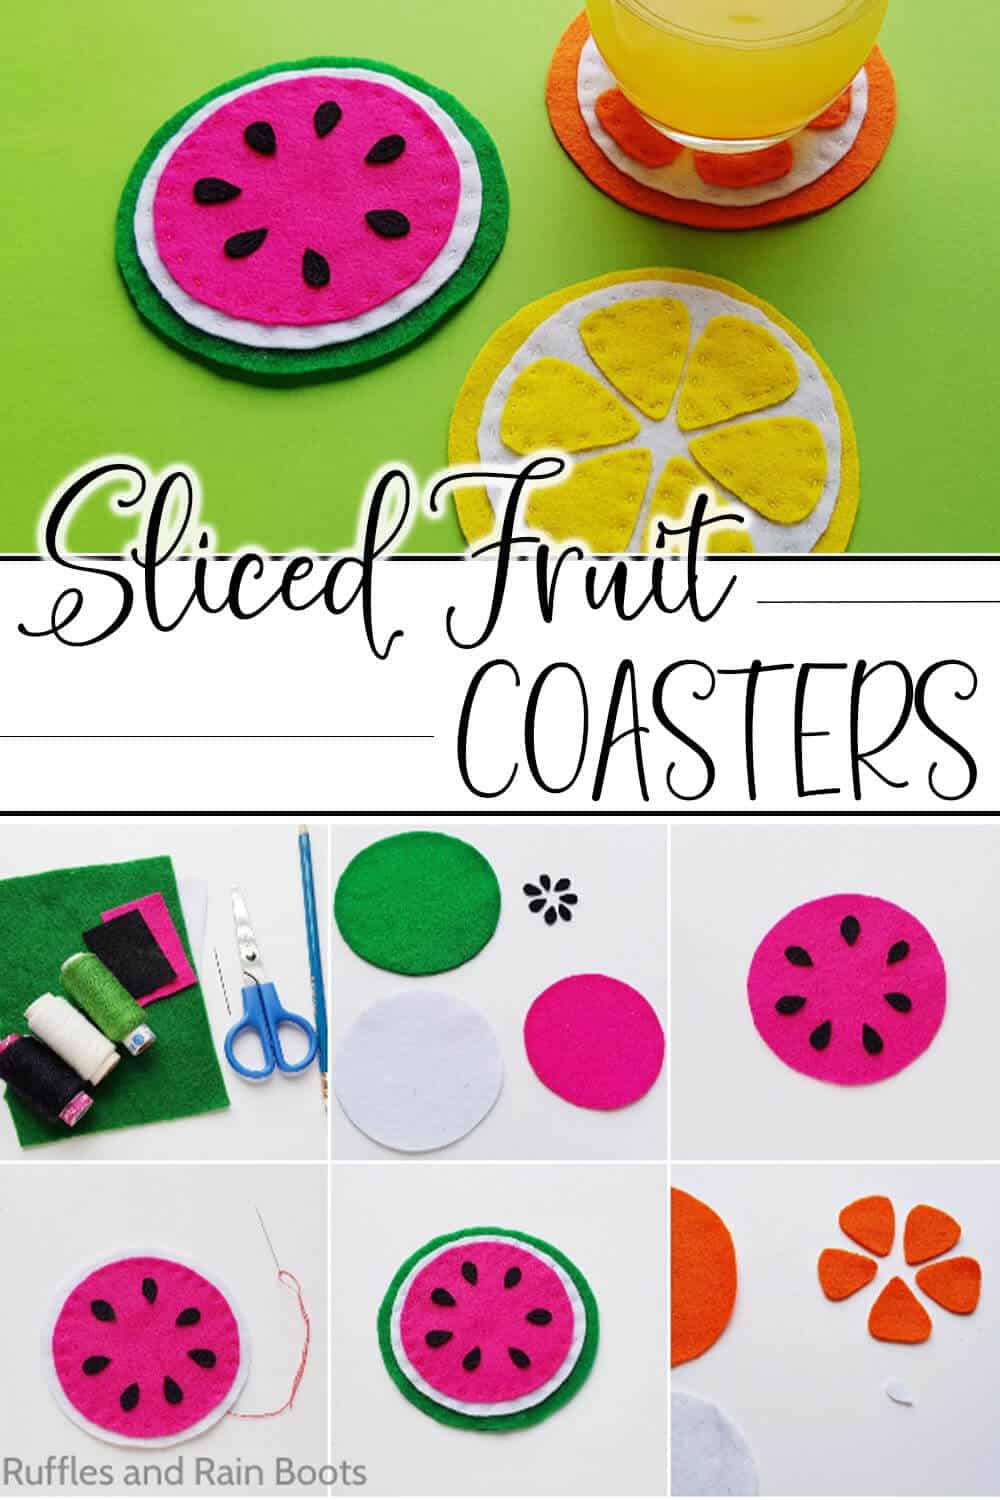
- First, download the free fruit coaster pattern so you can make this set of sliced fruit coasters.
- Before you cut anything, a word of warning: even though there are really fun cotton patterns at the craft store, skip them. Use felt to make the sliced fruit coasters – that way you don’t have to hem anything and they will soak up the condensation.
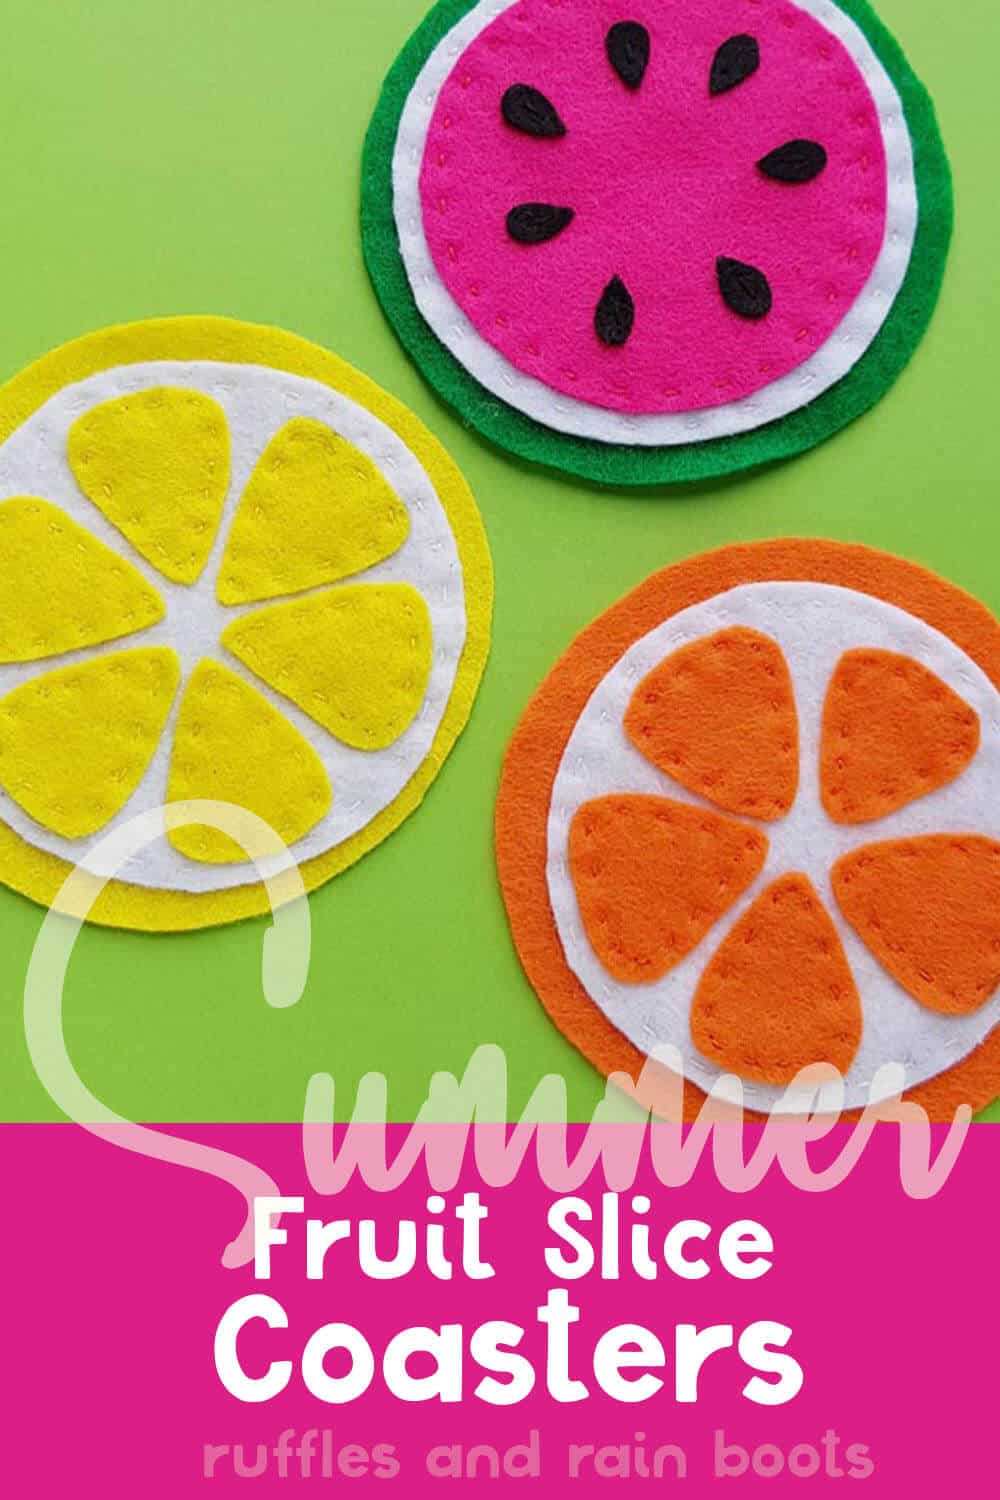
- I made a watermelon, orange and lemon coaster set (2 each), but there are so many other fruits you could do. Use the lemon template to make a lime, use a brown circle under a smaller white circle for a coconut, or make an exotic dragonfruit!
- How to GLUE These Coasters: If you don’t want to sew, don’t sew. Sewing is not a requirement for this project by any means. Pick up some fabric glue, like this one I use all the time, and use that instead of the stitches. Do not let the idea of sewing stop you from making your this summer activity.

More DIY Summer Crafts You Might Like
- Popsicle Stick Fairy Craft – Head to the dollar store for the supplies for this easy craft the kids are going to LOVE! Popsicle stick fariy puppets are endless hours of fun.
- Summer Sunglasses Free SVG Set – You’re not going to get more summery than a fun set of sunglasses with a palm tree. Make a fun summer shirt or tank top.
- Watermelon Crafts – So much sweetness for your summer enjoyment! This list of watermelon DIYs have something for everyone.
Please Save or Share This Fun Craft This Fun Felt Craft Idea
Your shares are how this site grows and I am sincerely grateful. Please share this summer craft for kids and adults to a crafty Facebook group or save it to your favorite felt crafts pin board.
How to Make Fruit Coasters from Felt
Below is the written tutorial. If you have any questions, use the comment section below.
As a reminder, if you want to glue, be sure to use a fabric or felt glue for your coasters. Do not use a school or PVA glue like Elmer’s.
Fruit Coasters

These fruit coasters are the easiest summer craft idea. And they're just straight-up adorable. I am planning to give mine as fish extender gifts, but these sliced fruit coasters also perfect for my own coffee table!
Materials
- Felt fabric in pink, black, white, green, yellow and orange
Tools
- Pencil or fabric pen
- Scissors
- Needle and thread or fabric glue
Instructions
- Make the watermelon coaster first. Cut out the pieces from the template and trace them onto the corresponding colors of felt: big circle-green, medium circle-white, small circle-pink) and teardrop shapes-black. Cut out the traced pieces.
- On top of the pink circle cut-out, arrange the black teardrop cutouts (the seeds of the watermelon) around the center. With black thread, stitch the seed cutouts to the pink circle cut-out. Tie off on the back side.
- Place the pink circle with the seeds on top of the white cut-out. Stitch around the edge of the pink circle to attach it to the white circle cut-out. Tie off on the back side.
- Place the white circle with the pink one attached on top of the big green circle. Stitch around the edge of the white circle to attach it to the green circle. Once the stitching is done, draw the needle to the back side and pull it between the white and green circle or the white and pink to tie-off.
- Repeat with the other fruit slices, layering them and sewing them on, then enjoy!


Notes
For more fun summer craft ideas, visit Ruffles and Rain Boots!
Meet the Creator
Hi there, I’m Sarah Nenni-Daher. I’m a crafty gal and always have at least 14 projects going at once. I am a crafter, designer, DIYer, and pattern maker. I share my creations here and in the Ruffles and Rain Boots® Shop.
Here at Ruffles and Rain Boots®, you’ll find DIY gnomes, crafts, gifts, cupcakes, laser crafts, and so much more. I love sharing video tutorials over on YouTube and chatting with other crafters in my Facebook groups. We’d love to have you!