
Dollar Tree Beaded Corn Craft
This nostalgic DIY bead corn craft could be something you and the little ones could make together and enjoy. The muted colors and inexpensive supplies make this a fun Dollar Tree fall craft idea.
A beaded pipe cleaner corn is a snap to create and looks great natural or painted. I’ll share a shortcut on how to color wood beads, so let’s get started.

RELATED READING: Dollar Tree Basket Pumpkin (Easy and Fast Fall Decor)
What You'll Find On This Page
Easy Harvest Corn Craft
Here at Ruffles and Rain Boots, when the weather turns cooler, the colors in my house change. This bead corn craft is one way to add those muted fall tones without the mess of corn husks all over.
If you want to make these with little helpers, you can tell them the Indigenous people of North America would eat this hominy-type, hard-shelled corn. It is not sweet like the ears of corn we have today, but really does display the most beautiful colors.
If you need time to gather your supplies for your corn craft for fall, save this to a crafts pin board or share it to Facebook. It will make this easier to find when you are ready to create your project.

As an Amazon Associate, I could earn from qualifying purchases. There may be affiliate links within this article.
RELATED READING: DIY 5 Minute Sock Pumpkins – So Cute!
Why This Corn Craft Is Perfect For Fall
This is such a cute and inexpensive craft to make. You need about 10-15 minutes (not including drying time) for this project and no more than $1.50-$2.
Pipe cleaner corn is a fun craft for the kids to help with. The younger children can thread the beads onto the chenille stems to work on their countinh and color skills while the older kids work on their own.
These stalks of corn will last for many years to come. And who doesn’t love a nostalgic craft?

RELATED READING: Dollar Tree Tin Pumpkin DIY for Fall
Tips For Making Beaded Corn For Fall
- When placing the paper towels on the work surface to dry the painted beads, put down some parchment or wax paper, too, to keep the paint from bleeding onto the workspace.
- Squeeze out the excess air before you massage the bags filled with paint and beads to avoid popping.
- If the raffia you’re using comes on a roll rather than folded in a bag, cut a length that is approximately 8-10 inches long and about 1/2″ thick.
- When painting the wooden beads, add 1 squirt of paint and about a 1/2 teaspoon of water. If the paint is too light, add another squirt of paint and massage more.

Supplies For Colored Beaded Harvest Corn
Below are the supplies I used to make this beaded harvest corn craft. For information on painting the wooden beads, please read the tips section above.
- Wooden Beads
- Yellow, Gold, Brown, Orange, and Burgundy Craft Paint
- Natural Raffia and Twine
- Chenille Stems, Tan (Pipe Cleaners)
- Ribbon
- Paintbrush
- Glue Gun and Glue Sticks
- Zip Close Sandwich Bags
- Paper Towels and Parchment Paper (to protect surface)
- Scissors and a Ruler

How To Make Corn Out of Beads
Each step for this Dollar Tree fall corn craft is detailed below to make it easier to follow. Keep this page open while you are creating your beaded corn for fall. If you would rather have a printable, scroll down and select the print button.

Place 24 wooden beads in each of two sandwich bags. Place 12 wooden beads in each of three bags. Leave the remaining 28 beads as natural wood.

In the first bag of 12 wooden beads, squeeze a bit of brown paint and add a few drops of water. Remove the air from the bag, close it, and massage the bag until all beads are coated.
Repeat this step with the second and third bags of 12 wooden beads with orange and burgundy craft paints. Repeat the steps with the 2 bags of 24 wooden beads with yellow and gold craft paints.

Place layered paper towels on your work surface. Carefully open each Ziplock bag and place the colored wooden beads out to dry.

Bend four 12” tan chenille stems in half. Next, wrap and twist each chenille stem around the others at the center until you have a rough star shape.

In random order, thread 14 of the natural and colored wooden beads onto each of the eight lengths of the chenille stems.

Place your index finger in the center of the wooden bead star and gather the ends together. Twist the remaining ends of the chenille stems together to secure the corn.

With scissors, cut the raffia bundle.

Wrap the bundle of raffia with twine approximately one inch from the cut end. Secure the twine with a knot and trim any long ends with scissors.
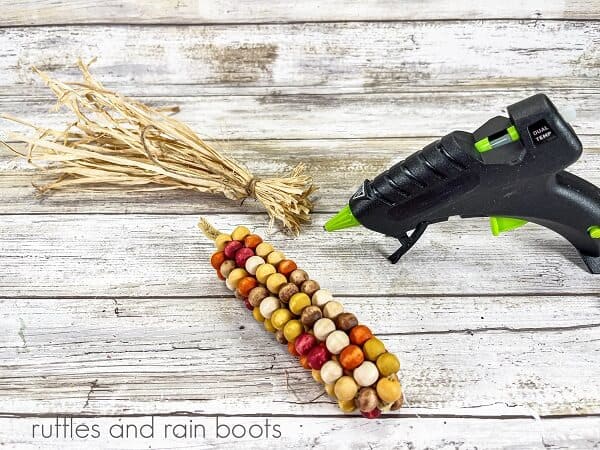
Attach the raffia top to the corn with a glue gun. Secure any stray raffia with additional hot glue.

Cut a 6” length from the ribbon. Tie the ribbon in a bow, notching the ends with scissors to prevent fraying.

Attach the bow to the corn with a glue gun.

Display it on your table or hang it on your front door. Make several to display or share.
Notes For Making Dollar Tree Fall Corn
- We used chenille stems rather than crafting wire because the beads stay in place.
- Acrylic paint is best for this project because it is non-toxic and safe for most surfaces. It can also easily be washed off with a bit of soap and water and dilutes easily.
- We chose colors for this project that we felt represented fall to us. The colors of Indian corn also include shades of red, blue, brown, and even black.
More Fall Crafts You May Like
- Cricut Pillow for Fall with Free SVG: Create a cute “Hand Picked Pumpkins” pillow in minutes with this free fall cut file.
- Make a Fall Mickey Mouse Topiary: If you have ever been to Disney in the fall, you know how magnificent it can be (that Disney magic is real)!
- Dollar Store Fall Mickey Mouse Wreath: This wreath came together with pumpkin picks from our local Dollar Store.
- Dollar Tree Pool Noodle Pumpkins: A noodle and some fabric, friends – let’s make a few cute fall pumpkins for our decor in just a minute.
Please Save or Share
Your shares are how this site grows and I sincerely appreciate it. Please save this craft to your fall or Thanksgiving pin board or share it on Facebook.

Dollar Tree Fall Corn Craft

Create this super cute Dollar Tree Corn craft in just about 30 minutes. Also known as Indian or ornamental corn, the colors range from red to white. This fall harvest corn craft was made with wooden beads, paint, chenille stems, raffia, twine, and ribbon. You can make a bunch of corn for your table or front door for less than $2. This is a fun craft to make with your kids or even a crafty get-together with friends to celebrate Fall or Thanksgiving.
Materials
- 3/8” Diameter Wooden Beads
- Yellow, Gold, Brown, Orange, and Burgundy Craft Paint
- Natural Raffia
- Natural Twine
- Chenille Stems, Tan
- Ribbon
- Ziplock Sandwich Bags
- Paper Towels
Tools
- Paintbrush
- Glue Gun and Glue Sticks
- Scissors
- Ruler
Instructions
- Place 24 wooden beads in each of the two Ziplock bags. Place 12 wooden beads in each of three Ziplock bags. Leave the remaining 28 beads of natural wood.
- In the first bag of 12 wooden beads, squeeze a small amount of brown paint and add about 1/2 teaspoon of water. Remove the air from the bag and zip it closed. Squish the bag until all the beads are coated. Repeat this step with the second and third bags of 12 wooden beads, and orange and burgundy craft paints. Repeat with the first and second bags of 24 wooden beads with yellow and gold craft paints.
- Place five sections of layered paper towels on your work surface. Carefully open each Ziplock bag and place the colored wooden beads out to dry.
- Bend four 12” tan chenille stems in half. Wrap and twist each chenille stem around the others at the center until you have a rough star shape.
- In random order, thread 14 of the natural and colored wooden beads onto each of the eight lengths of the chenille stem.
- Place your index finger in the center of the wooden bead star and gather the ends together. Twist the remaining ends of the chenille stems together to secure the corn.
- With scissors, cut the raffia bundle at the first bend.
- Wrap the bundle of raffia with twine approximately one inch from the cut end. Secure the twine with a knot and trim any long ends with scissors. Attach the raffia top to the corn with a glue gun. Secure any stray raffia with additional glue.
- Cut a 6” length from the ribbon. Tie the ribbon in a bow, notching the ends with scissors to prevent fraying. Attach the bow to the corn with a glue gun.
Meet the Creator
Hi there, I’m Sarah Nenni-Daher. I’m a crafty gal and always have at least 14 projects going at once. I am a crafter, designer, DIYer, and pattern maker. I share my creations here and in the Ruffles and Rain Boots® Shop.
Here at Ruffles and Rain Boots®, you’ll find DIY gnomes, crafts, gifts, cupcakes, laser crafts, and so much more. I love sharing video tutorials over on YouTube and chatting with other crafters in my Facebook groups. We’d love to have you!