
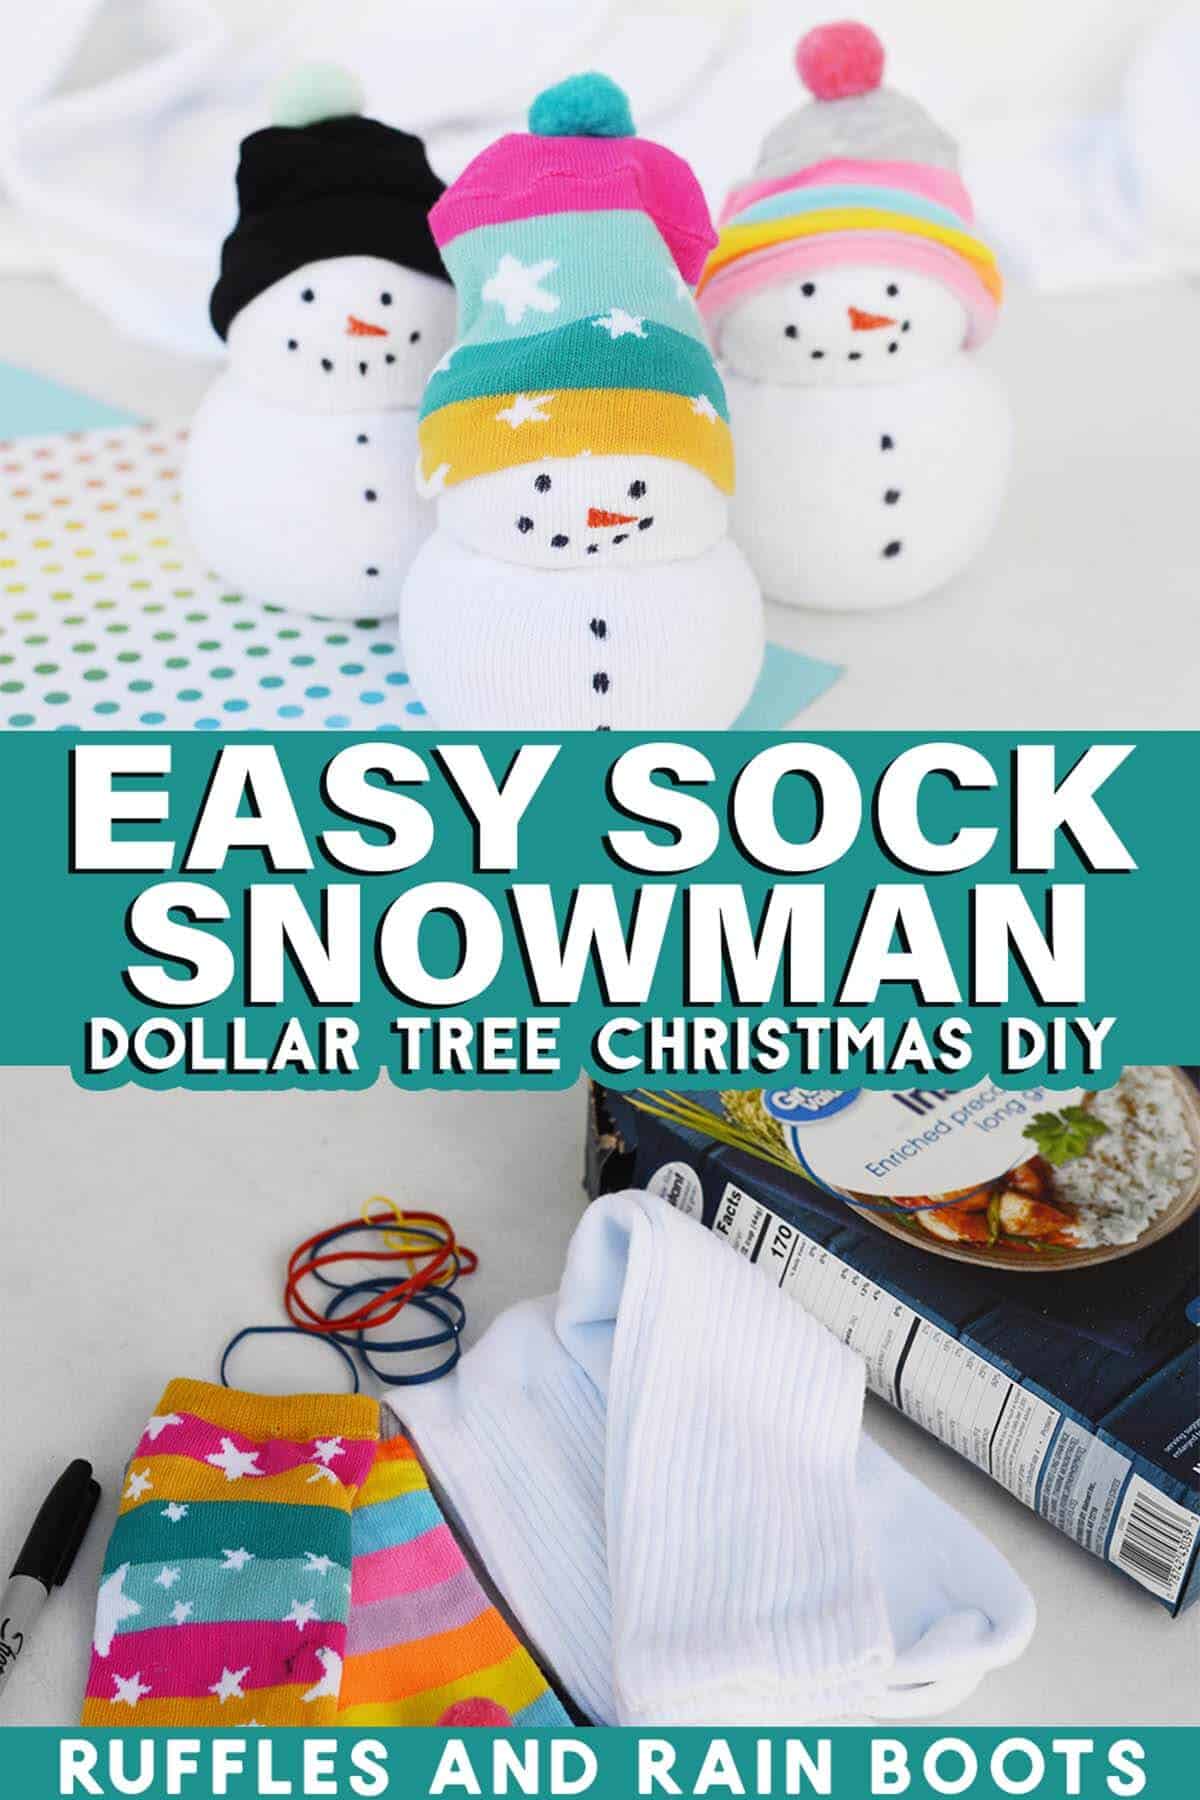
DIY Sock Snowman – Dollar Tree DIY
This cute DIY sock snowman tutorial is going to put a smile on your face, guaranteed. Gather all of the supplies at the dollar store or a big box store to make these into a winter fundraiser!
RELATED READING: Adorable Snowman Mini Mason Jar (Great Kid’s Craft)
What You'll Find On This Page
Cute Dollar Tree Sock Snowman
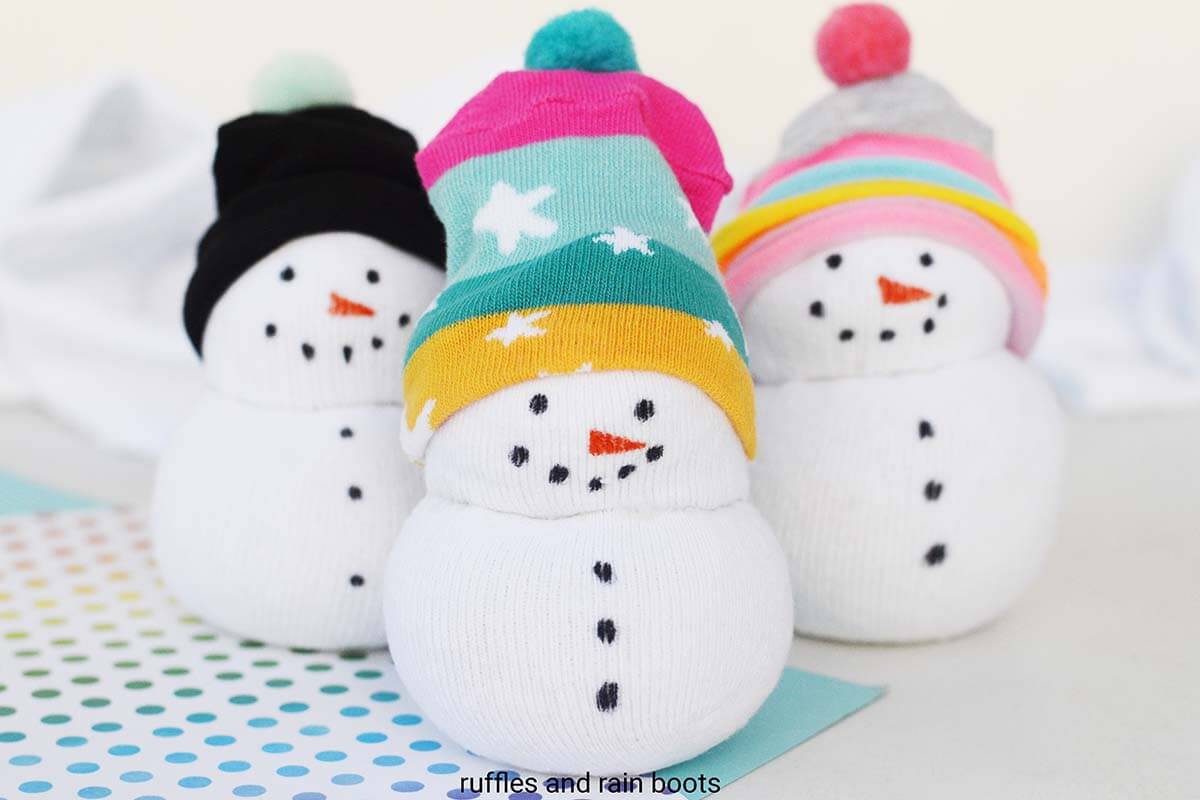
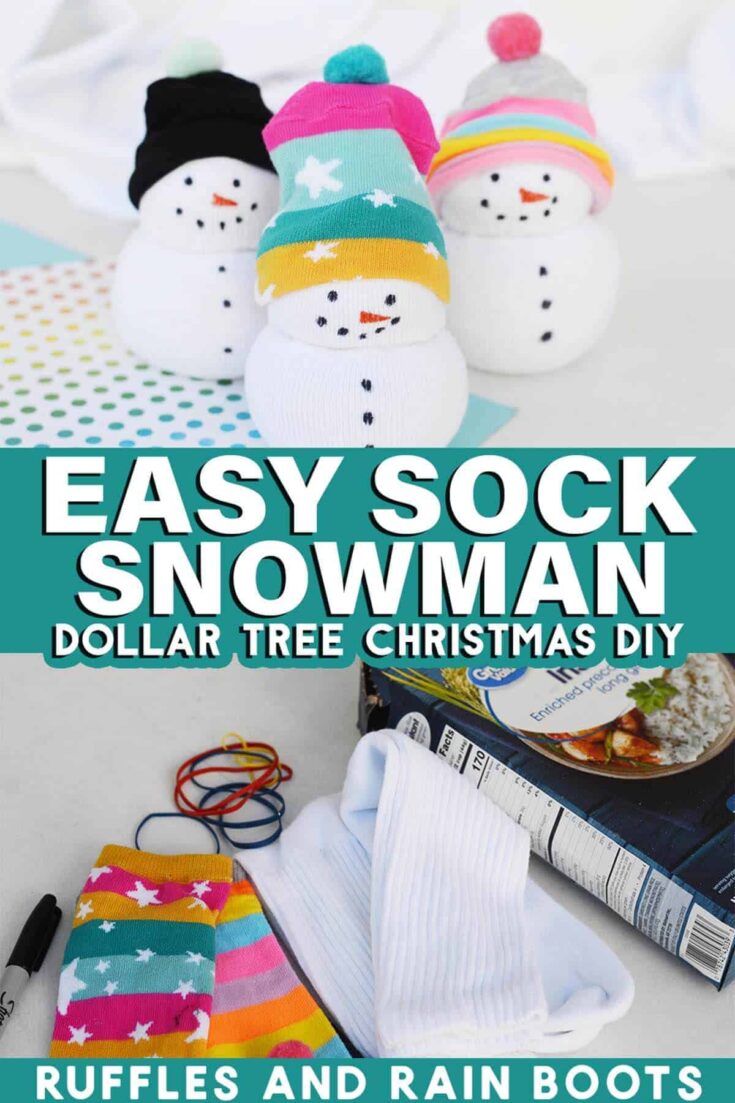
Here at Ruffles and Rain Boots, we’ve been crafting a ton for the holidays (which is normal). But this week, I’m sharing one of our all-time favorite crafts: a cute snowman made from SOCKS!
And the best part is that you can make a family of sock snowmen by using different sized socks for the activity. Note that you’ll need less rice for smaller socks.
If you don’t have time to make these adorable sock snowmen right now, save or share this page. Either share it to Facebook or save it to a winter crafts pin board so you can easily find it when you’re ready to begin.
Materials Needed
Head to the Dollar Tree to get the supplies you need. Other big box stores will also have the items at a low price and if you’re making a ton for a fundraiser, this might be best because they will have larger packs of socks.
If you’re creating this with the little ones, you will have to operate the glue gun or get them a low-temp version. Parental supervision is required for this sock snowmen craft because we’re using scissors and hot glue.
- Crew Socks (white)
- Cute Socks (fuzzy socks, colorful knits, etc.)
- Rice
- Rubberbands
- Black and Orange Markers
DIY Sock Snowman Video Tutorial
If you’re a visual learner, watch this very quick sock snowman DIY video tutorial on YouTube. It’s a quick project and an even faster video tutorial! :)
And while you’re there, be sure to subscribe to the channel for more easy craft ideas.

RELATED READING: Easy Dollar Tree Snowman Hat Ornaments
How to Make a Sock Snowman
Below are the step by step instructions for this Dollar Tree Christmas craft idea. Keep this page open and follow along.
If you want a printable version without images, scroll to the bottom of this article and select the print button.
Use scissors to cut off the ribbed portion of the crew socks, just over the top of the heel.

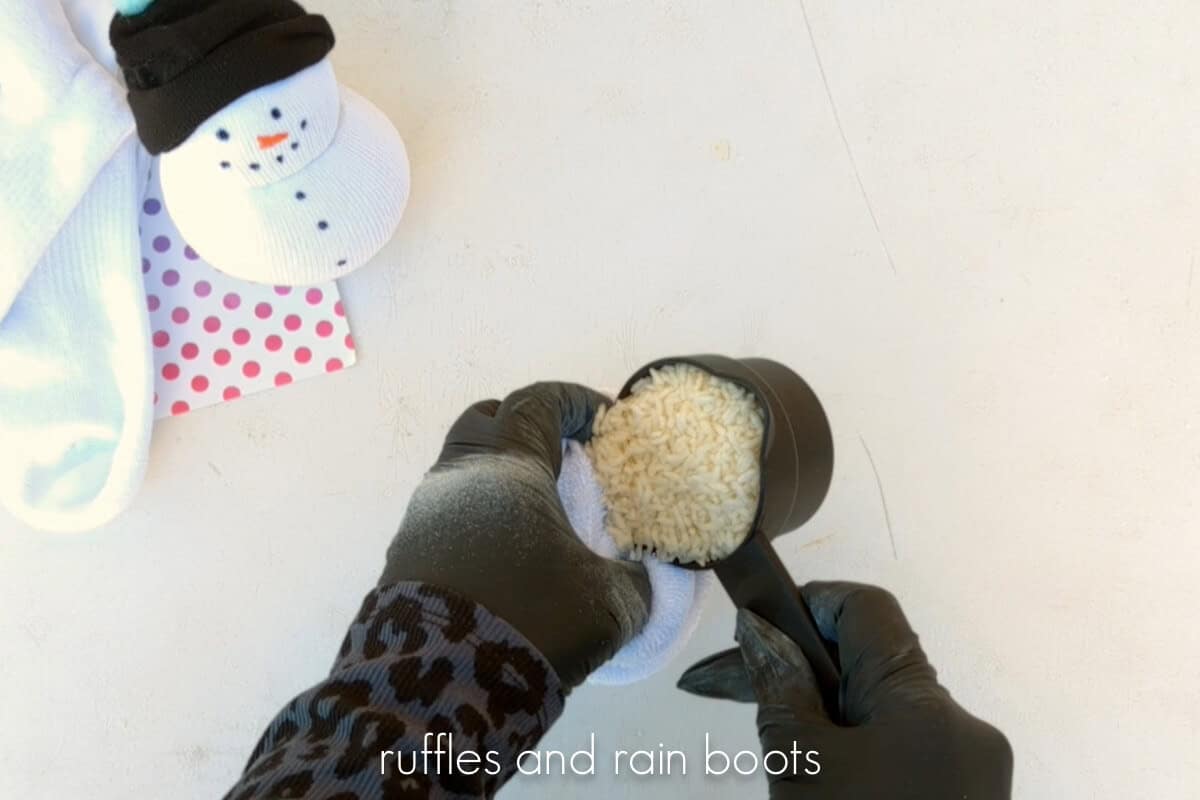
Fill the bottom of the sock with 1 cup of rice. Press it down, squish it, etc. to get it to widen out a bit at the bottom.
Secure the sock over the rice with an elastic rubber band. Make the band is as close to the rice as possible.
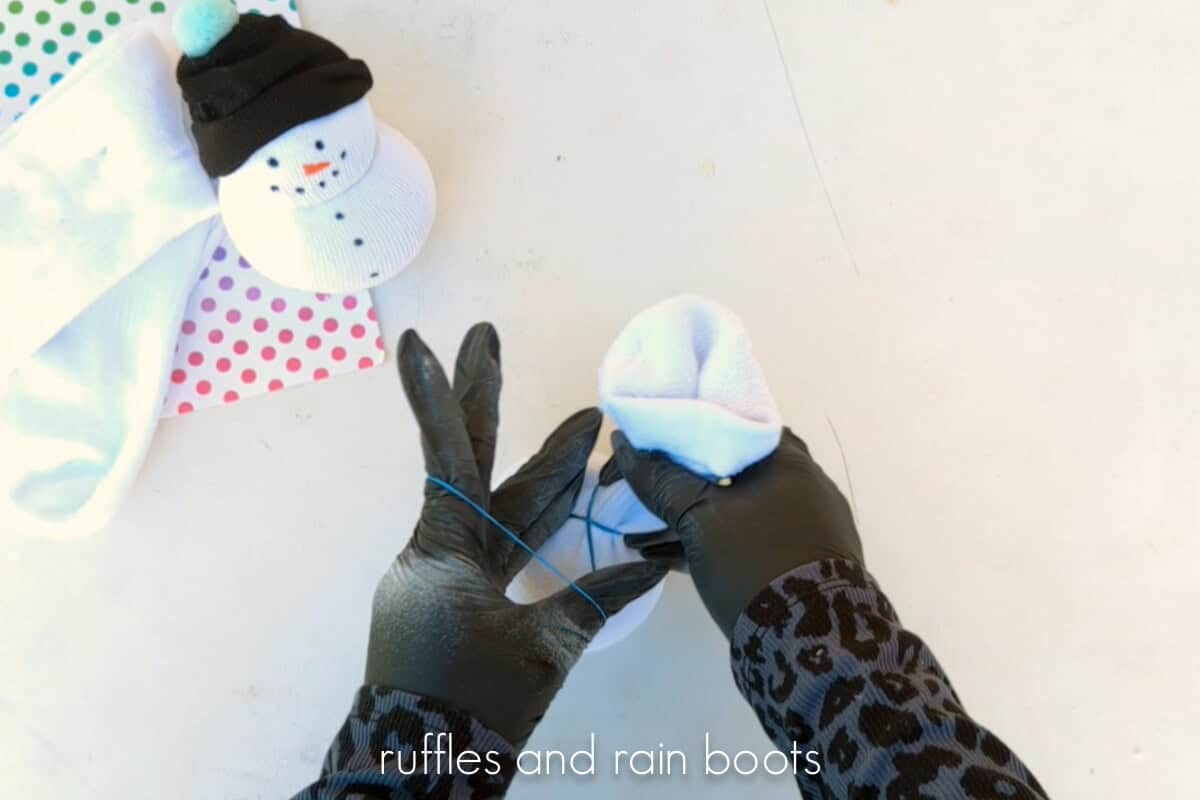
Add another 1/2 cup of rice to the sock and secure with a rubber band to create the snowman’s head.
Use scissors to cut off the excess sock to about 1/2 an inch above the band.
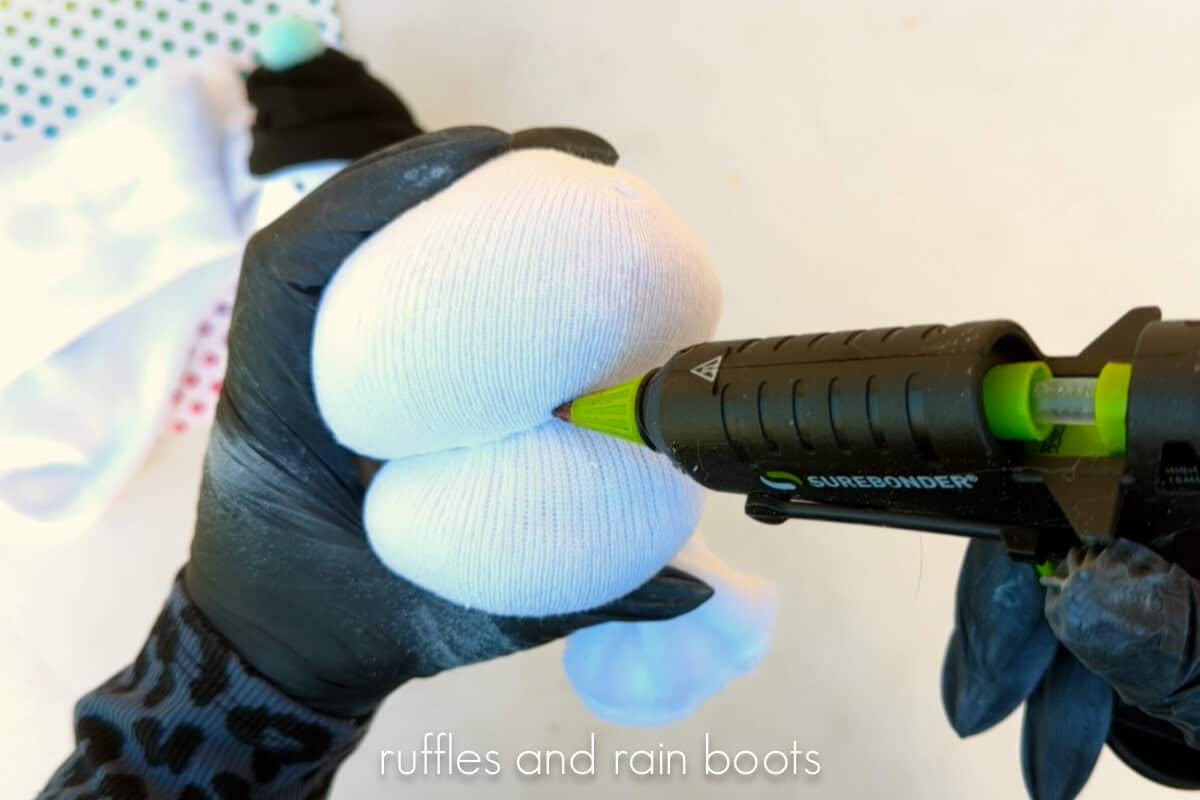
Use the hot glue gun to add a ring of glue around the bottom of the head portion of the snowman. Press it into the body well and hold it until it is secure.
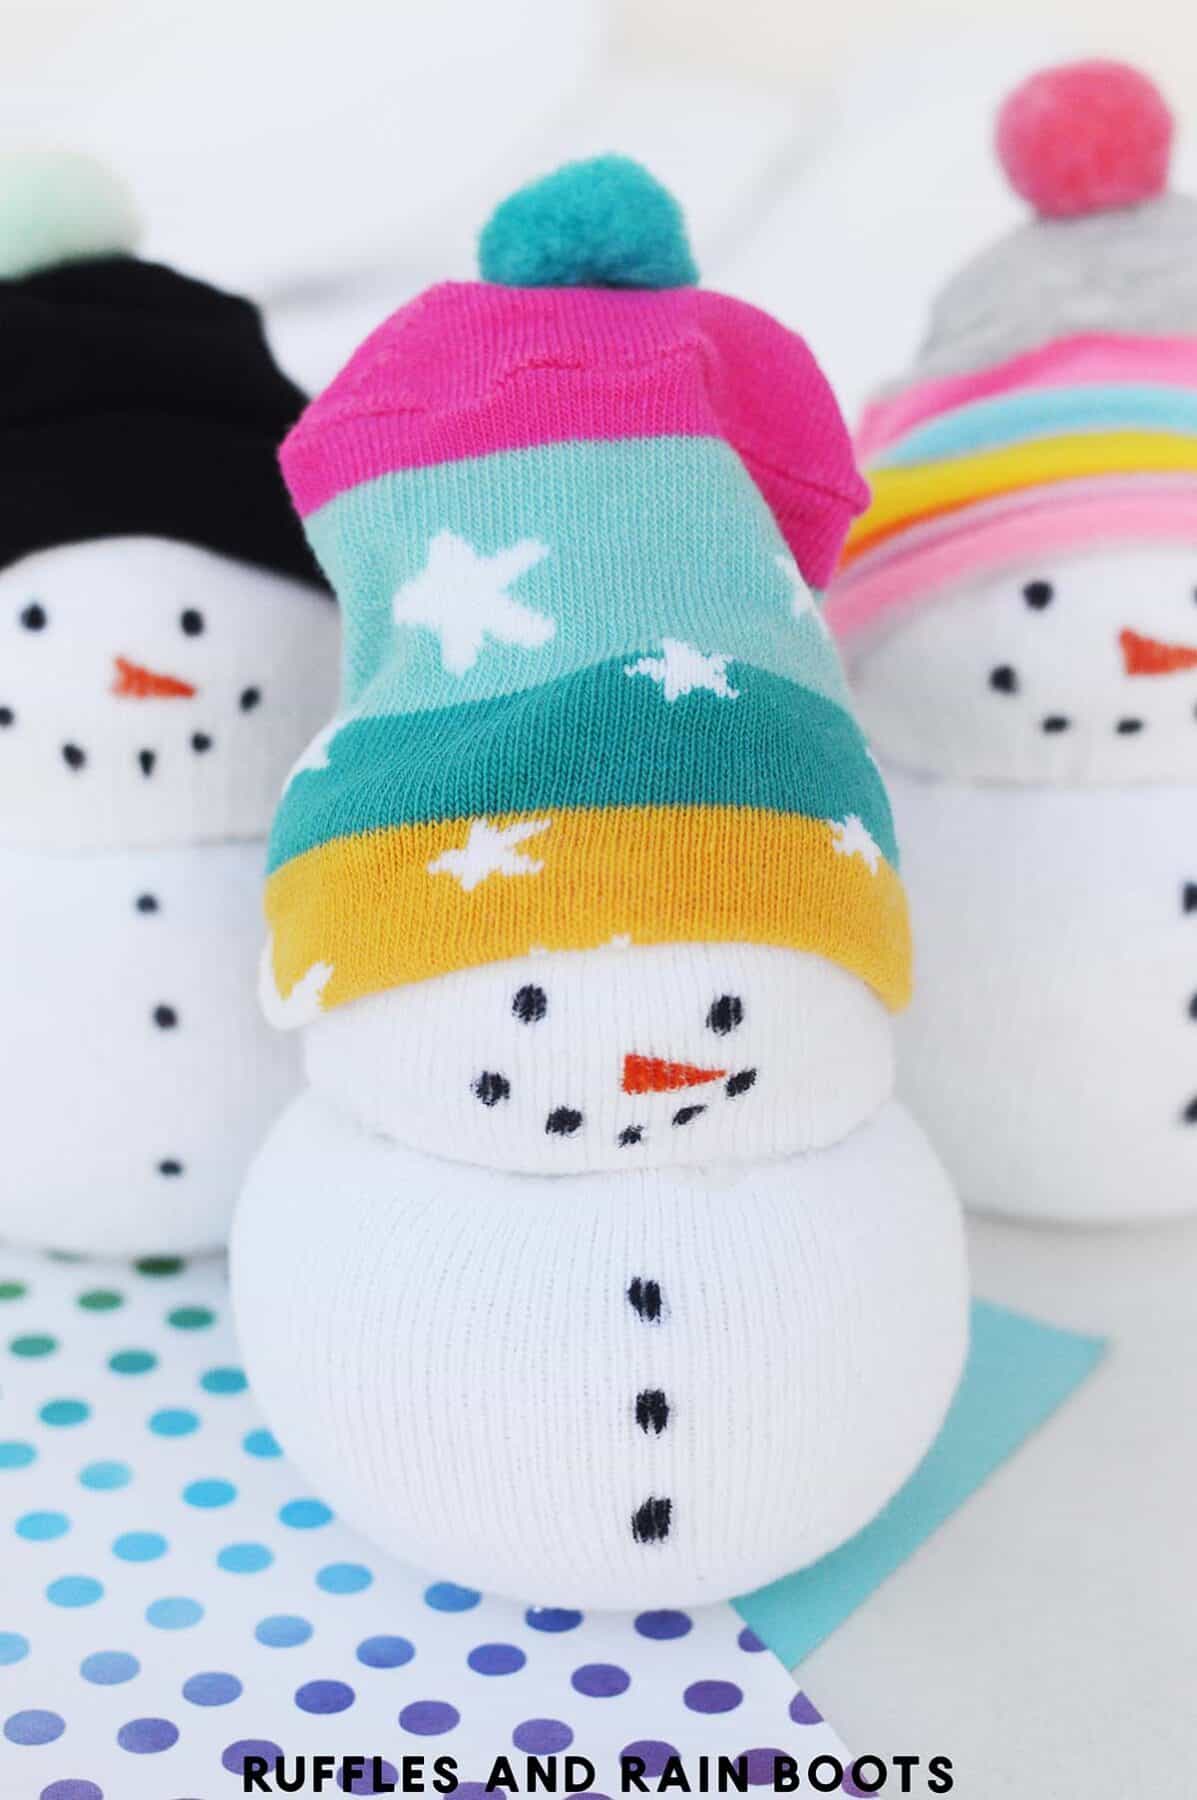
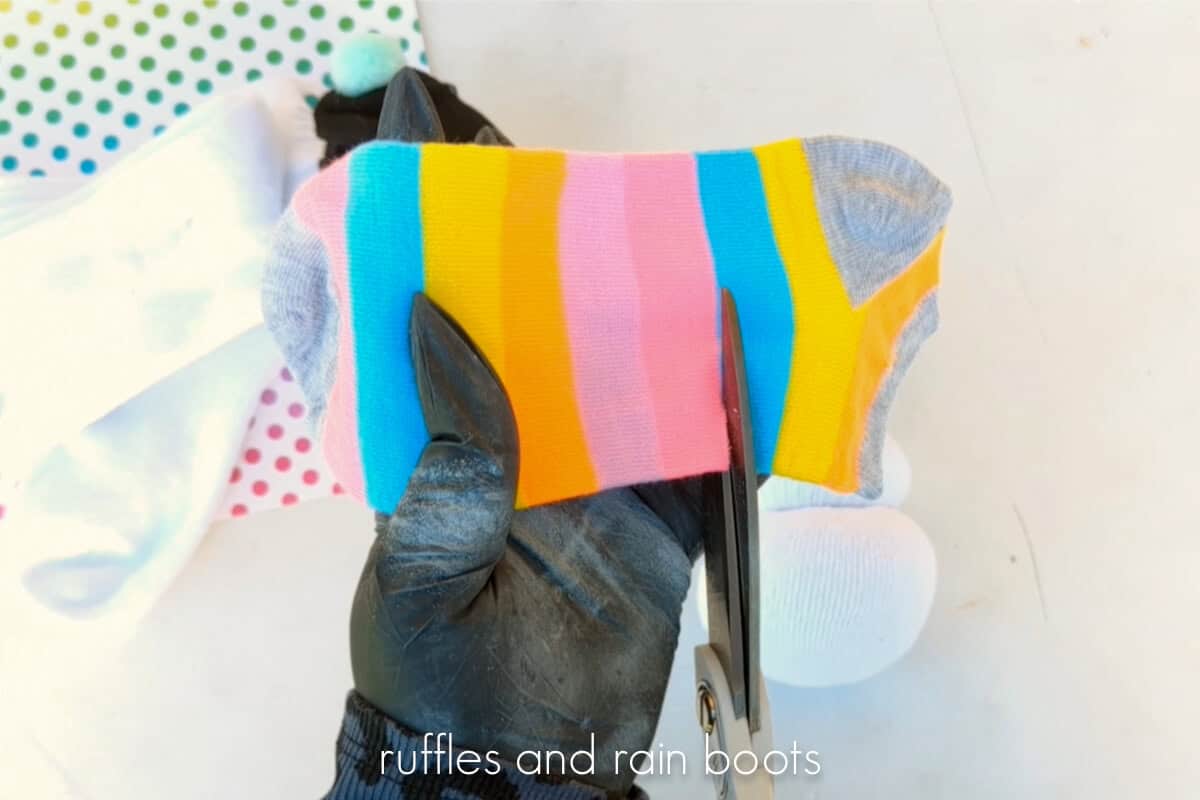
Use scissors to cut the colorful sock below the heel. Slide it onto the snowman’s head. You can glue it in place or add a pompom to the tip of the hat.
Use a black marker to create two eyes and a mouth for the snowman’s face and two or three buttons down the front of the body.
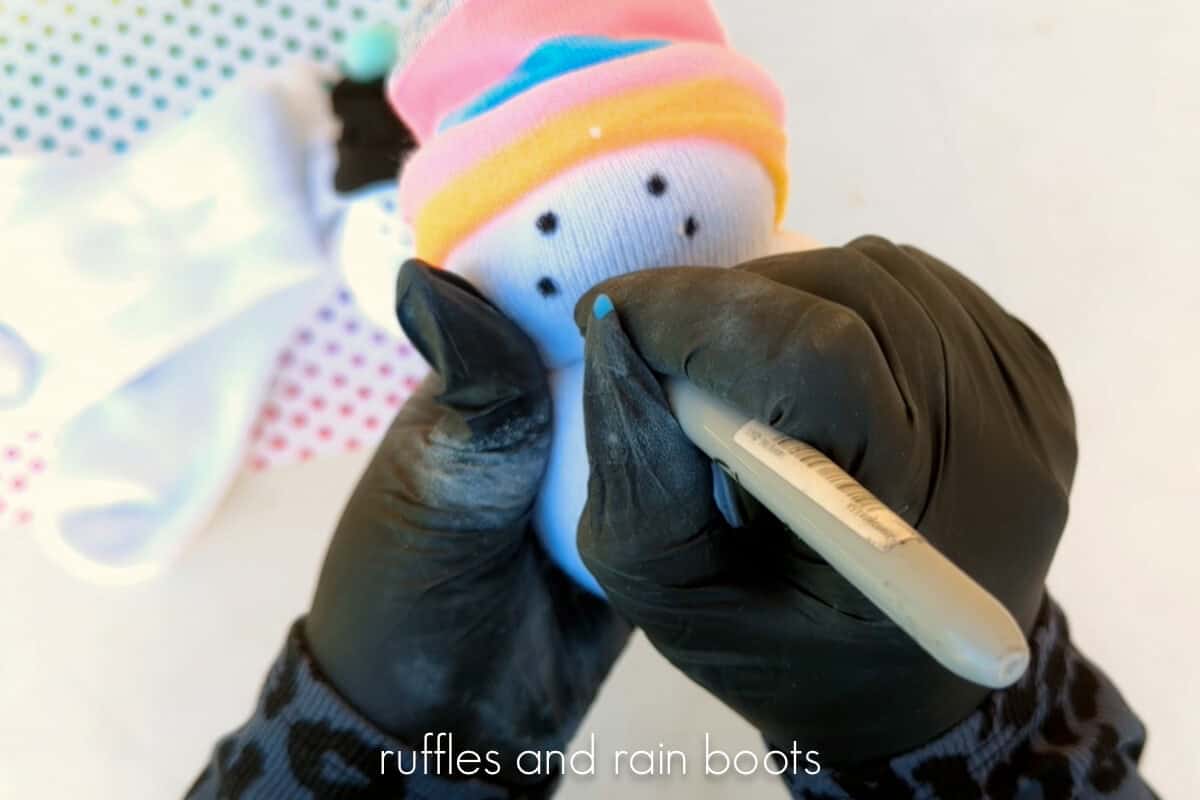
Use the orange marker to create a sideways triangle for a carrot nose on the snowman’s head and you’re ready to display your cute sock snowman!
More Snowman Craft Ideas You Will Like
- DIY Cork Snowman – This was – surprisingly – a huge hit with everyone. You can paint it or keep it plain and rustic to add to a winter kitchen display.
- Pumpkin Snowman Stack – Stacked anything is huge in the craft world right now. Use up those miniature pumpkins you forgot to pack away…
- Painted Snowman Treat Jar – Both small and big hands will have a blast making this quick painting project.
Please Save or Share This Fun Dollar Tree Winter Craft Idea
Your shares are how this site grows and I am grateful. Please save this to a DIY crafts pin board or share it with a crafty group on Facebook.
Easy Sock Snowman
This Dollar Tree DIY sock snowman craft idea is perfect for everyone to make this Christmas and winter season. These sock snowmen come out so cute and they are done in just minutes. Watch how easy they come together in this DIY sock snowman video tutorial.
Materials
- Crew Sock
- Decorative Sock
- Rice (about 1.5 cups per snowman)
- Rubberbands (2 per snowman)
- Pompoms, optional
Tools
- Scissors
- Hot Glue Gun and Glue Sticks
- Black and Orange Markers
- Measuring Cup
Instructions
- Use scissors to cut off the ribbed portion of the crew socks, just over the top of the heel.
- Fill the bottom of the sock with 1 cup of rice. Press it down, squish it, etc. to get it to widen out a bit at the bottom.
- Secure the sock over the rice with an elastic rubber band. Make the band is as close to the rice as possible.
- Add another 1/2 cup of rice to the sock and secure with a rubber band. Use scissors to cut off the excess sock to about 1/2 an inch above the band.
- Use the hot glue gun to add a ring of glue around the bottom of the head portion of the snowman. Press it into the body well and hold it until it is secure.
- Use scissors to cut the colorful sock below the heel. Slide it onto the snowman's head. You can glue it in place or add a pompom to the tip of the hat.
- Use a black marker to create two eyes and a mouth for the snowman's face and two or three buttons down the front of the body.
- Use the orange marker to create a sideways triangle for a carrot nose on the snowman's head and you're ready to display your cute sock snowman!
Notes
Optional: Use the sock cast offs to create scarves to wrap around the. neck area.
Meet the Creator
Hi there, I’m Sarah Nenni-Daher. I’m a crafty gal and always have at least 14 projects going at once. I am a crafter, designer, DIYer, and pattern maker. I share my creations here and in the Ruffles and Rain Boots® Shop.
Here at Ruffles and Rain Boots®, you’ll find DIY gnomes, crafts, gifts, cupcakes, laser crafts, and so much more. I love sharing video tutorials over on YouTube and chatting with other crafters in my Facebook groups. We’d love to have you!