
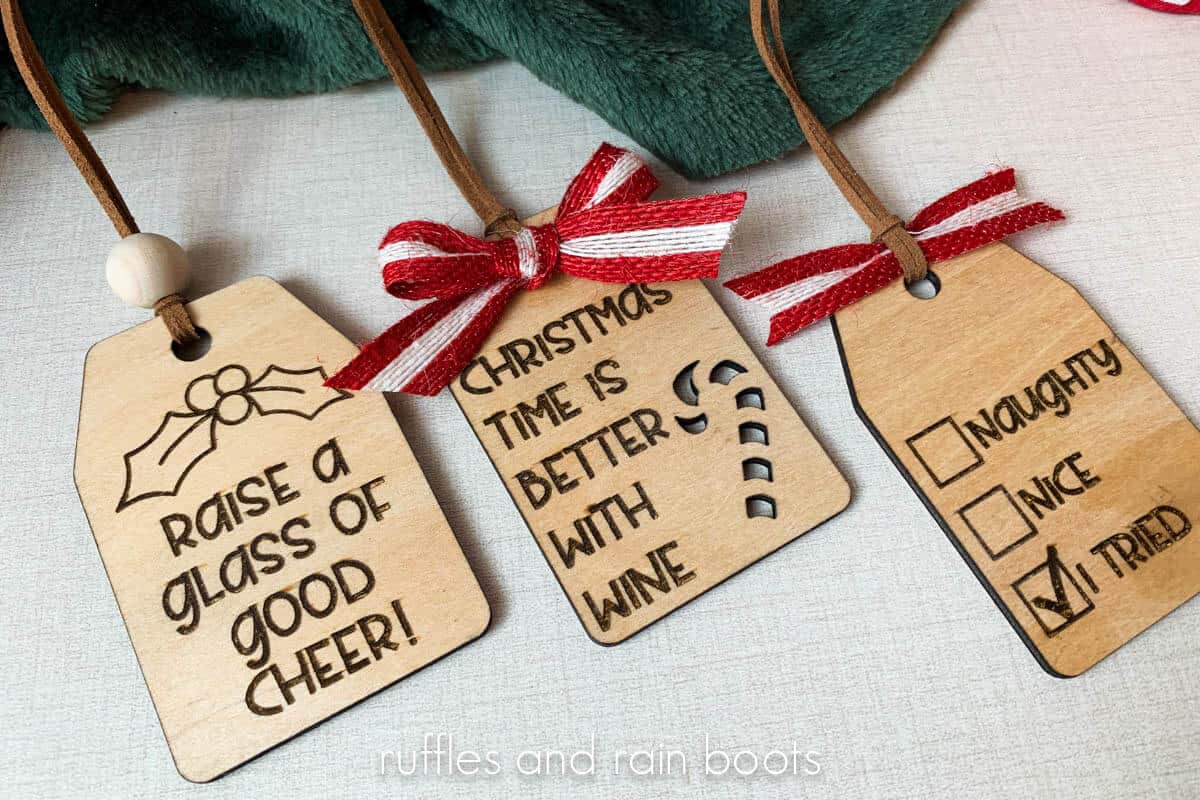
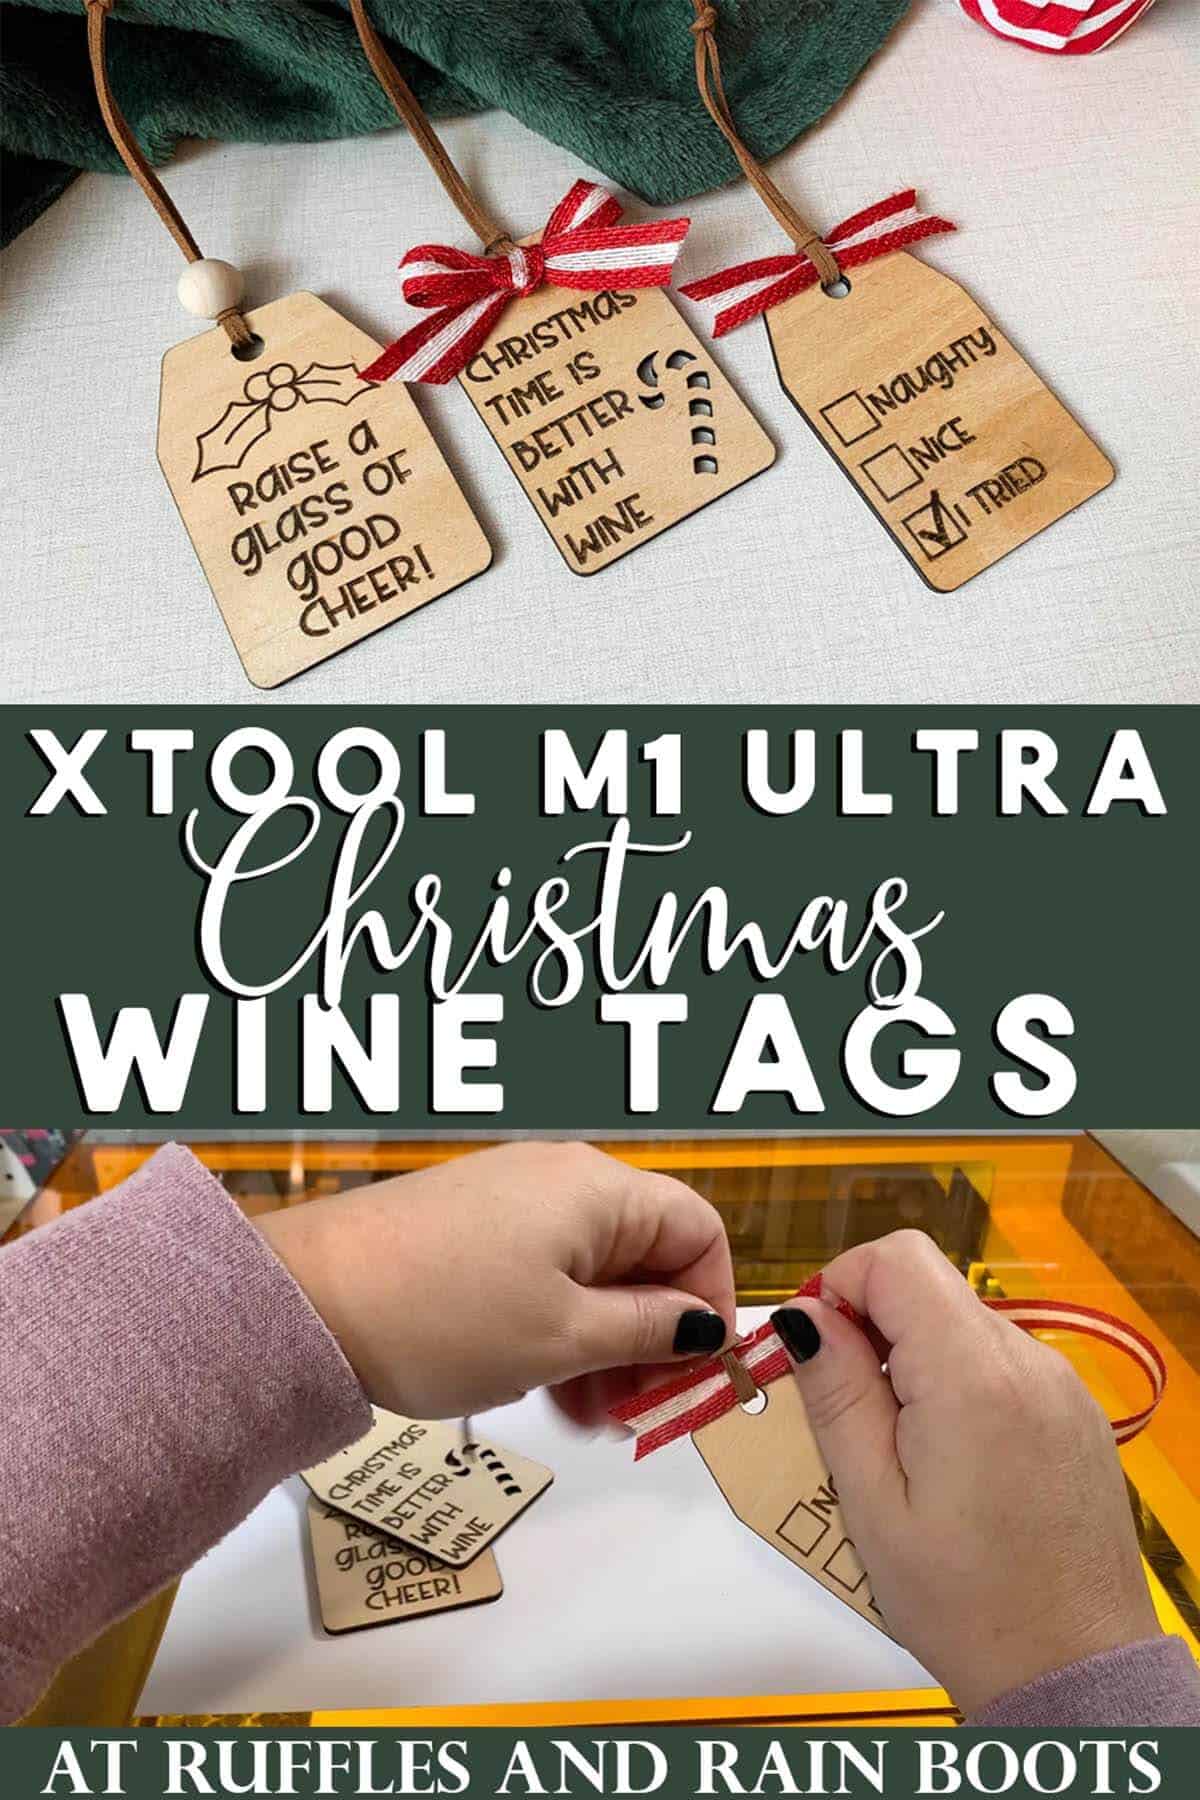
Laser Cut Christmas Wine Tags (Engraving and Cutting)
These laser cut Christmas wine tags are a laser engraving and cutting beginner project. No matter the machine or the type of laser, you can craft this holiday laser idea in only minutes.
RELATED READING: Easy Highland Cow Ornament for Christmas (Laser DIY)
What You'll Find On This Page
Christmas Wine Tag SVG Bundle
Here at Ruffles and Rain Boots, I’ve been in holiday crafting mode. It’s a busy time, but I love it!
Today, I created a set of 8 Christmas wine tag SVG designs for laser cutters and cutting machines. Whether you’re crafting with the xTool M1 Ultra or a Cricut machine, these holiday wine tags are a quick and fun project.
Below, I’ll share the step by step on how to laser cut wine tags from basswood, as well as engrave the premade sayings and designs. This xTool M1 Ultra project idea can be made with any laser.
If you love this project but can’t get started right now, share or save this laser cut Christmas project idea. Whether you save it to a Christmas crafts pin board or share it on Facebook, either will make this easy to find when you’re ready to begin this laser cutter projects idea.

As an Amazon Associate, I could earn from qualifying purchases. There could be affiliate links within this article.
RELATED READING: DIY Laser Cut Sun Catcher Tutorial
Materials Needed for This Christmas Laser Craft
Below are the materials I used to create this easy holiday gift idea. The paper masking is optional – I just don’t like the clean up side of laser cutting and engraving, so I use it to help maintain my love of the craft.
- Christmas Wine Tag SVG Bundle
- xTool M1 Ultra (or other laser)
- 3mm basswood plywood (or other thin wood)
- paper masking
- suede cord
- ribbon and /or beads
Christmas Wine Gift Tags Laser Project Video Tutorial
If you’re a visual learner like I am, watch the holiday wine tags laser cutting and engraving video tutorial on YouTube. We have a lot of fun on the channel, so be sure to subscribe.
Brand new to your xTool laser? Watch this short How to Set Up a Smart Test Array video tutorial for a safe, efficient way to set up a materials test.
What Laser Should I Use?
I own many lasers, but only two types of lasers right now: CO2 and diode. Below are summaries of each and suggestions on materials. Today, I”ll be using the xTool M1 Ultra but this craft and the set of Christmas wine tag SVGs can be used on ANY diode or CO2 laser.
- xTool P2 – A fully-enclosed CO2 laser, perfect for cutting acrylic and wood. This is an unrestricted laser when it comes to acrylic, wood, slate, etc. and is perfect for those with a small business or looking to start one.
- xTool S1 – The option I have is a 40 watt diode laser which cuts some acrylic, wood and does amazing engravings. This laser has some acrylic restrictions (no clear, mirror, translucent; primarily opaque) but powers through wood.
- xTool M1 Ultra – The updated version of the M1 shows up to the party with a printer (can print on wood), a laser, a set of blades, foil, and embossing, as well as a pen tool. This is my number one recommendation for crafters.
DIY Wooden Wine Tags Laser Project for Beginners
Below is the step by step tutorial to create these Christmas wine tags. Keep this page open and follow along or scroll to the bottom of the page to print out a version without images.
How to Set Up the Wine Tag SVG File in XCS
If you’re using an xTool laser machine, follow each step below to get the file ready. If you’re using another laser or cutting machine, import the SVG, set all red to cut and all blue to engrave.
Open a new project within XCS and import the SVG bundle or drag it into the project canvas. Note: you can also open the XCS file included in the download for a ready-to-go project.
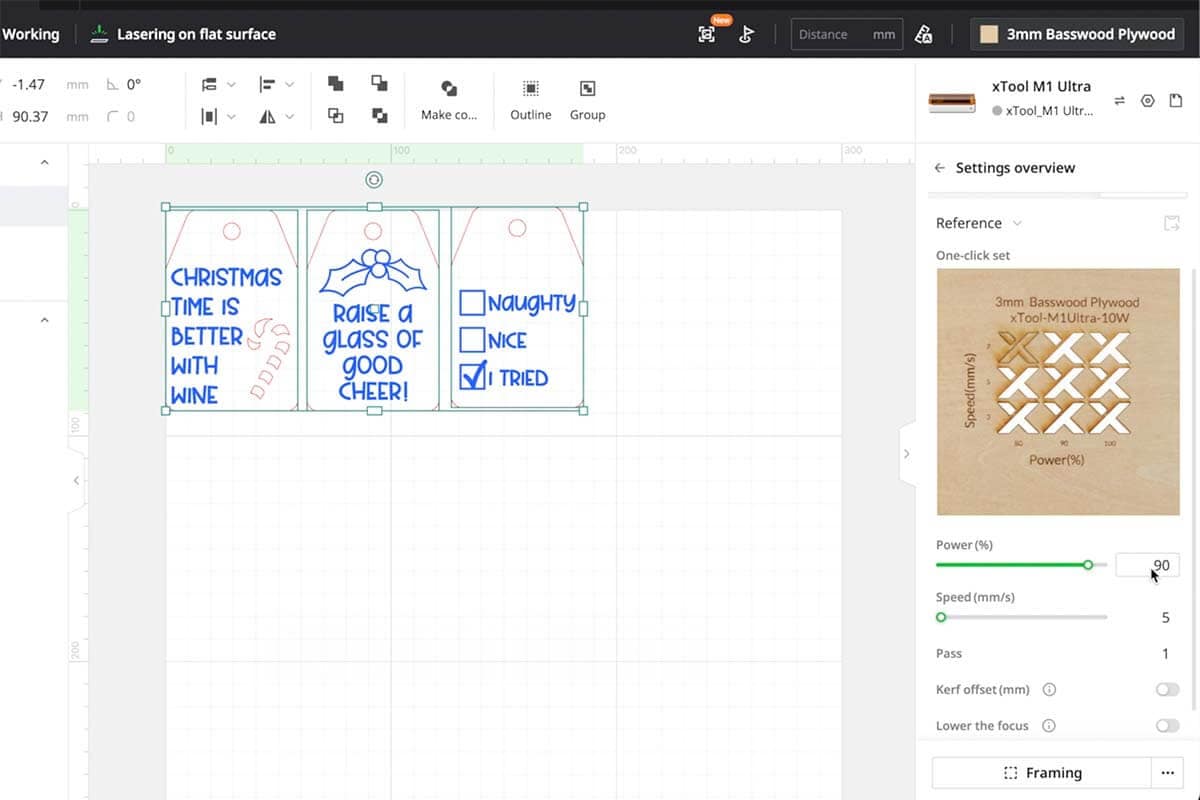
Ensure the size is correct for your project and enter the settings.
I used paper masking for a quick clean up, so my settings were: engraving 50, 50, and 1 pass and cutting 90, 5, and 2 passes.
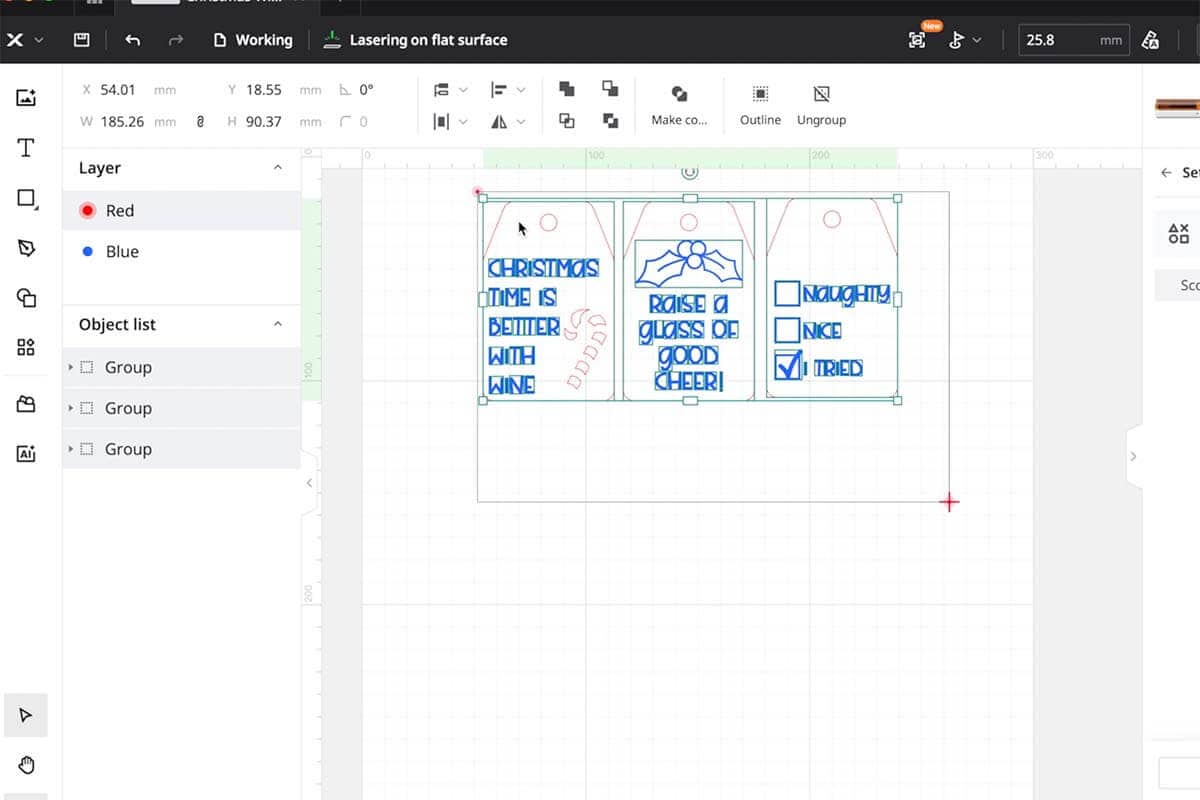
Note: if you want to create only a few of the gift tags, copy and paste them onto the Working canvas.
Load Material, Settings, and Process the Engravings and Cuts
Cover a piece of basswood ply in paper masking. Note that the grain of the wood should be vertical for the best results. Ensure there are no bubbles in the masking and place onto the slats or the honeycomb.
Turn on the M1 Ultra or other laser and select Auto-Measure from the top menu bar to enter the distance. Select the material or enter settings for both engraving and cutting if you haven’t done so already.
Next, select the Marking indicator in the top menu bar, select rectangle, and move the laser module to position the crosshair at the top left-most position of the material. Press the white button on the front of the M1 Ultra to lock it in place.
Move the laser module and position the crosshair at the bottom right-most portion of the material. Press the white button the front of the machine to lock in the vertex. Select end marking and done in the software.
Move the gift tags to be processed into the marking area, ensuring all pieces are a) moved at the same time in the same position and b) placed within the marked area. Save the file.
Frame the design, if desired, and process the material. Note: if using an air purifier or inline fan, please turn those on. If using the AP2 in the xTool SafetyPro class, ensure the dongle is in the M1 Ultra and select “Auto” on the purifier.
Clean Up and Dressing
Once the machine has processed the tags, remove them from the machine and clean up all edges. Remove the masking.
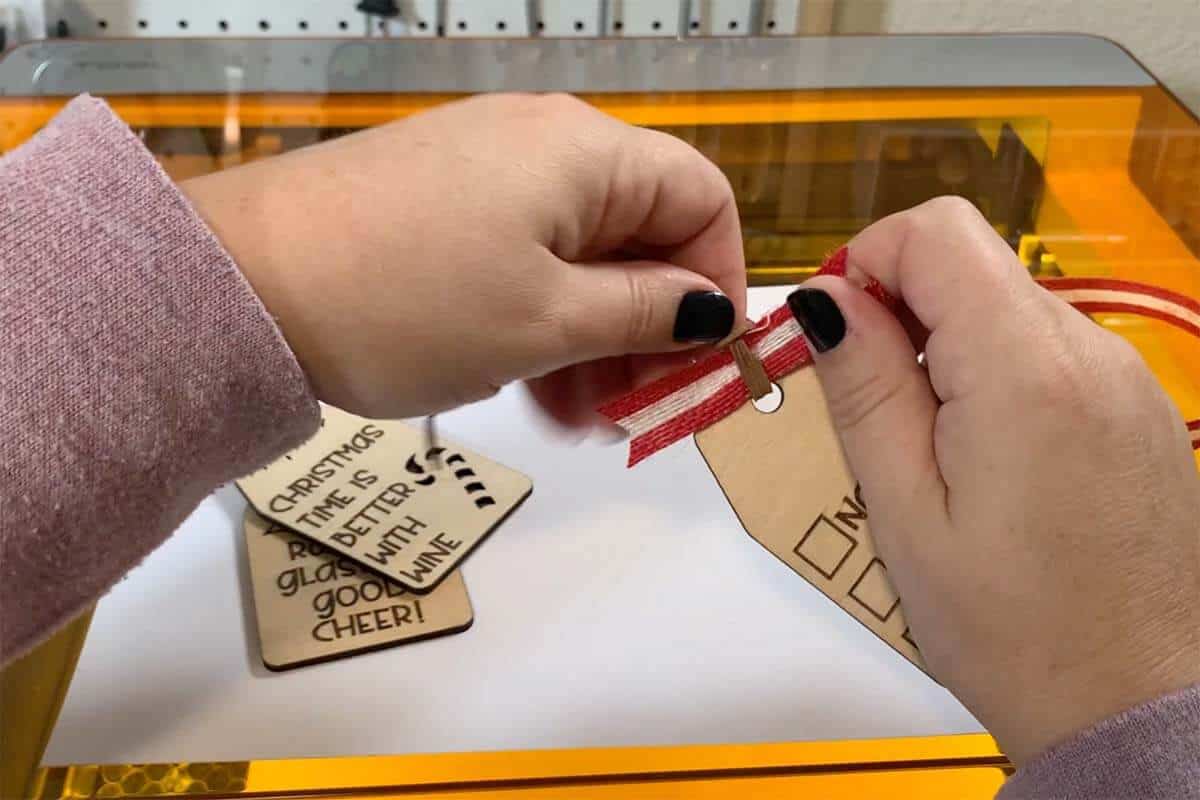
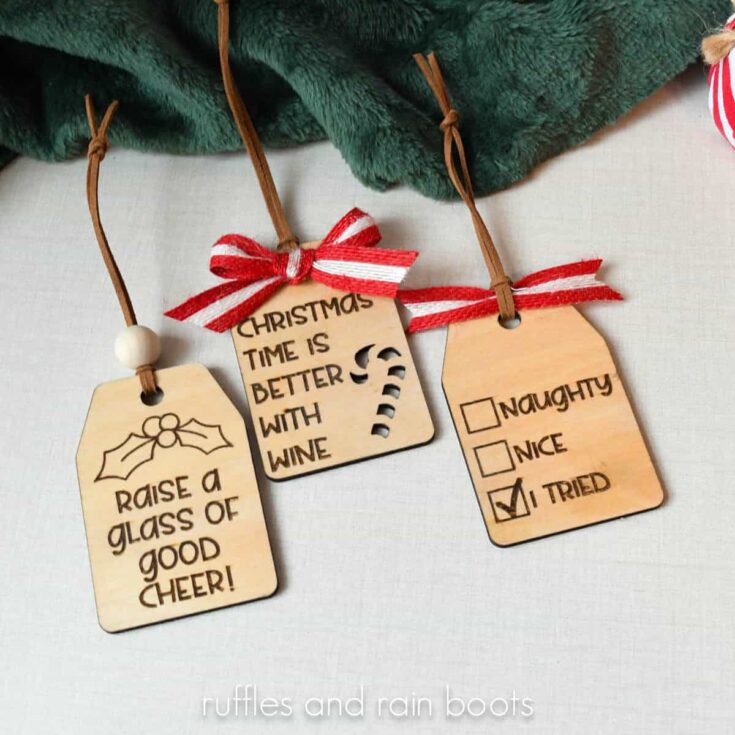
Cut between 10-12 inches of suede cord, fold in half, and slide the looped end through the front of the gift tag hole. Add a ribbon, bead, or bow to decorate and slip onto a bottle of wine!
More Beginner Laser Projects You Might Like
- How to Laser Engrave Slate Coasters – Whether you’re setting up one or a batch, learn the best way to engrave slate WITHOUT coatings.
- Laser Cut and Engraved Thanksgiving Wine Tags – These are funny, functional, and a huge hit to kick off the holiday season.
- Learn to Make Laser Cut Layered Signs – If you love the look of a multi-layered sign but don’t know where to begin, try this easy project idea.
Please Save or Share This Laser Christmas Craft Idea
Your shares are how this site grows and I am sincerely grateful. Please save this to a DIY laser projects pin board or share it with a laser group on Facebook.
Laser Cut Christmas Wine Gift Tags
Learn how to use XCS and the xTool M1 Ultra laser to create beautiful laser engraved and laser cut Christmas wine tags.
Materials
- Christmas Wine Tags SVG Set
- Basswood Plywood
- Paper Masking, optional
- Suede Cord
- Ribbon and Beads
Instructions
How to Set Up the Wine Tag SVG File in XCS
- If you're using an xTool laser machine, follow each step below to get the file ready. If you're using another laser or cutting machine, import the SVG, set all red to cut and all blue to engrave.
- Open a new project within XCS and import the SVG bundle or drag it into the project canvas. Note: you can also open the XCS file included in the download for a ready-to-go project.
- Ensure the size is correct for your project and enter the settings.
- I used paper masking for a quick clean up, so my settings were: engraving 50, 50, and 1 pass and cutting 90, 5, and 2 passes. Note: if you want to create only a few of the gift tags, copy and paste them onto the Working canvas.
Load Material, Settings, and Process the Engravings and Cuts
- Cover a piece of basswood ply in paper masking. Note that the grain of the wood should be vertical for the best results. Ensure there are no bubbles in the masking and place onto the slats or the honeycomb.
- Turn on the M1 Ultra or other laser and select Auto-Measure from the top menu bar to enter the distance. Select the material or enter settings for both engraving and cutting if you haven't done so already.
- Next, select the Marking indicator in the top menu bar, select rectangle, and move the laser module to position the crosshair at the top left-most position of the material. Press the white button on the front of the M1 Ultra to lock it in place.
- Move the laser module and position the crosshair at the bottom right-most portion of the material. Press the white button the front of the machine to lock in the vertex. Select end marking and done in the software.
- Move the gift tags to be processed into the marking area, ensuring all pieces are a) moved at the same time in the same position and b) placed within the marked area. Save the file.
- Frame the design, if desired, and process the material. Note: if using an air purifier or inline fan, please turn those on. If using the AP2 in the xTool SafetyPro class, ensure the dongle is in the M1 Ultra and select "Auto" on the purifier.
Clean Up and Dressing
- Once the machine has processed the tags, remove them from the machine and clean up all edges. Remove the masking.
- Cut between 10-12 inches of suede cord, fold in half, and slide the looped end through the front of the gift tag hole.
- Add a ribbon, bead, or bow to decorate and slip onto a bottle of wine!
Notes
Engraving Settings (masked basswood): 50 power, 50 speed, 1 pass, 120 LPC
Cut Settings: 90 power, 5 speed, 1 pass (candy cane was 2 passes)
Meet the Creator
Hi there, I’m Sarah Nenni-Daher. I’m a crafty gal and always have at least 14 projects going at once. I am a crafter, designer, DIYer, and pattern maker. I share my creations here and in the Ruffles and Rain Boots® Shop.
Here at Ruffles and Rain Boots®, you’ll find DIY gnomes, crafts, gifts, cupcakes, laser crafts, and so much more. I love sharing video tutorials over on YouTube and chatting with other crafters in my Facebook groups. We’d love to have you!