
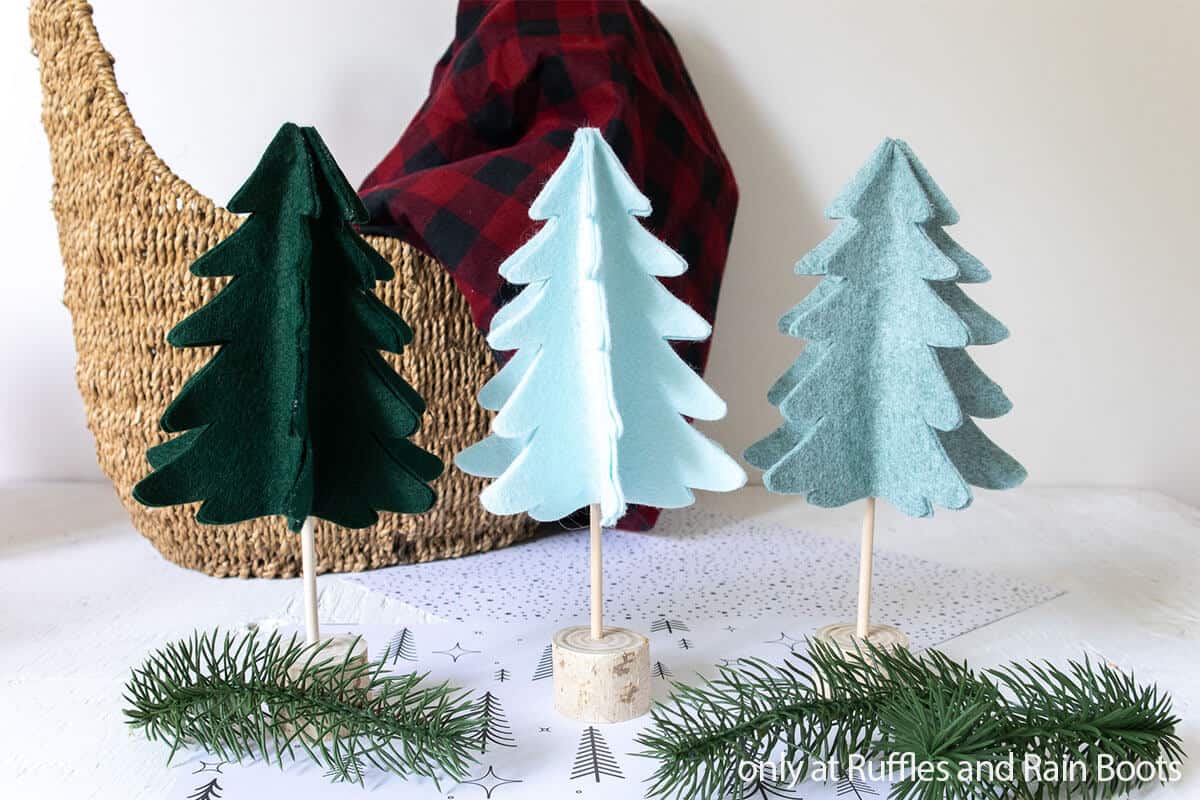
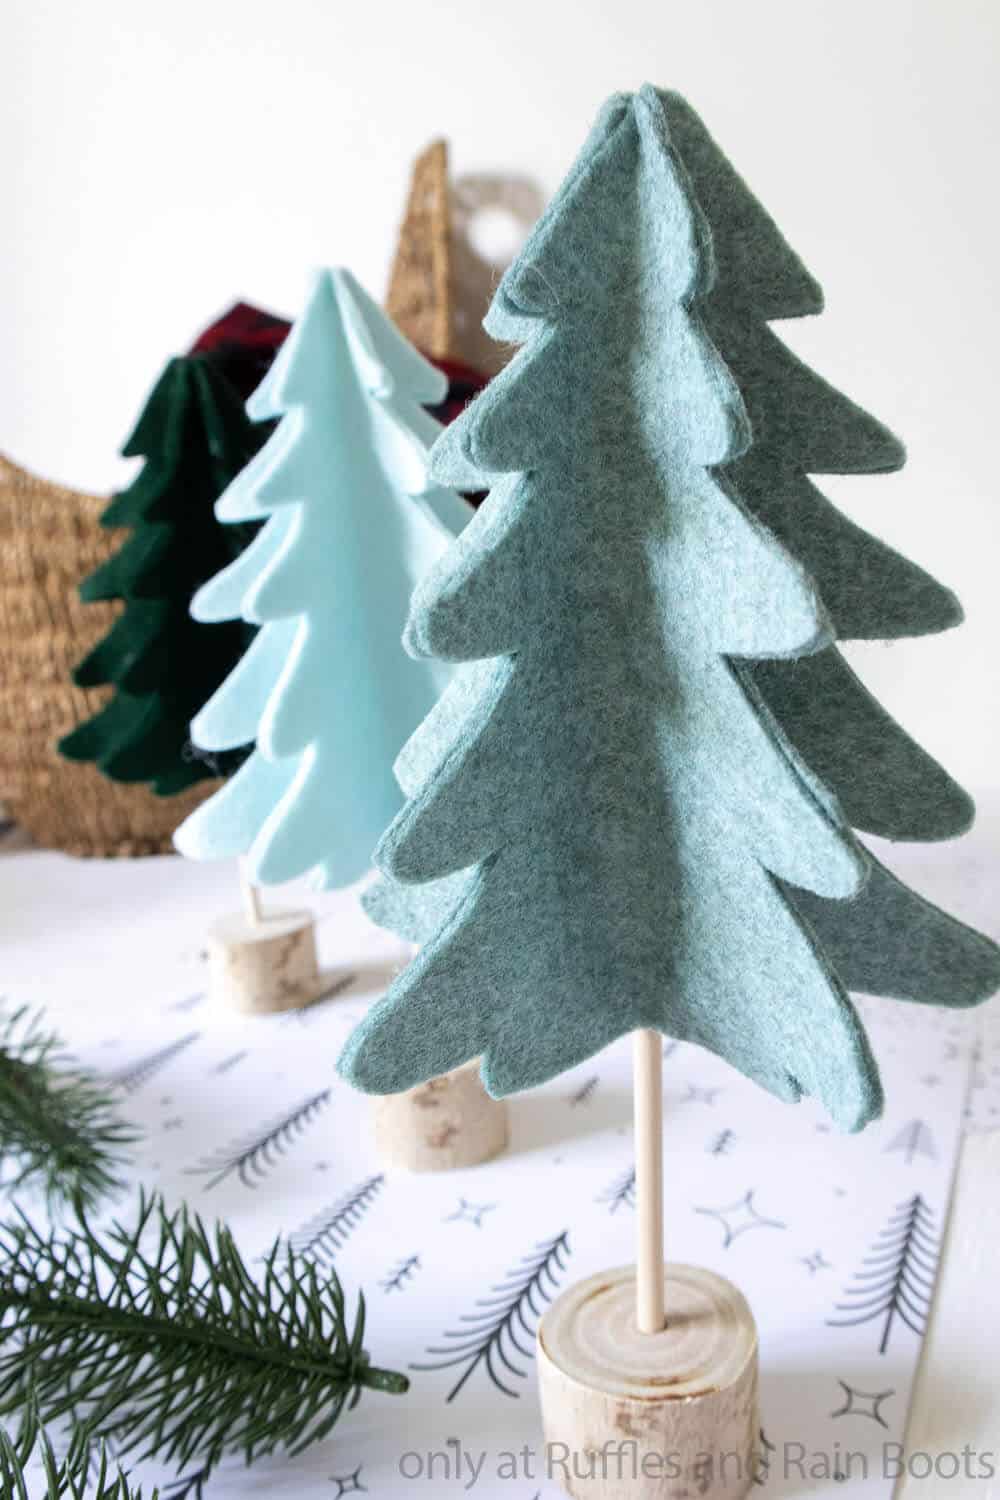
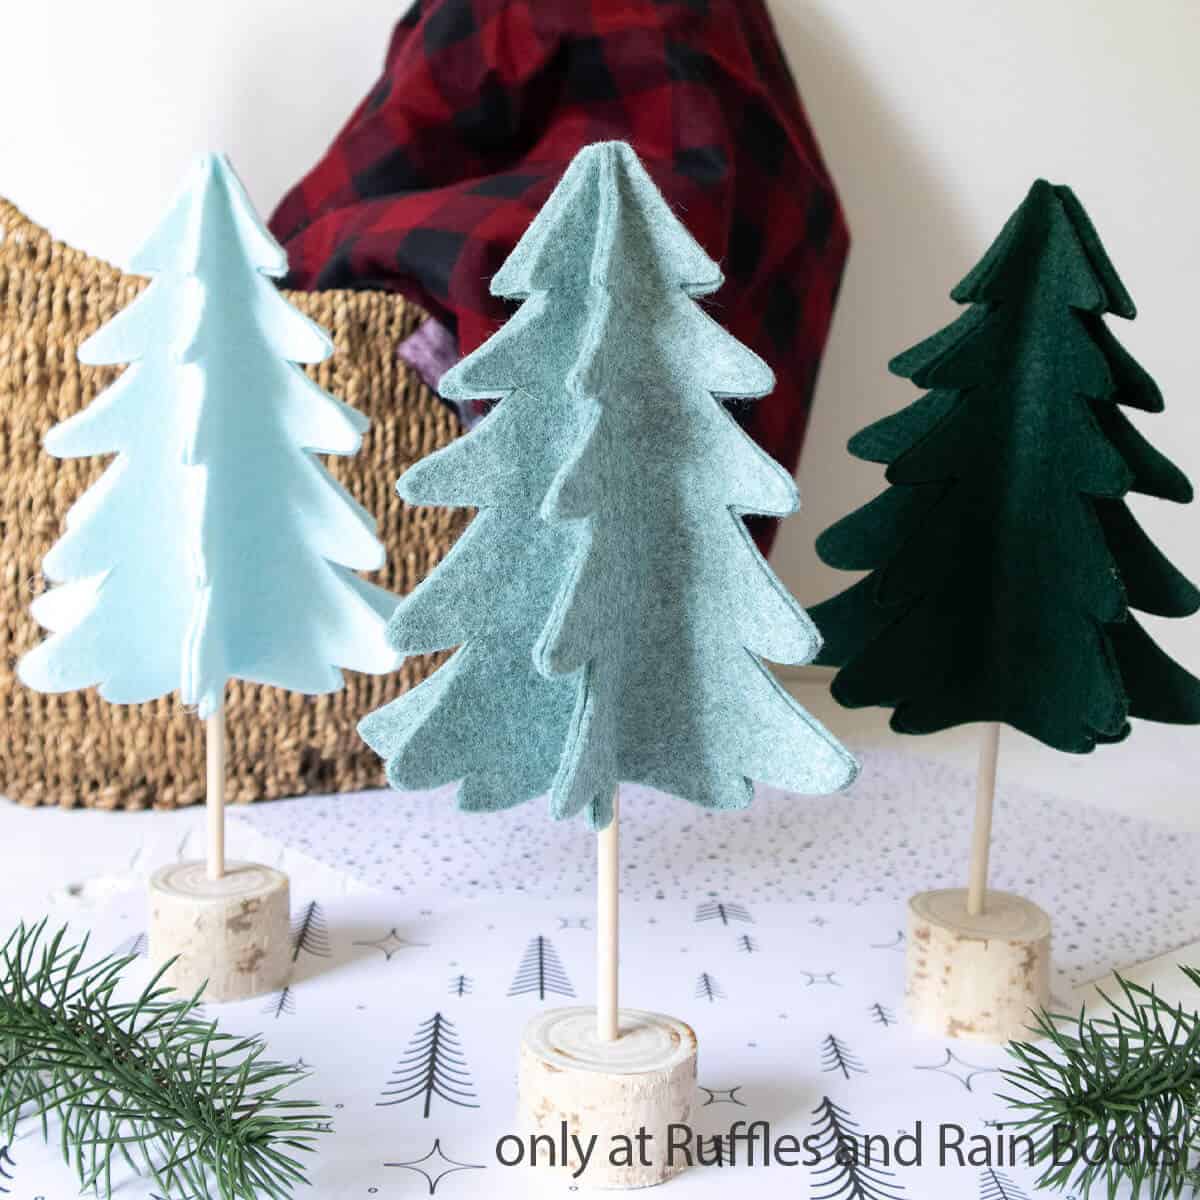
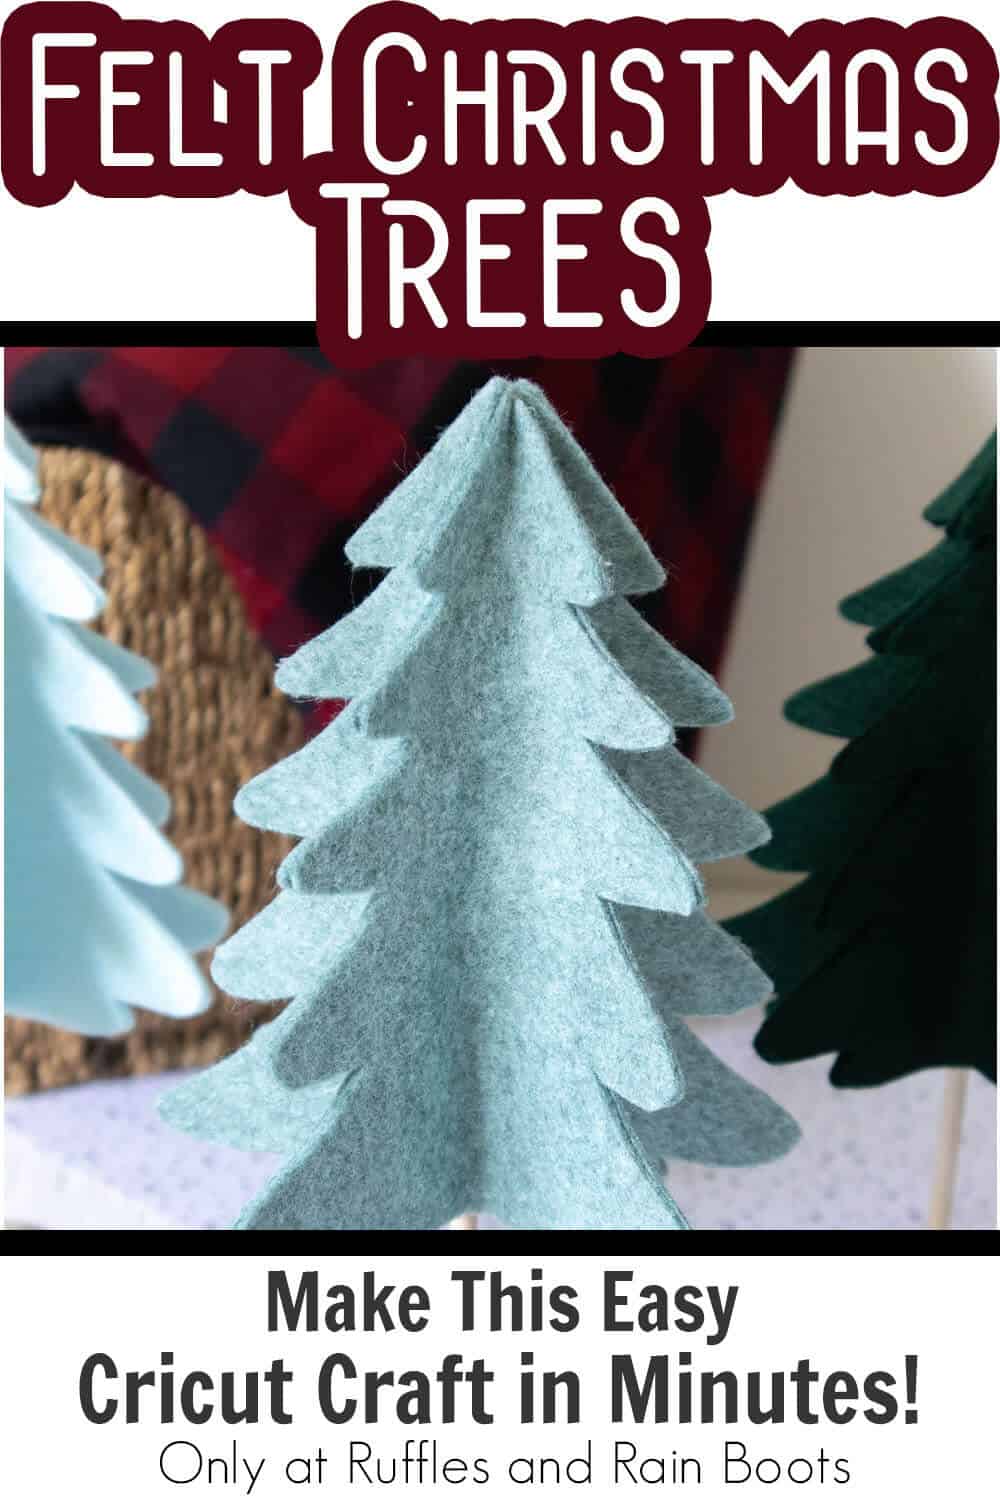
DIY Scandinavian Christmas Trees
I loved making these DIY Scandinavian Christmas trees so much because they’re simple, but really tasteful and go so well with any decor. They can be added into bookcases, tiered trays, or incorporated into a holiday decor centerpiece.
These 3D felt trees for Christmas and winter are very easy to make and I’m giving you a free template to use with scissors or a cutting machine. And you can add ornaments, snow, or anything else to this DIY felt Christmas tree craft.
RELATED READING: Easy DIY Fur Christmas Trees Craft
DIY Scandinavian Christmas Trees
Here at Ruffles and Rain Boots, I adore simple holiday crafts that you can make in just a few minutes. Plus, having a beautiful addition to my holiday tablescape or my mantle is always just that “one touch” which was missing.
These fun felt Christmas trees have been on my idea list for so long, I couldn’t wait any longer to make them.
RELATED READING: DIY Christmas Gnome (Easy Beginner Gnome)
If you love this easy Christmas craft idea but can’t get started right now, share this to Facebook or save it to a holiday crafts pin board. Either way will make this easy to find when you’re ready to begin.

As an Amazon Associate, I can earn from qualifying purchases. There could be affiliate links within this article.
Tips to Make DIY Felt Christmas Trees
- Start by grabbing the cut file set for the DIY Christmas trees here. You can use this to cut the tree shapes using a cutting machine or by hand with scissors. Everything is there for you to make this craft either way!
- Definitely use premium craft felt. It’s thicker and more luxe, so it’s going to stand up well over time, but it’s also going to give your trees a fuller, more professional look. You can certainly use craft felt, but it’s just not going to be as nice.
- When you’re layering your DIY felt Christmas tree pieces together, you can accidentally get the edges off and then they don’t look right. But that’s what I love about working with felt. You can just trim the uneven areas and make it look like a clean join!
- I used my Cricut Maker to cut the felt pieces for this particular Christmas craft. But you can use your Cricut Explore Air 2 as well, if you want. You’ll just need to use Heat-n-Bond on the felt, then you’ll be ready to cut.
How to Make Easy 3D Felt Christmas Trees
Below is the written tutorial, so keep this page open and follow along. If you’re a visual learner, watch the free Felt Christmas Tree video tutorial.

First, drill a hole in the center of the stump the same size as the wooden dowel.
If cutting the project out by hand, print off pattern template on 8.5×11 sheet of paper. Cut around each of the pattern pieces. Cutting out one tree at a time, place the pattern on top of the felt sheet in desired color. Using a pair of fabric scissors, cut out the tree shape along the solid line. Cut 6 pieces of each tree. Repeat for the remaining tree patterns.
If using a cutting machine, open a blank canvas in Cricut Design Space. Upload the Christmas Tree SVG File into Design Space. Select “Make It” in Design Space. Set material type to “Acrylic Felt”. Follow prompts for loading the mat into the Cricut cutting machine and cutting the felt. When prompted, unload the mat from the cutting machine. Continue cutting 6 pieces for each tree.
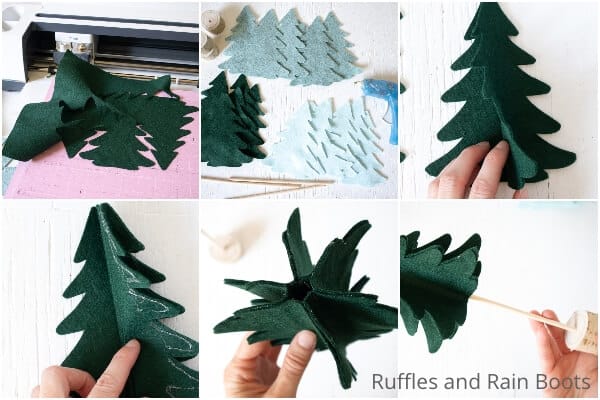
To assemble the trees, apply a bead of glue along the outer edge, along ONLY one side of a tree piece. Take care to leave a section of tree unglued on the base, in the center of the tree shape, about 1/2 inch at a minimum for inserting the dowel when the tree is assembled.
Place a second tree piece on top of the first, gently pressing the glued edges together. Fold back the unglued side of one piece and apply another bead of glue along the exposed outer edge. Again, take care to leave a section unglued on the base, in the center of the tree shape, about 1/2 inch at a minimum, for inserting the dowel when the tree is assembled.
Place another tree piece on top, gently pressing the edges together to affix them with the glue. Repeat with the remaining tree pieces, folding each tree piece outward and gluing the inner edge to the inner edge of the adjacent tree piece.
Place a dab of hot glue in the drilled hole in the wood round, then insert the dowel.
Thread the top of the dowel into the center of the tree pieces and press it all the way up through the center of the tree to the top. Add hot glue at the top and bottom of the tree, if necessary, to hold the dowel snugly.
Repeat to make additional felt trees and enjoy!
More DIY CHristmas Crafts You Might Like
- How to Make Yarn Christmas Trees – I love how easy it is to make your own little yarn trees for Christmas! They’re so fun and fuzzy…
- Hot Cocoa Felt Ornament Cricut Craft – If you’re all about decorating that tree this year with personalized ornaments, this fun cocoa ornament is cute enough to drink!
- Cricut Centerpiece for Christmas Decor – I’ll be honest, this fun Cricut centerpiece is already on my holiday tablescape and you’re not going to convince me that it’s too early ever.
Please Save or Share This Easy Christmas Craft idea
Your shares are how this site grows and I am sincerely grateful. Know a friend who’d like this? Please share it on Facebook or save it to your favorite DIY Christmas crafts pin board.
DIY Scandinavian Christmas Trees
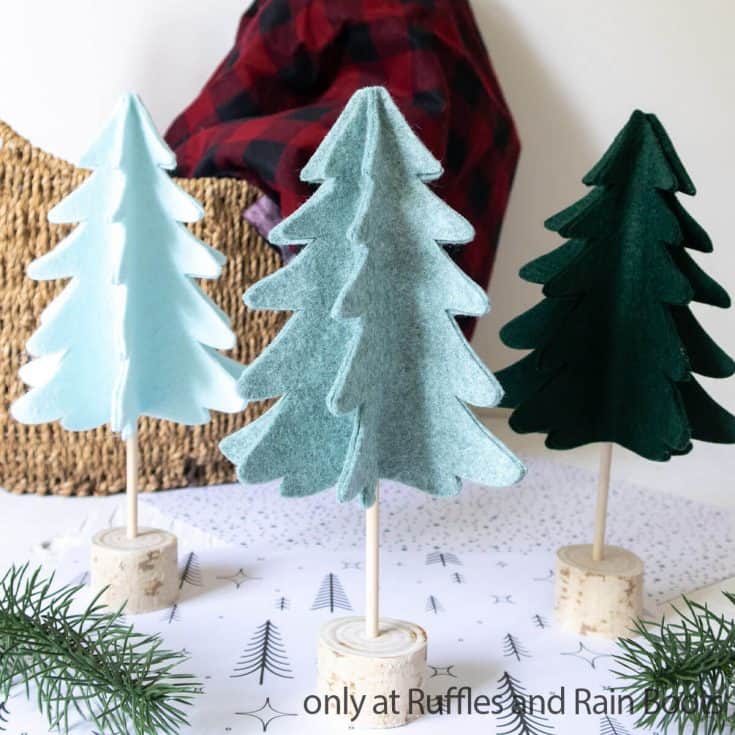
For a quick and fun addition to any holiday tablescape or mantle, these easy DIY Scandinavian Christmas trees make the perfect addition!
Materials
- Christmas Tree SVG file
- Felt fabric in 3 coordinating colors such as green and blue
- 1/4-inch Wooden dowel, 8” long
- Wood Round (1” diameter x 1.25” high)
Tools
- Fabric scissors
- Hot glue gun and clear craft glue
- Cricut Explore Air 2 or Cricut Maker, optional
Instructions
- Drill a hole in the center of the stump the same size as the wooden dowel.
- If cutting the project out by hand, print off pattern template on 8.5x11 sheet of paper. Cut around each of the pattern pieces. Cutting out one tree at a time, place the pattern on top of the felt sheet in desired color. Using a pair of fabric scissors, cut out the tree shape along the solid line. Cut 6 pieces of each tree. Repeat for the remaining tree patterns.
- If using a cutting machine, open a blank canvas in Cricut Design Space. Upload the Christmas Tree SVG File into Design Space. Select “Make It” in Design Space. Set material type to "Acrylic Felt". Follow prompts for loading the mat into the Cricut cutting machine and cutting the felt. When prompted, unload the mat from the cutting machine. Continue cutting 6 pieces for each tree.
- To assemble the trees, apply a bead of glue along the outer edge, along ONLY one side of a tree piece. Take care to leave a section of tree unglued on the base, in the center of the tree shape, about 1/2 inch at a minimum for inserting the dowel when the tree is assembled.
- Place a second tree piece on top of the first, gently pressing the glued edges together. Fold back the unglued side of one piece and apply another bead of glue along the exposed outer edge. Again, take care to leave a section unglued on the base, in the center of the tree shape, about 1/2 inch at a minimum, for inserting the dowel when the tree is assembled.
- Place another tree piece on top, gently pressing the edges together to affix them with the glue. Repeat with the remaining tree pieces, folding each tree piece outward and gluing the inner edge to the inner edge of the adjacent tree piece.
- Place a dab of hot glue in the drilled hole in the wood round, then insert the dowel.
- Thread the top of the dowel into the center of the tree pieces and press it all the way up through the center of the tree to the top. Add hot glue at the top and bottom of the tree, if necessary, to hold the dowel snugly.
- Repeat to make additional felt trees and enjoy!
Notes
For more fun DIY Christmas crafts, visit Ruffles and Rain Boots!
Recommended Products
As an Amazon Associate and member of other affiliate programs, I earn from qualifying purchases.


Can you tell me where you got the felt? I can’t seem to find that wonderful color that is in front :)
Oh, I just picked them up at Hobby Lobby. The differently colored one was a ‘heather’ style versus the regular colors.
Can you tell me where I can find wood rounds as tall as yours?
I got those from the craft store in the wood cutouts section (they were at the bottom, under the shelf with the really, really large ones).