
DIY Christmas Gnome in 10 Minutes (Free Pattern)
Make this fun DIY Christmas gnome in just 10 minutes using a sock, some fabric, and a wood bead. Using this free gnome pattern, this creates a cute traditional gnome.
This is the perfect beginner Christmas gnome as it can be made with a hot glue gun – no sewing is needed. Keep reading for the free gnome hat pattern and easy, step by step instructions.

RELATED READING: The Best Christmas Gnome Tutorials
What You'll Find On This Page
DIY Christmas Gnome
Here at Ruffles and Rain Boots, we love making holiday gnomes. There’s nothing like making a fun gift or booping a nose of a gnome that’s going to grace my farmhouse tiered tray. So, when I decided to make a DIY Christmas gnome, I got doubly excited. Not only could I make a fun gnome for myself, but I could make one for a friend too!
They’re so simple and easy to make, whether you’re a beginner gnome maker or an expert, you can make several super fast! Which is perfect for gifts, because, let’s be honest, I don’t want to spend an hour on each gnome – I’d rather make 10 gnomes for 10 friends. Ha! If you’re ready to make a fun Christmas beginner gnome, let’s get started.

As an Amazon Associate, I can earn from qualifying purchases. There could be affiliate links within this article.
RELATED READING: Make a Christmas Gnome Toilet Paper Roll Cover (Free Pattern)
No Time To Make This Christmas Sock Gnome Now? Save or Share for Later
Save this to your favorite Christmas crafts pin board or share it to Facebook. Either way will make this easy to find when you’re ready to begin.

Tips to Make a Beginner Christmas Gnome
- It’s best if you can find a super plush velvet to make your Santa sock gnome. But, there’s a trick you should know, if you can’t find velvet. Minky. Just as plush looking, if not quite as luxurious, minky fabric is so divine, no one will realize you didn’t get the velvet.
- Let’s talk gnome noses. I love making gnome noses out of whatever the closest round, beige item I can find. If that’s a wood bead or a ball of light brown polymer clay, then so be it. I love using wood beads like these, though, because they’re so consistent. And I don’t have to heat the oven or anything.
- I have to confess, the best and most fantastic part of making gnomes is the beard. For this particular beard, because I was going for a Santa gnome, I decided to do a fluffy white beard. But if you’d like to see some variations on my favorite faux fur beards, with this same gnome body, check out my popular farmhouse gnome tutorial here!

RELATED READING: Dollar Tree Gnomes for All Occasions
Christmas Sock Gnome with Free Slouchy Hat Video Tutorial
If you’re a visual learner, I have created a free slouchy hat gnome video tutorial for this project. Be sure to subscribe while you’re watching – we have a lot of fun on the channel.

More DIY Christmas Gnome Patterns You Might Like
- Santa Gnome from a Cone – I love making gnomes from cones because they’re so simple, straight-forward and easy for beginners.
- Fun Merry & Bright Gnome – If you’re all about that bright and joyous time of year with pinks and greens, maybe a little blue, then you’re going to love this easy gnome pattern.
- DIY Christmas Gnome with Feet (Really Big Ones) – My favorite holiday gnomes are unique and fun. This adorable gnome is so unique with his hilariously large feet!
Please Save or Share This Free DIY Christmas Gnome Pattern
Your shares are how this site grows and I am sincerely grateful. Know a friend who’d like this? Please save it to your favorite holiday DIYs pin board or share it with a crafty group on Facebook.

How to Make an Easy Christmas Gnome
Below is the step by step tutorial for this sock gnome with free slouchy hat gnome pattern. Keep this page open and follow along, using the comments section for any questions.
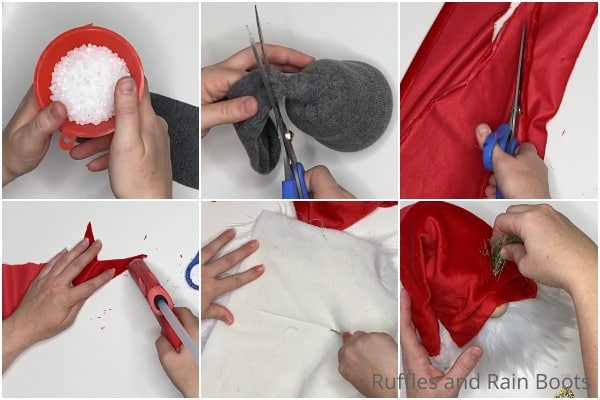
First, pour the poly beads into the toe of the sock. Fill the sock with polyfill about three-quarters of the way to the ankle. Tie off the sock with a knot. Trim the excess sock off and secure it with a little hot glue for extra security.
Lay the faux fur face-down so you’re working with the fabric backing. Using a razor or craft knife (not scissors), cut a rectangle wide enough to wrap all the way around the stuffed sock and long enough to cover the bottom 2/3 of the sock and have a hangover of about 1 inch. Be careful to only cut the fabric backing, not the faux fur if you want a nice, natural beard.
Wrap the rectangle of fur around the sock just under the knot and secure using hot glue. Only glue around the top half so the bottom is left loose and able to flow easily (like a gnome in the wild), particularly since we’re working with the overhang.
To create the long, slouchy hat for this gnome, cut out two triangles of fabric which are 17 inches tall (brim to point) and about 7 inches wide. Before cutting, wrap the fabric around the gnome to ensure that it will fit around the gnome well.
Flip the two pieces to lay right sides together and hem the brim edge with hot glue.
Keeping the fabric right sides together, add a line of hot glue around each of the two long edges of the triangle. Press the edges together and let the glue set completely.
Turn the glued hat right-side out (use a pencil to gently push out the tip of the hat if necessary).
Fit the hat onto the DIY Christmas gnome and part the beard a little where you’d like your nose to sit. Hot glue the wooden bead in place, taking care to hide any holes.
Add a dot of hot glue to the top of the nose and tuck the hat brim down onto the nose in a cute wrinkle.
Tug the hat down in the back and hot glue it in place.
To make the adorable mustache, cut a piece of faux fur about 4 inches long by 1 inch wide. Part the fur in the center and brush it out, then fold the fabric backing over onto itself and hot glue it in place, and allow the glue to set. Hot glue the mustache to the gnome just below the nose.
Affix an embellishment to the hat. I used a little pine bough and a glitter reindeer I found at the craft store. Then enjoy your DIY Christmas gnome!
DIY Christmas Gnome
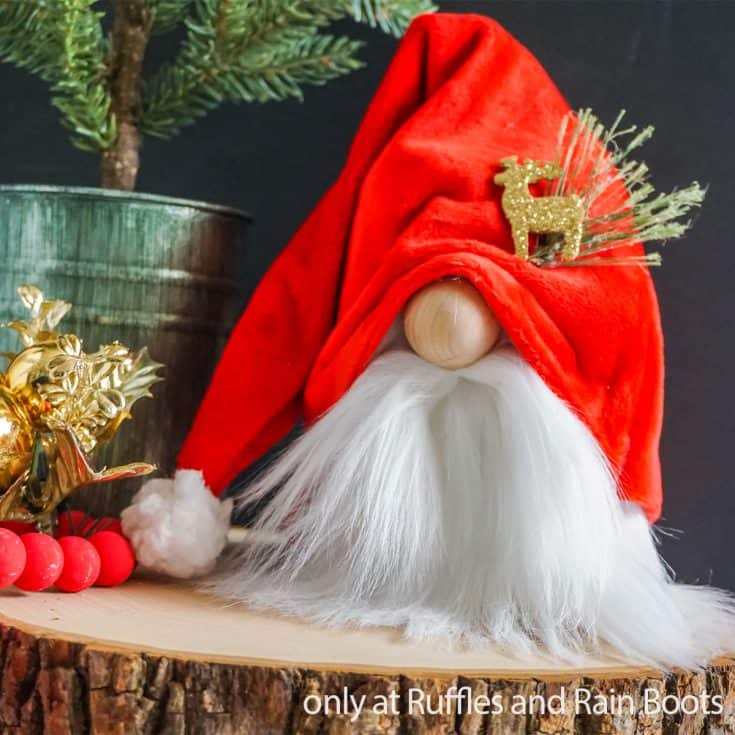
This DIY Christmas gnome features a slouchy hat and a fluffy mustache. He's perfect for a quick craft for the home or a gift idea.
Materials
- White Faux Fur
- Red Velvet Fabric for Hat
- Adult Sock
- Polyfill or fabric scraps to stuff the gnome body
- 1/2 cup Poly Beads
- wooden bead for the nose (we used these)
- Embellishment
Tools
- Scissors
- Hot Glue Gun and Glue Sticks
- Razor or Craft Knife
Instructions
- Pour the poly beads into the toe of the sock. Fill the sock with poly fill about three-quarters of the way to the ankle. Tie off the sock with a knot. Trim the excess sock off and secure with a little hot glue for extra security.
- Lay the faux fur face-down so you're working with the fabric backing. Using a razor or craft knife (not scissors), cut a rectangle wide enough to wrap all the way around the stuffed sock and long enough to cover the bottom 2/3 of the sock and have a hangover of about 1 inch. Be careful to only cut the fabric backing, not the faux fur if you want a nice, natural beard.
- Wrap the rectangle of fur around the sock just under the knot and secure using hot glue. Only glue around the top half so the bottom is left loose and able to flow easily (like a gnome in the wild), particularly since we're working with the overhang.
- To create the long, slouchy hat for this gnome, cut out two triangles of fabric which are 17 inches tall (brim to point) and about 7 inches wide. Before cutting, wrap the fabric around the gnome to ensure that it will fit around the gnome well.
- Flip the two pieces to lay right sides together and hem the brim edge with hot glue.
- Keeping the fabric right sides together, add a line of hot glue around each of the two long edges of the triangle. Press the edges together and let the glue set completely.
- Turn the glued hat right-side out (use a pencil to gently push out the tip of the hat if necessary).
- Fit the hat onto the DIY Christmas gnome and part the beard a little where you'd like your nose to sit. Hot glue the wooden bead in place, taking care to hide any holes.
- Add a dot of hot glue to the top of the nose and tuck the hat brim down onto the nose in a cute wrinkle.
- Tug the hat down in the back and hot glue it in place.
- To make the adorable mustache, cut a piece of faux fur about 4 inches long by 1 inch wide. Part the fur in the center and brush it out, then fold the fabric backing over onto itself and hot glue it in place and allow the glue to set. Hot glue the mustache to the gnome just below the nose.
- Affix an embellishment to the hat. I used a little pine bough and a glitter reindeer I found at the craft store. Then enjoy your DIY Christmas gnome!
Notes
For so many more adorable DIY Christmas gnome tutorials, visit Ruffles and Rain Boots .com
Recommended Products
As an Amazon Associate and member of other affiliate programs, I earn from qualifying purchases.


This is the only site I actually found the free tutorial !! Makes me happy 😃😊😁 I loved the simple little gnome guess I’m going to try and make it.