
DIY Pinecone Kissing Ball for Christmas
This simple yet elegant pinecone kissing ball craft for Christmas is a beautiful addition to your holiday decor. You can hang it, use it for a tablescape or make a smaller version to hang on your Christmas tree.
This handmade craft project for the holidays has such a romantic history. Back in Victorian times, young women would stand under a kissing ball in hopes a handsome suitor would give them a smooch.
RELATED READING: Make Adorable Pinecone Gnomes (Free Gnome Hat Template)
Christmas Kissing Ball Craft
Here at Ruffles and Rain Boots, we love new and fun ways to make Christmas crafts. With the hustle and bustle of the holiday season, it’s nice to relax by working on an easy craft like this Christmas kissing ball.
If you didn’t know, the original kissing ball craft was made with whole mistletoe and evergreen plant branches and made into a ball shape. And I love that look, but I had a LARGE collection of pinecones that I found in my craft room when I was packing to move.
No Time to Make This Now? Save or Share
If you are gathering up some supplies before you can create the kissing ball craft, save or share this on your favorite holiday craft pin board or share it on Facebook. Using the sharing buttons makes it easy when you are ready to begin your project.

As an Amazon Associate, I could earn from qualifying purchases. There may be affiliate links within this article.
Tips for Making a Pinecone Kissing Ball
- When gluing the pinecones onto the Styrofoam ball, use gentle, but firm pressure and enough glue to hold this multi-textured craft item.
- If you are using a white Styrofoam ball, paint it green first so any small gaps won’t be as noticeable as they would be on a white one. Don’t use spray paint – it eats the foam.
- You will need approximately 25-30 pinecones for this project. If you don’t have that many in your yard or don’t have a pine tree, you can order this pack of pinecones.
- To add a subtle bit of elegance to this project, use a beautiful satin ribbon to hang the kissing ball.
- A kissing ball using real sprigs, flowers, and berries can last for several weeks. To make this with evergreen sprigs, use a water-holding floral foam ball like this and mist regularly to keep it looking fresh and beautiful.
Supplies for a Pinecone Kissing Ball for Christmas
Below are the supplies I used, but check your craft stash to use what you have on hand. If you’re using this with live greenery, read the tips above on changes to make.
- Pinecones
- Styrofoam ball
- Sprigs of mistletoe and other seasonal greenery
- Ribbon for hanging
- Floral tape
- Hot glue gun
- Wire cutters and/or scissors
- Bamboo skewer or floral pick

How to Make a Kissing Ball Craft with Pinecones and Greenery
Each step for this craft is detailed below so it’s easy to follow. Keep this page open while you are creating a pinecone kissing ball. If you would rather have a printable how-to, just scroll down and select the print button.
If you’re a visual learner, watch this easy Christmas DIY come together with the pinecone kissing ball video tutorial. While you’re there, be sure to subscribe!
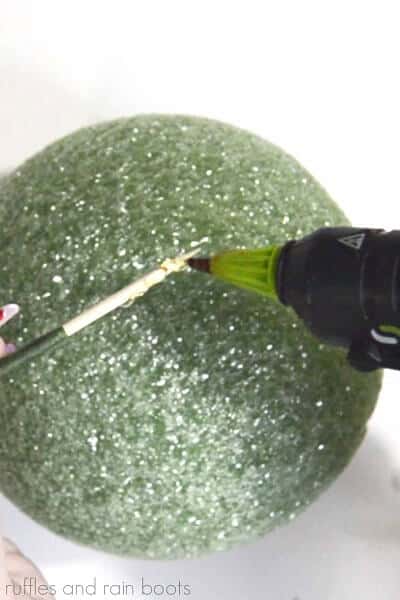
Use floral tape to adhere the ribbon to the blunt end a bamboo skewer or a floral pick. Apply hot glue to the end of the skewer, and insert it into your Styrofoam ball.
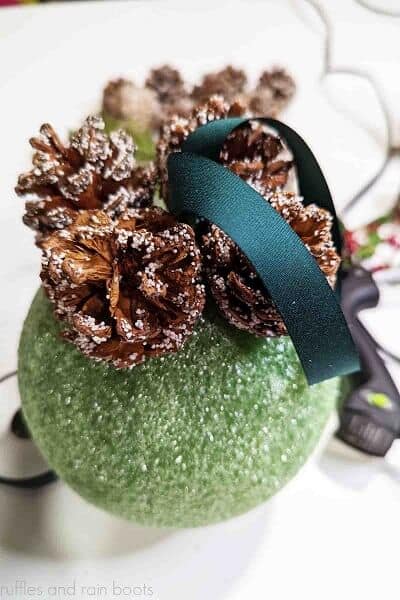
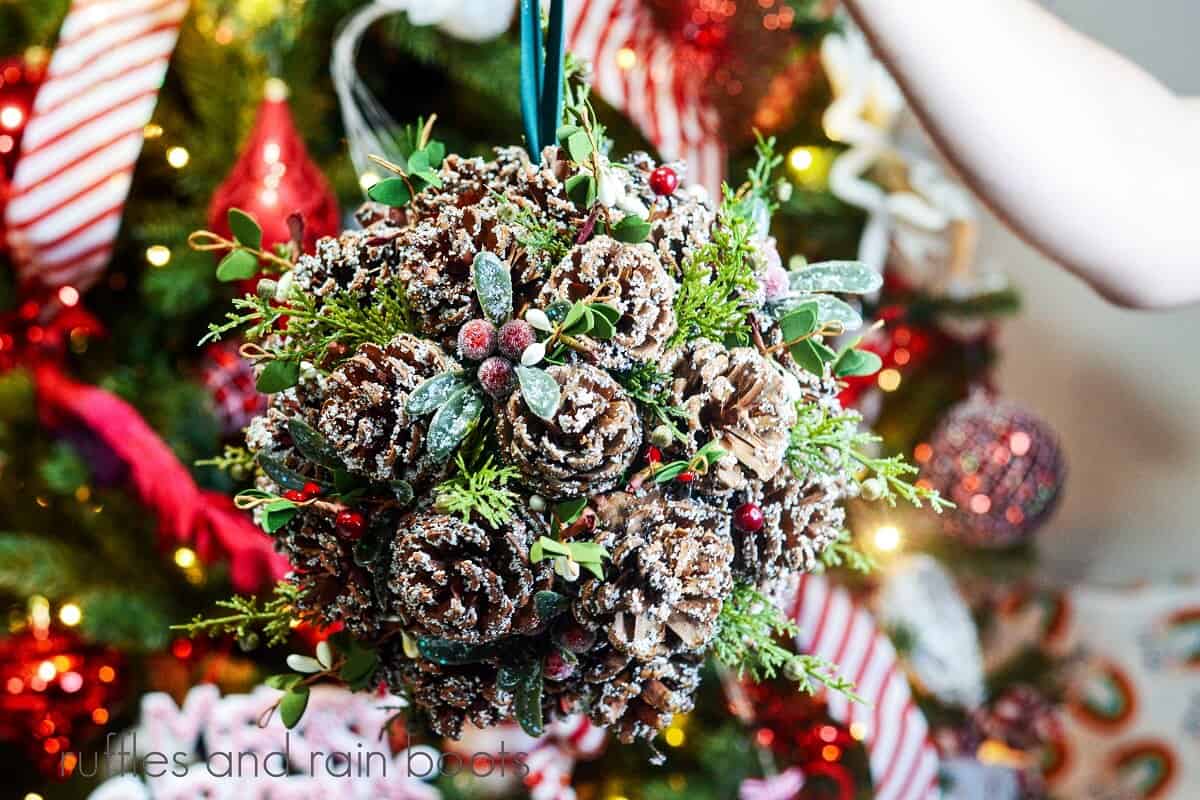
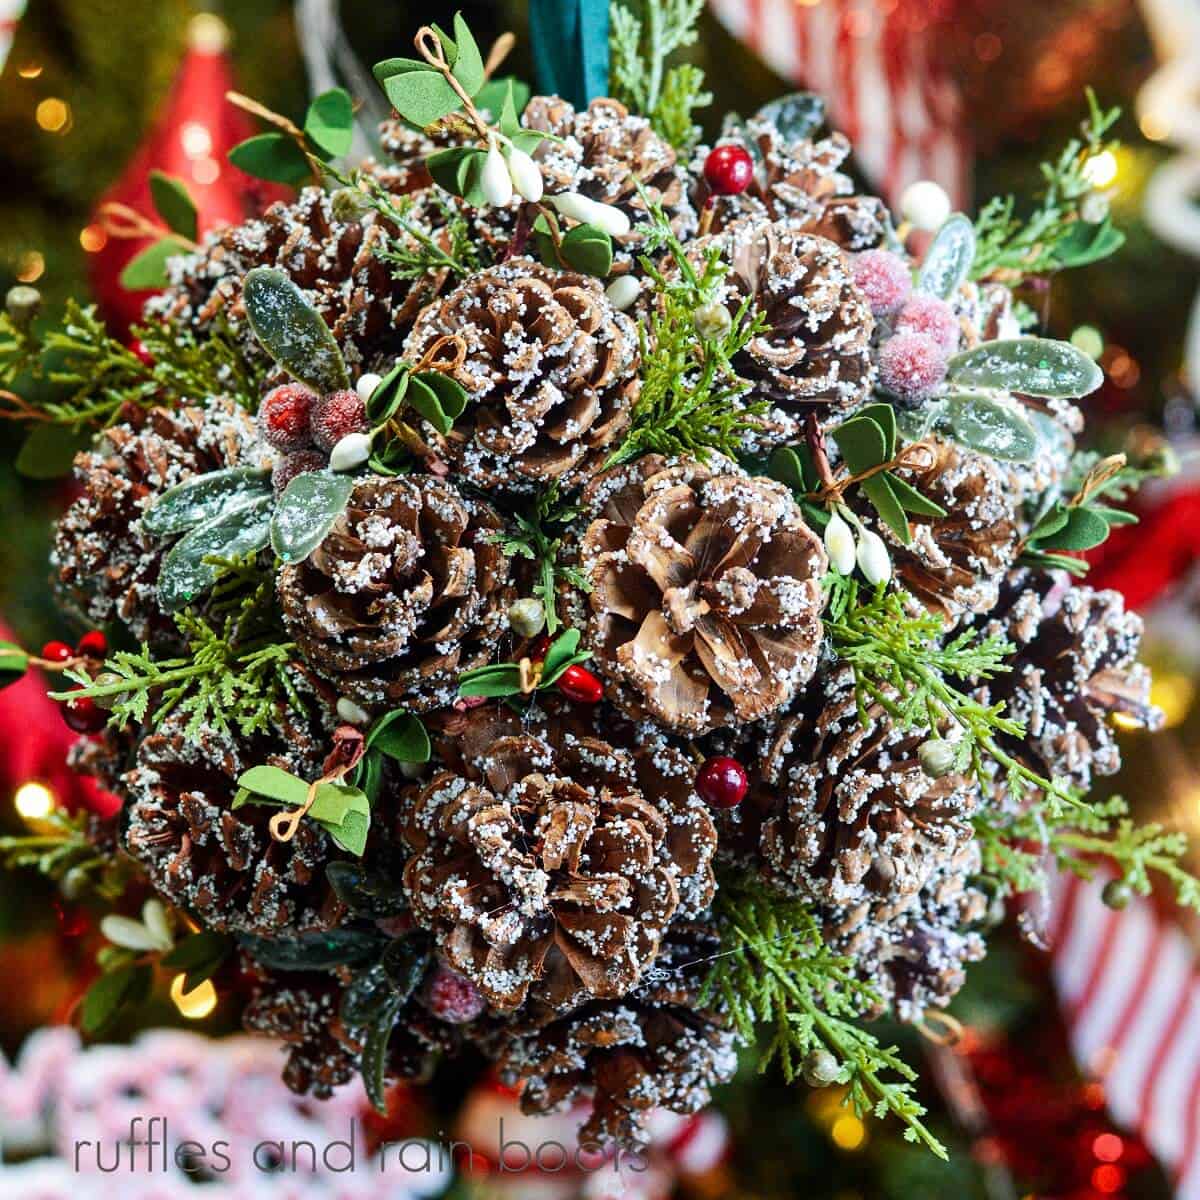
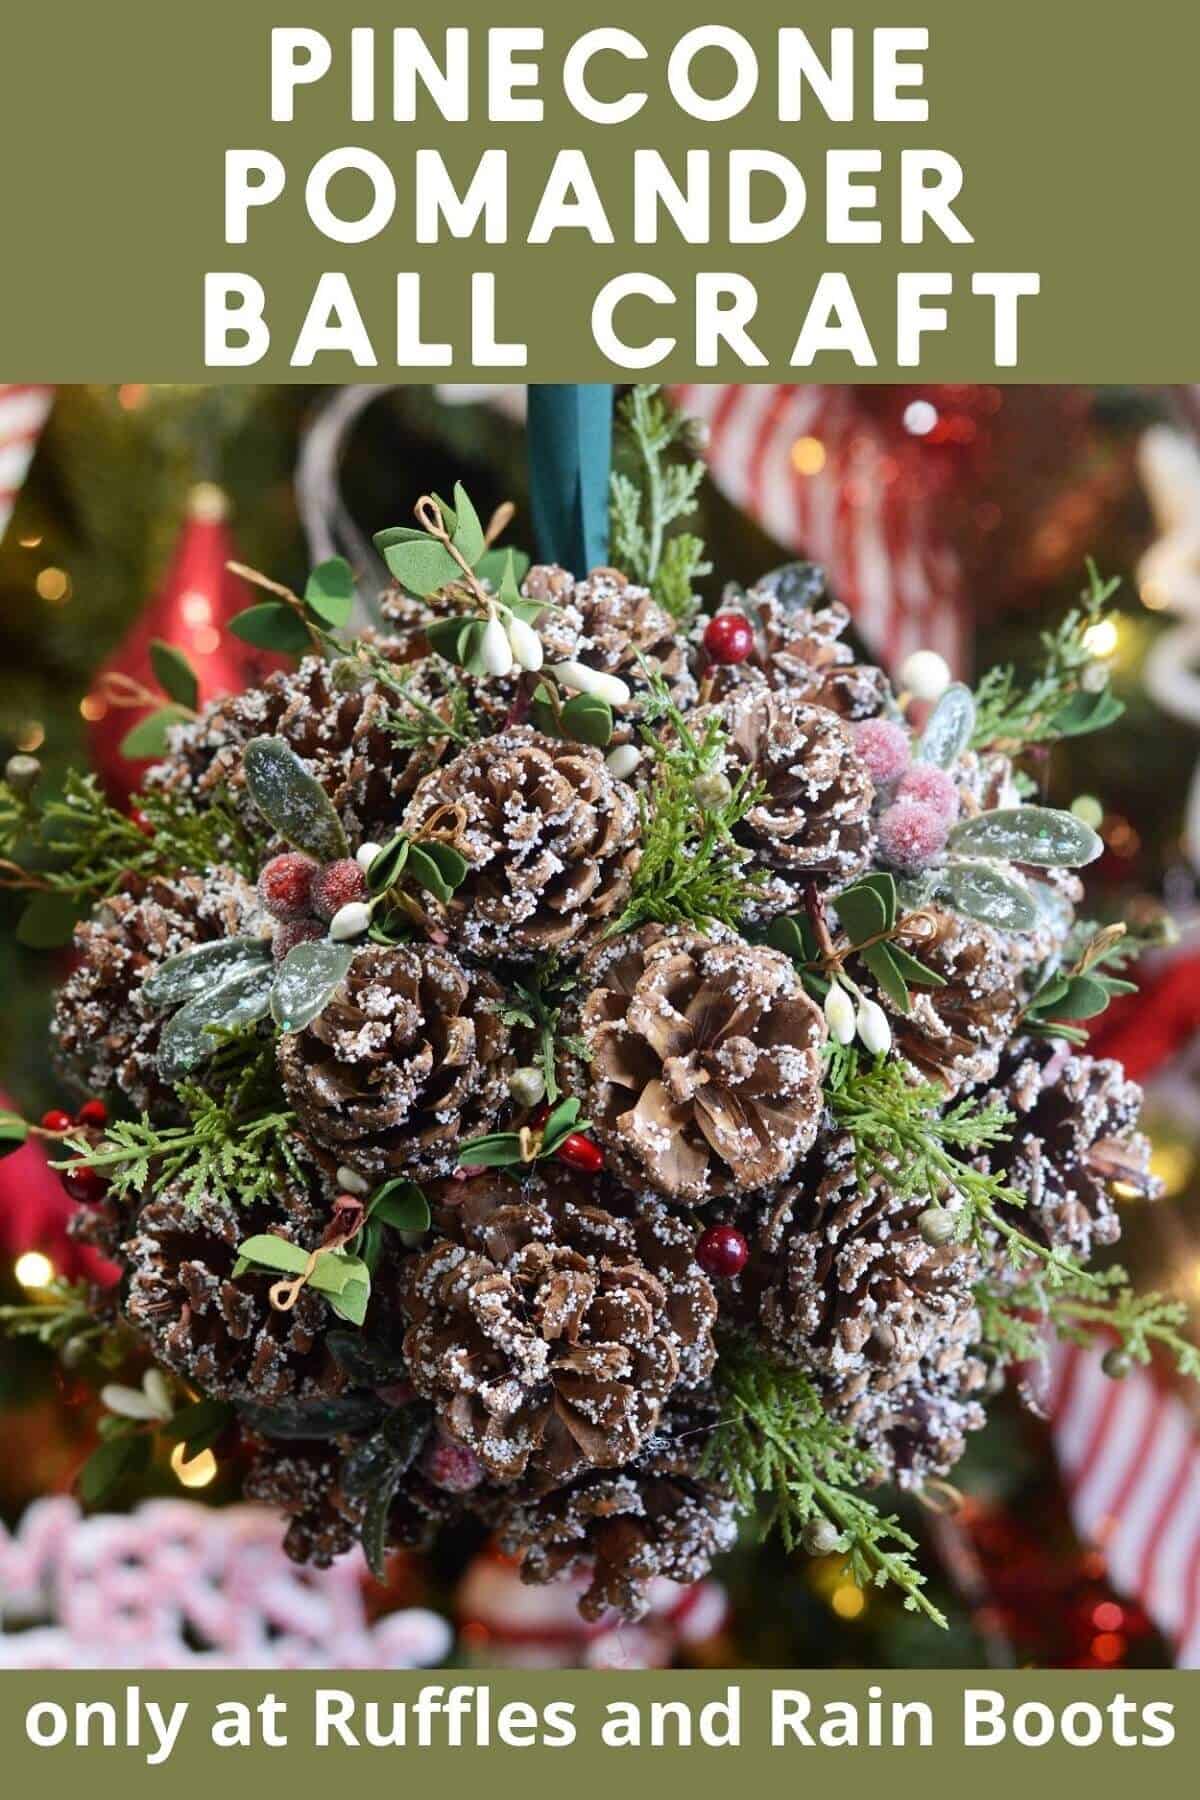
Starting at the top and using the hot glue gun, attach the pinecones to the Styrofoam ball, placing them close together.

Fill in any gaps with mistletoe, berries, ribbon, and seasonal greenery. I added a bit of color, as well, to make it stand out and mixed frosted and plain greenery to add sparkle without lights.
Additional Ideas When Making a Hanging Kissing Ball
- Add holly or ivy foliage to add hanging length to this pine cone kissing ball. It will give it more texture.
- If using this craft as a true mistletoe kissing ball, hang it in an area where it will get lots of foot traffic.
- A string of battery-operated fairy lights would look AMAZING in this, too. If you want to hide the battery pack, cut a hole from the foam near the top, glue a pinecone to the pack, and tuck it inside. Don’t glue it down and you’ll be able to easily swap the batteries each season.
Other Holiday Crafts You May Like
- Christmas Gnome Ornaments from Napkins: These precious Christmas tree ornaments are made from stenciled napkins. They are stunning and could not be easier to make.
- Easy Gnome Mug Topper: This fun Christmas gnome is made from polymer clay and paint and is completely food safe. This is the perfect gift for the gnome lover on your list.
- Merry Christmas Wood Round Sign: This stunning sign is made from supplies from your craft bin and using your Cricut machine. It is a wow-worthly creation everyone will admire.
- DIY Scandinavian Christmas Trees: These 3-D trees are made in 10 minutes with some felt, your Cricut machine, and a few other simple materials. What a gorgeous table centerpiece for your next holiday meal.
Please Save or Share
Your shares are how this site grows and I sincerely appreciate it. Please save this holiday kissing ball to your favorite Christmas craft pin board or share it on Facebook.
Pinecone Kissing Ball Craft for Christmas

This elegant and easy DIY pinecone kissing ball is a traditional decoration that gets a remake for your home this Christmas. Also called a pomander, you can add a fragrance or perfume to make the house smell amazing and even add lights! Use this holiday craft for parties, easy decor, or a fun Christmas craft idea. It works with artificial or live greenery and is so simple, you can make it in minutes with a handful of supplies.
Materials
- Pinecones (amount will vary depending on the size of the ball)
- 6” foam ball
- Sprigs of Greenery and Berries
- Ribbon
- Bamboo Skewer or Floral Pick
- Floral Tape (optional, can use glue)
Tools
- Hot Glue Gun and Glue Sticks
- Wire Cutters and/or Scissors
Instructions
- Cut a 10” length of ribbon. Use floral tape or glue to adhere the ribbon to a bamboo skewer or a floral pick. Apply hot glue to the end of the skewer, and insert it into the ball. This forms a secure hanger for the kissing ball.
- Starting at the top and using the hot glue gun, attach the pinecones to the foam ball. There will be spaces between the pinecones, but try to bunch them close together.
- Using wire cutters or scissors, snip 3”-4” sprigs of greenery, ribbon, faux berries, frosted picks, and anything else you'd like to fill in any gaps.
- Let the glue for the pinecone kissing ball set (I like to place it over a wide mouth mason jar) and hang.
Meet the Creator
Hi there, I’m Sarah Nenni-Daher. I’m a crafty gal and always have at least 14 projects going at once. I am a crafter, designer, DIYer, and pattern maker. I share my creations here and in the Ruffles and Rain Boots® Shop.
Here at Ruffles and Rain Boots®, you’ll find DIY gnomes, crafts, gifts, cupcakes, laser crafts, and so much more. I love sharing video tutorials over on YouTube and chatting with other crafters in my Facebook groups. We’d love to have you!