
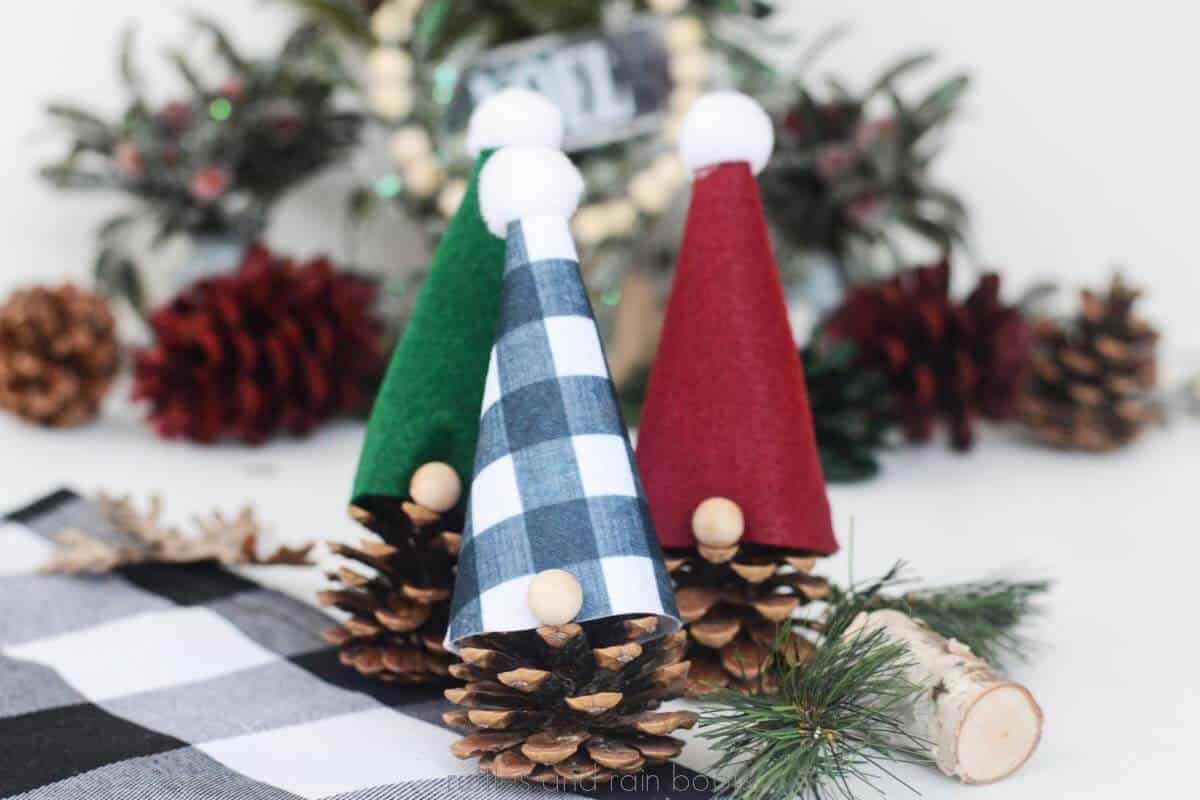
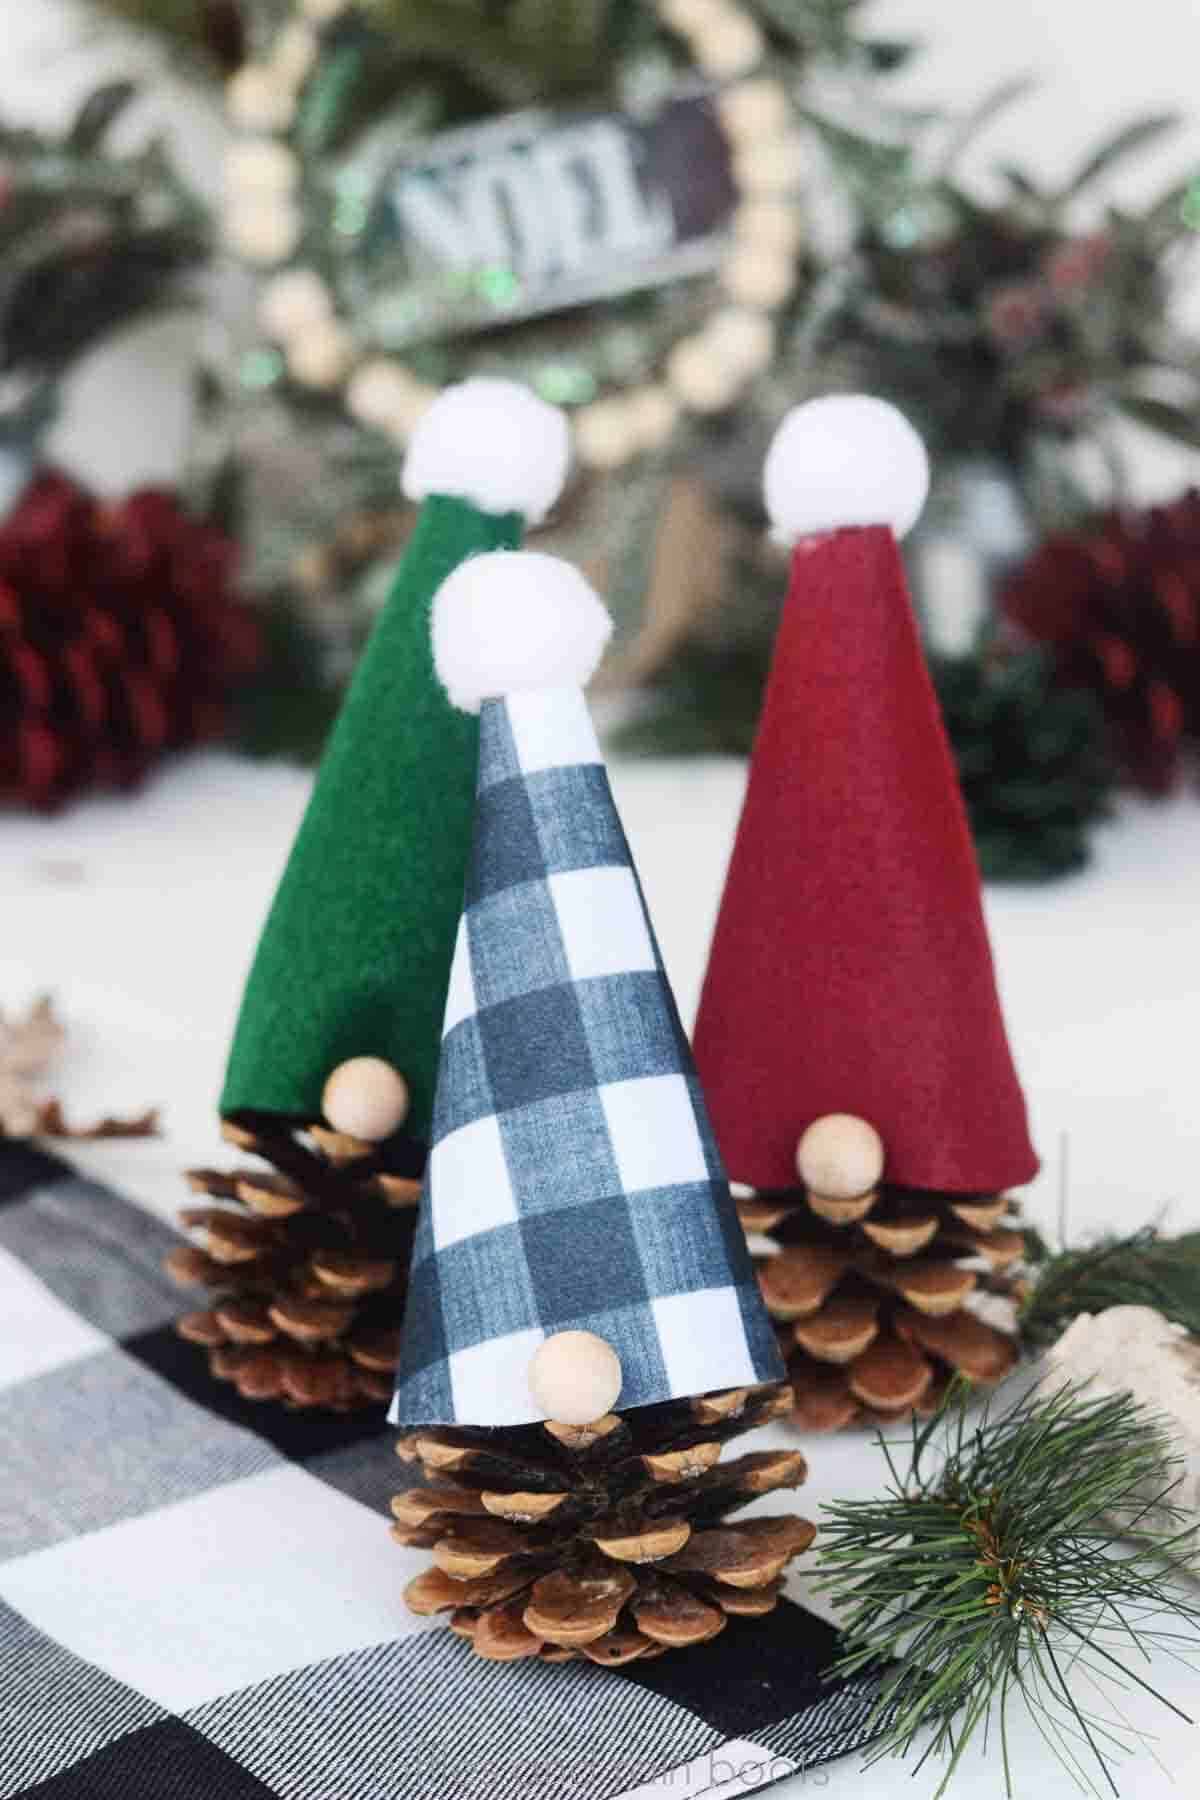
DIY Pinecone Gnomes with Pattern
Make these pinecone gnomes as Christmas ornaments or holiday decorations. They are a very quick craft and can use up scrap felt, pompoms, and other craft room staples.
Create your own or use the free gnome hat template provided. We used a few colors and patterns of felt in our holiday gnomes, but any fabric you have on hand will work, too. Let’s get started.
RELATED READING: This Easy Pompom Gnome Craft is Too Cute
Easy Pine Cone Gnomes Craft Idea
Here at Ruffles and Rain Boots, we’re known for gnomes (and easy vanilla cupcakes). I’ve shared the easiest sock gnome tutorial EVER, tons of DIY Christmas gnomes, gnome crafts for kids, and so much more.
We had a few minutes between stringing dried oranges, cinnamon sticks, and faux berries onto a garland and made these cute holiday gnomes. They are very quick to put together for big and little hands.
Please Save or Share This Fun Craft Idea
Your shares are how this site grows and I am sincerely thankful. Please save this to any easy DIY pin board or share it with a crafty group on Facebook.
As an Amazon Associate, I could earn from qualifying purchases. There could be affiliate links within this article.
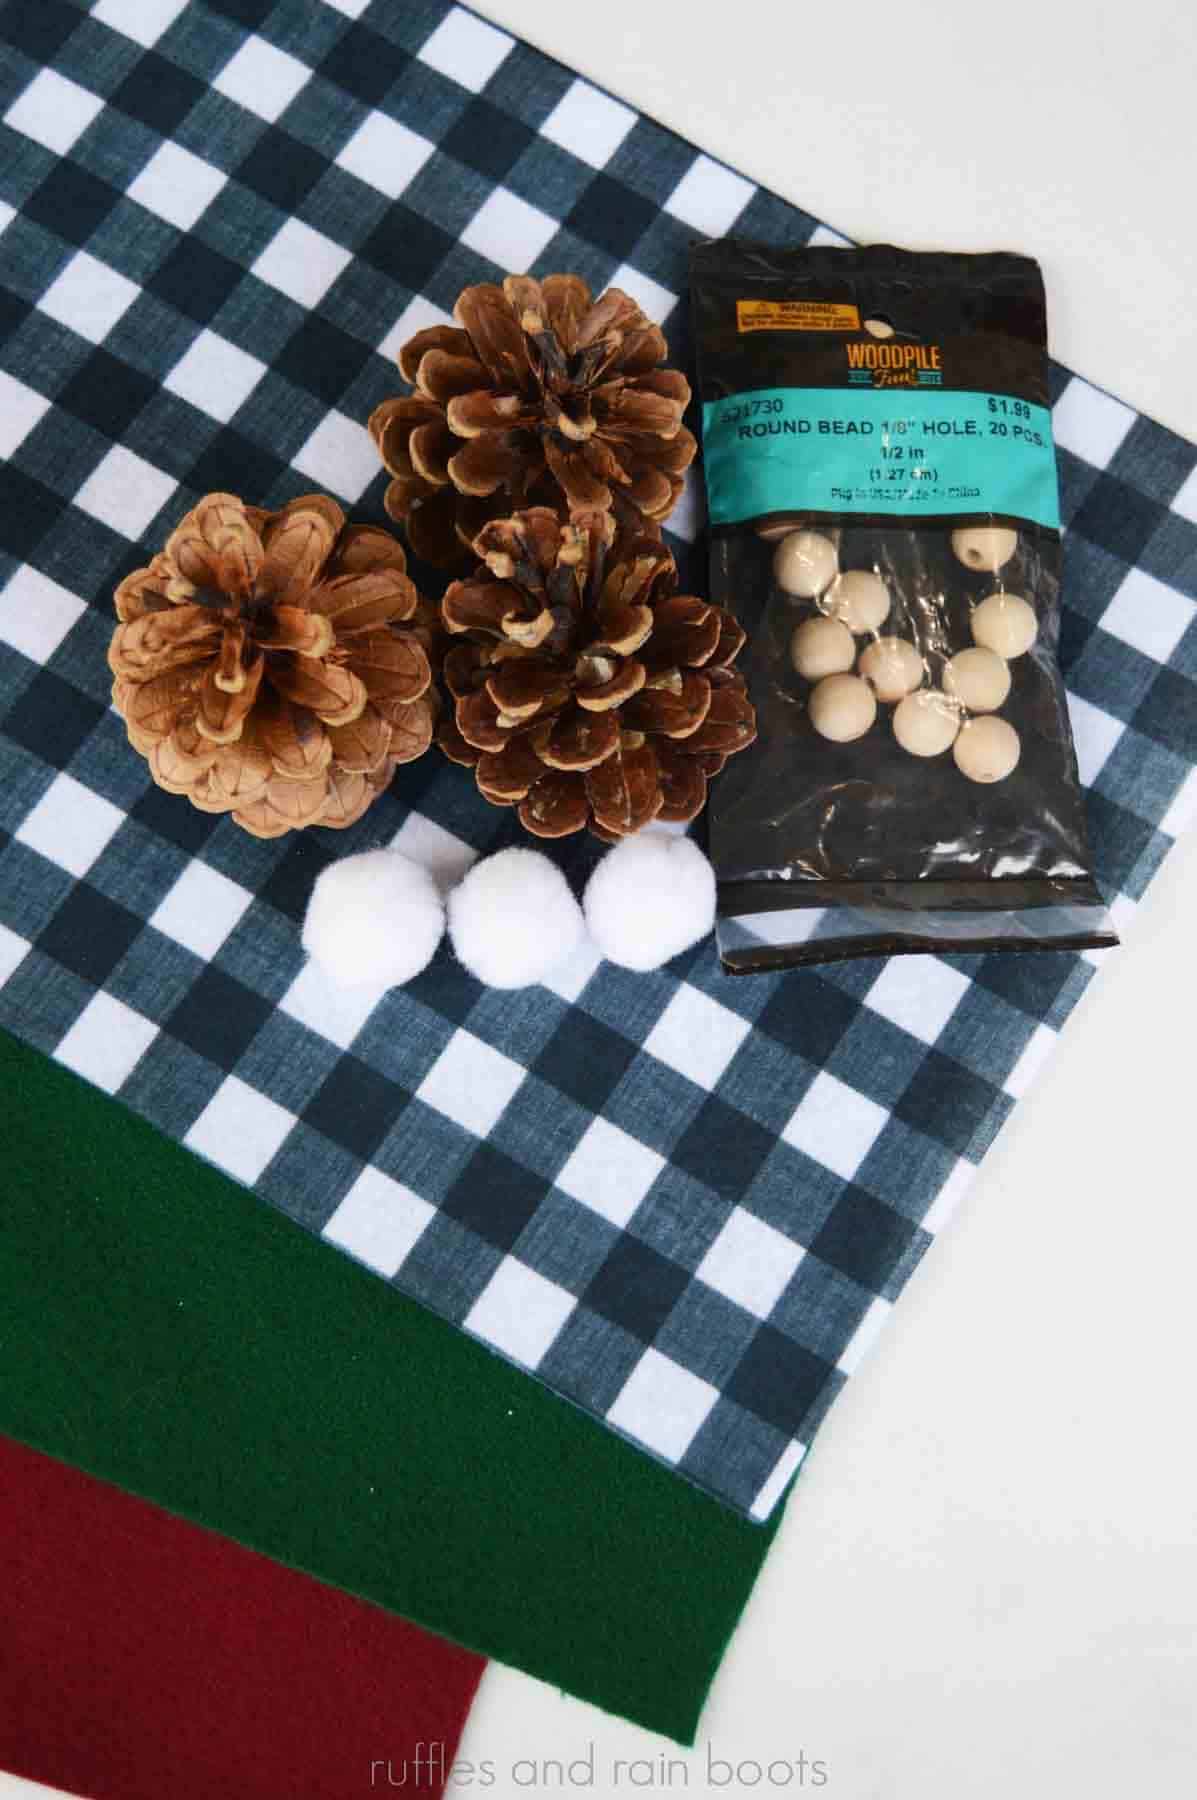
Supplies for Pinecone Gnomes
You will only need a few basic craft supplies to make this adorable Christmas craft idea. Gather up:
- free gnome hat pattern (optional) – The template can be sized up or down. To create a hat WITHOUT a template, see instructions below.
- felt – I used inexpensive felt sheets from the craft store, but any fabric or paper will do.
- pinecones – Use some you gather (and bake) or those available at the craft store. Some are scented like cinnamon, giving this gnome DIY a sensory treat.
- pom poms and wood beads – For the nose and hat decoration, I used a 1/2 inch wood bead and a simple white pompom. A bell would be cute on the hat.
- extras – A little yarn trim around the hat’s brim would be fun. If doing this, put the trim on first and then add the nose.
- ribbon – If you want to turn this into a gnome ornament to hang on the Christmas tree, you will need a ribbon or string for hanging. Affix before adding the pompom.
- hot glue gun and sticks OR a felt glue – If little ones are making this, opt for felt glue or a low temperature glue gun.
What You'll Find On This Page
Tips for Making This Christmas Gnome Tutorial
This super easy craft can be done by adults or kids (with only minor changes). Read through a few of the things we learned while making these guys.
- Don’t worry about the gnome hat template (download here) being exact. It’s going to be rolled into a cone shape, so you have a LOT of leeway.
- When the pinecone is bigger than the hat pattern, just add a bit of length and width all the way around the pattern evenly (start with a 1/2 inch).
- If you want to tie a bell onto the tip of the hat, roll the felt a bit tighter to sit higher on the pinecone. It will allow the hat to come to a point.
- Paint the gnome “beard” with white acrylic paint (you can even add glitter) or use a scrap of faux fur fabric or fur ribbon to add more of a face to your gnome.
- Use yarn scraps to add braids to make a little girl gnome and glue on the inside of the hat.
Oh and if you have leftover felt, try this DIY pom pom gnome ornament. They are really easy to put together and uses up any yarn scraps left over from other projects.

How to Make a Pinecone Gnome with Our Free Hat Pattern
Below are the detailed, step-by-step instructions for this easy Christmas gnome. Leave this page open and follow along, using the pictures as a guide. If you want to print the tutorial without pictures, scroll down to the bottom of this post.
If you are a visual learner, check out the easy pinecone gnome video tutorial on YouTube or below. It’s a very quick project (and video).
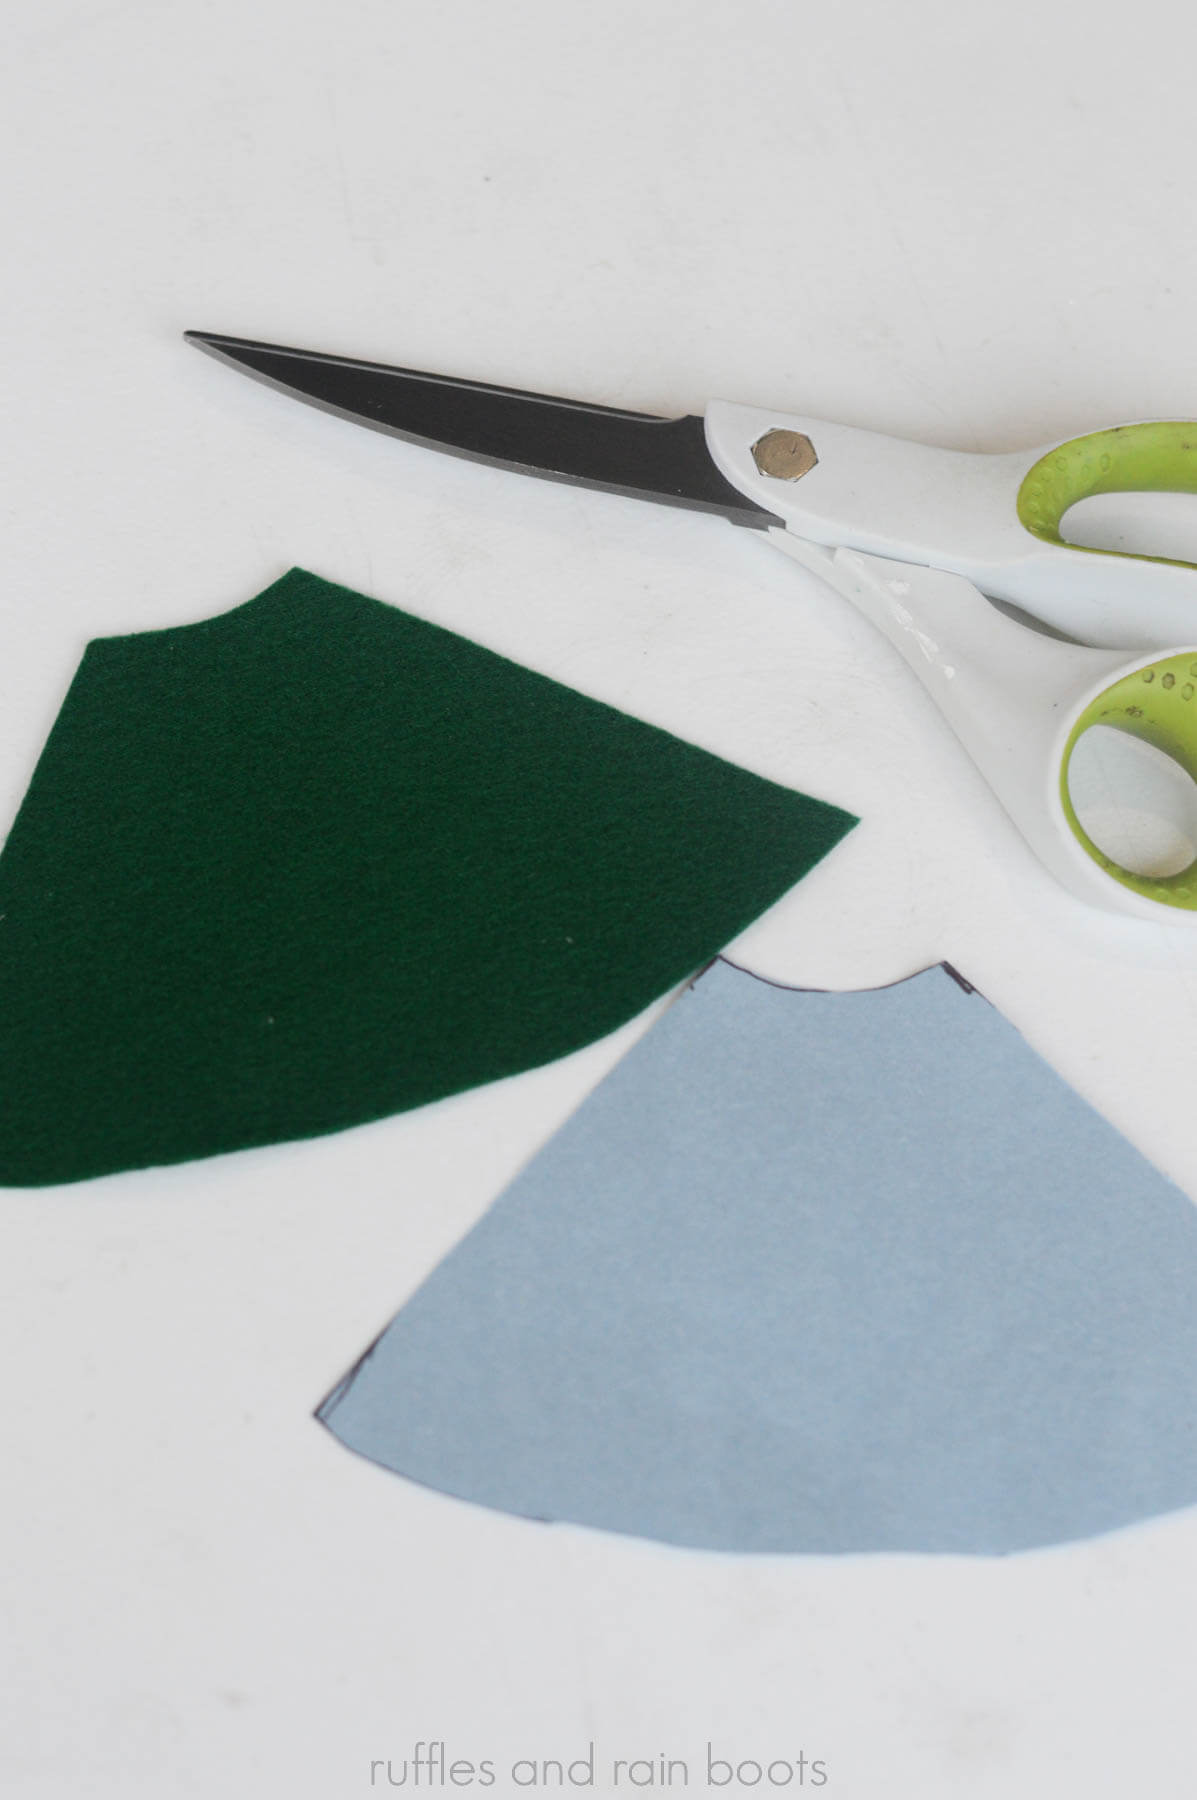
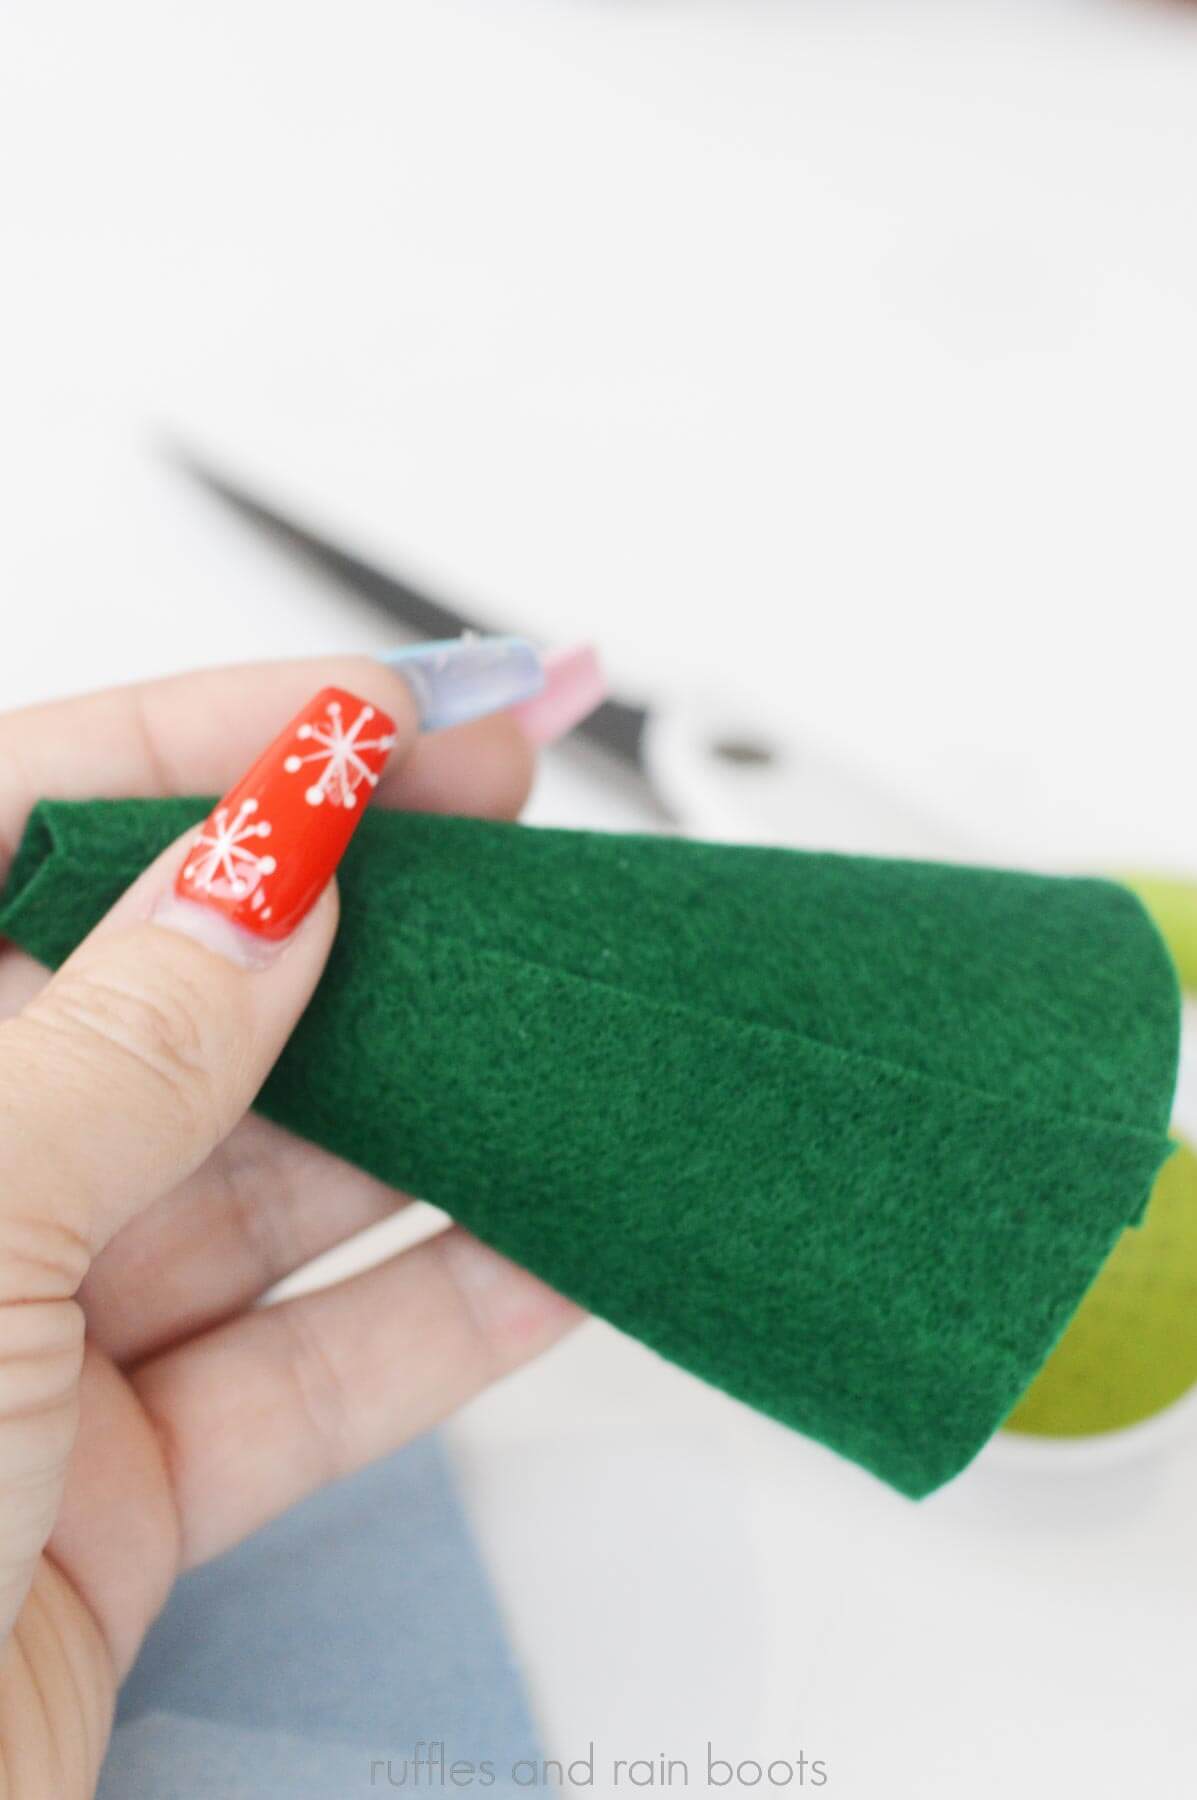
Step 1: Prepare the Pattern
Print the free hat template and cut it out. Use it to cut out a piece of craft felt.
Note: if you want to make mini pine cone gnome ornaments, scale down the free printable gnome hat pattern on your printer before sending it to print. It should be on the print screen / page set up view.
To make a hat WITHOUT the gnome pattern, roll a piece of felt into a cone to cover the entire width of the pinecone plus a half inch (it’s easy if you hold a finger on a corner). Eye ball the height to fit your pinecone and cut along the rolled felt to that height. Unroll it, clean up the bottom edge with scissors, re-roll, and glue the long edge into place.

Step 2: Form the Gnome Hat
Roll the hat into a cone shape and glue along one of the long edges to secure in place. Note: there will be a hole at the top; for a closed hat, overlap the edges more.
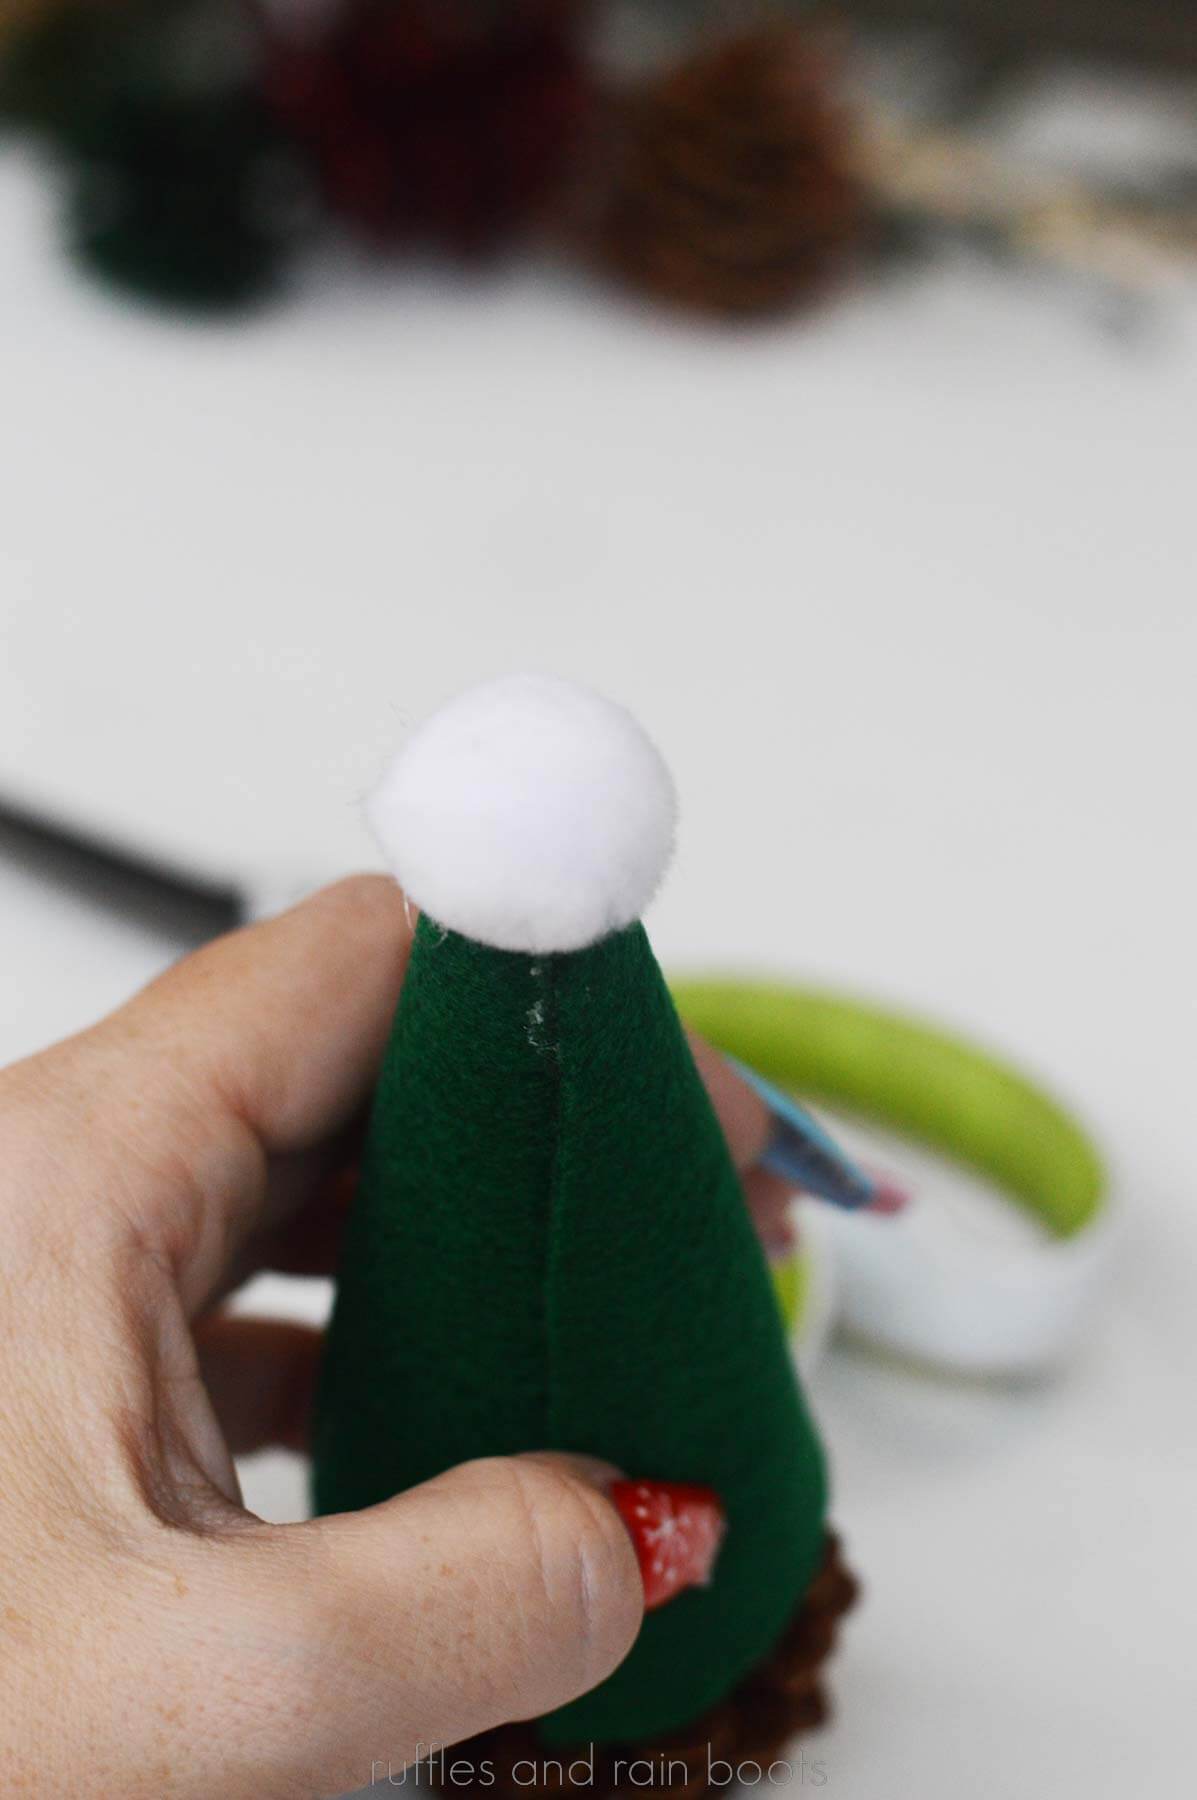
Step 3: Finish the Hat
Add decorations to the hat like a pompom at the top. You could also add a brim to the hat with yarn or faux fur.
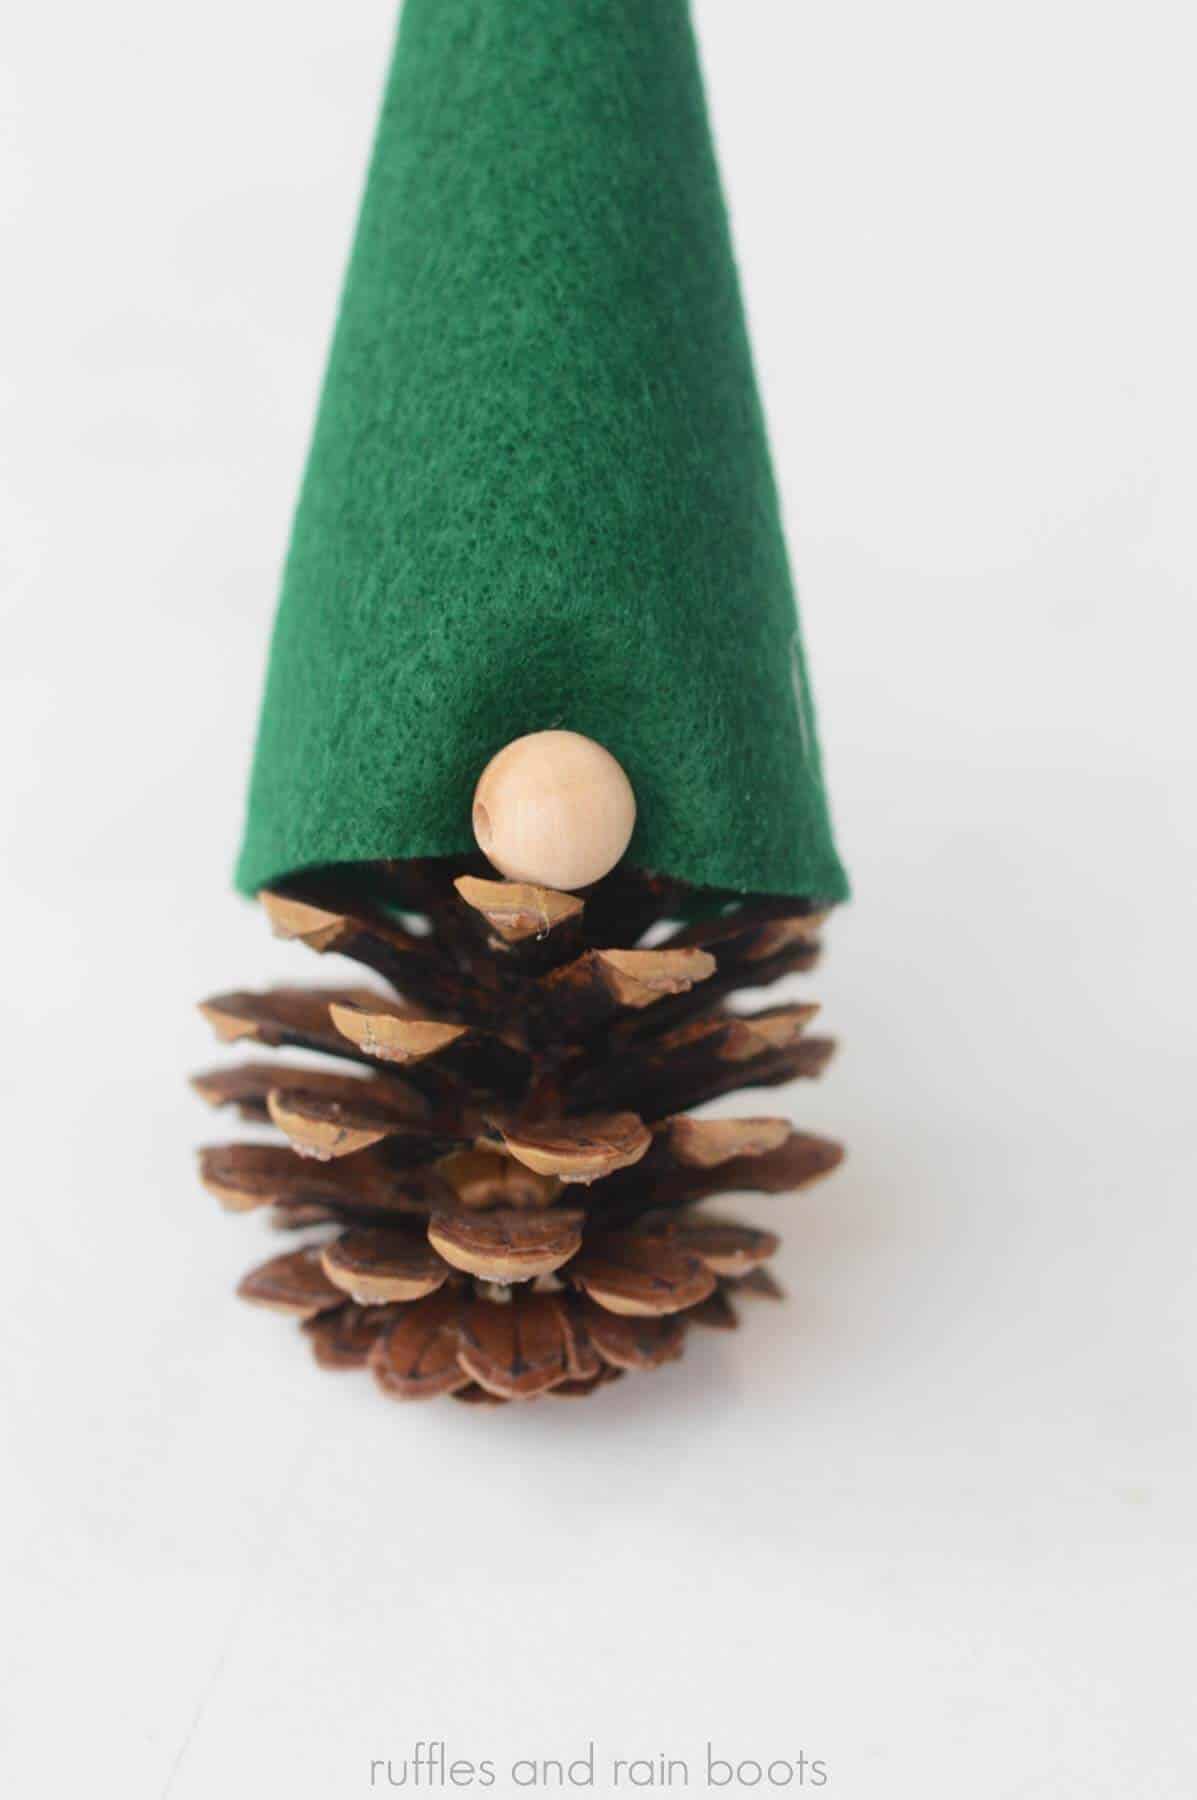
Step 4: Secure the Hat and Body
Glue the hat opening to the bottom of the pinecone (the pointy end). The top of the pinecone (the flat part) will be on the table. Be sure to secure the hat in a few places around the body for the best hold.
Step 5: Add a Gnome Nose
Glue the wood bead for a gnome nose directly onto the hat. It will adhere better to felt than on the edge of a pinecone’s plate.
If you have more pinecones than you know what to do with, make these adorable Christmas pinecone characters. Which one is your favorite? I’m partial to that reindeer.
How to Make a Pinecone Gnome Ornament with This Design
Follow this same tutorial to turn conifer cones into pinecone gnome ornaments. The changes you will make are:
- Glue a ribbon, jute twine, or string onto the inside of the hat before closing it up. You can use a needle to sew on a thin ribbon or string, as well.
- For an ornament, we need to take an additional step to make sure the hat is secure. Add glue to the top few rows of pinecone scales that will be just inside the brim of the hat. It’s okay if glue gets moved around – it will be covered.
- This step is optional, but you could add white paint in the front of the pinecone under the nose to make a bearded pinecone gnome ornament instead.
More Christmas Gnome Craft Ideas You Might Like
- Easy Christmas Sock Gnomes in Just 3 Minutes – I was challenged to create a sock gnome in just a few minutes and they couldn’t be cuter. Be sure to watch the video on this one!
- Pompom Gnome DIY – Use a bit of leftover yarn to create these gorgeous gnome ornaments. Add decorations to match a theme or leave them simple.
- Paper Hat Pompom Gnome – Colored or patterned paper is the star of this show! It’s a quick little holiday craft that is perfect for a package tie or ornament.
DIY Pinecone Gnomes

Create adorable pinecone gnomes using a bit of felt, a pompom, and a wood bead. Use the free gnome hat template to create a felt, fabric, and even a patterned paper hat! Easily turn this pinecone craft idea into Christmas gnome ornaments or package decorations with the addition of a ribbon. Make a few in about 15 minutes.
Materials
- 3 pinecones
- 3 felt sheets
- 3 1/2 wood beads
- 3 white pompoms
- Free Hat Pattern
Tools
- Scissors
- Hot Glue Gun and Glue Stick
Instructions
- Print the free hat template and cut it out. Use it to cut out a piece of craft felt.
- Roll the hat into a cone shape, add glue along one of the long edges, and overlap to secure in place.
- Add a pompom to the opening at the top of the hat.
- Turn the pinecone upside down so the flat part is on the table. Slide on the hat to the pointy end and secure with glue.
- Glue a small wood bead or pompom to the front of the hat to create the gnome nose.
- Repeat for the other pinecones, adding any decorations like bells, trim, and more. Display the Christmas gnomes!
Notes
Pinecones with nice, full bottoms work best for this craft because they will stand up on their own.
If the pinecones don't stand, add an ornament hanger with ribbon or string into the hat before adding the pompom topper.
I recommend felt because it's inexpensive, easy to find, and comes in an array of colors. That said, you may use cotton or fleece fabrics with success.
Meet the Creator
Hi there, I’m Sarah Nenni-Daher. I’m a crafty gal and always have at least 14 projects going at once. I am a crafter, designer, DIYer, and pattern maker. I share my creations here and in the Ruffles and Rain Boots® Shop.
Here at Ruffles and Rain Boots®, you’ll find DIY gnomes, crafts, gifts, cupcakes, laser crafts, and so much more. I love sharing video tutorials over on YouTube and chatting with other crafters in my Facebook groups. We’d love to have you!