
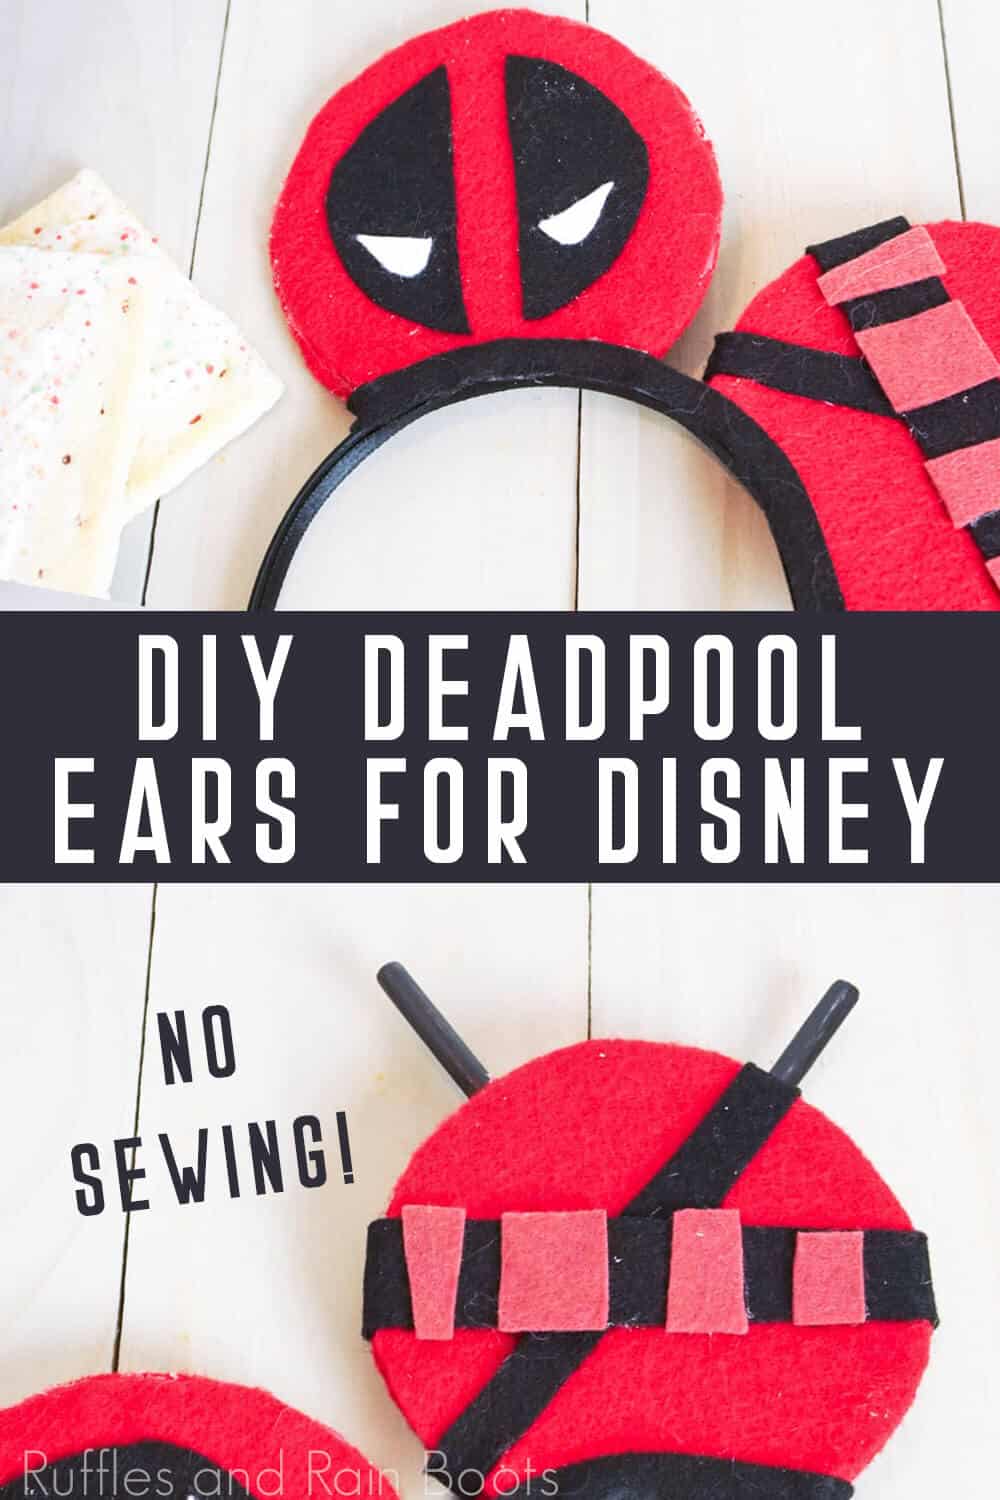
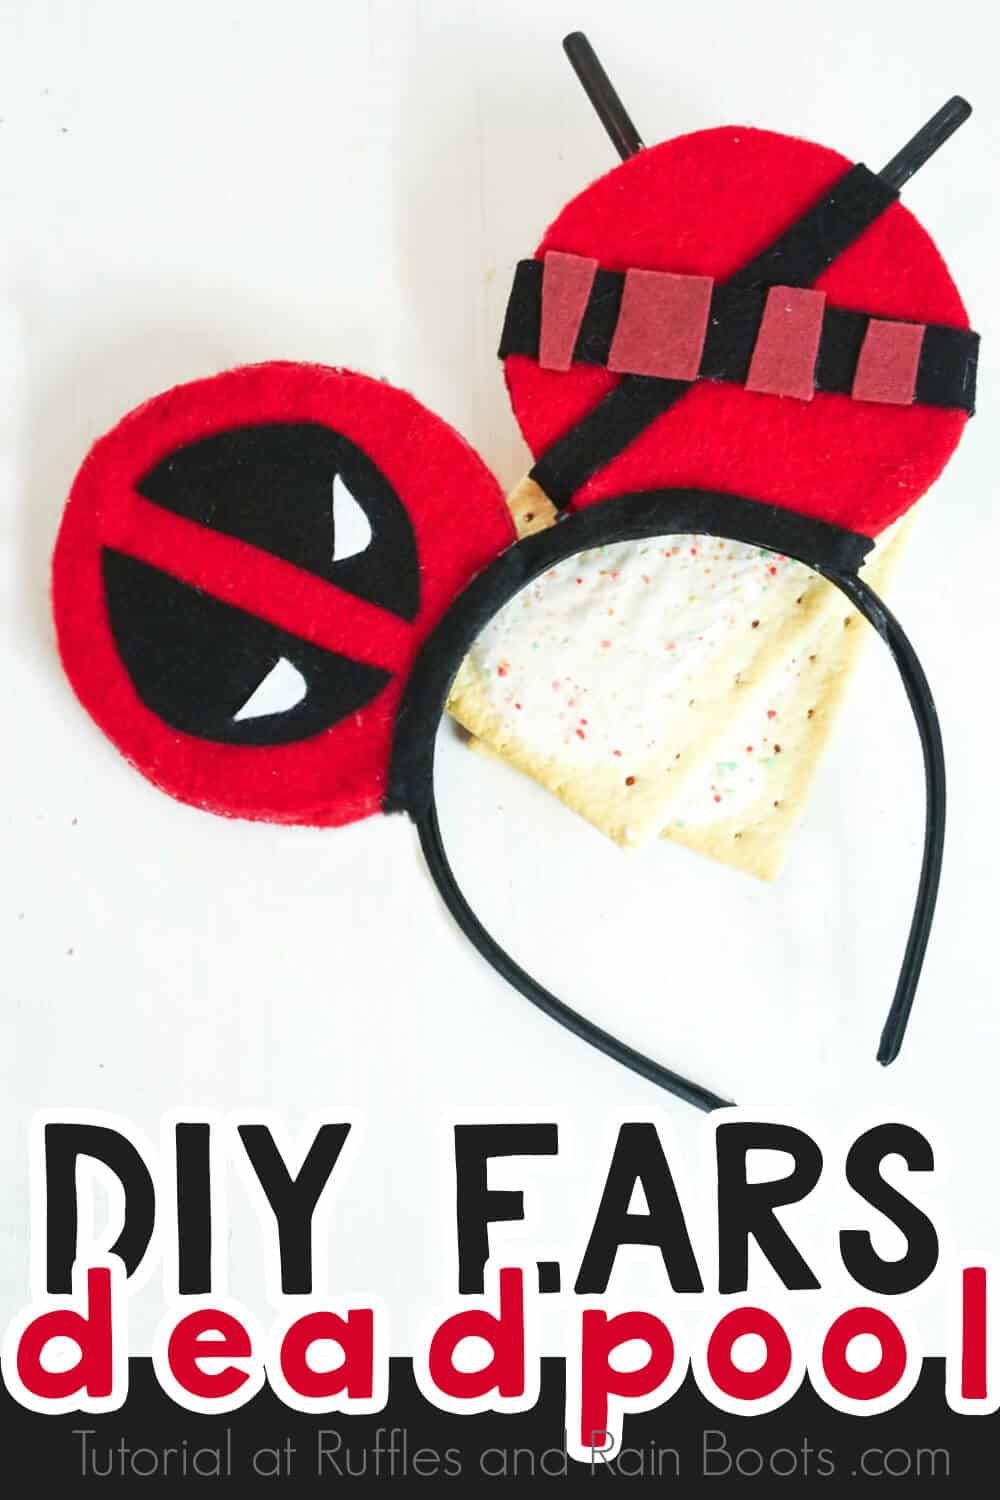
Make These Deadpool Mickey Ears for Your Next Trip to Disney
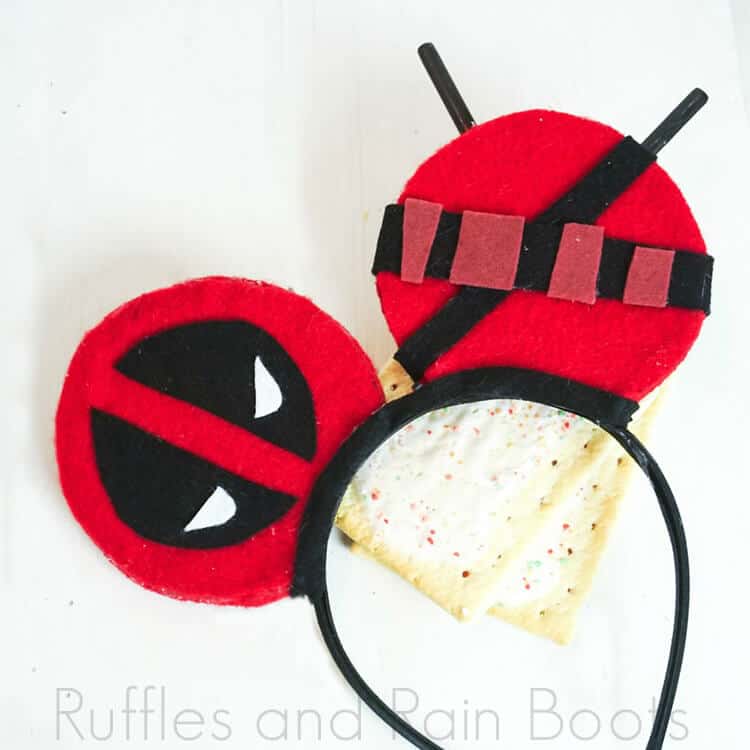
I am CERTAIN that Wade would be proud of these awesome Deadpool Mickey ears. They’re easy, awesome, and they’re so fun! I want to run around all the time wearing these DIY Deadpool ears for Disney, but, according to my kids, that’s not allowed. Pooh.
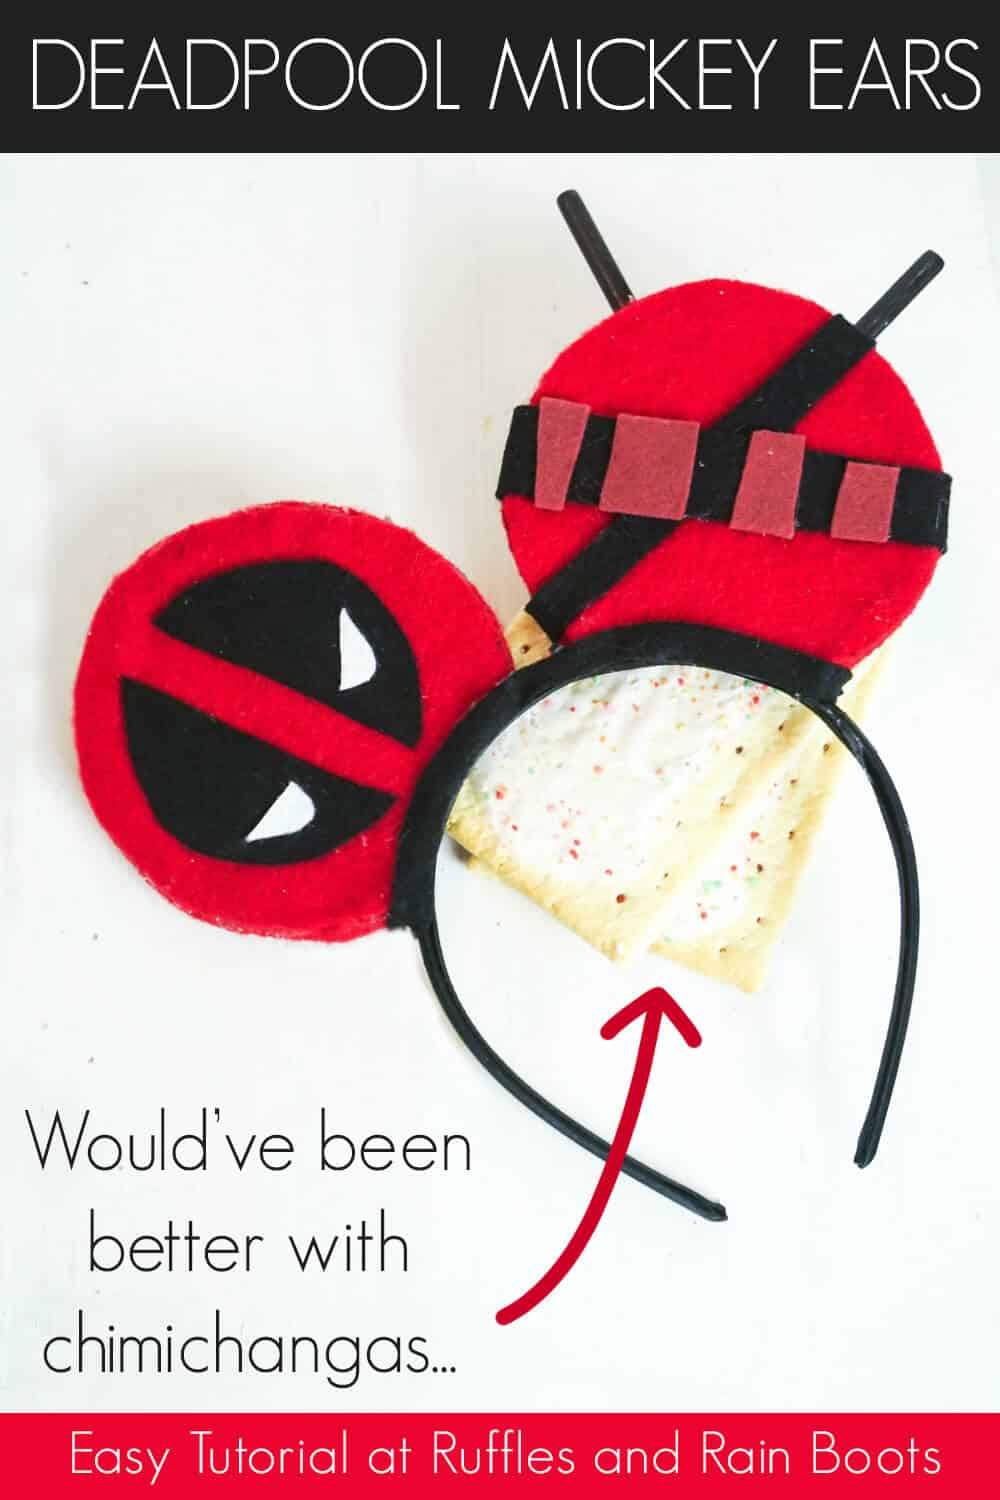
Deadpool Mickey Ears
Here at Ruffles and Rain Boots, we have a really special place in our hearts for Deadpool. Sure, we love all the Disney characters and make a ton of DIY Disney ears, just for the fun of making them. But Deadpool? He’s the best.
If you’re a fan of Wade and can’t wait to sport your own Deadpool ears for Disney, don’t let me hold you back. Let’s get started.
No Time to Make This Now? Pin it for Later
You’re busy, I get it. Pin this to your favorite DIY Mickey ears board on Pinterest and it’ll be here for when you’re ready.
Tips to Make these Deadpool Ears for Disney
- Be sure to download the free printable template. That will make your cuts so much easier.
- Use felt. It’s so much more forgiving than regular fabric and you can just trim off anything.
- Be careful to let your paint dry on the chopsticks–you don’t want black paint all over your pretty red Deadpool Mickey ears.
- If you’re worried about it raining or your DIY Mickey ears getting wet when you wear them, you can use foam core board instead of cardboard. I’m not worried about mine getting damp, so I went with cardboard.
- Use the hot glue sparingly so it doesn’t show through the felt. When you attach your complete ears to the headband, use a small amount of glue so that it doesn’t squirt out the side.
- Don’t press down on the felt when you hot glue it. Lesson learned: it will show through. Add a bit of glue and simply rest the felt on. It won’t show.
- If you see extra hot glue when you’re assembling these awesome Deadpool Mickey ears, just wipe it away quickly. If it’s dried, use a razor blade to remove it – trust me, it works.
How Do I Make these Deadpool Mickey Ears?
I’m so glad you asked. Below is our written tutorial. If you’re making a DIY Mickey ears playlist on YouTube, here is our Deadpool Mickey ears video tutorial.
Deadpool Mickey Ears

I am CERTAIN that Wade would be proud of these awesome Deadpool Mickey ears. They're easy, awesome, and they're so fun! I want to run around all the time wearing these DIY Deadpool ears for Disney, but, according to my kids, that's not allowed. Pooh.
Materials
- 2 Cardboard or Foam Core Board Circles 4-inches in Diameter
- 1 Black Headband
- 2 Chopsticks
- Black Craft Paint
- Craft Felt:
- Black
- Red
- Red-Brown
- Free Printable Template
Tools
- Hot Glue Gun & Glue
- Scissors
- Paintbrush
- Exacto Knife
- Sandpaper
Instructions
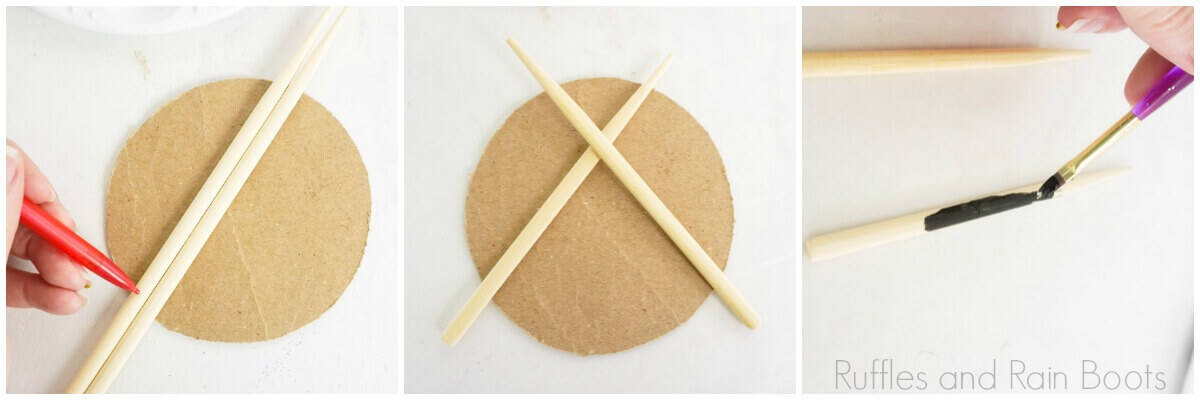
- Start by trimming chopsticks to be about 6-inches long, so that they will stick up on either side of the utility belt ear (the ear that is not Deadpool’s mask). I did this with a miter saw, but you can use the exacto knife or scissors--chopsticks are fairly easy to cut.
- Sand any splinters of wood off the chopsticks, as desired.
- Paint the chopsticks with the black craft paint. Allow to fully dry.

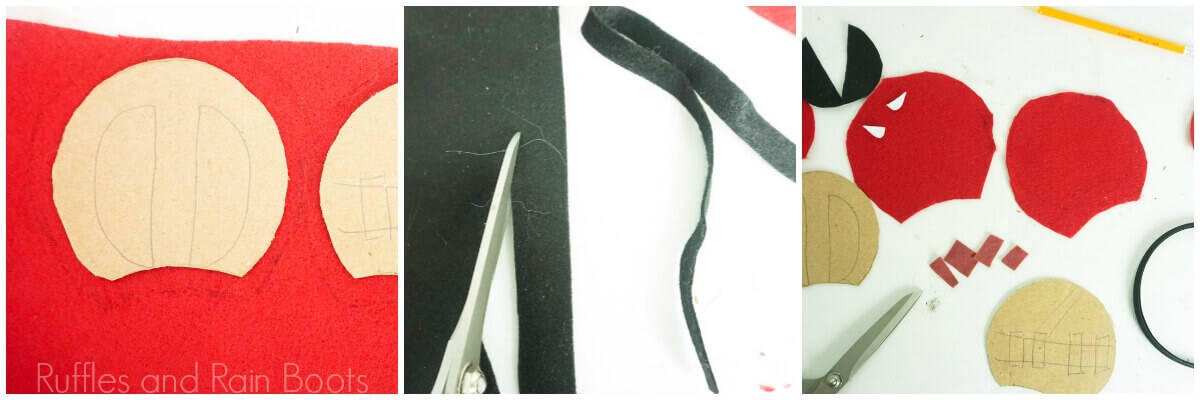
- Sketch location and size of Deadpool’s sword-sheath shoulder strap, utility belt and accompanying pouches onto one of your cardboard circles.
- Sketch general approximation of Deadpool’s mask on the other cardboard circle.
- Lay headband over cardboard circles and sketch where you want the ears to sit on the headband.
- Cut out area of ears that is unnecessary.
- Trace the new shape of the ear onto the red felt.
- Trace the new shape of the ear onto the red felt again, this time adding about ¼ to ½-inch additional felt around the edge. You should have 4 pieces of red felt to work with.
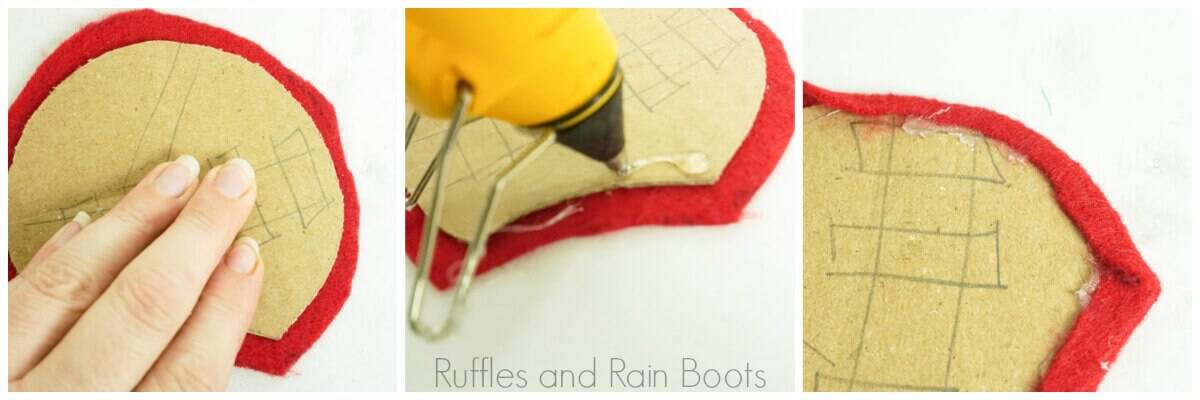
- Hot glue ear shapes of larger red felt to the back of the cardboard cut-outs, wrapping the extra around to the front and glueing the edge down.
- Hot glue ear shapes of the smaller red felt to the front of the cardboard cut-outs, taking care to glue the edges down.
- Trim red felt to be perfect. It’s what Deadpool would want.
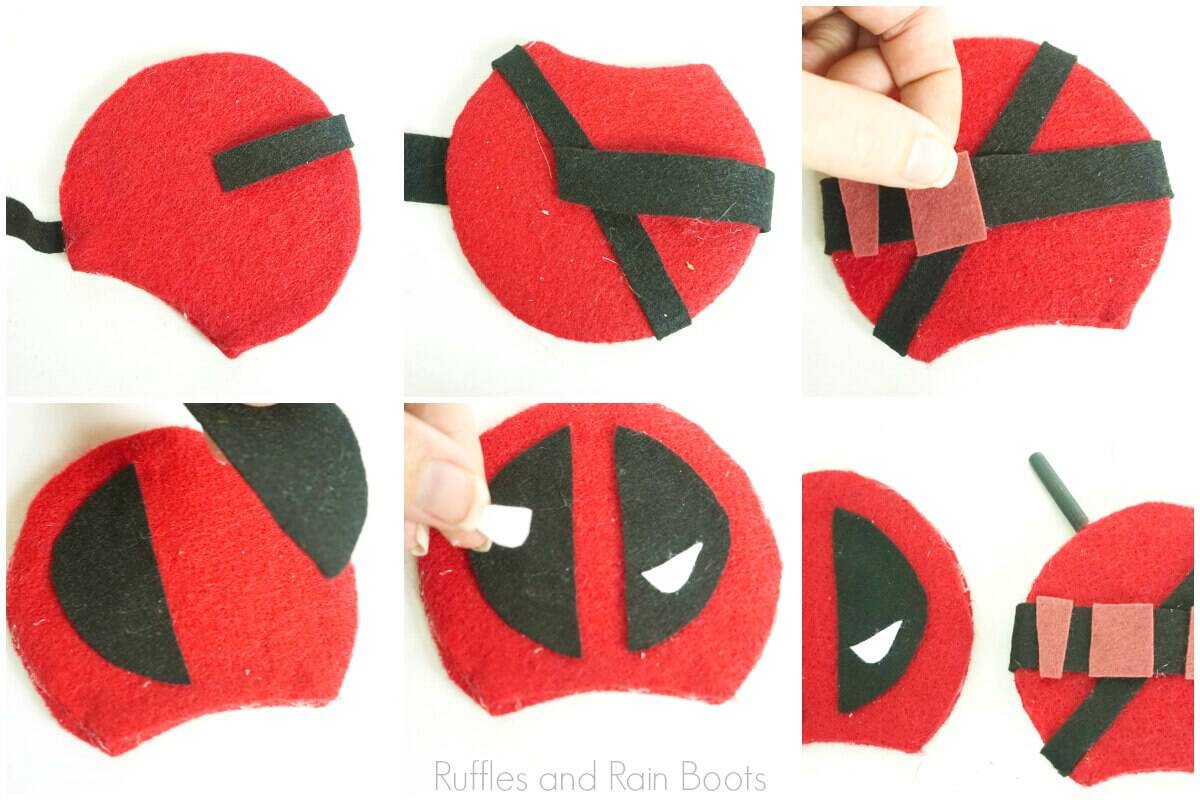
- From the black craft felt, cut out a ½-inch wide strip, or larger, dependant on your sketch of Deadpool’s utility belt and a ¼-inch wide strip or smaller, dependant on your sketch of Deadpool’s sword-sheath shoulder strap.
- Wrap each around the utility belt ear in the approximate location of your sketch and hot glue in place.
- Cut small rectangles in various sizes out of the red-brown craft felt and hot glue them in place along the utility belt.
- If the chopsticks have dried, hot glue them in place on the back of this utility belt ear in an “x” with one side on top of the sword-sheath shoulder strap, taking care not to let any of the chopstick hang over the bottom of the ear--all overhang should be at the top of the ear to keep the chopsticks from poking you in the head when the ears are worn. Set aside.
- To begin Deadpool’s mask ear, cut out the pieces on the provided template.
- Trace each cut out piece of the template onto the corresponding color of craft felt.
- Cut out the traced pieces of craft felt.
- Hot glue each piece to the corresponding location on the cardboard cut out. Keep in mind that these pieces DO NOT fit together tightly, like a puzzle, so you can place them where you want, but the lines need to be parallel and the eyes canted upward toward the outside to look like Deadpool’s mask.

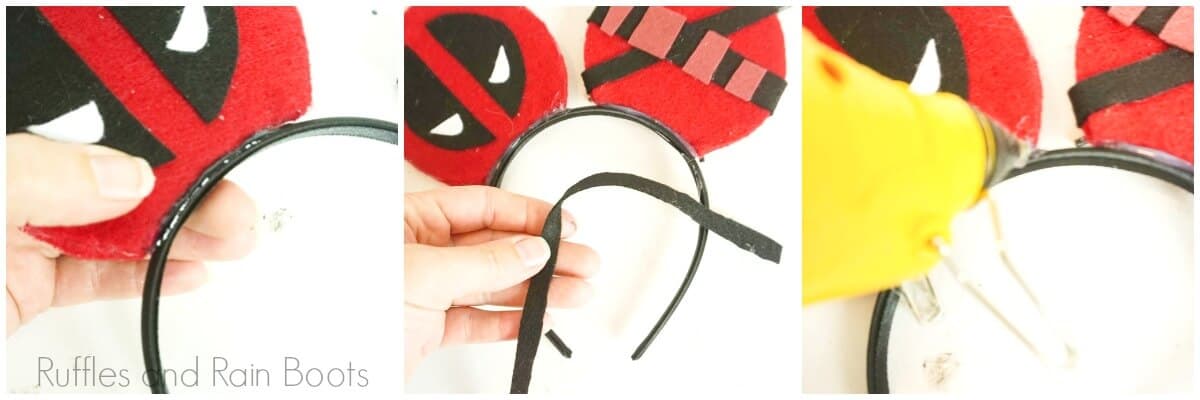
- Retrieve the utility belt ear and place both ears onto the headband where you want them to be.
- Hot glue the two ears in place on the headband, taking care to hold them firmly until the hot glue is completely cooled.
- Cut out a thin, maybe ¼-inch wide strip of black felt, long enough to wrap from one end of the ears to the other.
- Hot glue this in place, in front of the place where the ears and headband meet, to hide the hot glue.

Notes
For more cool DIY Disney Mickey ears, visit RufflesandRainBoots.com
Creativity, Delivered
Would you like inspiration delivered right to you each week? Sign up for the once-weekly Ruffles and Rain Boots newsletter and you’ll get that and more! Get access to the exclusive libraries full of free SVGs, hand lettering practice, and so much more.
More DIY Mickey Ears You Might Like
- Princess Leia Minnie Ears – If you say “I love you” and he says “I know,” you have a winner.
- No-Sew Lilo and Scrump Mickey Ears – If you’re designing for a younger alien story, these Lilo ears are perfect but these Angel and Stitch Mickey ears are the sweetest.
- Aladdin’s Princess Jasmine Minnie Ears – When the kids want in on the DIY Disney craft fun, these Jasmine Minnie Mouse ears or fun Dumbo Mickey Ears are a neat activity.
Please Save This to Pinterest
Your shares are how this site grows and I am sincerely grateful. Know a friend who’d like this? Please share it on Facebook or save it to your favorite DIY Mickey ears board on Pinterest.
Meet the Creator
Hi there, I’m Sarah Nenni-Daher. I’m a crafty gal and always have at least 14 projects going at once. I am a crafter, designer, DIYer, and pattern maker. I share my creations here and in the Ruffles and Rain Boots® Shop.
Here at Ruffles and Rain Boots®, you’ll find DIY gnomes, crafts, gifts, cupcakes, laser crafts, and so much more. I love sharing video tutorials over on YouTube and chatting with other crafters in my Facebook groups. We’d love to have you!