
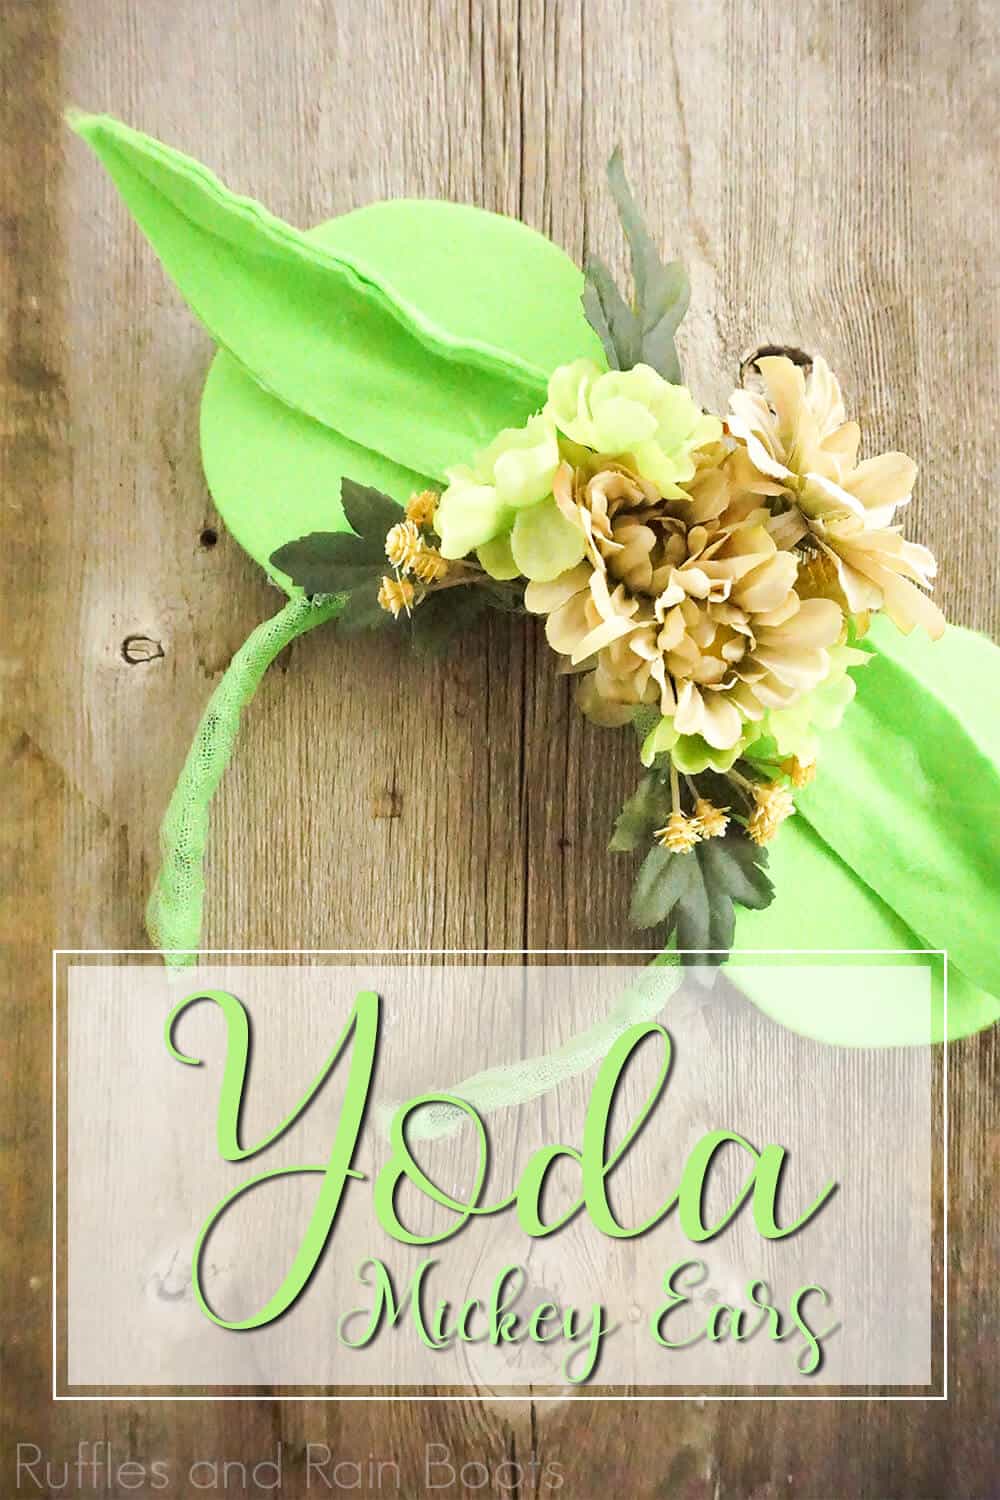
These Floral Yoda Mickey Ears Are Out of This Galaxy
Take a moment, you will, to enjoy the flora from Dagobah that an out of this galaxy floral Yoda Mickey ears have made. Wow. That was hard. No more of that. Just love these awesome Star Wars Minnie ears for Disney as much as me and we’re good. LOL!
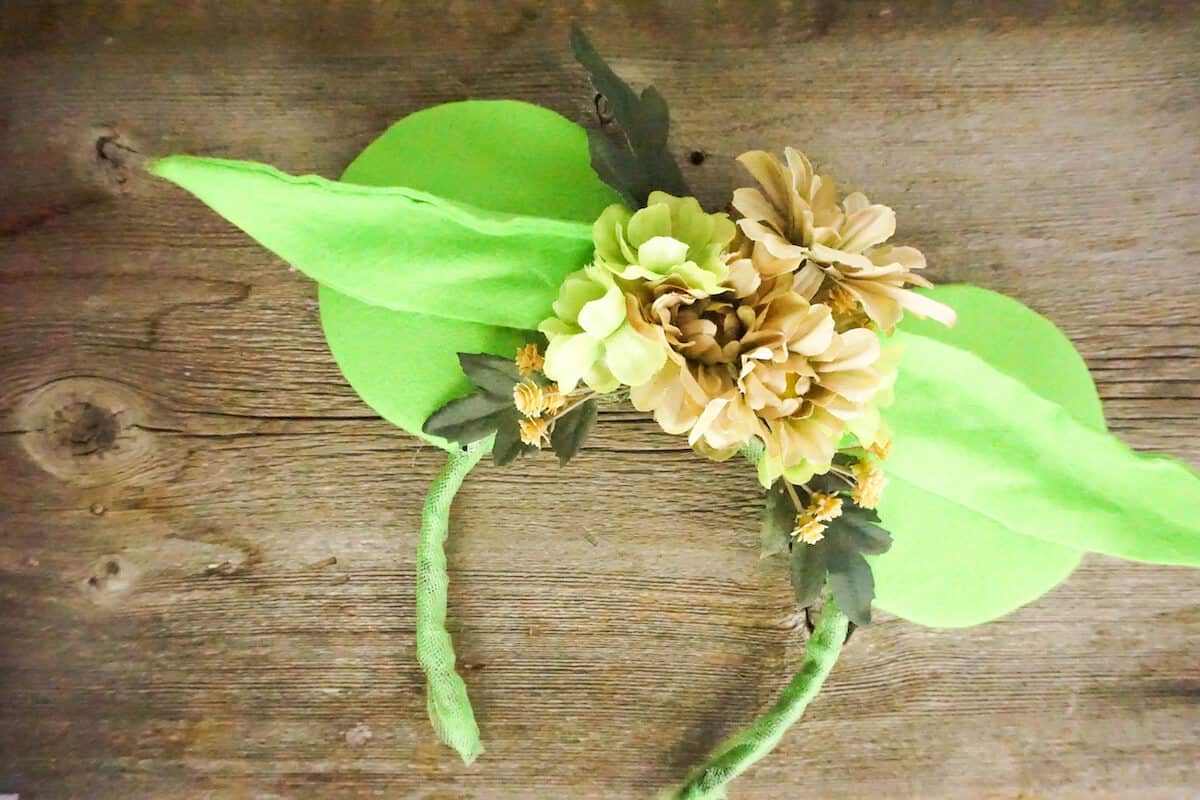
Yoda Mickey Ears
Here at Ruffles and Rain Boots, we have watched more than our fair share of hours upon hours of Star Wars. And, so, in our quest to find all the coolest Star Wars Mickey ears, we had an idea to make Mickey ears that were adjustable Yoda ears. Could we have both? A cake and eat it too? Why not.
And, the best thing? You can make these awesome adjustable Yoda Mickey ears in about 20 minutes. So cool. Let’s get started.
No Time to Make This Now? Pin it for Later
You’re busy, I get it. Pin this to your favorite DIY Star Wars Mickey Ears board on Pinterest and it’ll be here for when you’re ready.
Tips to Make these DIY Star Wars Mickey Ears
- Use floral wire if you can. If you don’t have any, you can use a wire hanger, but the wire from a hanger will not be as flexible, so your adjustable Yoda Mickey ears won’t be so… adjustable.
- If you want to use fabric instead of felt, be aware that the edges will fray and be a little less than perfect. That’s part of why I chose felt. I wanted the emphasis to be on the wrinkly ears, not the frayed edges.
- Do not skip getting some kind of fuzzy going inside the ears. It’s weird, but Yoda has fuzz in his ears.
- Click here to get the free printable template to cut these DIY Star Wars Mickey ears. It will make it easier in the long run if you don’t have to guess on those weird long ears.
How Do I Make these Yoda Mickey Ears?
I’m so glad you asked. Below is our written tutorial. If you’re making a DIY Star Wars Mickey ears playlist on YouTube, here is our Yoda Mickey ears video tutorial.
Yoda Mickey Ears

These Yoda Mickey ears will make any Star Wars fan swoon. You'll love crafting a pair because they are no-sew mouse ears and include a Mickey ear template!
Materials
- 2 Cardboard or Foam Core Board Circles 4-inches in Diameter
- 1 Black Headband
- 2 sheets Green Craft Felt
- ¼ yd Green tulle
- 2 Floral wires
- Various brown/green, beige and sand colored flowers
- Printable Template
Tools
- Hot Glue Gun & Glue
- Scissors
- Pencil eraser
Instructions
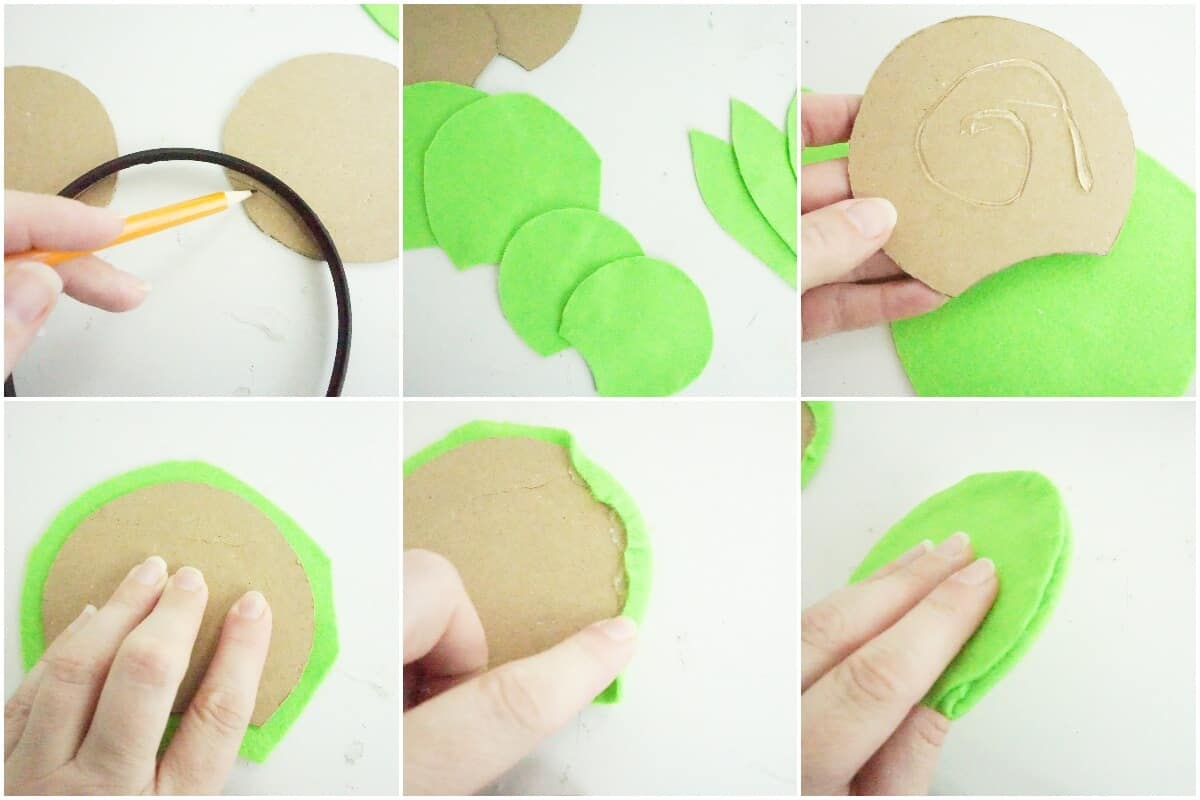
- Lay headband over cardboard circles and sketch where you want the ears to sit on the headband. Cut off the area of ears that is unnecessary.
- Trace the new shape of the ear onto the green felt. Trace the new shape of the ear onto the green felt again, this time adding about ¼ to ½-inch additional felt around the edge. You should have 4 pieces of green felt to work with.
- Hot glue ear shapes of larger green felt to the back of the cardboard cut-outs, wrapping the extra around to the front and glueing the edge down. Hot glue ear shapes of the smaller green felt to the front of the cardboard cut-outs, taking care to glue the edges down. Trim green felt to be perfect. Clean edges, Yoda would want. Set the two Mickey ears aside.

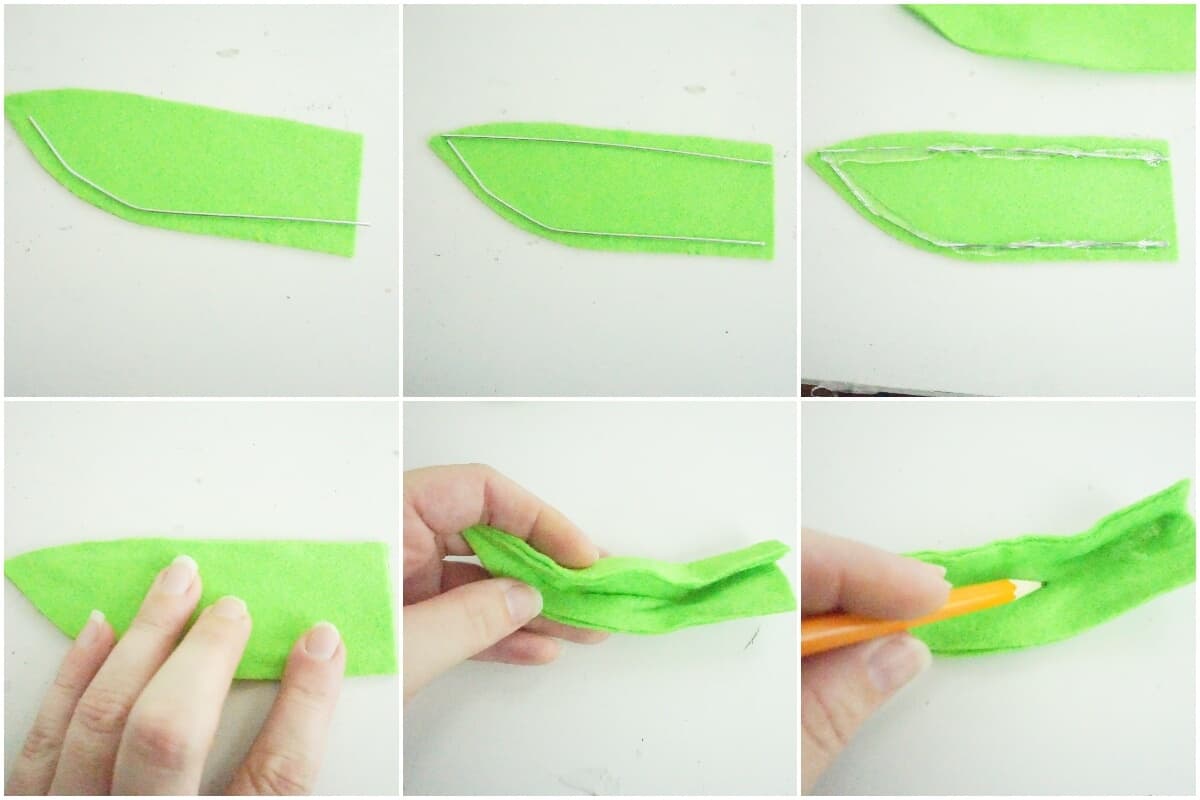
- To make the Yoda ears, cut out the ear shapes from the printable template. Using a pencil, trace four ear shapes onto the green felt. Cut out all 4 green felt ear shapes.
- Lay the floral wire across the bottom of an ear cut out, about ⅛-inch from the edge of the fabric, bending the wire to match the curvature of the ear. Trim the wire to exactly the length of the ear or a tiny bit longer.
- Lay the remaining portion of the same floral wire along the top of the same ear cut out, about ⅛-inch from the edge of the fabric, bending the wire to match the curvature of the ear and meeting up with the bottom edge wire. Trim the wire to exactly the length of the ear or a tiny bit longer.
- Tack the two wires in place with hot glue and allow it to cool completely before moving on, so that the wire doesn’t move around inside the ears. Place a bead of hot glue over the wires and onto the ear under them all the way around the edge of the Yoda ear cut out.
- Place a second Yoda ear cut out on top of the one with the wires and allow it to cool completely before moving on, so that the wires will stay in place within the Yoda ears.
- Using the pencil eraser, rub it along the inside of the Yoda ears, making it fuzzy. You can even add a little shade in there by coloring it lightly with the pencil. I did.
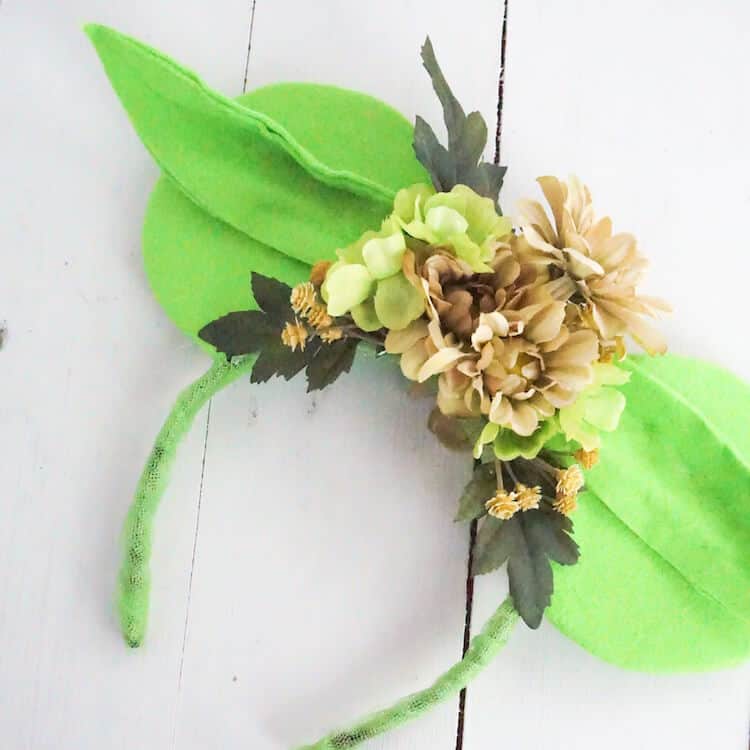
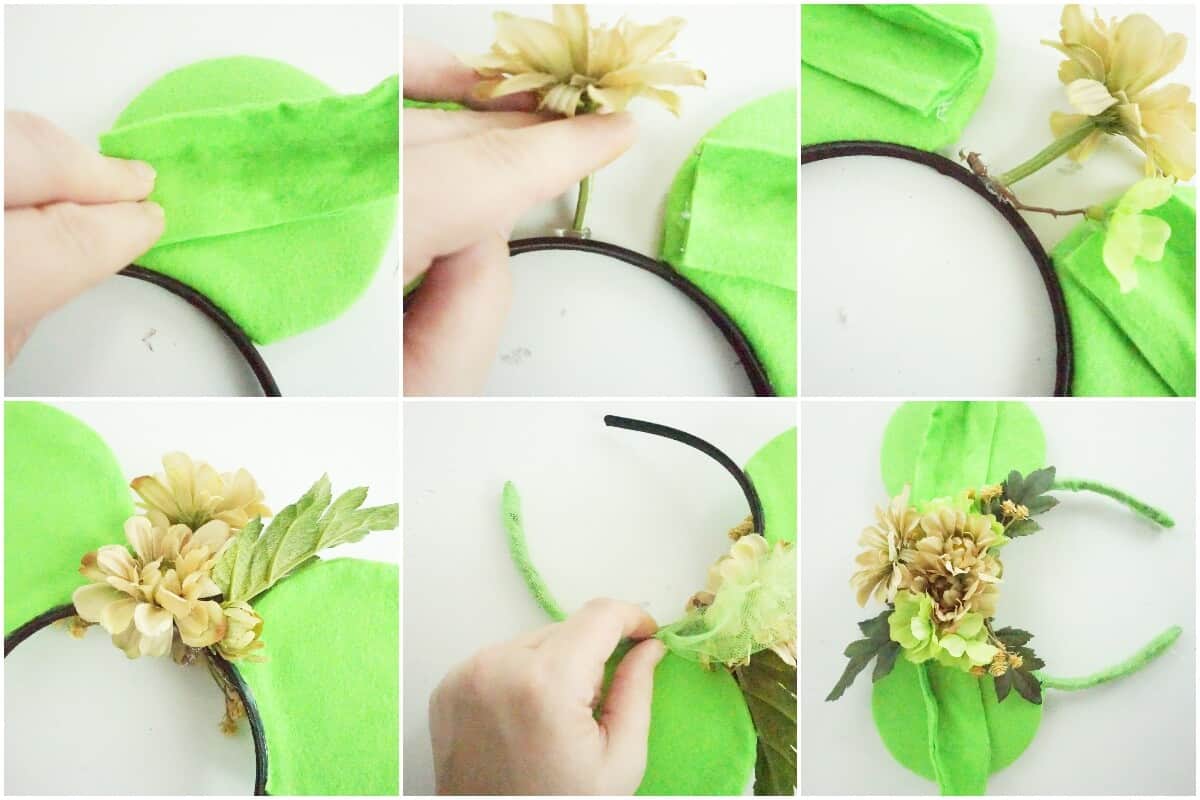
- Hot glue the two Mickey ears in place on the headband, taking care to hold them firmly until the hot glue is completely cooled.
- Hot glue the two Yoda ears to the Mickey ears, but only on the ends where the ears attach to Yoda’s head. Leave the remaining portion of the Yoda ears free, so that you can wrinkle them, curve them, or fold them - this allows them to be adjustable.
- Pick your favorite “big flower” from your set of various Dagobah-swamp flowers. Cut it from the stem about 2-inches. Hot glue this in place, standing vertically, equidistant between the two Mickey ears. This is not going to be super steady, so be aware that you will need to hold it until you can get the other flowers in place to support it.
- Fill-in the area between the bottom of this vertical flower and the headband with additional flowers and leaves. Be sure to add more along the bottom of the headband between the Yoda ears and the headband.
- Cut out a thin, 1/2-inch wide strip of green tulle, long enough to wrap from one end of the headband to the other. Hot glue this in place, wrapping where possible and definitely in front of the place where the ears and headband meet, to hide the hot glue.
Notes
For more awesome DIY Star Wars Mickey ears, visit RufflesandRainBoots.com
More Star Wars Minnie Ears for Disney You Might Like
- Princess Leia Buns – I like big buns, and I cannot lie. Those other princesses can’t deny that when Mickey ears walk by with big buns up top, I get squee! LOL! You know you’re singing along…
- Han and Chewie Mickey Ears – It’s a mix of “I love you…” and “Raaawrrr” that any Star Wars fan would love.
- Death Star Minnie Ears – I sense the Dark Side in these adorable Death Star ears. Good news? They’re puffy and squishy and kind of fun. COMING SOON
- Ewok Mickey Ears – These. Are. My. Favorite. Star Wars ears. And I cannot wait to share them with you! COMING SOON
Please Save This to Pinterest
Your shares are how this site grows and I am sincerely grateful. Know a friend who’d like this? Please share it on Facebook or save it to your favorite Star Wars Minnie ears for Disney board on Pinterest.
Meet the Creator
Hi there, I’m Sarah Nenni-Daher. I’m a crafty gal and always have at least 14 projects going at once. I am a crafter, designer, DIYer, and pattern maker. I share my creations here and in the Ruffles and Rain Boots® Shop.
Here at Ruffles and Rain Boots®, you’ll find DIY gnomes, crafts, gifts, cupcakes, laser crafts, and so much more. I love sharing video tutorials over on YouTube and chatting with other crafters in my Facebook groups. We’d love to have you!