
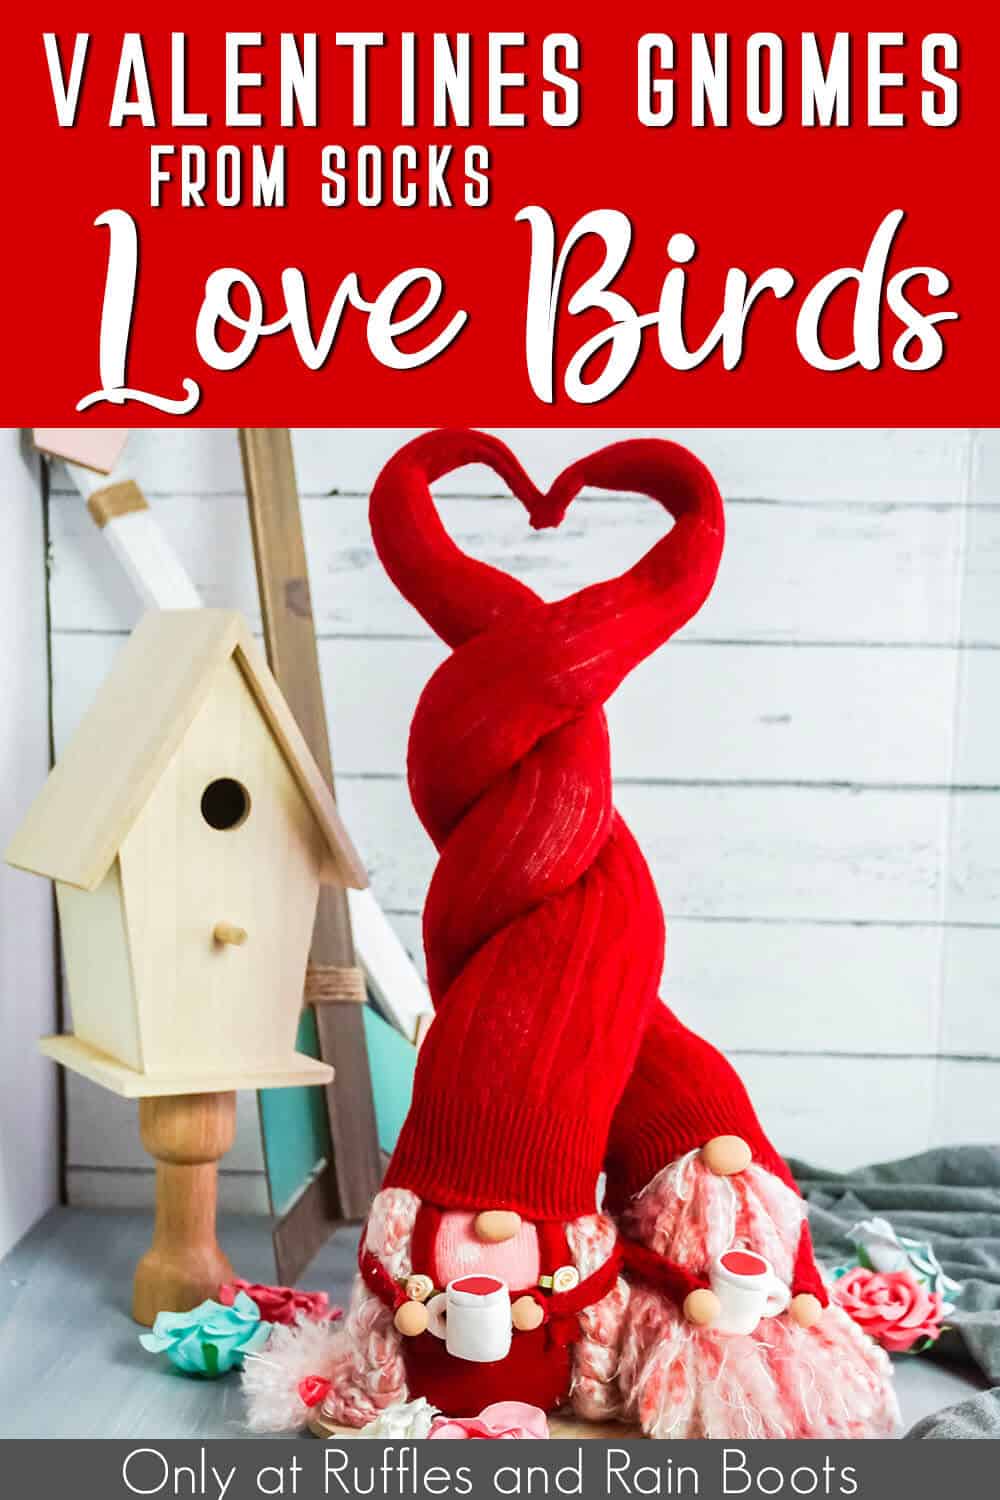
How to Make a Valentine Gnome – Heart Sock Gnome Couple
If you’ve been wondering how to make a Valentine gnome, this heart sock gnome couple is so easy and fun, you’re going to love making them. Everyone who sees them falls in love!
How to Make a Valentine Gnome
Here at Ruffles and Rain Boots, I have a love for all DIY gnomes. They’re so fun to make and I can’t get over how adorable the results always are. So, of course, I’ve caught the love-bug and made a little set of Valentine’s Day sock gnomes.
RELATED READING: DIY VALENTINE’S DAY GNOMES
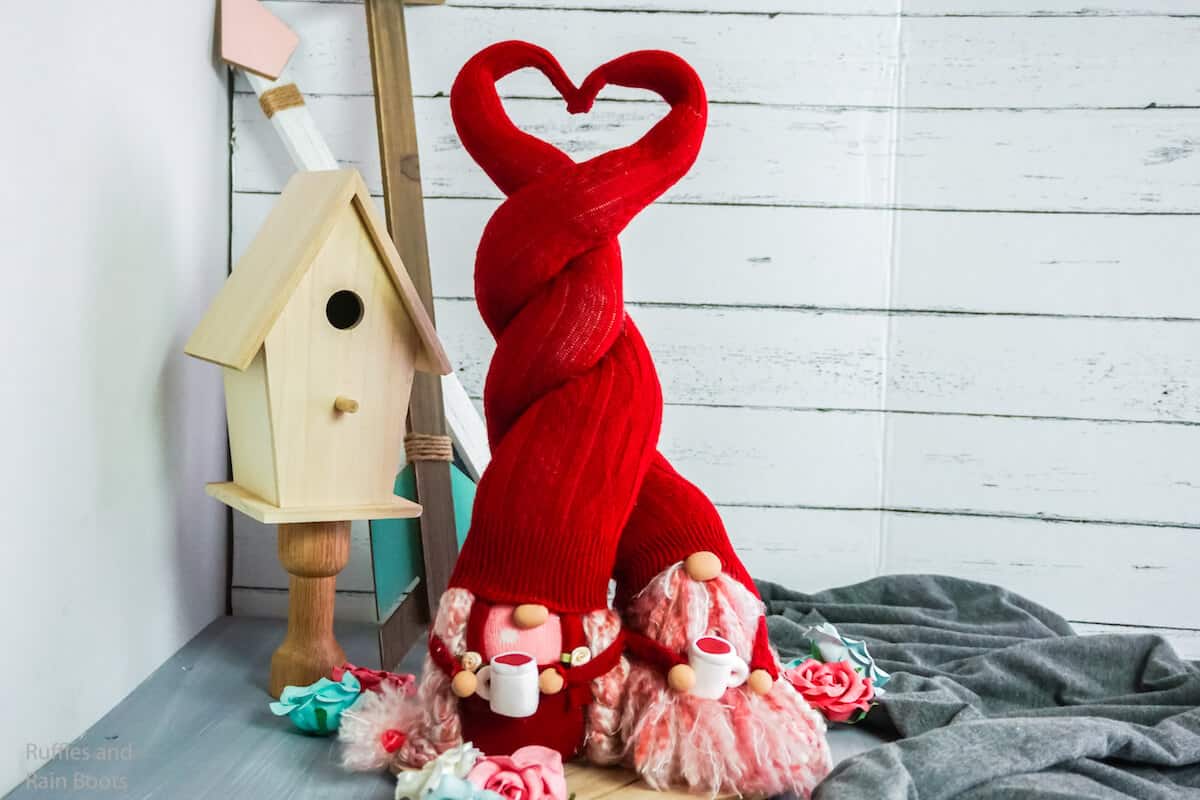
The twisty hat that comes up into a heart, the pink fluffy beard and braids – I just love everything about this gnome couple. Plus, they’re gnomes with coffee cups, so they’re already a step up on my list of adorable things. If you’re ready to make a set for Valentine’s Day, let’s get started.
No Time to Make This Now? Pin it for Later
Can’t make them right now? Be sure to share to Facebook or pin this to your favorite DIY crafts board on Pinterest and it’ll be here for when you’re ready.
As an Amazon Associate, I can earn from qualifying purchases.
Tips to Make a Heart Sock Gnome Couple
- Get knee-length socks – REALLY long socks. I got these red cable-knit socks and they were perfect. NOTE: when you click you’ll see different sizes – get large.
- To make the beard and braids, I used some variegated pink yarn I had in my craft stash. If you want to grab the same, click here to get the pink yarn I used, but check your stash.
- I used polymer clay to make the little coffee cups, hands, and noses. I like using wood beads for gnomes, as well, but when I’m already having to use polymer clay out to make coffee cups, well…
- If you want to make your own coffee cups, the good news is that my YouTube video here shows how to make them.
How Do I Make a Valentine Gnome?
I’m so glad you asked. Below is our written tutorial or, if you prefer, here is our Valentine’s Day twisted heart gnome video tutorial on YouTube.
Be sure to check out all of the questions and answers I have provided on learning how to make sock gnomes here. It will help you get an idea of all of the possibilities, problems, and tips I’ve shared in other gnome tutorials.
How to Make a Valentine Gnome with Socks

Add these DIY Valentine's Day gnomes to your list of projects. They are super easy sock gnomes to make and the twisted heart hats are epic!
Materials
- 2 Knee-Length Red Knit Socks
- 2 Pink Crew Socks
- 2-4 cups Rice, Polyfill Beads or other filler
- Pink Variegated Yarn
- Polymer Clay in red, light brown and white
- Twine
- Red Ribbon
- 2 Rose Baubles
- 4 Floral Wires
- Polyfill
Tools
- Hot Glue Gun and Glue
- Oven
- Scissors
- Piece of Cardboard, optional
- Brush or Comb
- Binder Clip
- Tape
Instructions
- Make your gnome nose and hands by combining a portion of light brown and white polymer clay until you have the color you want. Roll a quarter-sized portion of this clay into a neat ball. This is the nose. Make a second nose. Set aside. Roll two nickel-sized portions of this clay into two neat balls. These are the hands. Make a second set of hands. Set aside.
- Make the coffee by thoroughly combining red and white clay together to form a watermelon pink clay. Roll this into a cylinder about 3/4-inch thick. Set aside. Make a coffee cup by rolling a 1-inch by 1/2-inch section of white clay into a cylinder and, press a small depression into the top of the cylinder, making it slightly wider at the top with a depression. Press a 1/8-inch slice of the coffee into the depression in the cup.
- Using your Exacto knife (the backside of the blade), make a lip on the top edge of the cup. Repeat to make a second coffee cup. Smooth the coffee cups and coffee to your heart's content.
- Make a very tiny snake about 1/2 inch long and form into a "u" shape and press into the side of each cup. Bake the coffee cups, nose and hands per the clay package's directions. Allow them to cool fully.
- Fill the crew cut socks with 1-2 cups of polyfill beads, rice or other fill material. Stuff the sock full with polyfill the rest of the way, making your gnome as plump as you'd like. Close the top with a piece of twine knotted and hot glued to keep it from unknotting. Repeat with the second crew sock. These are the gnome bodies. Set aside.
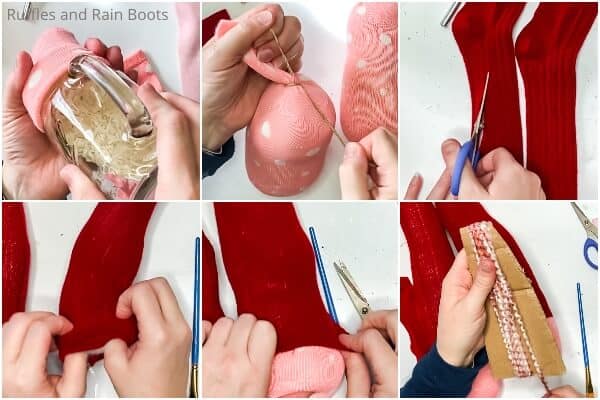
- Lay the two red socks flat side by side. Cut both socks, starting at the heel, moving upward toward the toe, into a sharp cone shape, ending at the toe. Do not discard the piece of the remainder, but do set it aside. Turn the socks inside out.
- Hot glue the two cut edges of one sock together, forming a hem. Repeat with the second sock. Allow the hot glue to cool/dry completely. Turn each sock right side out.
- Twist two of the floral wires together end-to-end to make a much longer floral wire. Bend one end of each floral wire over about 1/4 inch to blunt the end. Slide a floral wire up into a red sock. Repeat with the other floral wire and sock. Do not trim the floral wires--leave them long because the sock will stretch.
- Fill each of the red socks with polyfill, tucking it into the ends of the point, as best you can without making it lumpy. Slip a hat on the top of each gnome body, tucking a bit of polyfill around the knot on the top of the body to make the connection between the hat and body smooth.
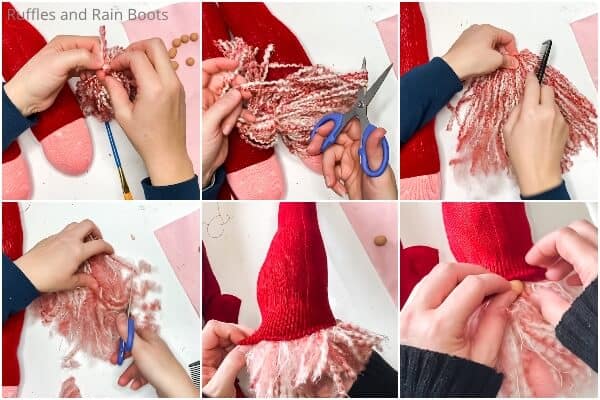
- Make the gnome beard by wrapping yarn into an 8-10-inch diameter loop about 20-30 times. I did this by grabbing a piece of cardboard about 8-inches long and wrapping the yarn around that, then sliding the wrapped yarn off.

- Cut a small portion of yarn and wrap this through the loops of yarn and tie it into a knot to keep the large yarn loops in place. Brush or comb the yarn, gently, unwinding the individual threads to make a fluffy more fur or hair type texture. Trim the mass of brushed yarn into a beard shape that is a little bit longer than the gnome body.
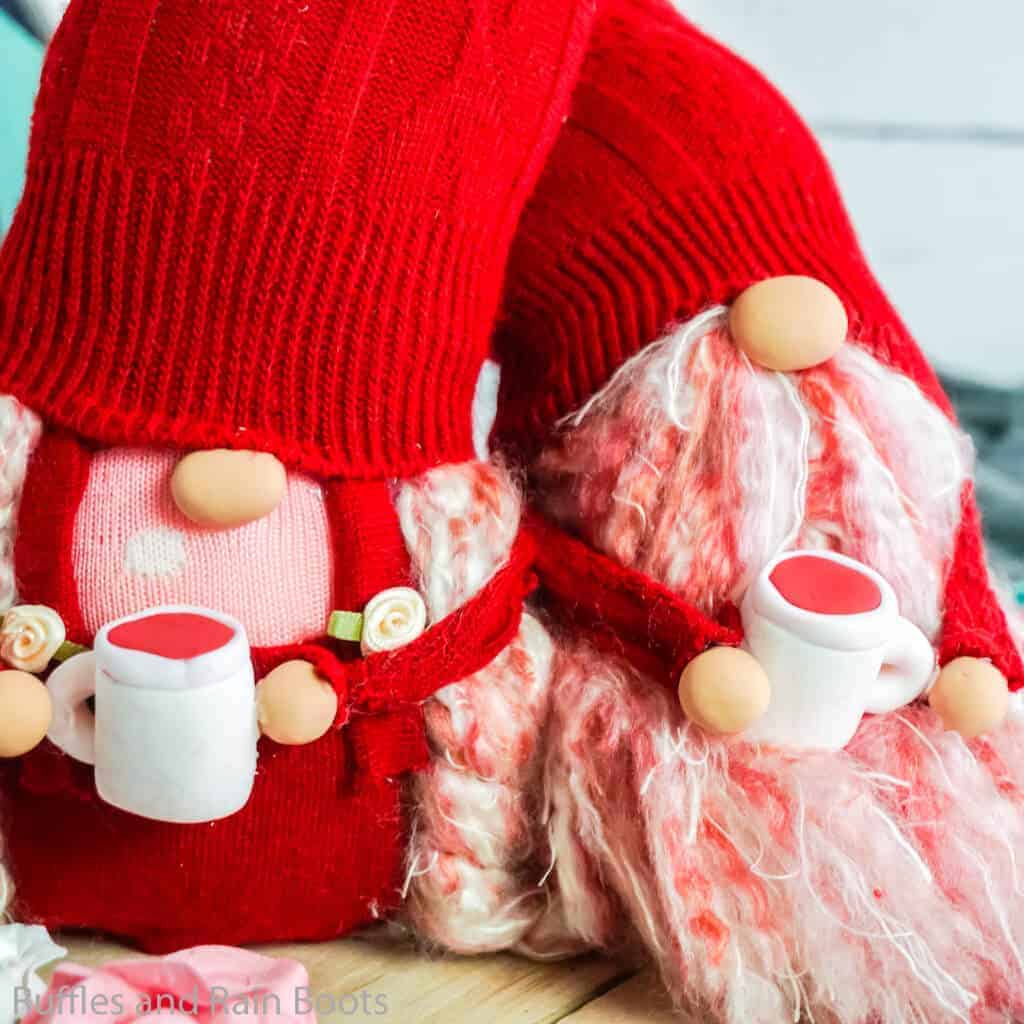
- Hot glue the yarn bead onto the body of the gnome, about an inch under the hat edge. Tuck a nose into the top of the bead, hot gluing it in place with the hat, creating a bit of a wrinkle.
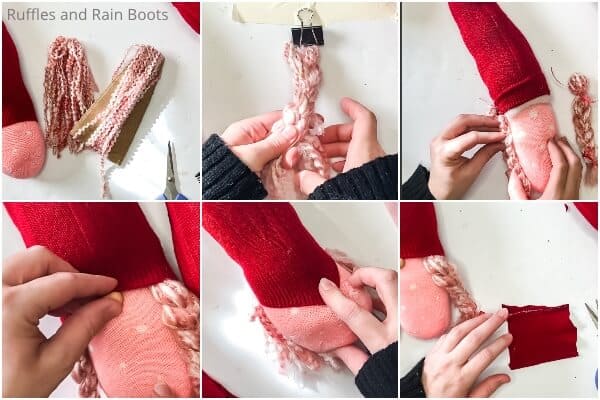
- To make the braids, wrap yarn into an 8-10-inch diameter loop about 10-15 times. I did this by grabbing a piece of cardboard about 8-inches long and wrapping the yarn around that, then sliding the wrapped yarn off.
- Cut a small portion of yarn and wrap this through the loops of yarn and tie it into a knot to keep the large yarn loops in place. Brush or comb the yarn, gently, unwinding the individual threads to make a fluffy more fur or hair type texture. Attach one end of the yarn to a binder clip and tape the binder clip in place on your desk. Braid the brushed yarn.
- Tie the end in place with ribbon and curl the ends. Remove from the binder clip. Trim the ends of the braid so that the yarn is fairly even. Repeat making a second braid.
- Hot glue the braids on each side of the gnome's head, tucked up into the hat by about an inch. Hot glue the nose onto the girl gnome, tucking it up into the hat a little and securing it in place with a little wrinkle in the hat.
- To make the apron for the little girl gnome, cut a scrap section of the discarded portion of sock about the width of her body and about half the height.
- Fold the edges over and glue in place, creating a hem. Cut two lengths of the discarded sock portion about 1/4 inch wide, long enough to go down the front of the gnome, from the edge of the hat to the apron, with overhang on both ends--to make apron straps. Fold the strap pieces in on itself to form a hem.
- Hot glue the apron in place, with the straps tucked up into the hat and hanging over the apron. Hot glue the rose baubles onto the straps where they overlap the apron.
- With the scraps of red sock that you have remaining, cut two 1/2-inch wide sections as long as you can get. Fold this section of red sock fabric in half twice to form a hem and hot glue in place. Slip each arm up into the hat, behind the beard and braids and hot glue in place. Hot glue the hands onto the ends of the arms.
- Hot glue a coffee cup between each hand of each gnome
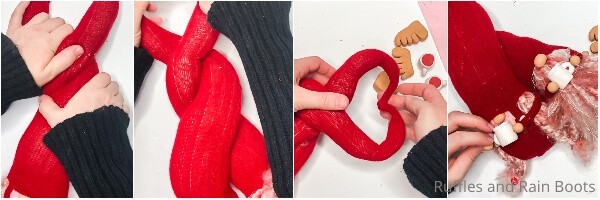
- Twist the two hats together, tightly, sewing or hot gluing it in place, if necessary, as many times as you can, leaving a 4-6 inch section loose at the top. Curve the loose sections of the hat toward each other and form a heart.
- Hot glue the center of the heart in place and enjoy!


Notes
For more fun gnome tutorials (a lot more), visit RufflesandRainBoots.com
More Valentine Craft Ideas You Might Like
- Felt Valentine Cone Gnomes – This no-sew easy craft is a beginner’s guide to Valentine’s Day gnomes.
- Valentine’s Day Gnome Wreath – Trust me, you’ve never seen a wreath like this one!
- Epic Date Night Jar – I LOVE date night, and even more, I love having 70+ ideas to make date night interesting, Valentine’s Day or not.
- Harry Potter Valentines Free Printable – If you love Valentine crafts and a little magic, maybe this set of free printable classroom Valentines will tickle your fancy!
Please Save This to Pinterest
Your shares are how this site grows and I am sincerely grateful. Know a friend who’d like this? Please share it on Facebook or save it to your favorite Valentine crafts board on Pinterest.


These two are probably my new favorite Valentine decorations! Thank you so much for sharing!!
Oh, I’m so glad to hear you like these sweet little sock gnomes, Helen. They are a lot of fun to put together.