
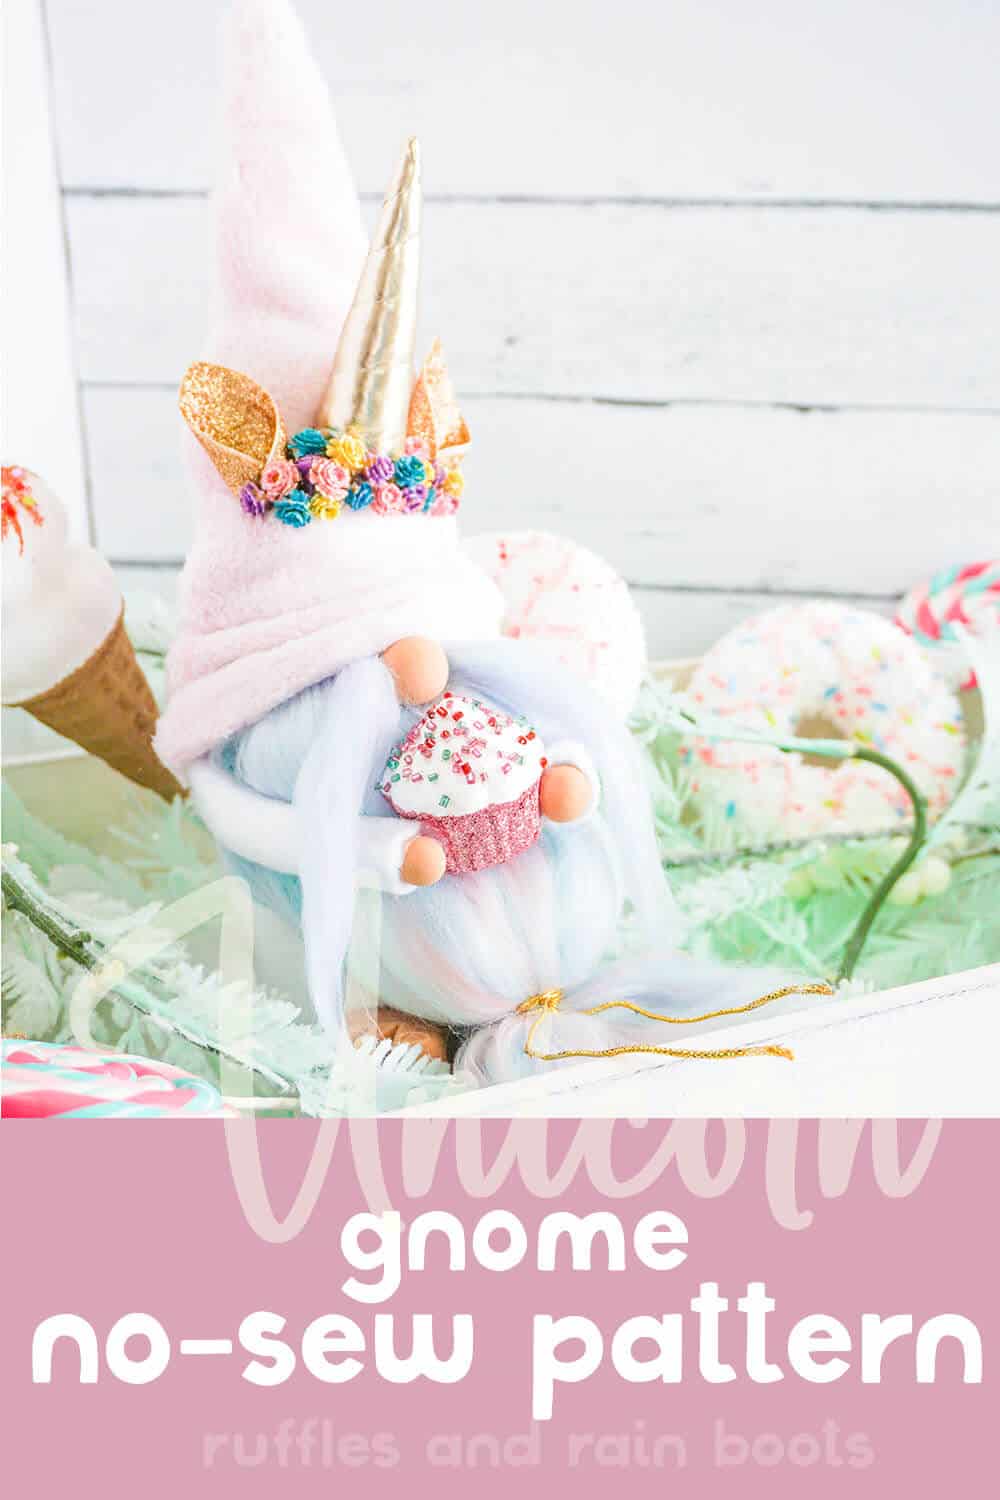
Make this Adorable Unicorn Gnome Pattern That’s No-Sew and So Easy!
So fast and simple. I can make this no-sew unicorn gnome pattern in about 25 minutes and it’s so adorable, you’ll love it!

Unicorn Gnome Pattern
Here at Ruffles and Rain Boots, we love unicorns – and gnomes. No wonder then that when the two ideas collided in my head, I had to make it! Simple and easy, that’s the name of this game, you make this unicorn using a unicorn headband and a few faux flowers. It’s the perfect gnome unicorn for beginners!
RELATED READING: HOW TO MAKE A NO-SEW GNOME BASIC TIPS AND TRICKS
Plus, you can make the beard in your own chosen color scheme to go with your chosen decor. Which is SO FUN! So, grab a bit of fleece and let’s get started.

No Time to Make This Now? Pin it for Later
You’re busy, I get it. Pin this to your favorite gnome patterns board on Pinterest and it’ll be here when you’re ready.

As an Amazon Associate, I can earn from qualifying purchases.
Tips to Make this No-Sew Gnome Unicorn
- The basis for this gnome is my easy no-sew gnome pattern here – the no-sew Tucked Gnome (still holding strong as my most popular gnome pattern). A truly simple gnome, it comes together quick, and is planned out to reduce the number of cuts. Plus, you can get the pattern AND cut files for Cricut or Silhouette here to make it so you never have to pick up a pair of scissors.
- One of the best parts about making gnomes is the noses. I generally make my gnome noses with any round, beige thing that works. It could be a wooden ball or a wood beads like these. For this gnome, though, I used polymer clay ball to match the feet!
- This particular beard is not made using my typical methods. This one is a custom beard just for this gnome made using wool roving like this. With a little bit of patience and some hot glue, the bead comes to life so fast!

Get the Gnome Pattern
Click below to add the gnome pattern to your cart. Have fun creating!
How Do I Make this Unicorn Gnome?
I’m so glad you asked. Below is our written tutorial. If you’re making a fun DIY gnome playlist on YouTube, here is our DIY unicorn gnome video tutorial.
Unicorn Gnome Pattern

So simple you can make this easy unicorn gnome pattern in just a few minutes without a moment of sewing!
Materials
- Tucked Gnome Pattern
- Tucked Gnome Pattern SVG Set, optional
- 1/4 yard White Fleece Fabric
- 1/4 yard Pink Fleece Fabric
- Rainbow Roving
- Felt Scrap Piece for Beard Backing
- Poly-Beads
- Small Amount of Poly-Fill
- 3 12-inch lengths Floral Wire
- Polymer Clay in Light Brown and White
- Unicorn Headband
- Cupcake Pick
- Tiny Plastic Flowers and Nail Polish to Paint Them, optional
- Small Piece of Gold Thread
Tools
- Hot Glue Gun and Glue
- Razor Blade or Craft Knife
- Scissors
- Wire Cutters
- Comb
Instructions
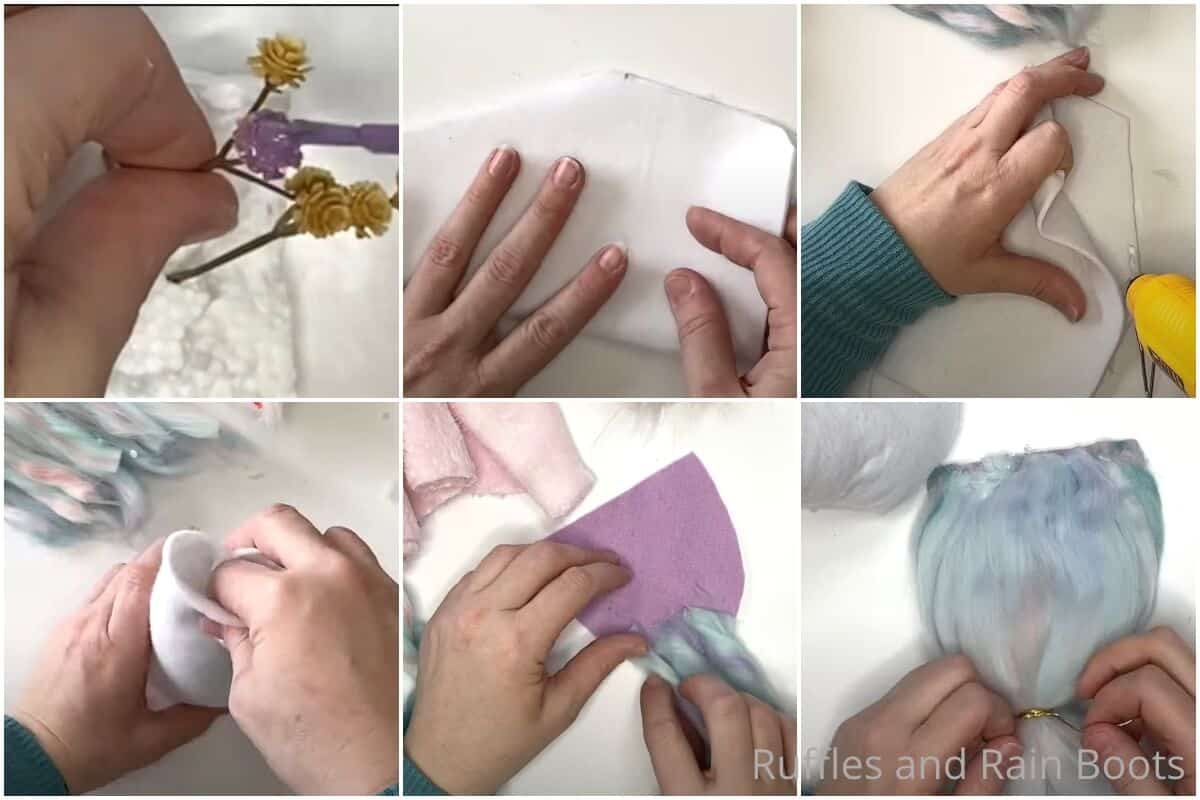
- Start by painting your flowers, if necessary. I painted mine with nail polish in multiple colors. Allow the flowers to dry completely.
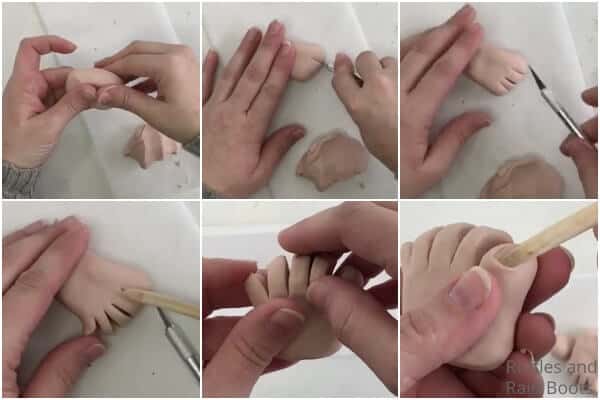
- Make your gnome nose and feet by preheating your oven per the directions on your polymer clay packaging. Then combine a portion of light brown and white polymer clay until you have the color you want.
- Roll a quarter-sized portion of this clay into a neat ball. This is the nose. Set aside.
- Repeat rolling two additional balls of clay slightly smaller than the first. These will be the hands. Set aside.
- Break off two equal sized portions of clay about the size of half of your palm and about 1/2 inch thick. Form each into similarly sized rectangles, longer and thicker on one end (slightly) than the other.
- With your craft knife, cut 5 slots into one long side of each rectangle about 1/3 of the way through the rectangle. These form the toes. Using your finger or a flat-sided tool, round over the edges of each toe. With the craft knife, flatten and scrape a little bit on the top of each toe to form a toenail.
- Bake the polymer clay feet, hands and nose per the directions on your polymer clay packaging. Allow them to cool completely before handling.

- To make the gnome, trace and cut out one large gnome body shape from the white fleece fabric. Additionally, fold the pink fleece fabric over and cut one hat shape from the pink fleece fabric.
- Fold the gnome body shape in half and run a hem along the open side with your hot glue. Fold the flap of the gnome body shape over and close the bottom of the gnome with hot glue or a seam. Allow the glue to dry fully.
- Fill the gnome body with 1-2 cups of Poly Beads. Tuck a small portion of Poly-Fill into the top of the gnome body to hold the Poly Beads inside.
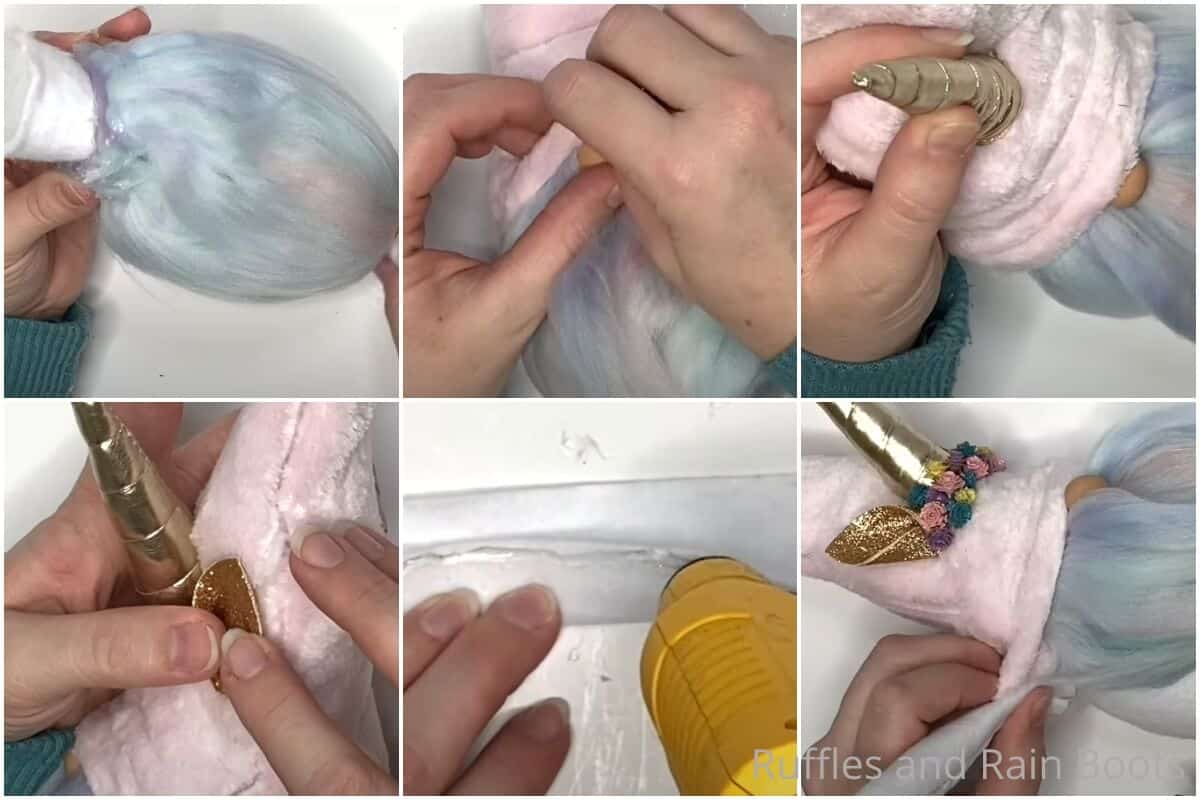
- With your hot glue gun, run a hem along open side of the hat piece. Allow glue to dry completely. Fill the hat a little with a small amount of Poly-Fill if you want a pointy hat; if you want a floppy hat, just put a tiny amount of Poly-Fill in the hat. To make the hat bendy and shapeable, hot glue a floral wire into the hat by bending one end over to make a small loop (so the wire won't poke through the fleece) then hot gluing the wire into the hat along the seam. Trim the wire to end just inside the bottom of the hat and bend this end of the wire over to make a small loop, then hot glue this in place as well,
- Cut out out a "u" beard shape from the felt scraps about 4-inches wide at the top and about 4 inches long. Hot glue 6-8 inch strips of the roving in layers onto the felt piece, hot gluing just the ends, leaving the larger part of the roving loose. When you have built-up your beard to an adequate fluffiness, gently comb the roving into a neat beard shape, trimming it as necessary. Tie the bottom of the beard with the gold thread, for a cute addition.

- Affix the beard to the gnome by hot gluing the felt backing of the beard to the body, about 2 inches below the top edge of the gnome body. Hot glue the nose in place about 1-inch below the top of the beard. Add a piece of the roving under the nose, gently combed out, to form a mustache, if desired.
- Place the hat on top of the gnome's head, tucking it down over the top of the nose. Squish it down snugly, making several wrinkles to help support the horn. You may need to hot glue the wrinkles in place. But wait to do so until you have the horn in place.
- Hot glue the hat in place in the back and sides of the gnome, in just a couple of places--not the whole way around, then one little dot on the nose to make a wrinkle (this is the best part).
- To add the horn, remove the horn from the headband along with the ears. Place the horn directly above the nose of the gnome, about 3 inches above it, leaving plenty of room in the hat for the wrinkles noted in the last step. Hot glue the horn in place, at an angle. To ensure that the horn holds this desired location, you will need to add hot glue to both the bottom of the horn and the back of the horn, to allow the hat to pull the horn vertical.
- Fold the sides of the ears inward and hot glue them in place, then hot glue an ear on either side of the horn. Cover your hot glue work at the base of the ears and horn by adding the little plastic flowers.
- Cut out two arm shapes from the white fleece. Place a line of hot glue down one long side of the arms and hem it. Fill each arm with a tiny amount of Poly-Fill, followed by a small length of floral wire, to make the arm bendy.
- Slip the arm up into the hat on the side and hot glue it in place. Hot glue the hands in place on the ends of the arms. Place the cupcake floral pick piece between the arms, hot gluing them in place.
- Hot glue the back of each foot to the bottom of the gnome, leaving the toes peeking out on either side of the beard. Then display your gnome!
Notes
This gnome stands 10-inches (ish, depending on how twisty you make your hat, of course).
For more fun no-sew patterns for gnomes, visit Ruffles and Rain Boots (we have lots...).
Recommended Products
As an Amazon Associate and member of other affiliate programs, I earn from qualifying purchases.


More Easy No-Sew Gnome Tutorials You Might Like
- No-Sew Mini Farmhouse Gnome Pattern – They’re tiny, perfect for a farmhouse tiered tray, and they’re kissing – such a fun pattern.
- DIY Farmhouse Sock Gnome without Sewing – My most popular gnome tutorial ever, you can make a gnome for any occasion without a pattern at all!
- Bubble Body Gnome Pattern – No-sew or sewn, if you would prefer, this easy two-way pattern is about the funnest little gnome ever!
Please Save This to Pinterest
Your shares are how this site grows and I am sincerely grateful. Know a friend who’d like this? Please share it on Facebook or save it to your favorite easy crafts board on Pinterest.
Meet the Creator
Hi there, I’m Sarah Nenni-Daher. I’m a crafty gal and always have at least 14 projects going at once. I am a crafter, designer, DIYer, and pattern maker. I share my creations here and in the Ruffles and Rain Boots® Shop.
Here at Ruffles and Rain Boots®, you’ll find DIY gnomes, crafts, gifts, cupcakes, laser crafts, and so much more. I love sharing video tutorials over on YouTube and chatting with other crafters in my Facebook groups. We’d love to have you!