
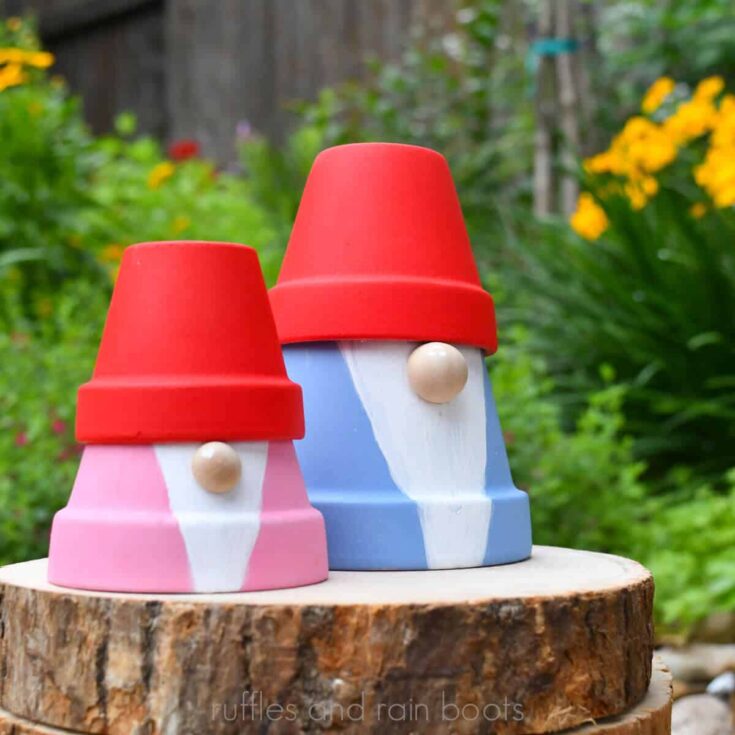
The Cutest Flower Pot Gnomes Craft
You can make these flower pot gnomes with paint, a bead, and dollar store clay pots. They can be made any size, so if you have terra cotta pots on hand, use those.
This painting project can be set up for kids or adults and they’re so much fun to decorate. And it’s so easy to match any theme, holiday, occasion, or decor!

RELATED READING: Clay Pot Garden Gnome DIY – It Went Viral for a Reason!
What You'll Find On This Page
Easy Painted Gnomes Craft
Here at Ruffles and Rain Boots, I’m known throughout the Internet as someone who makes a lot of DIY gnomes, free gnome patterns, and other fun gnome crafts. It’s something I’ve been doing for years, long before their new-found popularity here in the States.
This easy craft can be set up like so many others: with a couple of basic craft supplies like paint and glue and a trip to the Dollar Tree or other dollar store. Clay pot crafts are so much fun for kids and adults because the “body” is done for you!
If you want to set up this fun gnome painting craft but can’t begin now, save this to a DIY projects pin board or share it to Facebook. Either way will make it easy to find when you’re ready to begin.

As an Amazon Associate, I could earn from qualifying purchases. There could be affiliate links within this article.
RELATED READING: The Original Pot Head Gnomes (So Cute and Simple)
Materials for Clay Pot Gnomes (for Kids or Adults)
Head over to the dollar store for the terra cotta pots. They come in multiples (smalls have three, medium has two pots) and are perfect for this craft. You will need:
- clay pots in two sizes
- paint
- a gnome nose (wood ball, bead, etc.)
- paint brush
- glue gun or E6000
Best Paint for Garden Gnomes
I want to put a note to state that if you are putting these outside, dollar store paint might not be the best for this project. When I shared how to restore a garden gnome, I recommended the following because they work and they hold up!
- Primer – The colors will be SO much better! I use this primer on all outdoor projects because it holds up.
- Outdoor Paint – This is the outdoor paint set I used and it has held up well.
- Sealant – You will need a tested winner for an outdoor sealant with UV protection like this.
Flower Pot Gnomes Video Tutorial
If you’re a visual learner, see how fun this project can be with the flower pot gnomes video tutorial. While you’re there, be sure to subscribe – we have a lot of fun.

How to Paint a Gnome Clay Pot
Spray paint the pots or paint them white. This will help any color really POP and works great when using cheap paint.

Turn both pots upside down (so the opening is at the bottom). Paint the “top” pot (the gnome hat) one or two coats of a color. Set aside to dry fully.
Paint the “bottom” pot (the gnome body) another color, leaving room for a white gnome beard. An upside down triangle or a U-shape both work great for this. Repeat with another coat of paint, if necessary. Set aside to dry fully.

Glue the smaller pot onto the top pot with a generous line of glue along the edge (not on the flat surface, but the brim). Let dry fully before moving.

Glue on a small wood ball or round for a nose and display your flower pot gnome!

Note: once all paint and glue is dry, you can spray them with a sealant to place outdoors or to avoid scratching the paint.
More Easy Crafts You Might Like
- Clay Pot Bees Craft Project – This fun craft idea is adorable and perfect to make when it’s too hot to go outside.
- Adorable Clay Pot Mushrooms – Spruce up the garden with a bit of paint and some upside down terra cotta pots.
- Cute Clay Pot Unicorn DIY – Need a quiet and creative distraction? Set up this easy unicorn craft idea and enjoy the silence.
Please Save or Share This Terra Cotta Pot Gnome Craft
Your shares are how this site grows and I am sincerely grateful. Please save this to a DIY projects pin board or share it with a crafty group on Facebook.

Flower Pot Gnomes Craft
These terra cotta pot gnomes are the cutest craft for kids and adults. Flower pot gnomes are easy to create with a paint of paint and some glue, so let's grab a few basic craft supplies to get started. Set up this easy DIY gnome craft for kids or adults and follow the lessons learned or paint tips to make the colors pop!
Materials
- Clay Pot (Small, about 2 inches)
- Clay Pot (Medium, about 3 inches)
- Wood Ball or Half Back
- Paint (two colors and white for the beard)
- Optional, Spray Paint
- Optional, Sealant
Tools
- Paintbrush
- Glue Gun and Glue Sticks (or E6000)
Instructions
- Optional: spray paint the pots or paint them white. This will help any color really POP and works great when using cheap paint.
- Turn both pots upside down (so the opening is at the bottom). Paint the “top” pot (the gnome hat) one or two coats of a color. Set aside to dry fully.
- Paint the “bottom” pot (the gnome body) another color, leaving room for a white gnome beard. An upside down triangle or a U-shape both work great for this. Repeat with another coat of paint, if necessary. Set aside to dry fully.
- Glue the smaller pot onto the top pot with a generous line of glue along the edge (not on the flat surface, but the brim). Let dry fully before moving.
- Glue on a small wood ball or round for a nose and display your flower pot gnome!
- Optional: once all paint and glue has dried, spray them with a sealant to place outdoors or to avoid scratching the paint.
Meet the Creator
Hi there, I’m Sarah Nenni-Daher. I’m a crafty gal and always have at least 14 projects going at once. I am a crafter, designer, DIYer, and pattern maker. I share my creations here and in the Ruffles and Rain Boots® Shop.
Here at Ruffles and Rain Boots®, you’ll find DIY gnomes, crafts, gifts, cupcakes, laser crafts, and so much more. I love sharing video tutorials over on YouTube and chatting with other crafters in my Facebook groups. We’d love to have you!