
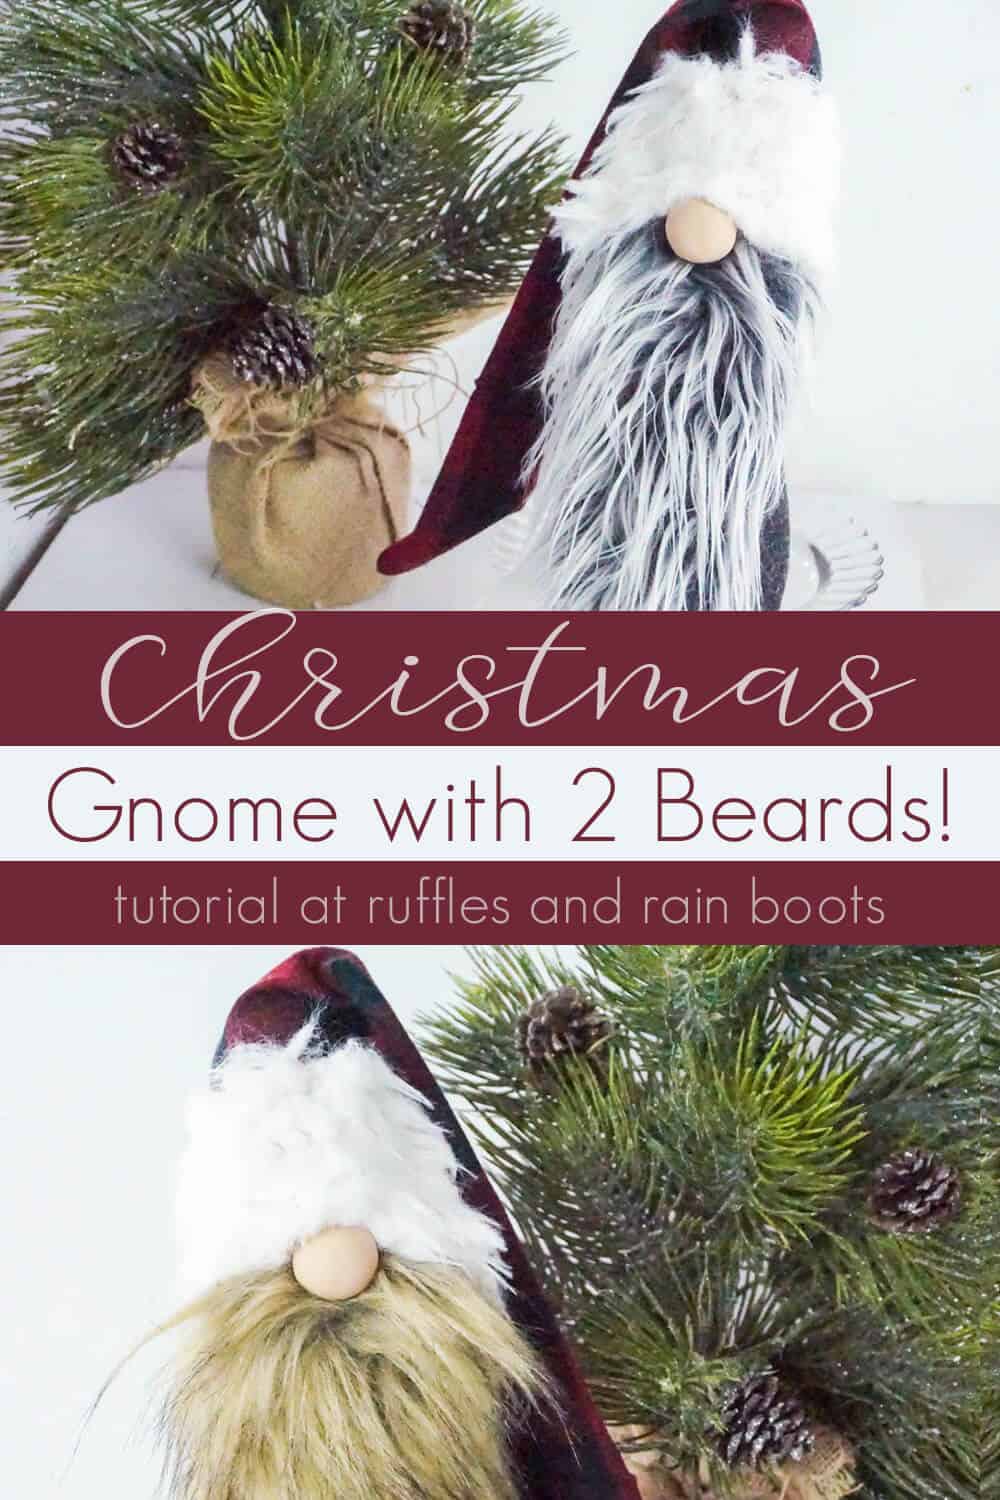
This Lumberjack Christmas Gnome is so Easy, You Can Make it in Minutes
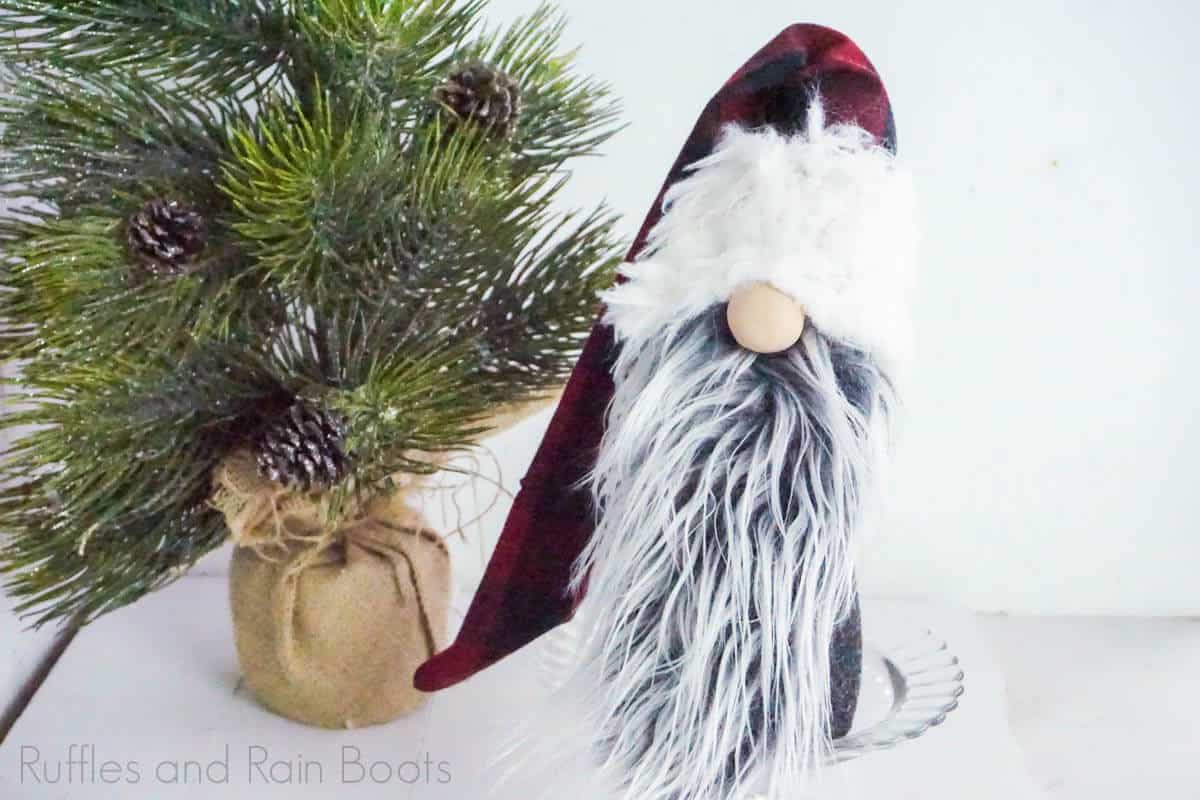
When I needed a holiday gnome, I knew making a buffalo check gnome was in my future. And so this lumberjack Christmas gnome was the result. So easy, but the perfect holiday decor!
What You'll Find On This Page
Lumberjack Christmas Gnome
Here at Ruffles and Rain Boots, we are all about the awesome holiday gnome. So many fun ones I’ve made, but this lumberjack Christmas gnome has a special place in my heart. I mean, look at that face! He’s so grumpy, but so cute. But the real magic is in his interchangeable beards.
RELATED READING: MR. AND MRS. CHRISTMAS GNOMES
Yeah, that’s right, this buffalo check gnome can swap beards! Isn’t that insane?! I am still in awe that I came up with this idea. It’s so awesome. If you’re ready to make a fun holiday gnome with two beards, let’s get started.
DIY Christmas Gnome Tutorials
If you’re looking for the best DIY Christmas gnome tutorials, you have come to the right place. Check out all of my favorite tomte tutorials for the holidays!
No Time to Make This Now? Pin it for Later
You’re busy, I get it. Pin this to your favorite Christmas decor ideas board on Pinterest and it’ll be here for when you’re ready.

As an Amazon Associate, I could earn from qualifying purchases.
Tips to Make a buffalo check gnome
- For the supplies I use on my gnomes, see this list. I have many different options for fur, noses and hands, and staples you will need to have on hand.
- He needs a large nose, this buffalo check gnome does. I mean, normally, I don’t go for big-nosed guys, but this one, because of his design and just all that extra fluff from the hat brim, the nose has to be a little big.
- Click here for the free printable Christmas gnome pattern. You could try to make him without a pattern, but it’s so much easier with it. Trust me.
- If you feel like this little Christmas gnome is looking kind of drab on your shelf, grab the other beard and swap it out! That makes for an awesome change of looks in a few seconds!

How Do I Make this Lumberjack Christmas Gnome?
I’m so glad you asked. Below is our written tutorial.
Lumberjack Christmas Gnome

When I needed a holiday gnome, I knew making a buffalo check gnome was in my future. And so this lumberjack Christmas gnome was the result. So easy, but the perfect holiday decor!
Materials
- 2 Cups Dry Rice
- Polyfill
- Polymer Clay (for gnome nose):
- 1 small, 1 dime-sized portion of brown
- 2 quarter-sized portions of white
- ¼ yd Charcoal or Black Craft Felt
- ¼ yd Buffalo Check Fabric
- ⅛ yd Fluffy White Fabric
- Printable Template/Pattern
- Mongolian Fur in Grey and Brown
- Velcro Dots or Strip
- Lumberjack Gnome Pattern
Tools
- Hot Glue Gun & Glue
- Scissors
- Exacto Knife (to cut the fur)
- Wax Paper
- Oven
- Sewing Machine
- Black or Charcoal Thread
Instructions
- Start making your gnome nose by combining the brown and white polymer clay until a flesh-color is consistent throughout.
- Roll the clay into a neat ball, making sure it’s smooth all the way around.
- Bake in the oven per the polymer clay package directions. Allow to cool before touching. Set aside.
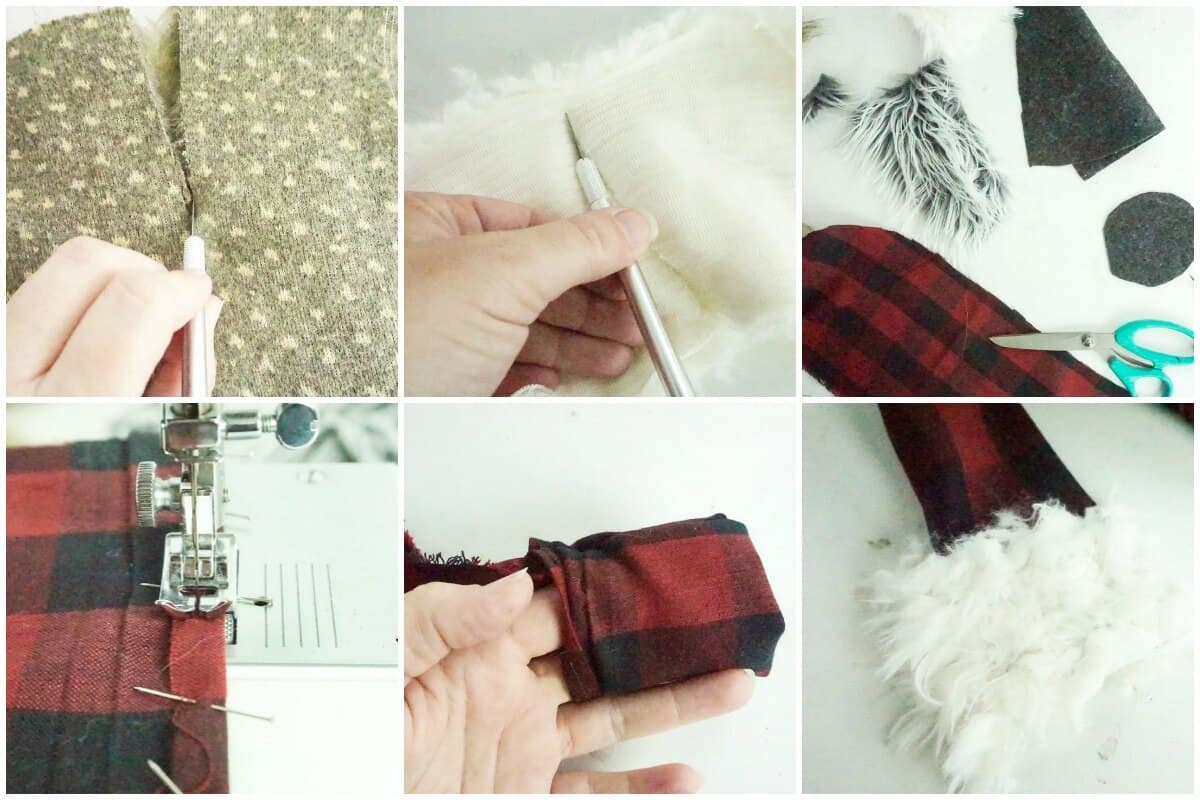
- Cut out the following:
- 1 body from printable pattern in Black Craft Felt
- 1 circle base from printable pattern in Black Craft Felt
- 1 small rectangle about 2-inches long by ½-inch wide in Black Craft Felt
- 1 triangle about 24-inches long with a base of about 8-inches wide in Buffalo Check Fabric
- 1 large rectangle of Fluffy White Fabric about 8 ½-inches long by 4-inches wide
- 1 beard triangle shape from each color of the mongolian fur (using the exacto knife on the back side of the fur, being careful not to cut the fur itself)
- 1 small rectangle from each color of the mongolian fur, parted, for mustaches, optional
- To assemble the gnome body:
- Fold the body cutout in half vertically with the outsides facing inward.
- Pin in place and sew that hem, leaving both ends open.
- Pin the circle base to the wider end of the open cone and sew in place.
- Turn the cone right side out.
- Fill the base with rice and tuck a bit of polyfill to fill it to the top to keep the rice from falling out and ensure that the gnome body has nice shape.
- Set aside.
- To assemble the hat:
- Fold the hat triangle cutout in half vertically with the outsides facing inward.
- Pin in place and sew that hem.
- Fold the opening of the hat outward by ¼ inch and pin in place. Sew that hem.
- Turn the hat right side out.
- With hot glue gun, tack the Fluffy White Fabric rectangle cutout onto the bottom hem, all the way around the hat base. Whipstitch in place.
- Trim all strings.
- Add 1-2 handfuls of polyfill to hat base to give it some fluff.

- To assemble the gnome:
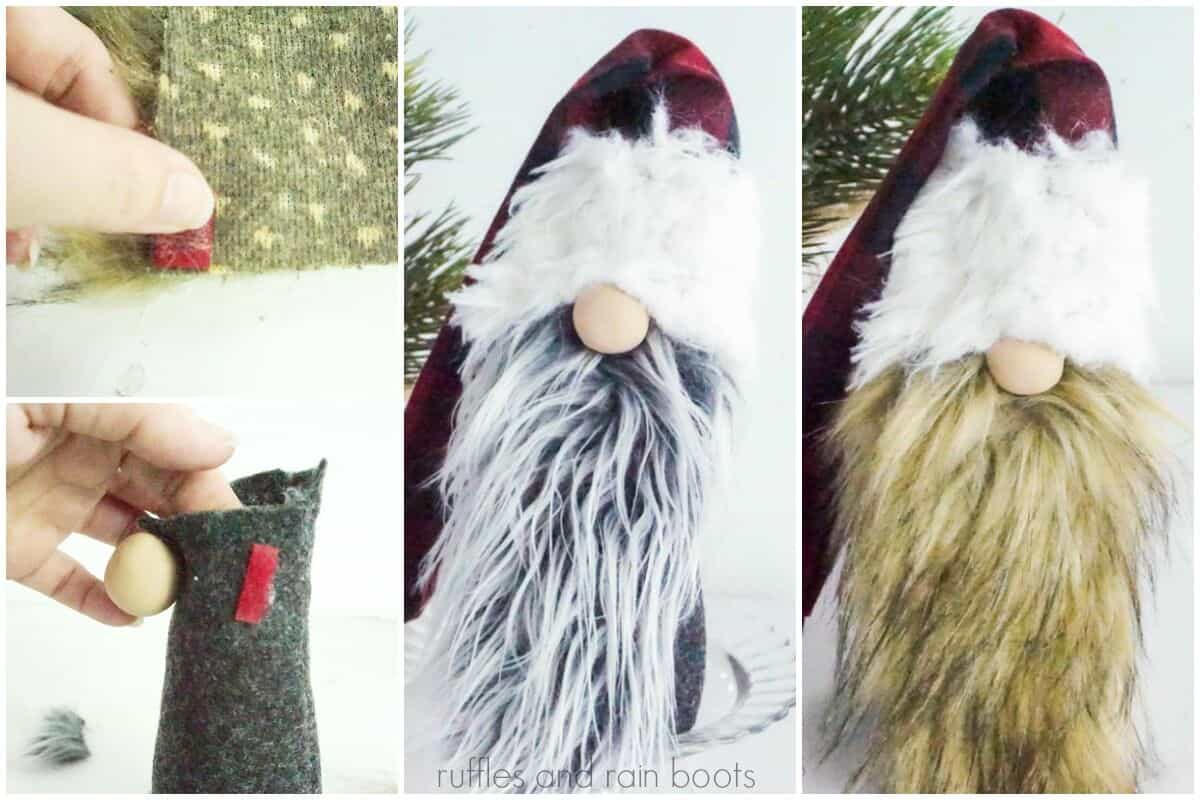
- Whip stitch or hot glue the small rectangle of Black Craft Felt onto the inside of your gnome body on one end, so that it can flip outward and lay on the outside of the gnome body, creating a flap.
- Hot glue gnome nose in place on the end of that flap.
- Set hat on top of gnome body, tucking the top of the body into the hat and wrinkling hat down on nose and hot glue hat in place in that wrinkle onto the nose. Also hot glue the back of the hat down, but leave the front and sides loose.
- Hot glue mustaches in place on each beard.
- Place a beard on the front of the body, where you want it to lay, and mark the uppermost corners.
- Hot glue or whip stitch soft velcro onto the marked locations for the beard corners.
- Hot glue or whip stitch prickly velcro onto the corresponding corners on the two beards.
- Flip the nose up, tuck the beard under it and put in place with the velcro.
- Flip the nose back down and hot glue the hat in place in all locations not interfering with the beard’s movement.
- Enjoy!
Notes
For more fun holiday gnome tutorial ideas, visit Ruffles and Rain Boots.
More Holiday gnome tutorials You Might Like
- Christmas Gnome Ornaments – If you need nisser for your Christmas tree, these adorable Christmas gnome ornaments make for the best ideas. You’ll find so many fun ideas here.
- The Best Christmas Gnome Tutorials Ever – Over 75 tutorials and videos for making an awesome Christmas nisse (or 10) for the holidays.
- Scandinavian Christmas Gnomes – So cute, and seriously the best tomte tutorials you need to check out. We update it all the time, so be sure to bookmark it.
Please Save This to Pinterest
Your shares are how this site grows and I am sincerely grateful. Know a friend who’d like this? Please share it on Facebook or save it to your favorite Christmas decor crafts board on Pinterest.
Meet the Creator
Hi there, I’m Sarah Nenni-Daher. I’m a crafty gal and always have at least 14 projects going at once. I am a crafter, designer, DIYer, and pattern maker. I share my creations here and in the Ruffles and Rain Boots® Shop.
Here at Ruffles and Rain Boots®, you’ll find DIY gnomes, crafts, gifts, cupcakes, laser crafts, and so much more. I love sharing video tutorials over on YouTube and chatting with other crafters in my Facebook groups. We’d love to have you!