
Modern Christmas Tree Decor DIY
This modern Christmas tree DIY takes a few pieces and turns them into wow-worthy art. Turn this into a wall hanging or tuck it under an entryway table for stunning holiday decor.

RELATED READING: DIY Christmas Tree Gnome (So Adorable!)
What You'll Find On This Page
DIY Christmas Tree Decor
Here at Ruffles and Rain Boots, I’m a firm believer that when you find an amazing staple, you share it. So, here I am sharing the best-ever sprigs I’ve found to use for holiday decor, floral arrangements, and door hangers. They have four distinct ways to use them.
I picked up the wall art on clearance knowing I wouldn’t use the front as it was, but the back was stunning. Just a reminder to keep your eyes open for anything!

As an Amazon Associate, I could earn from qualifying purchases. There could be affiliate links within this article.
RELATED READING: DIY Grinch Ornaments for the Christmas Tree
What You Will Need
- wooden slat wall decor or another solid piece
- the best-ever pine sprigs (seriously, I love these and have purchased them many times)
- small Christmas ornaments (mine were about 2 inches)
- hot glue gun, wire cutters, and scissors
Note that I also swapped around my hardware – I used the same hanger and screws from the piece I purchased. I also used spackle and some paint to hide the holes.
Modern Christmas Tree Decor Video Tutorial
If you want to watch this come together, here is the quick, modern Christmas tree decor video tutorial. While you’re there, be sure to subscribe – we have a lot of fun on the channel.

How to Make This Fun Christmas Decor DIY
I flipped the entire piece over and will be working on the back. I loved this because I can store it and the decorations will be protected inside of the picture itself.
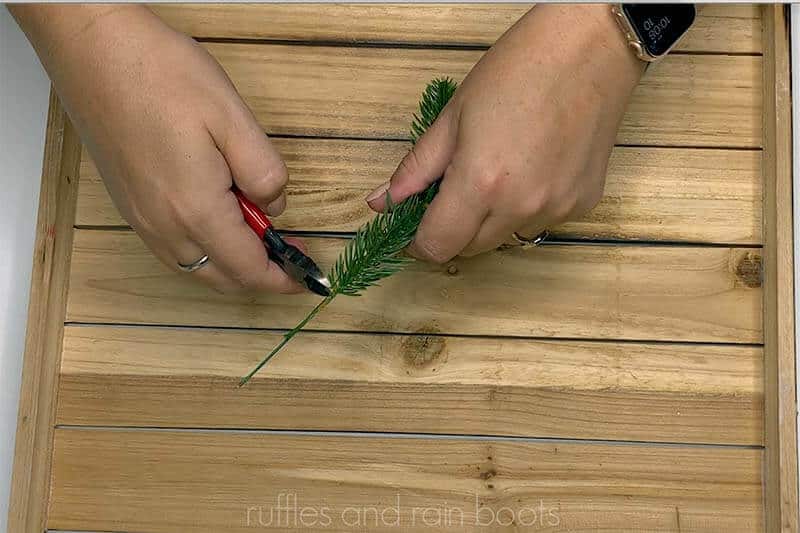
Lay out the pine sprigs in a triangle shape resembling a Christmas tree. I used the wire cutters to remove sections from some branches. The cut off pieces were used at the top to finish the tip of the tree, so keep those.
Once you have the placement of the sprigs, use hot glue to secure them into place. I held each one for about thirty seconds.
After each sprig is dry, bend the ends / tips towards the hanging to give it nice, polished look.

Glue on the Christmas baubles under the sprigs, add on the hanging hardware, and your easy Christmas project is done and ready for display.

More Crafts You Might Like
- Easy Ribbon Christmas Tree – This easy decor DIY is a fun way to use pretty ribbons or fabric scraps in your decorating.
- Easy Painted Glass Tumblers for Christmas – Whether you’re making them for yourself or as holiday gifts, these are a lot of fun.
- 3D Felt Christmas Trees – Get the free felt Christmas tree pattern and make these fun, dimensional decorations.
- DIY Yarn Christmas Trees – A little yarn plus some scissor-snipping fun and you’re left with these fluffy trees.
Please Save or Share This Fun and Easy Christmas Decor Idea
Your shares are how this site grows and I am sincerely grateful. Please share this with a crafty group or save it to a DIY holiday crafts ideas pin board.

Meet the Creator
Hi there, I’m Sarah Nenni-Daher. I’m a crafty gal and always have at least 14 projects going at once. I am a crafter, designer, DIYer, and pattern maker. I share my creations here and in the Ruffles and Rain Boots® Shop.
Here at Ruffles and Rain Boots®, you’ll find DIY gnomes, crafts, gifts, cupcakes, laser crafts, and so much more. I love sharing video tutorials over on YouTube and chatting with other crafters in my Facebook groups. We’d love to have you!