
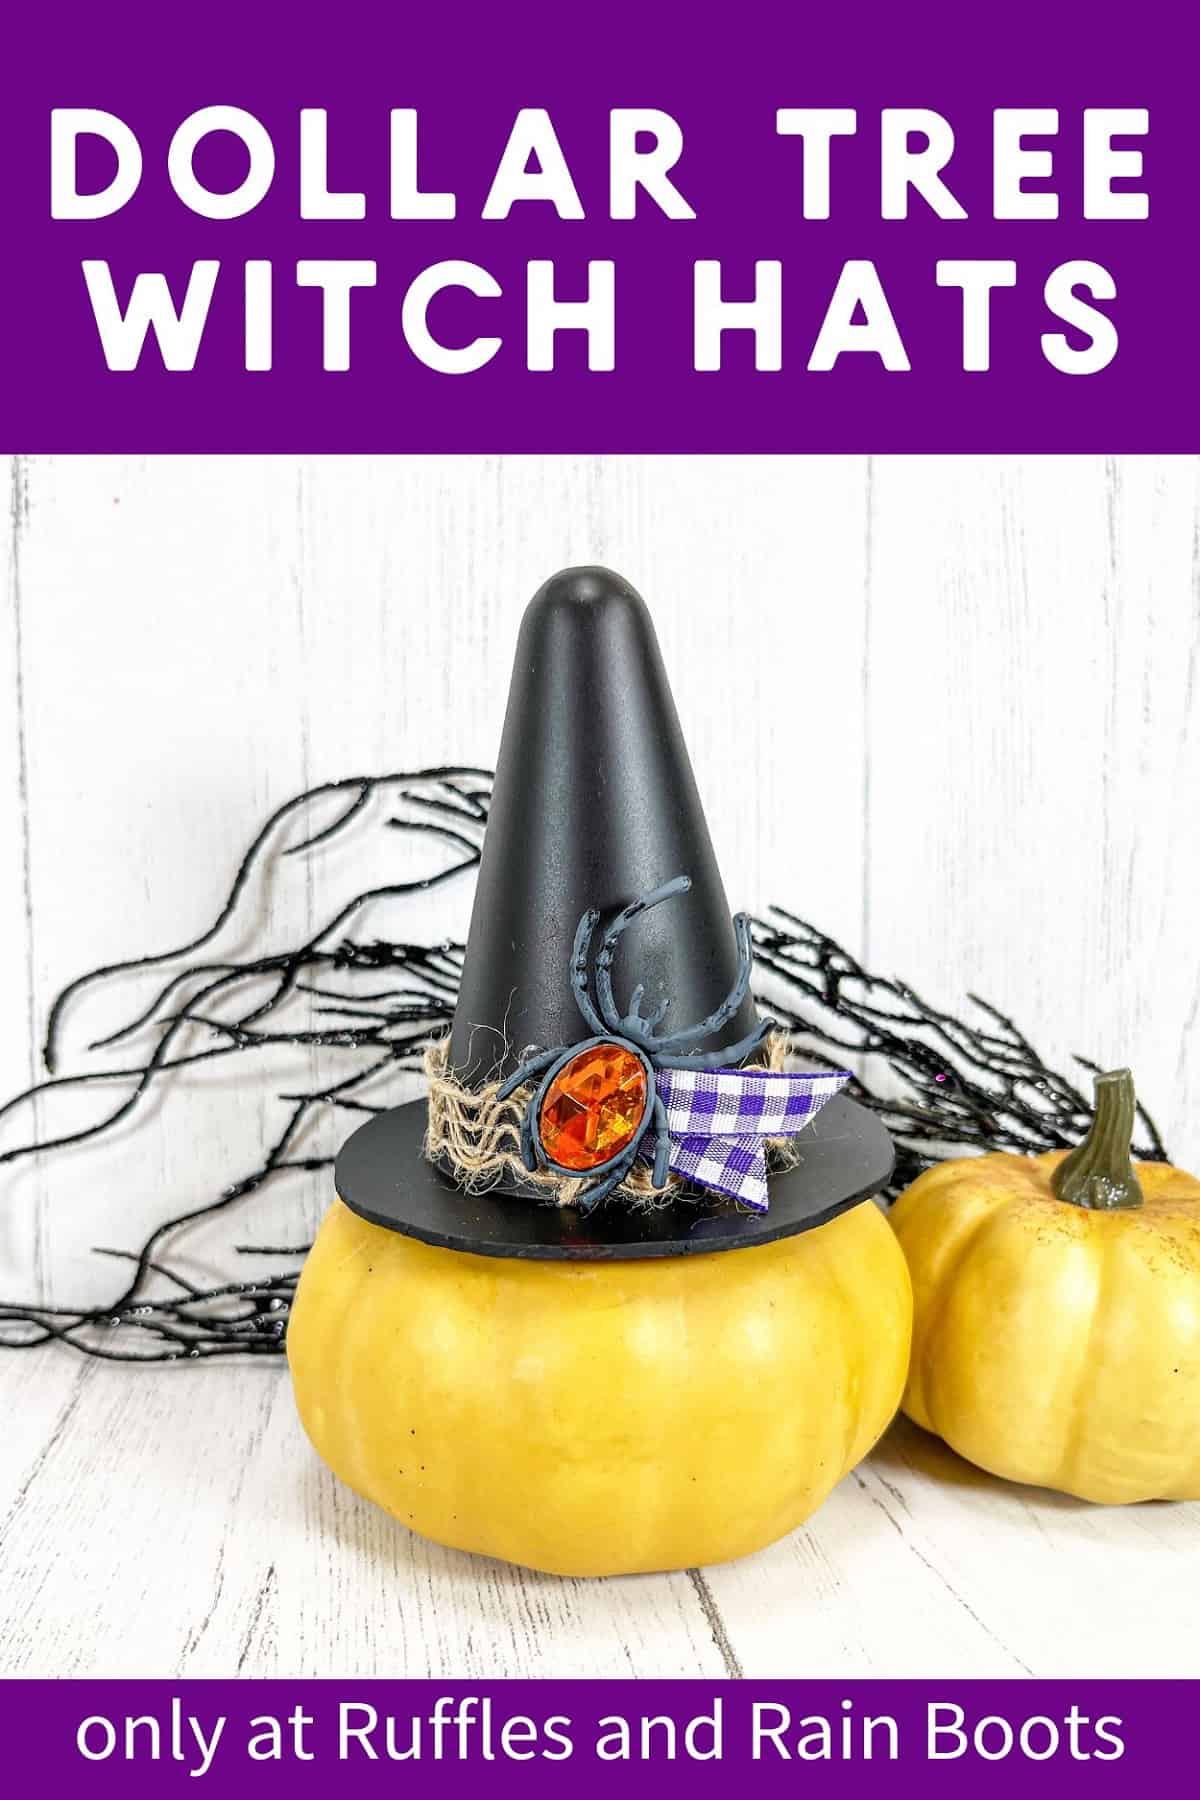
Dollar Tree Witch Hat Craft for Halloween
If you are looking for something to make during the spookiest of seasons, you will be transfixed by this Dollar Tree Halloween craft – it’s an adorable witch hat craft. It is cute, quick, and only slightly scary!
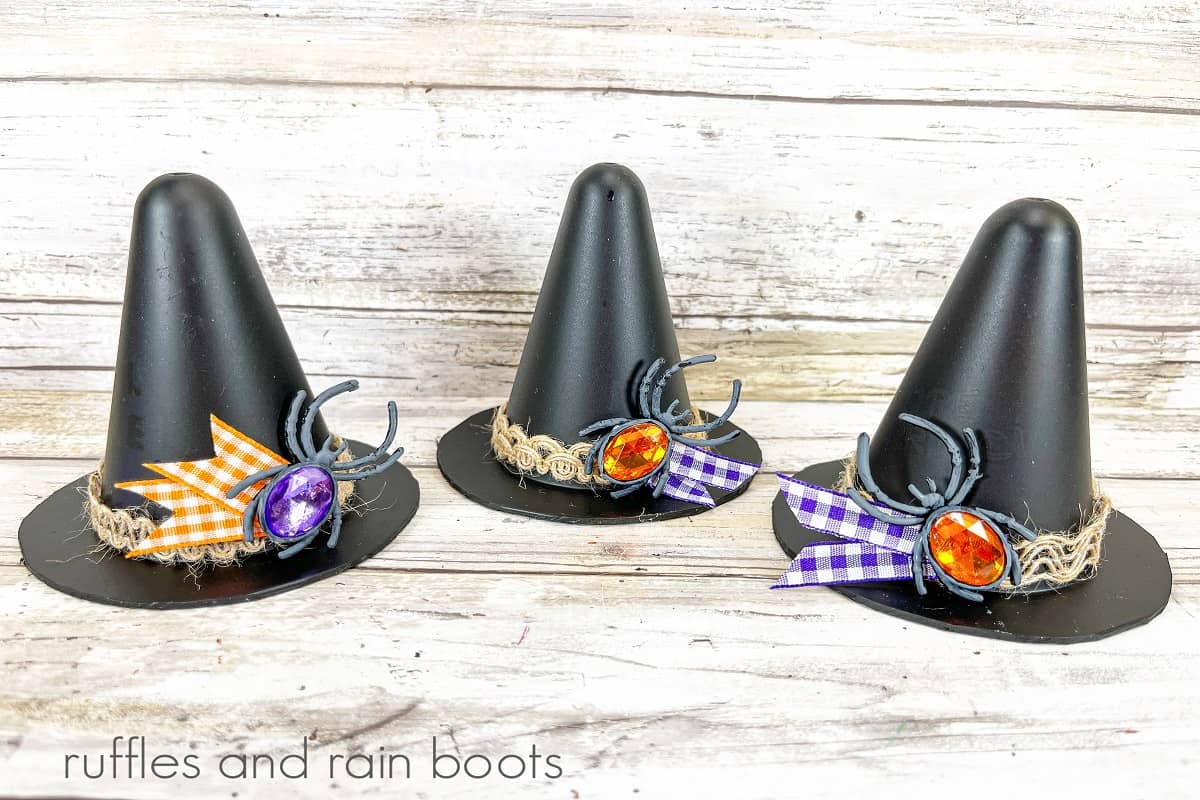
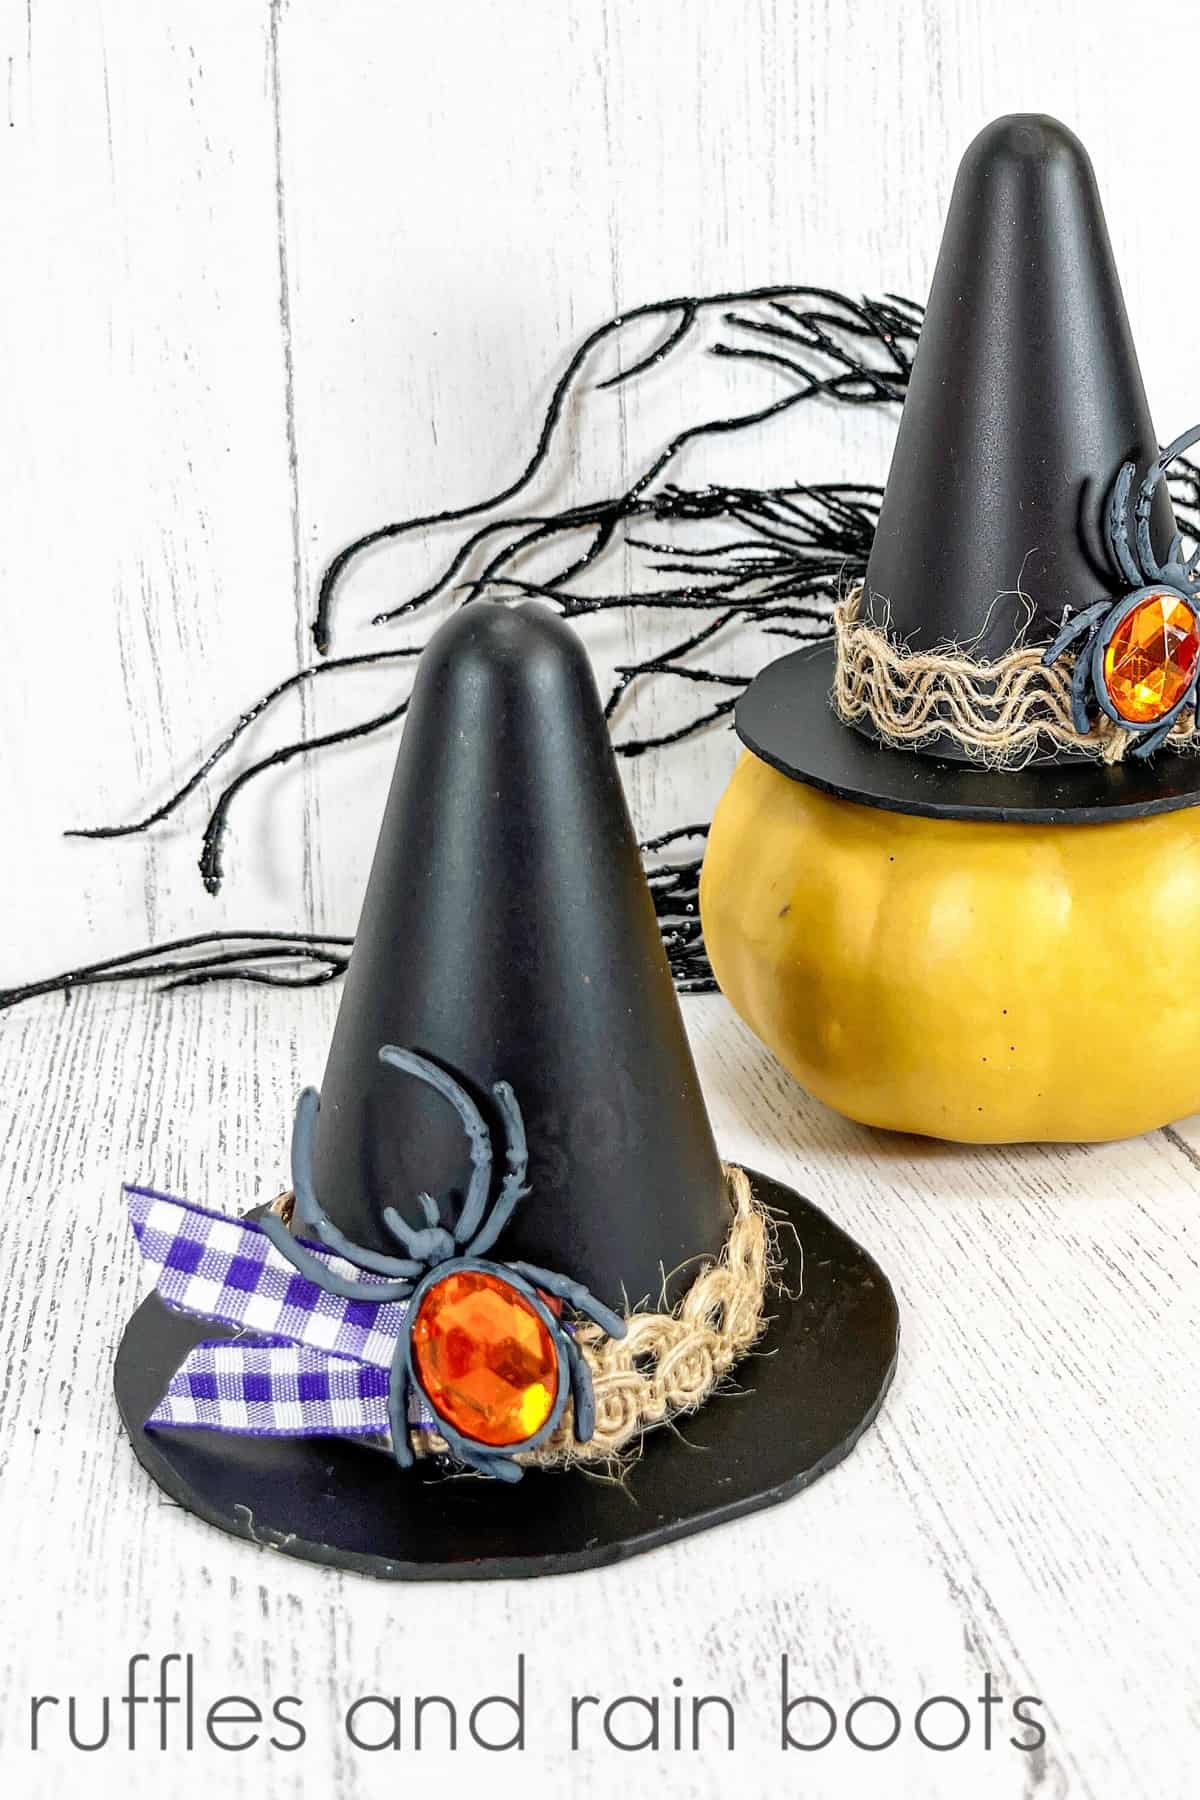
Who knew some inspirational mini cones from the Dollar Store could transform into something so unique? We have to admit, these little witch hats are quick to become one of our favorite Halloween crafts.
RELATED READING:
What You'll Find On This Page
Dollar Store Mini Cone Witch’s Hats
Here at Ruffles and Rain Boots, we love to decorate and dress up for Halloween. Now that the kiddo is older, she can help with her costume and making decorations for the house. We love to make our home a bit spooky but family-friendly too.
If you have about 30 minutes to spare, you can make a trio of these cute little hats. And that includes the time it takes for the paint to dry! What a great way to spend a small part of your day making something so cute it is bound to bring smiles to anyone who sees them.
If you need to gather your supplies for this mini witch’s hat craft for Halloween, bookmark this page to make it easy to find when you are ready.
As an Amazon Associate, I could earn from qualifying purchases. There may be affiliate links within this article.
Why These Witch’s Hats Make A Great Craft
They are cheap and quick…two words we like when it comes to making a craft. You can make three witch hats for less than $3 and no more than 30 minutes.
Grab the kids! They can help you make these little hats. Depending on the age of your kiddo, they can paint and glue and possibly cut the bottom of the cone. This does take some strength, so an adult may need to intervene at this step.
They are so stinking cute! The jeweled spider rings add just the right touch of the creepy and kooky factor without going over the top.
RELATED READING:
Tips for Making Halloween Witch Hats
- Because these mini cones are brightly colored and have inspirational wording on them, you will most likely want to paint two coats of black multi-surface craft paint. You could also use a primer if you like, but we don’t feel it is necessary.
- If you cannot find multi-surface craft paint, you can also use black spray paint in a well-ventilated area. We suggest spray painting outdoors if the weather permits.
- We love the burlap trim on these mini cone witch for Halloween. If you prefer, any 5/8″ ribbon or trim will work just fine.
- If you can’t find them at your local Dollar Tree, I found jeweled plastic spider rings online. There are so many, you can use them for cupcakes, a surprise in a Halloween bath bomb, or wear them just because they are cool!

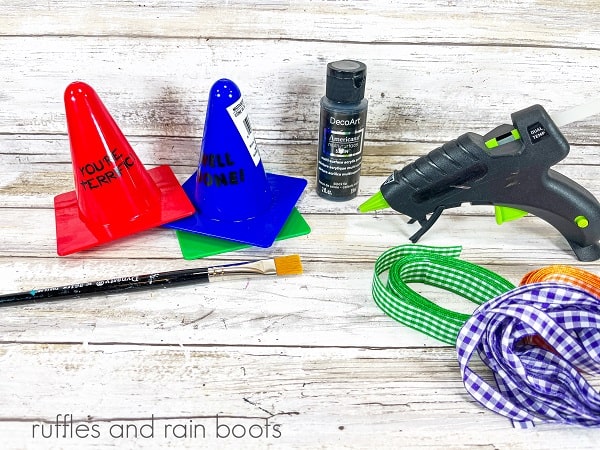
Supplies to Make Mini Cone Witch’s Hats
Below are the supplies I used to make my mini witch hats decor ideas. Before you head to the store for supplies, check your craft bin or sewing room. For information about painting these mini cones, read the tips section above.
- Mini Inspirational Word Cones
- Multi-Surface Craft Paint
- Light Grey Acrylic Craft Paint
- Burlap Trims
- Gingham Ribbon
- Spider Rings
- Permanent Black Marker
- Glue Gun and Glue Sticks
- 3.5” Circle Template
- Paintbrush
- Ruler
- Scissors
How to Make Mini Cone Witch Hats for Halloween
Each step for this craft is shown below to make it easier. Keep this page open while you create your mini cone witch hat DIY. If you would rather have a printable how-to, scroll down and select the print button.
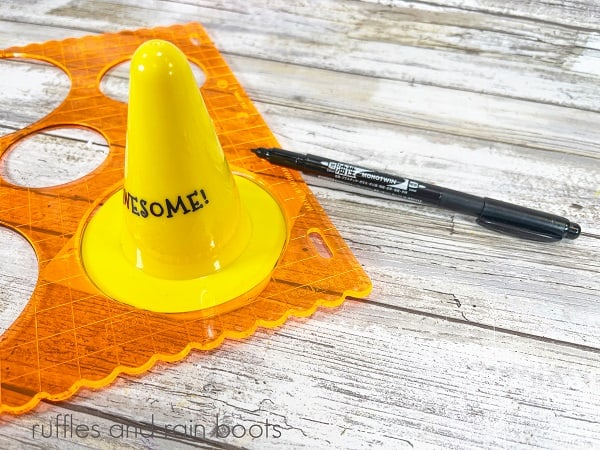
Place a 3.5” circle template over the plastic cone and trace the circle with a permanent black marker. Carefully trim the excess plastic away from the base of the cone with a pair of scissors.

Paint the plastic cones with black multi-surface acrylic craft paint. Let dry.
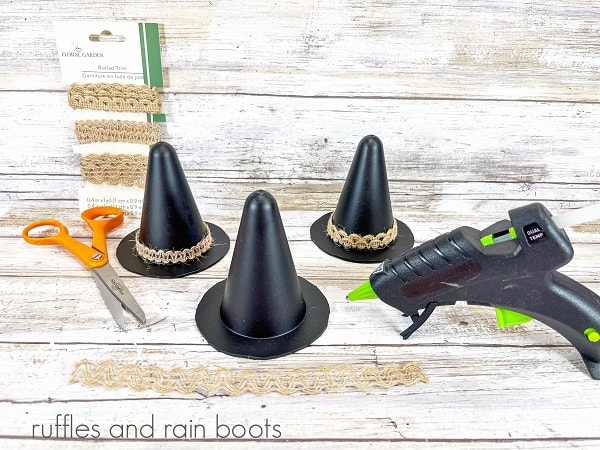
Measure and cut 8” lengths of burlap trim. Attach around the base of the cone using a glue gun. Trim any excess with scissors.

Cut the plastic circle (the part that fits on your finger) from the back of three jeweled spider rings.

Paint the legs and body of the spiders with light grey acrylic craft paint. Measure and cut 4” lengths of ribbon, fold them in half and attach them to the back of the spiders with a hot glue gun. Cut notches into the ends of the ribbons.
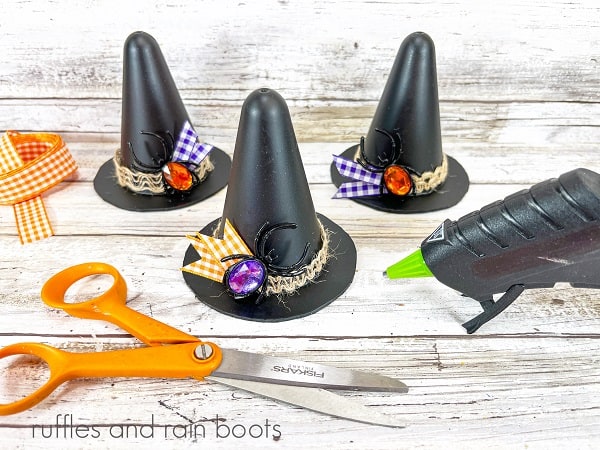
Attach the decorative spider jewel and ribbon to the hat band of the witch’s hats with a glue gun.
Notes for Making Mini Witch Hats
- The plastic these cones are made from is pretty sturdy. It may take a little muscle when you are cutting the circles out with the template.
- Can’t find the mini cones locally? Here are 4 inch plastic cones online.
- We think these mini witch hats would make a great placeholder for your Halloween party!
More Halloween Crafts You May Enjoy
- DIY Halloween Witch Gnomes: These little witch gnomes are so cute and so much fun to make! All you need are a few simple materials and you will have your witch ready to fly on her broom in no time.
- 5 Free Halloween Doormat SVG Bundle: These free files are to be used with your Cricut, Silhouette, or other cutting machine. I think my favorite file is Hey Boo! So cute and easy to make. And it’s a fun way to decorate the porch for Halloween.
- How to Make a Pirate Gnome: We promise not to make you walk the plank but we hope you make one of these adorable pirate gnomes! It even has a gold hook for a hand! Isn’t that hysterical?
- Making a Halloween Gnome Garland: These little gnomes are the perfect way to decorate the house for Halloween. The Halloween decorations would look perfect hung up in your Farmhouse style decor for the spookalicious holiday.
Please Save or Share
Your shares are how this site grows and I sincerely appreciate it. Please save this craft to your favorite Halloween pin board or share it on Facebook.

Mini Cone Witch's Hat Craft

Create these cute but not spooky witch hats in just about 30 minutes using a Dollar Tree cone and basic craft supplies. Add this to your Halloween home décor and place it on a tabletop, on top of seasonal gourds, on your mantle, or a tiered tray.
Materials
- Mini Inspirational Word Cones
- Multi-Surface Craft Paint
- Light Grey Acrylic Craft Paint
- Burlap Trims
- Gingham Ribbon
- Jeweled Spider Rings
Tools
- Permanent Black Marker
- Glue Gun and Glue Sticks
- 3.5” Circle Template
- Paintbrush
- Ruler
- Scissors
Instructions
- Place a 3.5” circle template over the plastic cone and trace the circle with a permanent black marker. Carefully trim the excess plastic away from the base of the cone with a pair of scissors.
- Paint the plastic cones with black multi-surface acrylic craft paint. Let dry.
- Measure and cut 8” lengths of burlap trim. Attach around the base of the cone using a glue gun. Trim any excess with scissors.
- Cut the plastic circle (the part that fits on your finger) from the back of three jeweled spider rings.
- Paint the legs and body of the spiders with light grey acrylic craft paint. Measure and cut 4” lengths of ribbon, fold them in half, and attach them to the back of the spiders with a glue gun. Cut notches into the ends of the ribbons.
- Attach the decorative spider jewel and ribbon to the hat band of the witch’s hats with a glue gun.
Meet the Creator
Hi there, I’m Sarah Nenni-Daher. I’m a crafty gal and always have at least 14 projects going at once. I am a crafter, designer, DIYer, and pattern maker. I share my creations here and in the Ruffles and Rain Boots® Shop.
Here at Ruffles and Rain Boots®, you’ll find DIY gnomes, crafts, gifts, cupcakes, laser crafts, and so much more. I love sharing video tutorials over on YouTube and chatting with other crafters in my Facebook groups. We’d love to have you!