
How to Laser Engrave Slate
One of the best-selling laser products are laser engraved slate coasters and today, I’m going to show you how easy they are to make. The secret is in the settings.
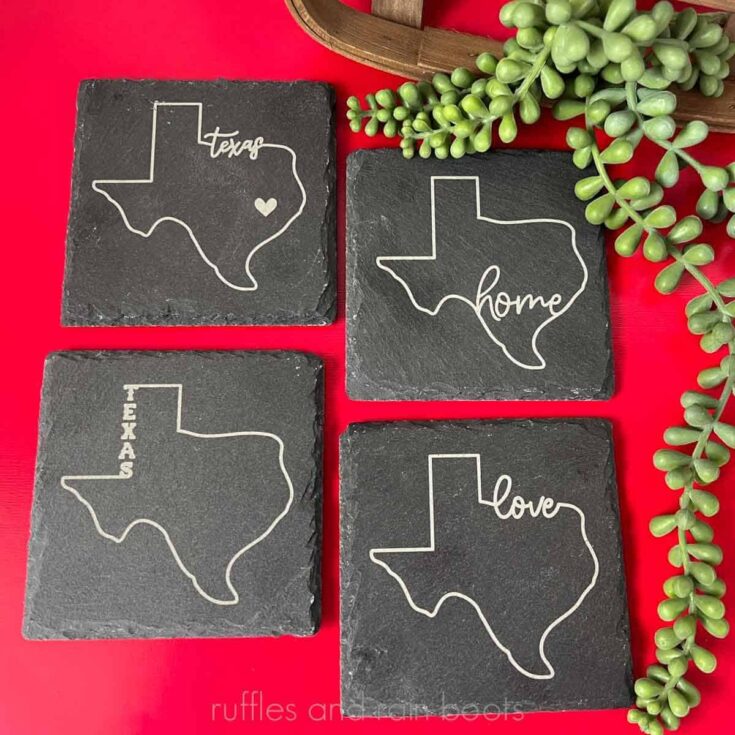
Learn how to create slate coasters using a diode laser, specifically the xTool S1. Without any cameras, we are able to perfectly place designs using the Pin-Point Positioning™ system.

RELATED READING: Why xTool S1 Pin-Point Positioning is Unmatched
What You'll Find On This Page
Laser Engraved Slate Coasters
Here at Ruffles and Rain Boots, I’m having fun with both diode and CO1 laser craft ideas. Today, I am sharing one of the best-selling products you can make with a laser: slate coasters.
Coaster shapes vary which makes them perfect for custom or stock designs. I’ll be using my Texas outline SVG bundle, but you can use any vector.
You might have read that some people recommend spraying slate with polyurethane to “brighten up” the engraving. While that’s okay for plaques, it’s useless if someone wants to use a slate coaster. I’ll show you how dialing in your settings for YOUR LASER can produce bright slate engravings without any coating.
If you want to try this project but can’t start right now, save or share this page. Either way will make it easy to find when you’re ready to begin.

As an Amazon Associate, I could earn from qualifying purchases. There could be affiliate links within this article.
Still Looking for a Laser Right for You?
This project uses the 40 watt xTool S1 but below are the desktop lasers I have. If you’re unsure of which one might be right for you, just ask (join the laser crafts Facebook group). I’ll ask you some questions to point you in the right direction, but here are summaries for each:
I own three types of lasers right now: CO2, diode, and fiber (infrared). Below are summaries of each and suggestions on materials. If you have questions, please ask! Not all lasers are right for those looking to start a business or side hustle. If that’s you, choose the P2 or the S1.
- xTool P Series – A fully-enclosed CO2 laser, perfect for cutting acrylic and wood. This is an unrestricted laser when it comes to acrylic, wood, slate, etc. and it’s my top choice.
- xTool S1 – The option I have is a 40 watt diode laser which cuts some acrylic, wood and does amazing engravings. This laser has some acrylic restrictions (no clear, mirror, translucent; primarily opaque) but powers through wood.
- xTool M1 ULTRA – The updated version of the ground-breaking xTool M1 shows up to the party with a printer (can print on wood), a laser, a set of blades, foil, and embossing, as well as a pen tool. Great for crafters!
- xTool F2 – This dual laser is portable! It’s the best-selling, landmark setting laser that contains a diode and an infrared laser. It’s perfect to take to shows, markets, and events.
- WeCreat Vista – This is a fun tool to have if you’d like to work primarily with tumblers or wood. The patented FlipLaser design turns the laser head 90 degrees, allowing you a great tumbler engraving experience.
Tips and Tricks to Engrave Slate
If you have some slate on hand, use those. And if you don’t, pick up some slate coasters from Amazon. They’re inexpensive when learning and are cheaper than slate plaques.
Next, and I can’t say this enough: run a test for your laser and your slate. While I will always share my settings, I encourage you to run them for every material you bring into the laser. Watch this short How to Set Up a Smart Test Array video tutorial for a safe, efficient way to set up a materials test.
As I mentioned above, if you use a coating on slate you can remove the moisture-absorbing properties of the material (so don’t do it with coasters). It’s possible to get bright slate engravings, you just have to find the right settings!

If you’re here to engrave a photograph onto slate, close this now. That process is a little more involved than a vector slate engraving like this, so watch this video on how to prepare an image for engraving.
And finally, don’t be scared to try this. I’ve had more interest in my slate coasters than most other products and they can easily (and inexpensively) be packaged for both market sales AND for shipping.
How to Laser Engrave Slate Coasters
If you’re a visual learner and want to see a detailed XCS 2.0 tutorial, watch the slate coaster engraving tutorial on YouTube. Be sure to subscribe to the channel – we have a lot of fun!

Set up and run a materials test for your laser to determine your settings (mine are below). Please watch how to set up a laser materials test video linked above if you’re new to laser engraving or are a beginner working with lasers.

Place the slate item(s) into the bed of the laser on either the slats or a honeycomb. Position the crosshair of the laser head over one of the items to measure distance.
Drag the design into the laser software’s workspace. Using XCS, it’s a simple drag and drop with an SVG.
Set the design to process as an engraving and then enter the parameters you identified in the test for power, speed, passes, and lines per centimeter.

Measure the distance (or the height, per your laser’s instructions). With the xTool S1, simply press the auto distance measure icon and the machine will measure and insert the distance.
Next, you can use the marking feature within XCS to set multiple points for each coaster. With the crosshair at the top left-most position of coaster 1, press the start button on the machine to lock in the first vector. Move the crosshair to the bottom right-most position of that coaster and press the machine’s start button to lock in the square. Select end marking and repeat for every item on the laser bed and then select done.

Once the marked areas are in the workspace, drag each design into their respective marked area. NOTE: you are not lining up the designs with each other, only each design within each marked area. You can opt to frame or skip to process.
Process the job, staying close to the laser. Once the slate has been engraved, remove the items and wipe with any dry cloth. There is NO NEED TO SEAL.

More Laser Crafts You Might Like To Try
- Highland Cow Door Sign Laser Cut Project – This fun project is a popular one for me because this guy is TOO cute (and comes with a free highland cow SVG). ;)
- xTool Screen Printer – The xTool S1 was made to partner up with this fun, centuries-old craft to bring it into the 21st century.
- How to Use Mirror Acrylic – If you have or are interested in a CO2 laser, mirror acrylic is intimidating. Here’s how to prepare, engrave, and cut mirror acrylic.
Please Save or Share This Laser Craft Idea for Slate
Your shares are how this site grows and I am sincerely grateful. Please save slate coasters laser DIY to a laser crafts to make and sell ideas pin board or share it with a laser group on Facebook.

How to Engrave Slate with a Laser
Learn how to laser engrave slate coasters, plaques, and keepsakes using any diode or CO2 laser. The set up and positioning of the designs is the hardest part of the process and I'll share how to make it foolproof every time using the xTool S1 laser.
Materials
Instructions
- Set up and run a materials test for your laser to determine your settings (mine are below). Please watch how to set up a laser materials test if you're new to laser engraving or are a beginner working with lasers and watch this tutorial's video to get tips.
- Place the slate item(s) into the bed of the laser on either the slats or a honeycomb. Position the crosshair of the laser head over one of the items to measure distance.
- Drag the design into the laser software's workspace. Using XCS, it's a simple drag and drop with an SVG.
- Set the design to process as an engraving and then enter the parameters you identified in the test for power, speed, passes, and lines per centimeter.
- Measure the distance (or the height, per your laser's instructions). With the xTool S1, simply press the auto distance measure icon and the machine will measure and insert the distance.
- Next, you can use the marking feature within XCS to set multiple points for each coaster. With the crosshair at the top left-most position of coaster 1, press the start button on the machine to lock in the first vector. Move the crosshair to the bottom right-most position of that coaster and press the machine's start button to lock in the square. Select end marking and repeat for every item on the laser bed and then select done.
- Once the marked areas are in the workspace, drag each design into their respective marked area. NOTE: you are not lining up the designs with each other, only each design within each marked area.
- You can opt to frame or skip to process. Process the job, staying close to the laser.
- Once the slate has been engraved, remove the items and wipe with any dry cloth. There is NO NEED TO SEAL.
Notes
Engrave Settings xTool S1 40 watt: power 30, speed 220, pass 1, lines 200
Meet the Creator
Hi there, I’m Sarah Nenni-Daher. I’m a crafty gal and always have at least 14 projects going at once. I am a crafter, designer, DIYer, and pattern maker. I share my creations here and in the Ruffles and Rain Boots® Shop.
Here at Ruffles and Rain Boots®, you’ll find DIY gnomes, crafts, gifts, cupcakes, laser crafts, and so much more. I love sharing video tutorials over on YouTube and chatting with other crafters in my Facebook groups. We’d love to have you!