
High-End Embroidery Hoop Orb Decor
Learn to make your own pieces like this gorgeous high-end embroidery hoop orb decor. The inspiration can come from anywhere – I was inspired by a hoop orb piece I saw in a very fancy store.
This may be one of my favorite DIY home decorations I have made so far. It was made with simple supplies from Dollar Tree and cost around $3. Doesn’t it look like it cost ten times that amount? It’s so easy to make, so let’s get started.

RELATED READING: Turn an Embroidery Hoop Into a GORGEOUS Wreath
What You'll Find On This Page
Embroidery Hoop Orb Decor
Here at Ruffles and Rain Boots, it is not a secret we love Farmhouse decor and easy-to-make DIY projects for our home. If we can find affordable activities for you that won’t break the bank, we get excited to share those with you. This is one of those design opportunities!
If you are an avid DIYer like me, this is something you will want to roll up your sleeves and dive into. I don’t know about you, but I would rather save time going shopping and browsing in a store and making something fun for myself instead. This is especially true on a dreary rainy day when you’d rather stay in than go out.
Distinctive Homemade Home Decor Accent
If you can’t start on this fun up-cycle craft idea right now, save or share this to make it easy to find when you’re ready to begin.

As an Amazon Associate, I could earn from qualifying purchases. There may be affiliate links within this article.
Tips for Making a High-End Embroidery Hoop Orb
- If you prefer a more covered look, you can leave out the water from the paint. Apply 1-2 coats of paint and allow to dry completely. You will still have that high-end look you are craving that doesn’t have a primitive look.
- To give this homemade hoop orb decor a weathered or rustic look, paint 2 coats of paint and use fine grit sandpaper and go over several small areas on the orb. This will give your project the look of an antique decoration for your home.
- For a fun look of metal for your wooden embroidery hoop orb, substitute metallic paint for acrylic paint. After drying, if you want a weathered look, use the fine-grit sandpaper to rough up the orb a bit.

RELATED READING: Turn Old Embroidery Hoops into Stylish Pumpkins Like This
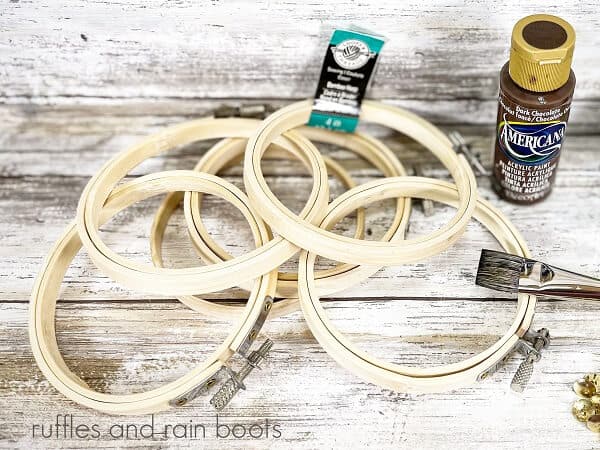
Supplies to Make an Embroidery Hoop Orb
Below are the supplies I used to make an embroidery hoop orb, but check your craft store stash to see what you have on hand. If you want to give your orb a metallic look, read the tips above for the instructions.
- Wooden Embroidery Hoops
- Wooden Candlestick
- Wooden Finial
- Dark Brown Acrylic Craft Paint
- Glue Gun and Glue Sticks
- Paintbrush
- Paper Plate
- Paper Towels or Baby Wipes

How to Make a High-End Orb Decor
Each step for this craft is detailed below so it’s easy to follow. Keep this page open while you are creating your high-end embroidery hoop orb. If you would rather have a printable how-to for this craft, scroll down and select the print button.
Loosen the metal screws on the embroidery hoops and separate the inner and outer hoops, giving you four total.

On a paper plate, mix the dark brown acrylic craft paint with about ½ teaspoon of water, giving it the consistency of a stain. Paint the entire surface of the four unfinished hoops.
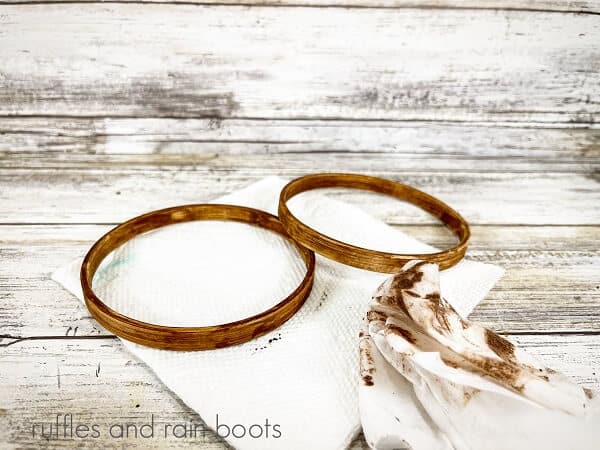
Before the paint dries completely, wipe off some of the excess paint with a paper towel or baby wipe. Set aside to allow the paint to dry completely.

Paint the wooden candlestick and finial, wiping away any excess. Set them aside to dry completely.

Take the two solid wood embroidery hoop pieces, and insert one inside the other making an “X” shape. Next, loosen the metal screw on the third hoop and slide it over the first two, going around the perimeter of the “X”. Tighten the metal screw until taut.
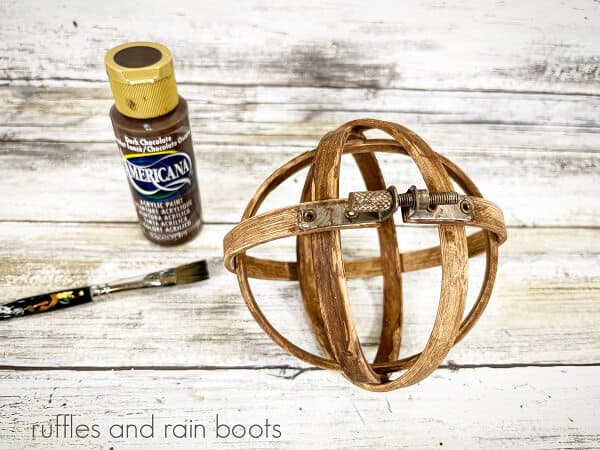
Loosen the screw on the fourth hoop as far as it will go and then slide it over the first three hoops horizontally around the middle. Tighten the metal screw until the hoop is snug. Paint the metal screws with the brown paint mixture.

If desired, secure the hoops at connecting points with the hot glue gun. Using the hot glue gun, attach the candlestick to the bottom of the orb and glue the finial to the top of the orb. Now you are ready to show off your beautiful high-end hoop orb.
Additional Ideas for Making an Embroidery Hoop Orb Decor
- We love the idea of making several smaller orbs and filling a tall vase with them. This would look stunning on your end table or nightstand in the bedroom.
- Decide on a room to show off your orbs, and paint several in complimentary colors to that room. Place in a basket with faux greenery and flowers or baby’s breath and place on a table or mantle in that room.
- If you have a tired tray, place a variety of sizes of embroidery hoop orbs within and on top of the tray. Add a few pieces of lush greenery for added color and texture.
More Home Decor Crafts You May Enjoy
- Make These Easy Braided Jute Coasters – These unique and easy-to-make jute coasters fit in perfectly with your coastal or farmhouse home decor theme. They are inexpensive to make but look like you bought them in a big box store.
- This Wood Round Tiered Tray is a Fun and Rustic Project – Do you have a collection of farmhouse decor and no central place to show them off? This unusual round wood-tiered tray is the perfect place to showcase your beautiful pieces.
- This Dollar Tree Duster Wreath is Easy Farmhouse Christmas Decor – No one will guess that this high-end-looking wreath is made from duster cloths from Dollar Tree!
Please Save or Share
Your shares are how this site grows and I sincerely appreciate it. Please save this home decor idea to one of your favorite craft pin boards or share it on Facebook.

High-End Embroidery Hoop Orb Decor

You can make this quick and easy high-end embroidery hoop orb décor in just 30 minutes with limited supplies from a craft store. It is the perfect size for a tiered tray decoration. Make additional orbs in a variety of sizes and use them in a vintage dough bowl as a table centerpiece. These embroidery hoop orbs are perfect for your primitive or farmhouse-style home décor. It also makes a wonderful gift for any upcoming occasion.
Materials
- (2) 4” Wooden Embroidery Hoops
- 2.75” Wooden Candlestick
- ½” Wooden Finial
- Dark Brown Acrylic Craft Paint
Tools
- Glue Gun and Glue Sticks
- Paintbrush
- Paper Plate
- Paper Towels or Baby Wipes
Instructions
- Loosen the metal screws on the embroidery hoops and separate the inner and outer hoops, giving you four total.
- On a paper plate, mix the dark brown acrylic craft paint with about ½ teaspoon of water, giving it the consistency of a stain. Paint the entire surface of the four unfinished hoops.
- Before the paint dries completely, wipe off some of the excess paint with a paper towel or baby wipe. Set aside to allow the paint to dry completely.
- Paint the wooden candlestick and finial, wiping away any excess. Set them aside to dry completely.
- Take the two solid wood embroidery hoop pieces, and insert one inside the other making an “X” shape. Next, loosen the metal screw on the third hoop and slide it over the first two, going around the middle of the “X”, and tighten the metal screw.
- Loosen the screw on the fourth hoop as far as it will go and then slide it over the first three hoops horizontally around the middle. Tighten the metal screw until the hoop is snug. Paint the metal screws with the brown paint mixture.
- If desired, secure the hoops at connecting points with the hot glue gun. Using the hot glue gun, attach the candlestick to the bottom of the orb and glue the finial to the top of the orb.
Notes
You can do this high end craft idea using any size of embroidery hoops.
Meet the Creator
Hi there, I’m Sarah Nenni-Daher. I’m a crafty gal and always have at least 14 projects going at once. I am a crafter, designer, DIYer, and pattern maker. I share my creations here and in the Ruffles and Rain Boots® Shop.
Here at Ruffles and Rain Boots®, you’ll find DIY gnomes, crafts, gifts, cupcakes, laser crafts, and so much more. I love sharing video tutorials over on YouTube and chatting with other crafters in my Facebook groups. We’d love to have you!