
Gnome Toilet Paper Cover Free Pattern
If you need a quick win craft, make this cute gnome toilet paper cover with my free gnome pattern. It’s done in 10 minutes and you can probably make it with what you have on hand.
This adorable Christmas gnome comes together so easily. Be sure to read my tips on choosing the right fabric for this holiday craft.
RELATED READING: DIY Scandinavian Christmas Gnomes
What You'll Find On This Page
Free Pattern: Gnome Paper Roll Cover
Here at Ruffles and Rain Boots, I’ve shared a toilet paper Christmas gnome and it went viral because it was SO CUTE and quick (5 minutes). Today, I’m finally sharing one made back in 2020.
This Christmas gnome craft was put on hold because… well, there was a bit of toilet paper roll shortage. Remember that all over the news?! Now that it’s over, let’s get to crafting with those rolls for some cute holiday decor!
If you love this project but can’t get started now, save this page to a pin board or share it on Facebook. Either way will make it easy to find when you’re ready to begin this easy Christmas craft idea.

As an Amazon Associate, I could earn from qualifying purchases. There could be affiliate links within this article.
RELATED READING: How to Make a Gnome Hat – Free Gnome Hat Patterns (15 Ways)
How to Choose the Fabric for Christmas Gnome Crafts
Always look at what you have on hand that might work for this chubby little gnome cover. I recommend using fabrics which have a bit of stretch, especially if you’re new to working with fabric crafts.
Stretchy fabrics will allow for a bit of error in cutting the pattern pieces and it will also fit around the toilet paper rolls a bit easier. Here are the fabrics I recommend for this craft in order of the most highly recommended first:
- Fleece – Most fleece has a two way stretch, is inexpensive, and comes in a variety of colors and patterns.
- Felt – In this craft, I used felt cut from the bolt (not felt craft sheets) because we can cut the full pattern and it has a small amount of stretch.
- Flannel – Many flannels have very little stretch. Using this for the gnome hat is fine, but do not use it for the body.
- Cotton – Most cotton fabrics have zero stretch. If using any cottons for this craft, add at least half an inch to everything to account for hemming and the lack of stretch.

Christmas Gnome Toilet Paper Roll Cover Video Tutorial
If you’re a visual learner like I am, don’t worry. I’ve created a craft-along toilet paper Christmas gnome video tutorial here so we can make this together in real time.
While you’re there watching, be sure to subscribe. We have a lot of fun on the channel.

Materials I Used for This Holiday Gnome DIY
Below are the supplies and tools I used for this gnome cover. In the video, I detail additional items to use as replacements.
- Felt (or Fleece) for the Body (and Optional Spacer)
- Flannel (or Fleece) for the Hat
- Faux Fur (I used this gorgeous gray and white)
- Dowel Cap or Wood Bead for the Gnome Nose
- Sherpa Fleece, Ribbon, or Yarn for the Trim
- Button, Needle, and Thread (or Hook and Loop Closure)
- Bell
- Scissors, Pencil, Hot Glue Gun
- Free Gnome Paper Toilet Roll Cover Pattern
RELATED READING: How to Make a Sock Gnome in 3 Minutes
How to Make a Toilet Paper Gnome Cover
Download, print, and cut out the free gnome toilet paper roll cover pattern above – no sign up required. Keep this page open while you move through the steps, watch the video linked above, or print off the step by step tutorial instructions without photos by scrolling to the bottom of this page.
Fold over the felt, line up the pattern, cut the body pattern piece (with the tab on ONE end). Wrap it around a roll of toilet paper to get the sizing to determine if you need to cut the spacer piece.

Optional: if using the spacer piece, glue to the inside of the body piece in one, two, or three layers.
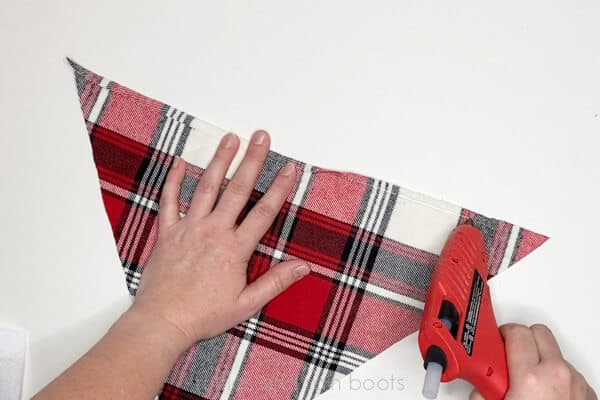
Next, cut the hat pattern piece from the flannel. Fold the flannel and place the straight edge of the pattern against the fold to cut it out.

Hem the bottom brim of the hat piece on the wrong side of the fabric and each of the side pieces no more than 1/4 of an inch.
Place the hat piece with the wrong side facing up and glue the body piece to it. Note: the tab should be at the top right and the join should be about 1/4 of an inch to have enough fabric to tuck into the bottom of the paper roll.

Wrap the piece around the toilet paper roll, tugging the roll up into the brim as far as it can go. Pinch the pieces together and add a bit of glue, holding until secure. Glue up the rest of the hat.

With the piece wrapped around the roll as above, use a pencil to make a mark to place the button. Sew on the button and then cut a small “X” into the tabbed portion of the body piece. Secure the body piece by slipping the tab over the button.

Cut a piece of trim long enough to cover from one edge of the body piece to the other edge and wide enough to cover the join of the hat and body piece. Secure the trim one side before gluing on the nose. Once the nose is on, secure the trim over it and around to the other side.

Cut a piece of faux fur to the pattern piece (or your desired shape) and glue on under the trim and nose. Note: you might have to notch the center of the faux fur to tuck it up under the nose.

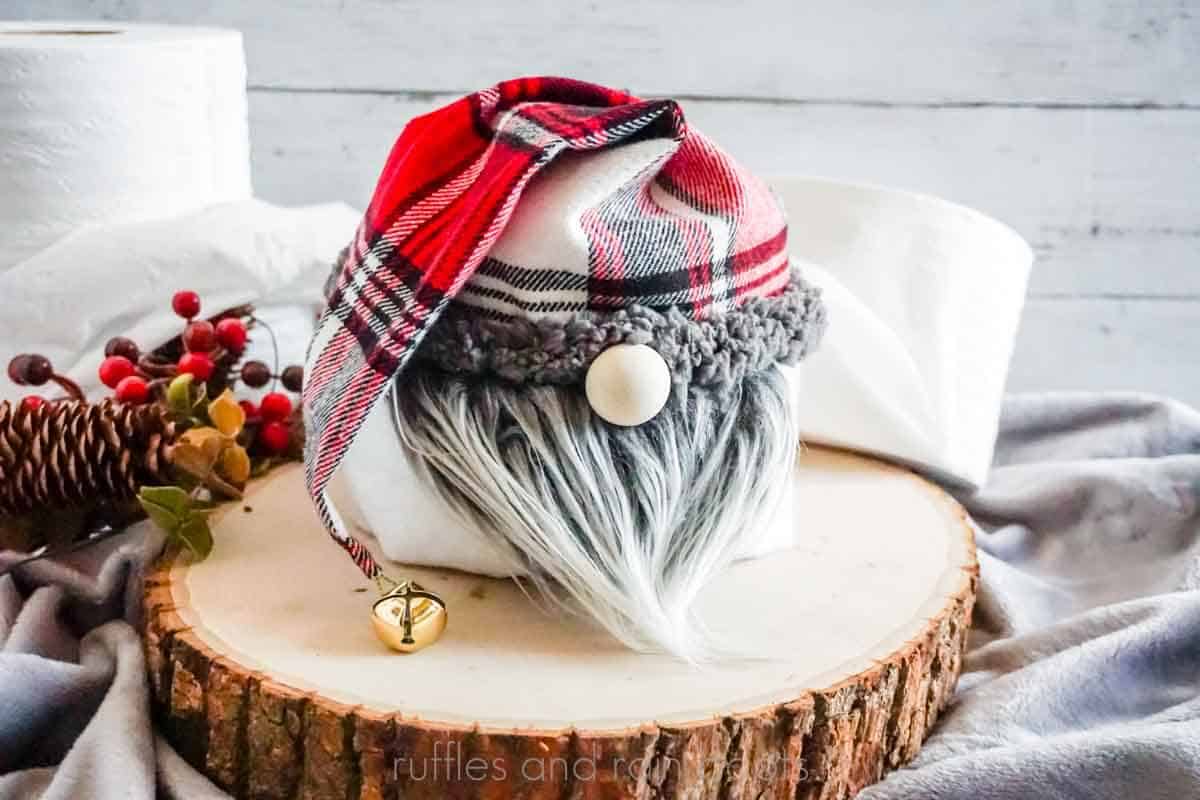
Cover the paper roll and tuck up the felt into the bottom center. Add a bell or any decorations and display your new Christmas toilet paper gnome cover!
More Christmas Gnome Crafts You Might Like
- DIY Rope Gnomes – Watch this rope gnome video tutorial and use the free instructions to create the sweetest little gnome ornaments.
- DIY Large Christmas Gnomes with Arms – This chunky, chubby fella cannot wait to be made. He’s a cute one!
- Christmas Gnome with Arms and Legs DIY – This gorgeous traditional gnome can be sewn or hot glued together.
Please Save or Share This Gnome Cover
Your shares are how this site grows and I am sincerely grateful. Please use the sharing buttons to save this to a DIY Christmas craft pin board or share it with a crafty group on Facebook.
Gnome Toilet Paper Cover

Take 10 minutes to make this gnome toilet paper cover using my free pattern, a hot glue gun, and some fabric. This free gnome pattern will make a cute Christmas decoration but can be used all year round.
Materials
- Felt (or Fleece) for the Body (and Optional Spacer)
- Flannel (or Fleece) for the Hat
- Faux Fur
- Dowel Cap or Wood Bead for the Gnome Nose
- Sherpa Fleece, Ribbon, or Yarn for the Trim
- Bell or Other Decoration
- Free Gnome Toilet Paper Roll Cover Pattern
Tools
- Button, Needle, and Thread (or Hook and Loop Closure)
- Scissors
- Pencil
- Glue Gun and Glue Sticks
Instructions
- Download, print, and cut out the free Christmas gnome pattern.
- Fold over the felt, line up the pattern (fold on pattern to fold on fabric) and cut the body pattern piece (with the tab on ONE end). Wrap it around a roll of toilet paper to get the sizing to determine if you need to cut the spacer piece (folded over once or twice, depending on the toilet paper roll). If using the spacer piece, glue it to the inside of the body piece, even with the tab.
- Next, cut the hat pattern piece from the flannel. Fold the flannel and place the straight edge of the pattern against the fold to cut it out.
- Open the hat fabric, and glue up the bottom brim of the hat piece on the wrong side of the fabric. Also glue each of the side pieces as hem of 1/4 of an inch.
- Place the hat piece with the wrong side facing up and glue the body piece to it. Note: the tab should be at the top right and the join should be about 1/4 of an inch to have enough fabric to tuck into the bottom of the paper roll.
- Wrap the piece around the toilet paper roll, tugging the roll up into the brim as far as it can go. Pinch the pieces together and add a bit of glue, holding until secure. Glue up the rest of the hat.
- With the piece wrapped around the roll as above, use a pencil to make a mark to place the button. Sew on the button and then cut a small "X" into the tabbed portion of the body piece. Secure the body piece by slipping the tab over the button.
- Cut a piece of trim long enough to cover from one edge of the body piece to the other edge and wide enough to cover the join of the hat and body piece. Secure the trim one side before gluing on the nose. Once the nose is on, secure the trim over it and around to the other side.
- Cut a piece of faux fur to the pattern piece (or your desired shape) and glue on under the trim and nose. Note: you might have to notch the center of the faux fur to tuck it up under the nose.
- Cover the paper roll and tuck in the felt at the bottom into the center. Add a bell or any decorations.
Meet the Creator
Hi there, I’m Sarah Nenni-Daher. I’m a crafty gal and always have at least 14 projects going at once. I am a crafter, designer, DIYer, and pattern maker. I share my creations here and in the Ruffles and Rain Boots® Shop.
Here at Ruffles and Rain Boots®, you’ll find DIY gnomes, crafts, gifts, cupcakes, laser crafts, and so much more. I love sharing video tutorials over on YouTube and chatting with other crafters in my Facebook groups. We’d love to have you!