
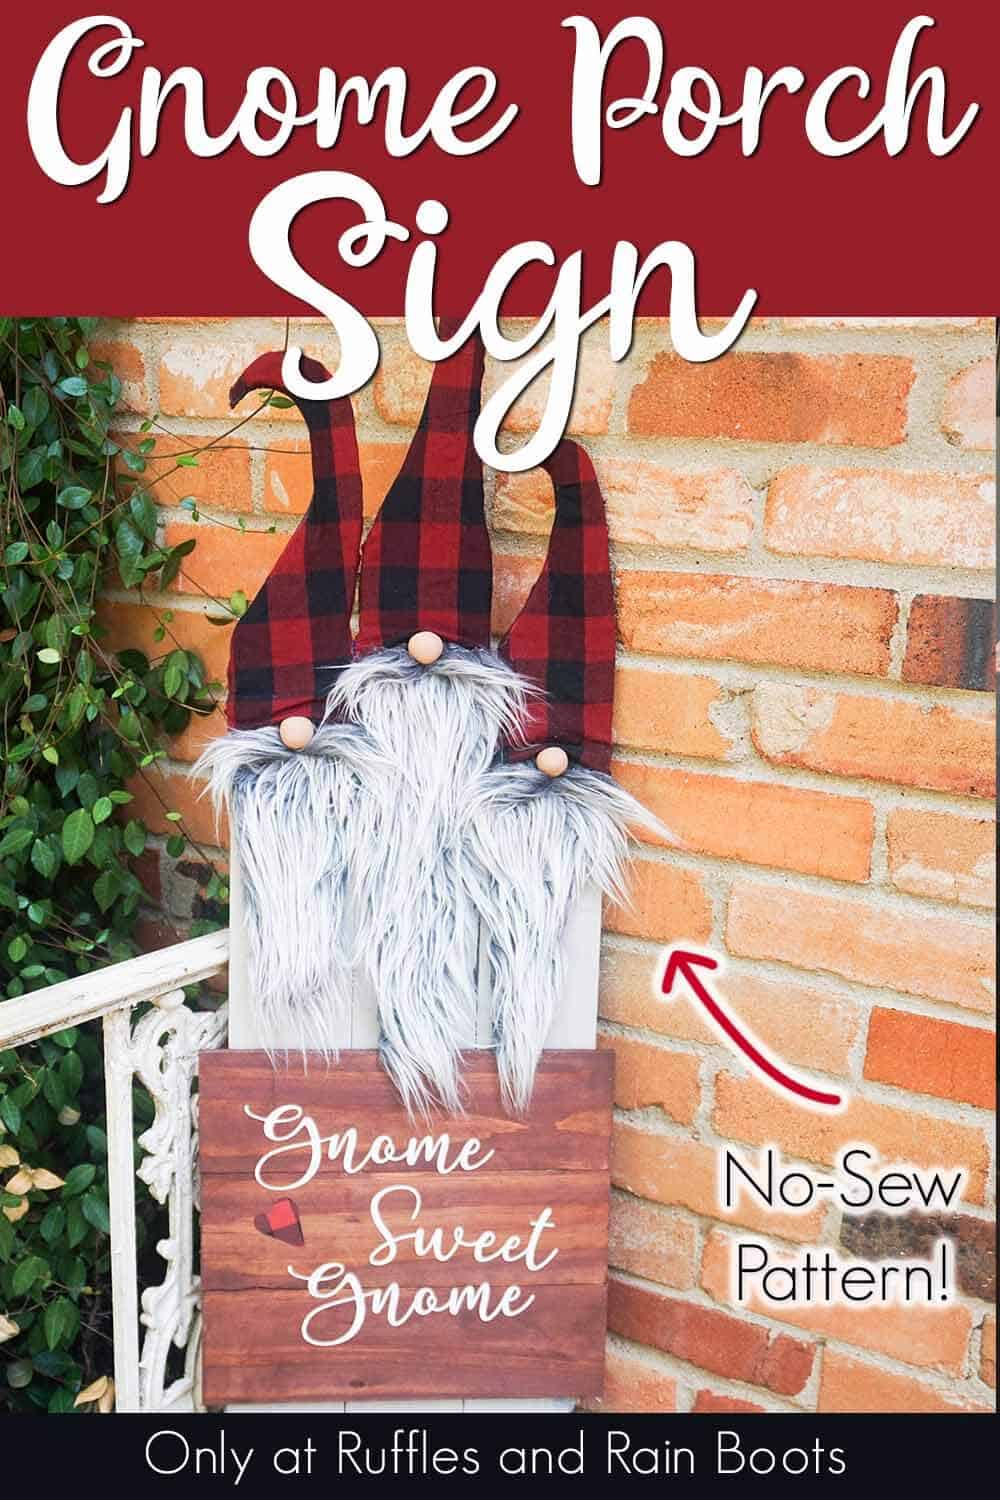
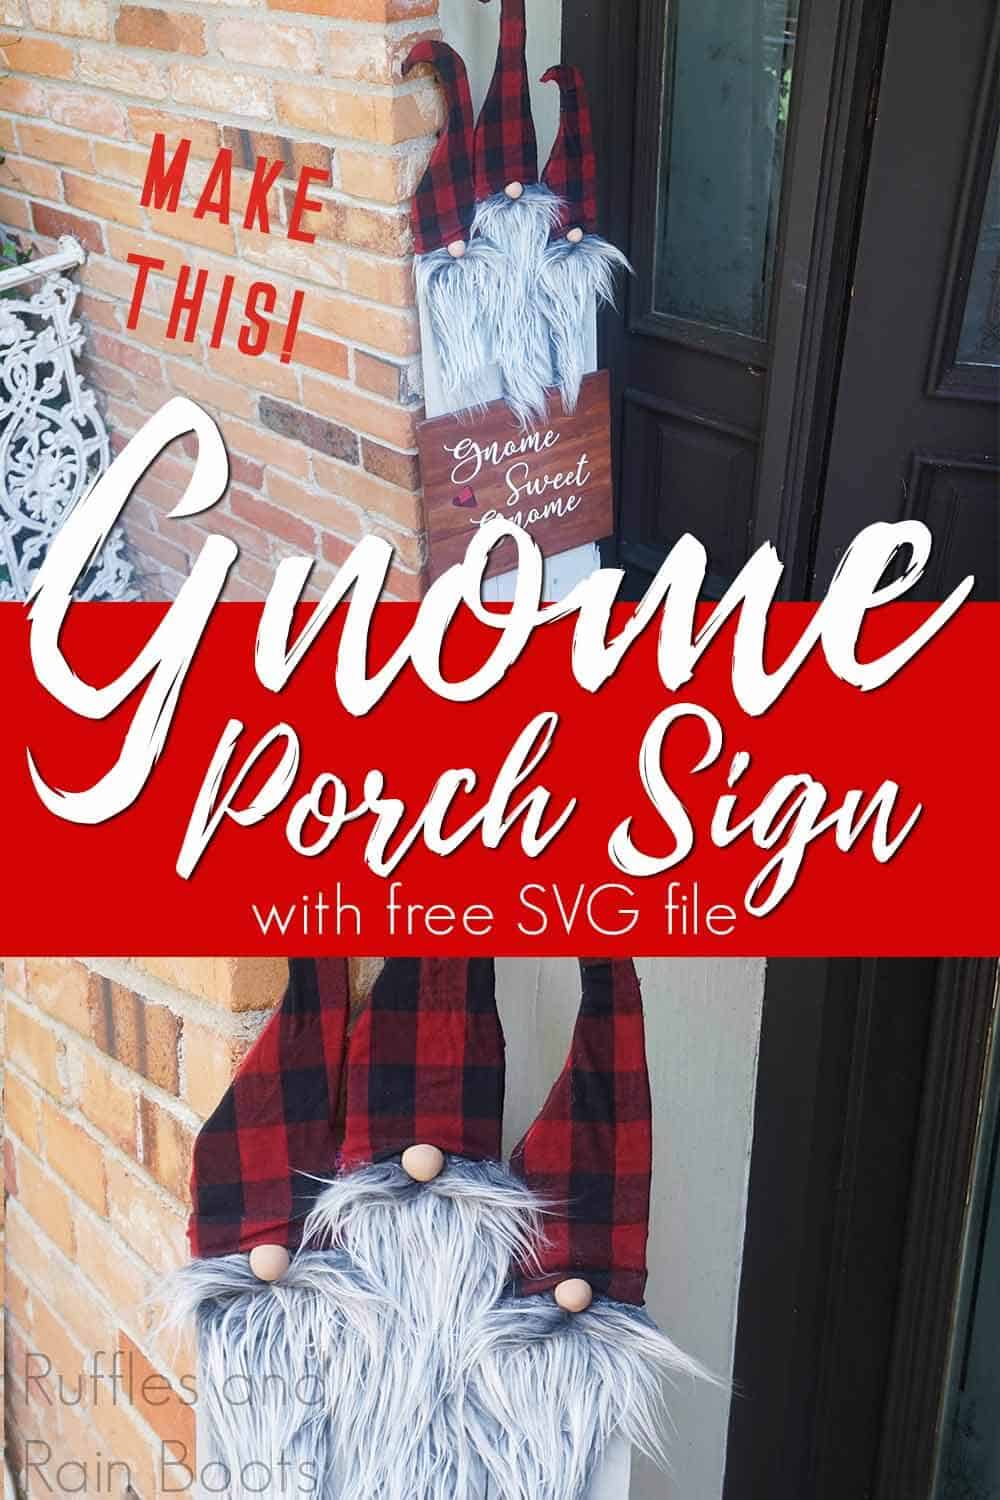
Make This Gnome Sweet Gnome Porch Sign with Free Gnome SVG
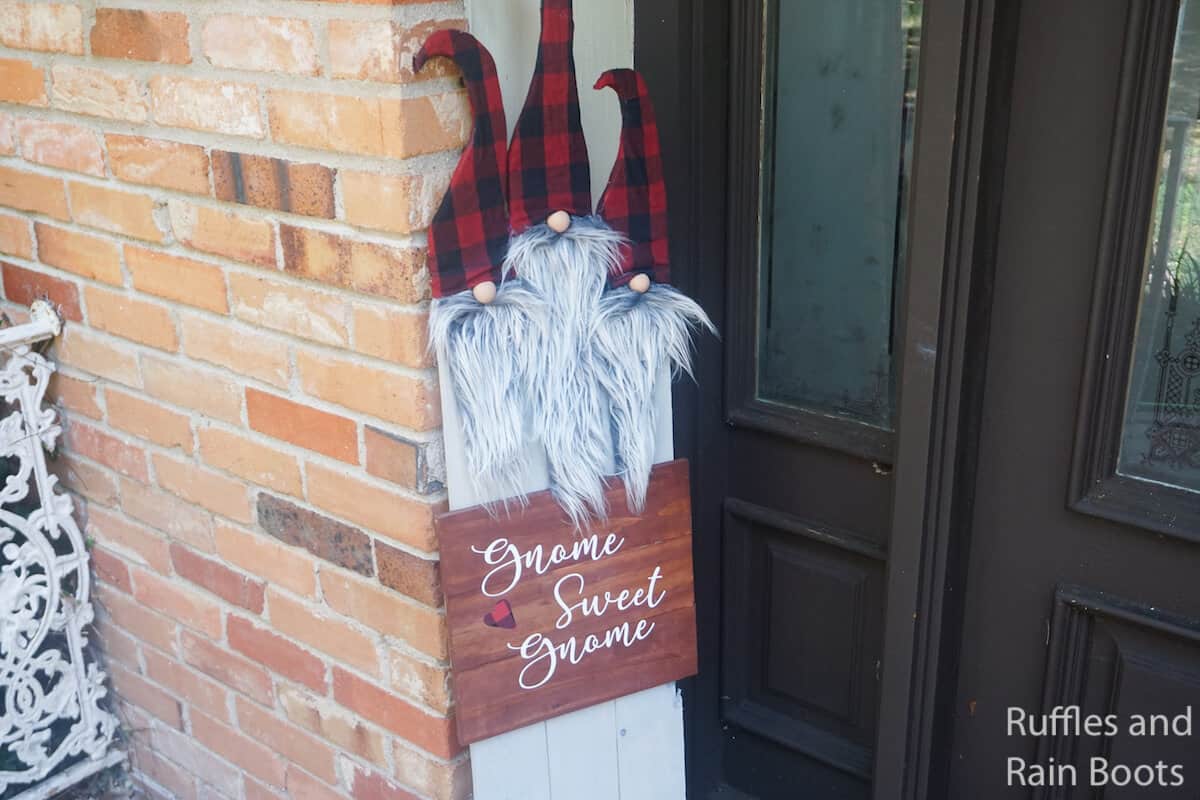
I may have a small gnome obsession, but if having this gnome sweet gnome porch sign is wrong, I don’t wanna be right. Because this gnome sign and free gnome SVG is so cute I could squee.
What You'll Find On This Page
Gnome Sweet Gnome Porch Sign
Here at Ruffles and Rain Boots, we have made so many gnomes, I am afraid to count. They’re just so fun, though. It’s like relaxation, creativity and a little bit of giggle got mixed together and out came these gnomes. Plus, gnomes make great gifts. But, I’m keeping this gnome sweet gnome porch sign.
RELATED READING: DIY GNOME TUTORIALS
I just love being greeted by these three little grumpy gnomes on the gnome sign every time I get to the driveway. A reason to smile when you get home is priceless. If you’re ready to make a whimsical sign for the porch, let’s get started.
DIY Christmas Gnome Tutorials
If you’re looking for the best DIY Christmas gnome tutorials, you have come to the right place. Check out all of my favorite tomte tutorials for the holidays!
No Time to Make This Now? Pin it for Later
You’re busy, I get it. Pin this to your favorite DIY gnomes board on Pinterest and it’ll be here for when you’re ready.
Tips to Make a Gnome Sign
- Click here to get the free printable gnome porch sign pattern and free SVG set for the Gnome Sweet Gnome sign the gnomes are holding. Of course, you can certainly make this adorable Gnome Sweet Gnome Porch Sign, but it’ll be a ton easier if you have a pattern.
- I made the cuts on the wood with my scroll saw, but you could use a jig saw or a hand saw. It’s not as hard as it looks. Just go really slowly when you’re making the turns. And, remember, if you break a piece off, that’s not a tragedy (I actually did break the tip off my biggest gnome). All you have to do is glue it back on. Glue is magic.
How Do I Make this Gnome Sweet Gnome Porch Sign?
I’m so glad you asked. Below is our written tutorial.
First, start by making your gnome noses by combining your white and light brown polymer clay, working it until the color is consistent throughout.
Break the polymer clay into 3 equal-sized portions.
Roll these portions of light brown polymer clay into 3 neat balls.
Bake the gnome noses in the oven per the directions on your polymer clay packaging. Allow to cool completely before handling.
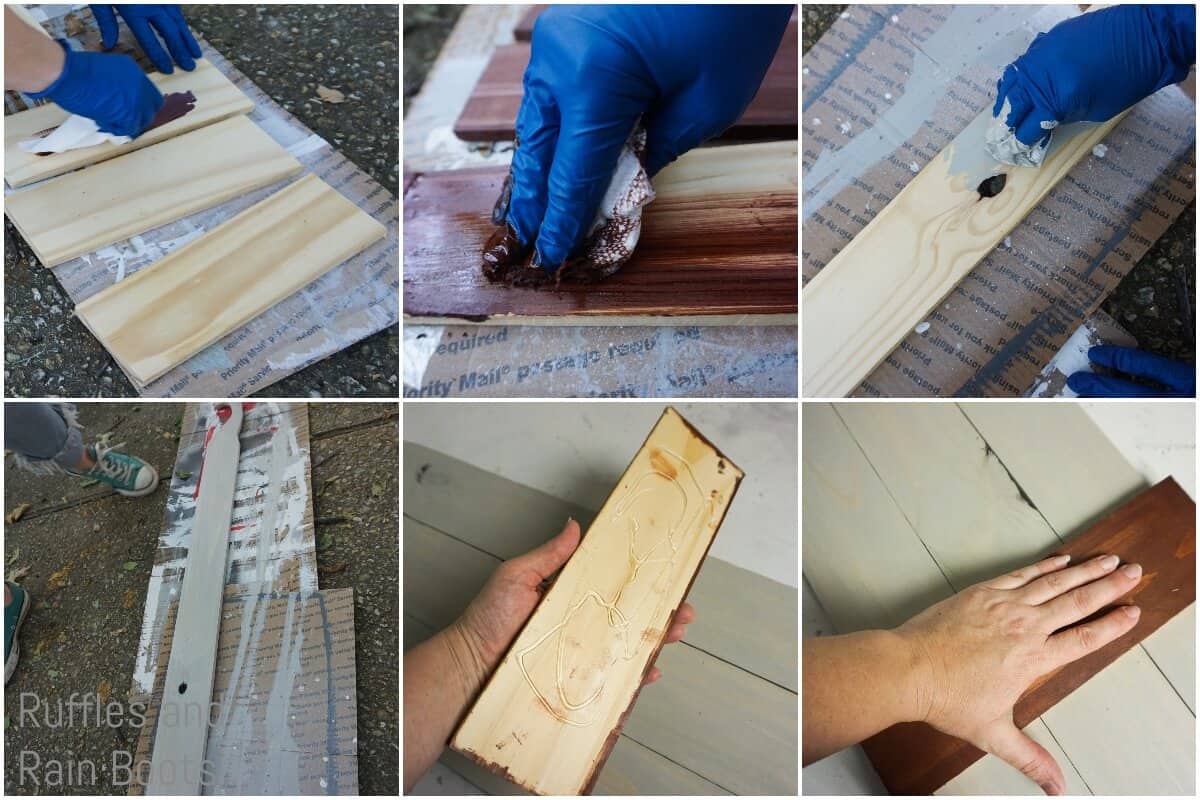
Trim 9-12-inches from one end of each fence panel. Make sure to keep one fence panel long, one short, and one somewhere between.
Set the cutoff pieces aside but do not discard them, as we will need them later on.
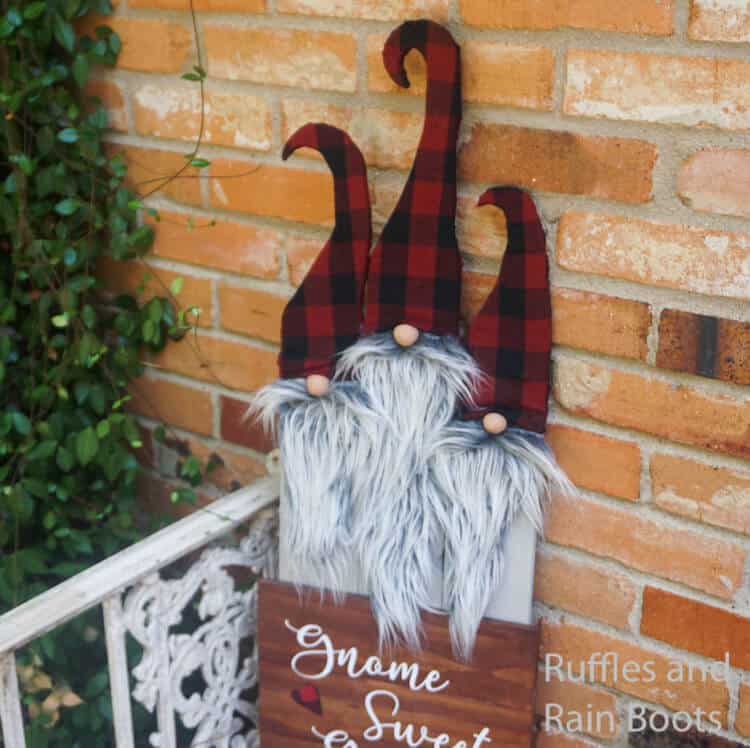
Using the template (or make your own template, if you wish), trace the gnome hat shapes onto one end of each of the shortened fence panels. With your saw, cut out each gnome hat shape.
Sand each gnome hat shape and the body of each gnome.
Stain all three gnomes with the grey wood stain.
Allow the stain to dry fully. Set aside.
With the cutoffs from earlier, trim them all to be the same length (I cut mine to all be 12 inches).Sand all of the cutoffs.
Stain all of the cutoffs with the Cognac wood stain.
Allow the stain to dry fully. With the gnomes facing stained-side-up, line them up however you wish them to stand on your porch. Meaning, you need to line up the bottoms and line up the sides so it’s all nice and neat.
Hot glue the cognac-stained cutoff pieces onto the front of the fence panels lined up neatly. This will hold the gnomes together but will also be the sign that they’re ‘holding’.
Make sure this is about 1/3 or 1/2 way down the gnomes, as you want to have plenty of room for their beards.

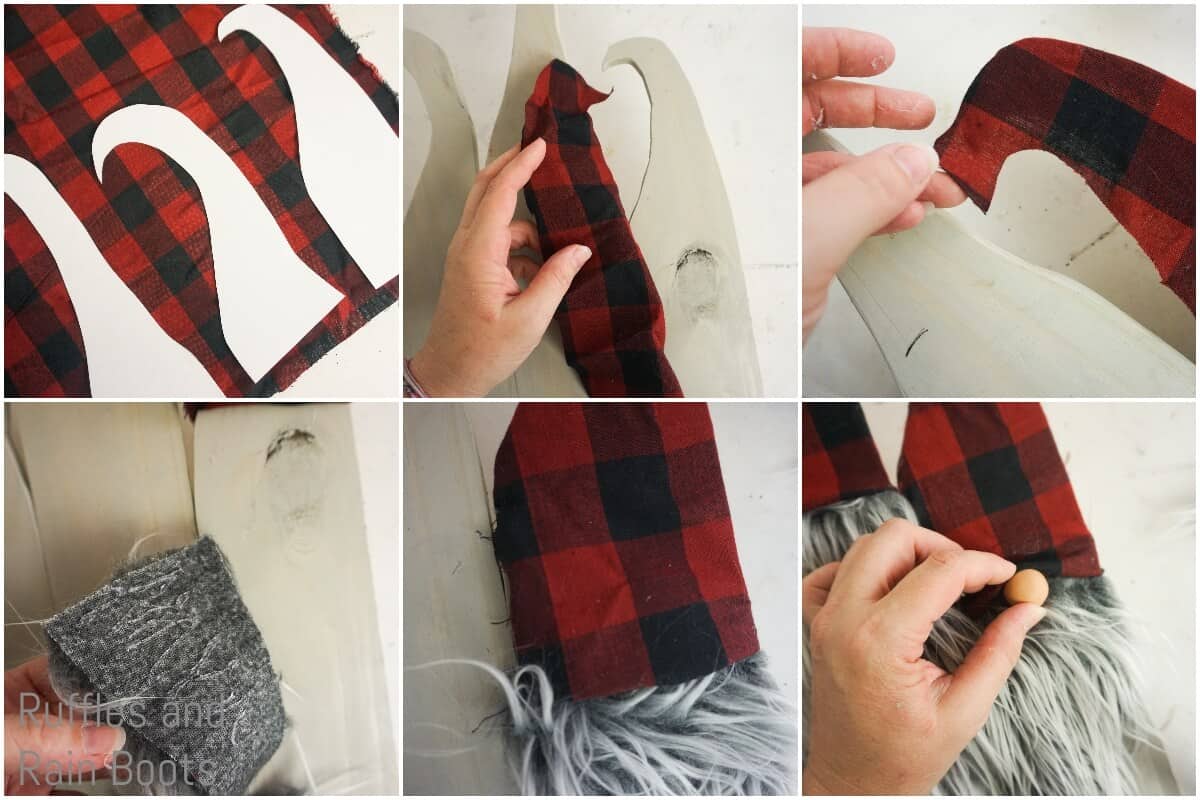
Using the template you used to cut out the fence panels, trace that shape onto the buffalo check fabric, with an additional 1/2-inch extra on each side to wrap around the wood.
Cut out three beards from the Mongolian Fur the length you desire for each gnome, about 1/8-inch wider than the fence panels (so that the beards touch on the middle and wrap around a little on the outside edges.
Cut out three small rectangles of the Mongolian Fur for mustaches, parting the fur in the middle and finger-brushing it to each side to make the shape of mustache you want.
Glue the beard to each fence panel, just above where the hat shape on the wood begins.
Affix the noses to the tops of the beards.
Hot glue the mustaches on under the noses.
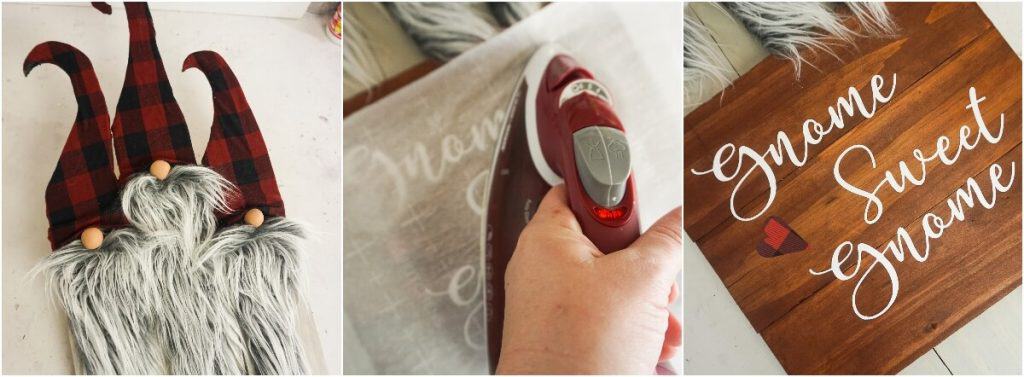
Glue the buffalo check fabric hats onto the gnomes, wrapping the fabric around the edges wrinkling the hat on the nose, and gluing that in place.

Print the ‘gnome sweet gnome’ SVG and affix, as desired. I used heat transfer vinyl because it was on sale at my local craft store.
Enjoy!
Get 45 More Free Christmas SVG Files
Crafting for the holidays can be hard and I’d like to help make it easy. I’ve put a ton of my brand new designs into the shop and are giving them away to subscribers for free. Happy holidays, indeed. Whether or not you’re already getting the Ruffles and Rain Boots newsletter, just pop your info into the box below and you’ll receive 12 days of crafty happiness delivered right to your inbox.
[thrive_leads id=’25773′]
More DIY gnomes You Might Like
- Reindeer Gnome – If Rudolph the red nosed reindeer could be any cuter, he’d be a gnome. Oh, wait…this is exactly that!
- Peppermint Gnome – All the red and white swirly goodness of the best Christmas candy in a gnome,
- DIY Gnome Tutorials – If you need a few ideas for making gnomes, well, this is where you’ll find ’em all!
Please Save This to Pinterest
Your shares are how this site grows and I am sincerely grateful. Know a friend who’d like this? Please share it on Facebook or save it to your favorite DIY gnomes board on Pinterest.
Gnome Sweet Gnome Porch Sign

I may have a small gnome obsession, but if having this gnome sweet gnome porch sign is wrong, I don't wanna be right. Because this gnome sign and free gnome SVG is so cute I could squee.
Materials
- Gnome Porch Sign Pattern and Cut Files
- 3 Fence Planks
- Grey Wood Stain
- Cognac Wood Stain
- 1/4 yard Buffalo Check Fabric
- 1/4 yard Mongolian Fur
- 2 Quarter-Sized Portions of White and Light Brown Polymer Clay (or 3 Wooden Beads)
Tools
- Scroll Saw or Jigsaw
- Sand Paper
- Paintbrushes
- Hot Glue Gun and Glue
- Scissors
- Oven
Instructions
- First, start by making your gnome noses by combining your white and light brown polymer clay, working it until the color is consistent throughout.
- Break the polymer clay into 3 equal-sized portions.
- Roll these portions of light brown polymer clay into 3 neat balls.
- Bake the gnome noses in the oven per the directions on your polymer clay packaging. Allow to cool completely before handling.
- Trim 9-12-inches from one end of each fence panel. Make sure to keep one fence panel long, one short and one somewhere between. Set the cutoff pieces aside but do not discard, as we will need them later on.
- Using the template (or making your own template, if you wish), trace the gnome hat shapes onto one end of each of the shortened fence panels.
- With your saw, cut out each gnome hat shape.
- Sand each gnome hat shape and the body of each gnome.
- Stain all three gnomes with the grey wood stain.
- Allow stain to dry fully. Set aside.
- With the cutoffs from earlier, trim them all to be the same length (I cut mine to all be 12-inches).
- Sand all of the cutoffs.
- Stain all of the cutoffs with the Cognac wood stain.
- Allow stain to dry fully.
- With the gnomes facing stained-side-up, line them up however you wish them to stand on your porch. Meaning, you need to line up the bottoms and line up the sides so it's all nice and neat.
- Hot glue the cognac-stained cutoff pieces onto the front of the fence panels lined-up neatly. This will hold the gnomes together but will also be the sign that they're 'holding'. Make sure this is about 1/3 or 1/2 way down the gnomes, as you want to have plenty of room for their beards.

- Using the template you used to cut out the fence panels, trace that shape onto the buffalo check fabric, with an additional 1/2-inch extra on each side to wrap around the wood.
- Cut out three beards from the Mongolian Fur the length you desire for each gnome, about 1/8-inch wider than the fence panels (so that the beards touch on the middle and wrap around a little on the outside edges.
- Cut out three small rectangles of the Mongolian Fur for mustaches, parting the fur in the middle and finger-brushing it to each side to make the shape of mustache you want.
- Glue the beard to each fence panel, just above where the hat shape on the wood begins.
- Affix the noses to the tops of the beards.
- Hot glue the mustaches on under the noses.
- Glue the buffalo check fabric hats onto the gnomes, wrapping the fabric around the edges and wrinkling the hat on the nose and gluing that in place.
- Print the 'gnome sweet gnome' SVG and affix, as desired. I used heat transfer vinyl because it was on sale at my local craft store.

- Enjoy!

Notes
For more fun DIY gnomes, visit Ruffles and Rain Boots

this project is so over-the-top cute!! thank you for sharing & something to think about for next year.
Could wooden pallets work instead of fence panels? Or would the pallets be too small in the width?
I love these gnomes and hope to make these for next year’s presents .
Thanks for posting.
This project can be made as big or as small as you’d like, so those wooden pallet boards will work just fine. ;)