
This Adorable DIY Gnome Shadow Box Craft is so FUN!
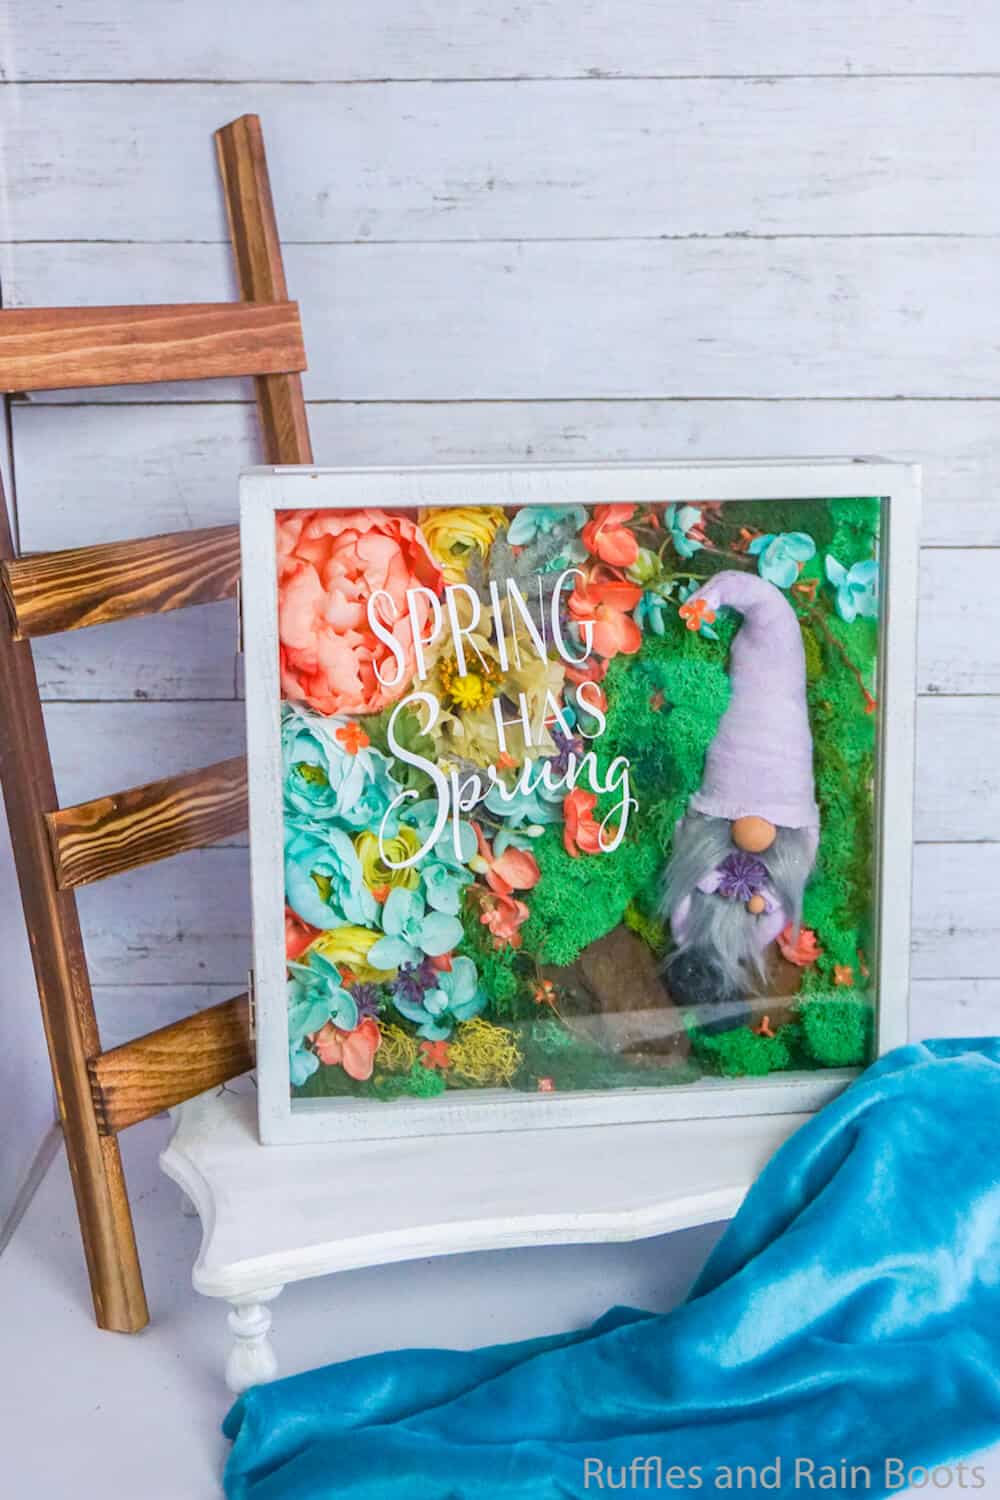
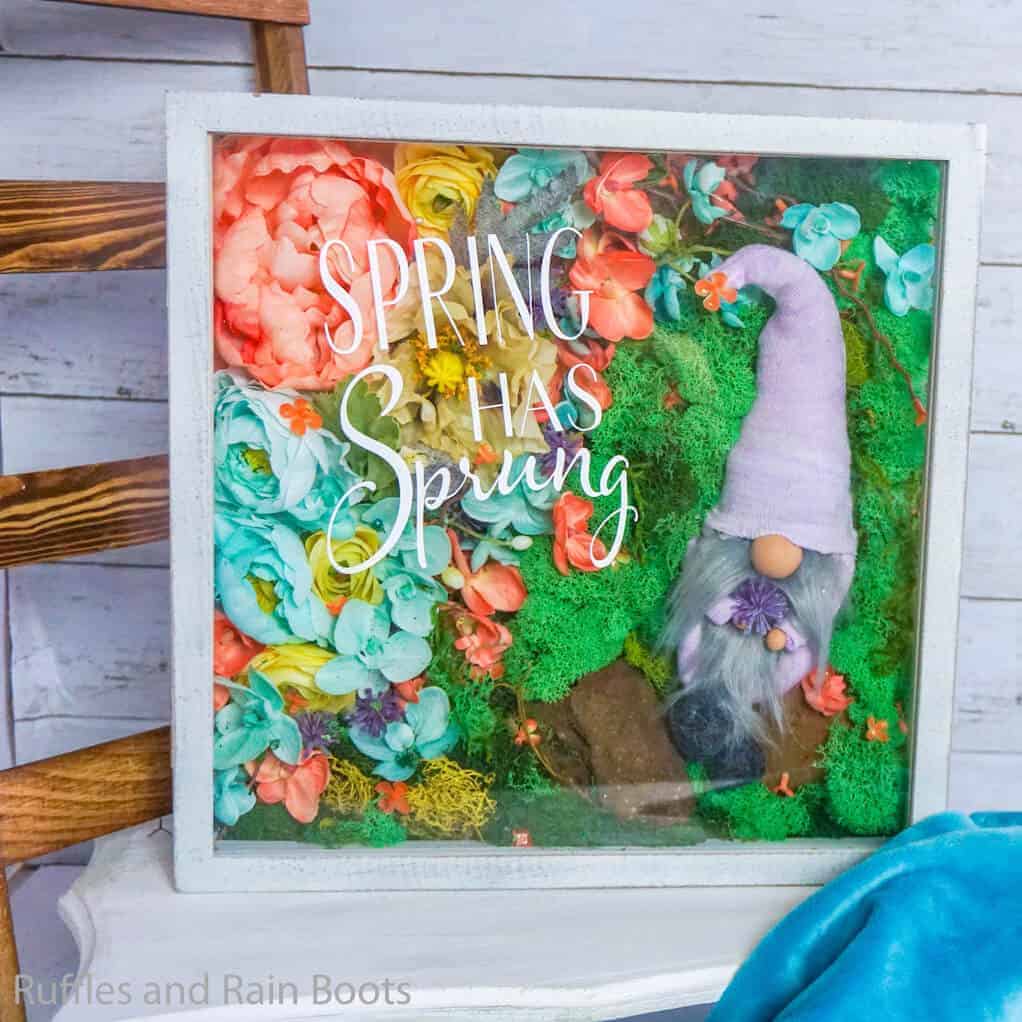
I love this easy DIY gnome shadow box. It’s the perfect spring decor piece that can be customized for any season and it is such an adorable addition to my entry.

DIY Gnome Shadow Box
Here at Ruffles and Rain Boots, I have a bit of an obsession with gnomes. To be honest, I make so many that I give many of them away… But not this guy. A spring gnome shadowbox was the perfect piece to add to my spring decor on my entryway table.
RELATED READING: HOW TO MAKE A NO-SEW GNOME
If you want to make one for yourself – for any season – let’s get started.
No Time to Make This Now? Pin it for Later
Want to come back to this later? Pin this to your favorite easy DIY ideas board on Pinterest and it’ll be here when you’re ready.

As an Amazon Associate, I can earn from qualifying purchases.
Tips to Make a Shadow Box Gnome
- Start with a small sock (I used a child’s) and then make the gnome a little smaller by not stuffing it too high with polyfill.
- I used a 12×12 Shadowbox with a 2-inch depth like this one. My advice is to get one with a linen backing to pin things on. There was no glue necessary, so you can swap out the pieces later if you’d like!
- I found my rocks out in the yard but if you don’t have access to rocks in your yard, you can find something similar at your home improvement store. Or, you can even put a piece of old wood or driftwood in the spot.
- Making gnome noses is kind of a thing where you just have to find what you like for the look you’re going for. Sometimes I use wood balls, sometimes I use a button and a lot of times, I love to use polymer clay because I can make it into any shape and size.
- Grab the free spring has sprung SVG cut file set here and be prepared to put that easy weed iconic spring proclamation on your shadowbox!
How Do I Make this DIY Gnome Shadow Box?
I’m so glad you asked. Below is our written tutorial. For the FULL video tutorial, click here.
DIY Gnome Shadowbox

You're not going to believe how easy it is to make this awesome DIY gnome shadowbox for spring. It's quick, cute, and the perfect addition to your farmhouse decor. Well, mine--you're going to have to make your own. Ha!
Materials
- 1 12x12x2 Shadowbox
- White Permanent Vinyl
- Cut File for "Spring Has Sprung"
- 15-20 Faux Flowers in Varying Sizes
- 1 1/2 cups Moss
- 2 Fist-Size Rocks
- 1 Small Sock
- Faux Fur Scraps
- 3 Beige Polymer Clay Balls (1 for nose and two for hands)
- 2 Black Polymer Clay Balls (for shoes)
- Small Amount of Polyfill Beads
- Small Amount of Polyfill Stuffing
- 5-6 Long Sewing Pins
- Floral Wire
Tools
- Wire Cutters
- Scissors
- Hot Glue Gun & Glue
- EasyPress Mini
- Cricut Explore Air 2 or Cricut Maker
- Exacto Knife or Razor Blade
Instructions
- Cut the tops off of all of your large and medium sized faux flowers, getting the remaining nubs as close to the flower as possible without actually cutting the flower. Select two small flowers and set aside to be placed on the gnome later. Make sure you leave a few of the smaller flowers on vines whole to weave in amongst the other flowers.
- With the shadowbox laying on a table and open, start by placing your rocks in the bottom right corner of your shadowbox.
- On the left side of the shadowbox in the upper left corner, start placing the largest flowers where you want them to be. Place the flowers on vines next, winding the vine through the larger flowers and pinning the vine in place as desired.
- Fill in all the spaces between about where you want the moss to start and the big flowers with smaller and smaller flowers, then add in the moss, filling in any remaining space, with the exception of exactly where the gnome will sit.
- Place pins in several locations throughout the shadowbox to hold the flowers and moss in when the shadowbox is set back up straight. Test the efficacy of the pins by setting the shadowbox up. Add more pins as necessary.
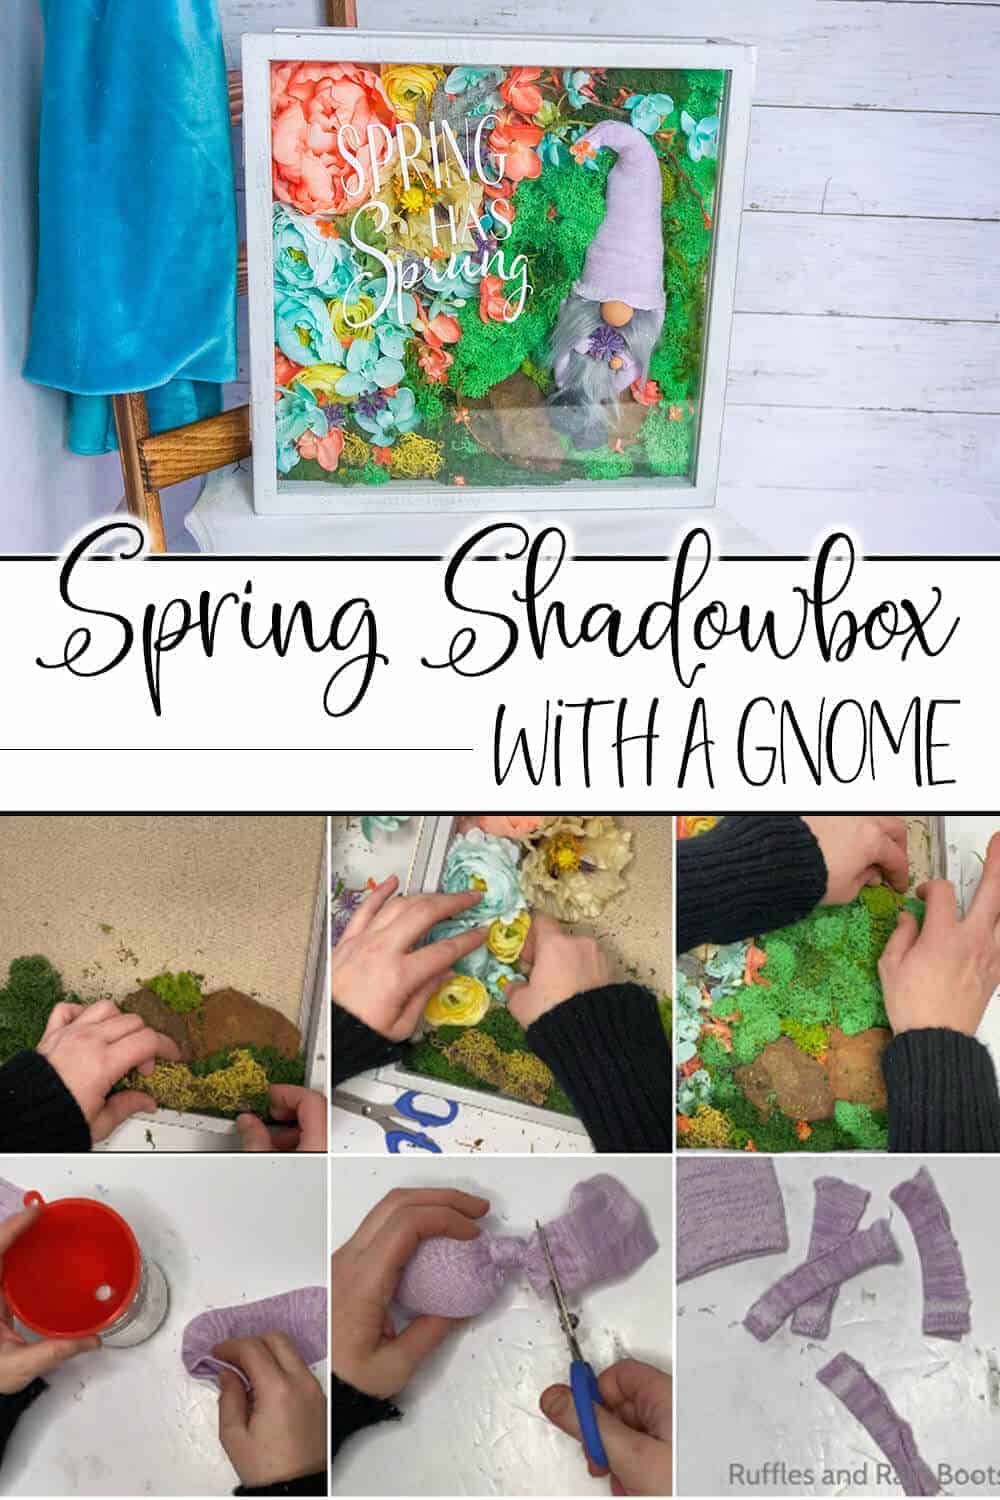
- To make the gnome, fill one of the socks about halfway full with polyfill beads. Tie the sock closed and cut off the excess sock fabric. Hot glue the knot of the sock closed.
- With the scraps of sock that you cut off the sock body, cut four 1-inch wide sections as long as you can get. Fold one of these sections of sock fabric in half, with the right sides facing. Hot glue the two cut sides of the sock piece together forming a hem. Repeat with all 4 pieces of sock to make the arms and legs. Turn the arms and legs right-side-out.

- With the second sock, cut a big long angle, starting at just below the heel, moving all the way up into the toe, making a large, thin angled cut. Turn this second sock inside out. Hot glue the two cut edges together, forming a seam. Turn the sock (now a hat) right side out. Feed the floral wire up into the hat, followed by polyfill as full as desired. Trim the wire to no longer than the sock opening. Tuck the hat down over the body and make sure you like the fit.
- Hot glue the nose on just above where you want the beard to start. Cut out a large beard shape from the faux fur by turning the fur over and cutting only the fabric with the Exacto knife. To determine how big to make my beard I simply laid the filled sock over the fur and made a "U" shape that would leave fur just at the edge of the sock to overhang on the bottom of the gnome and starting about 1 inch from the top of the sock--and about as wide as the entire front half of the sock. Hot glue the beard to the body.
- Tuck the hat back down onto the gnome head and hot glue the brim in place over the nose with a cute wrinkle (the best part!). Pull the hat down low in the back and hot glue it in place. Leave the sides open to place the arms--we'll glue the sides in a moment.
- Slip each arm up into the hat (trim as desired), behind the beard and hot glue in place. Hot glue the hands onto the ends of the arms.
- Hot glue the legs onto the bottom of the gnome, behind the beard and about the center of the sock bottom-of-the-gnome, then slide a 2-3 inch long piece of floral wire into each leg, trimming it to no longer than the hem of the leg. Hot glue the shoes onto the ends of the legs.
- With the reserved flowers, tuck one between the two hands and hot glue them in place. Then hot glue one flower on the end of the hat and curl the hat over.
- Place the gnome in the shadowbox and nestle him in place amongst the moss, then close the door.
- Load the cut file to Cricut Design Space and cut the lettering on your Cricut cutting machine. Be sure to mirror the lettering when using heat transfer vinyl. Trust me, wasted vinyl is so sad.
- Weed the vinyl then, with the Easy Press Mini, affix the lettering to the upper left side of the front glass before hanging your gnome shadowbox and enjoying!


Notes
For more fun spring craft ideas, visit Ruffles and Rain Boots!
Recommended Products
As an Amazon Associate and member of other affiliate programs, I earn from qualifying purchases.

More DIY Gnome Ideas You Might Like
- The Best Spring Gnomes – If you need a little touch of cuteness to brighten your spring farmhouse decor, you have got to check out these awesome spring gnomes. So much cuteness I die. LOL!
- Spring Cone Gnome with Rain Boots – Speaking of cuteness overload, this cone gnome is super easy to make and wears rain boots…sweet!
- Spring Sock Gnome with Boots – This is perhaps the easiest way to make a gnome–from a sock! And he’s doubly adorable because he’s got a little pair of boots.
Please Save This to Pinterest
Your shares are how this site grows and I am sincerely grateful. Know a friend who’d like this? Please share it on Facebook or save it to your favorite easy crafts board on Pinterest.
Meet the Creator
Hi there, I’m Sarah Nenni-Daher. I’m a crafty gal and always have at least 14 projects going at once. I am a crafter, designer, DIYer, and pattern maker. I share my creations here and in the Ruffles and Rain Boots® Shop.
Here at Ruffles and Rain Boots®, you’ll find DIY gnomes, crafts, gifts, cupcakes, laser crafts, and so much more. I love sharing video tutorials over on YouTube and chatting with other crafters in my Facebook groups. We’d love to have you!