
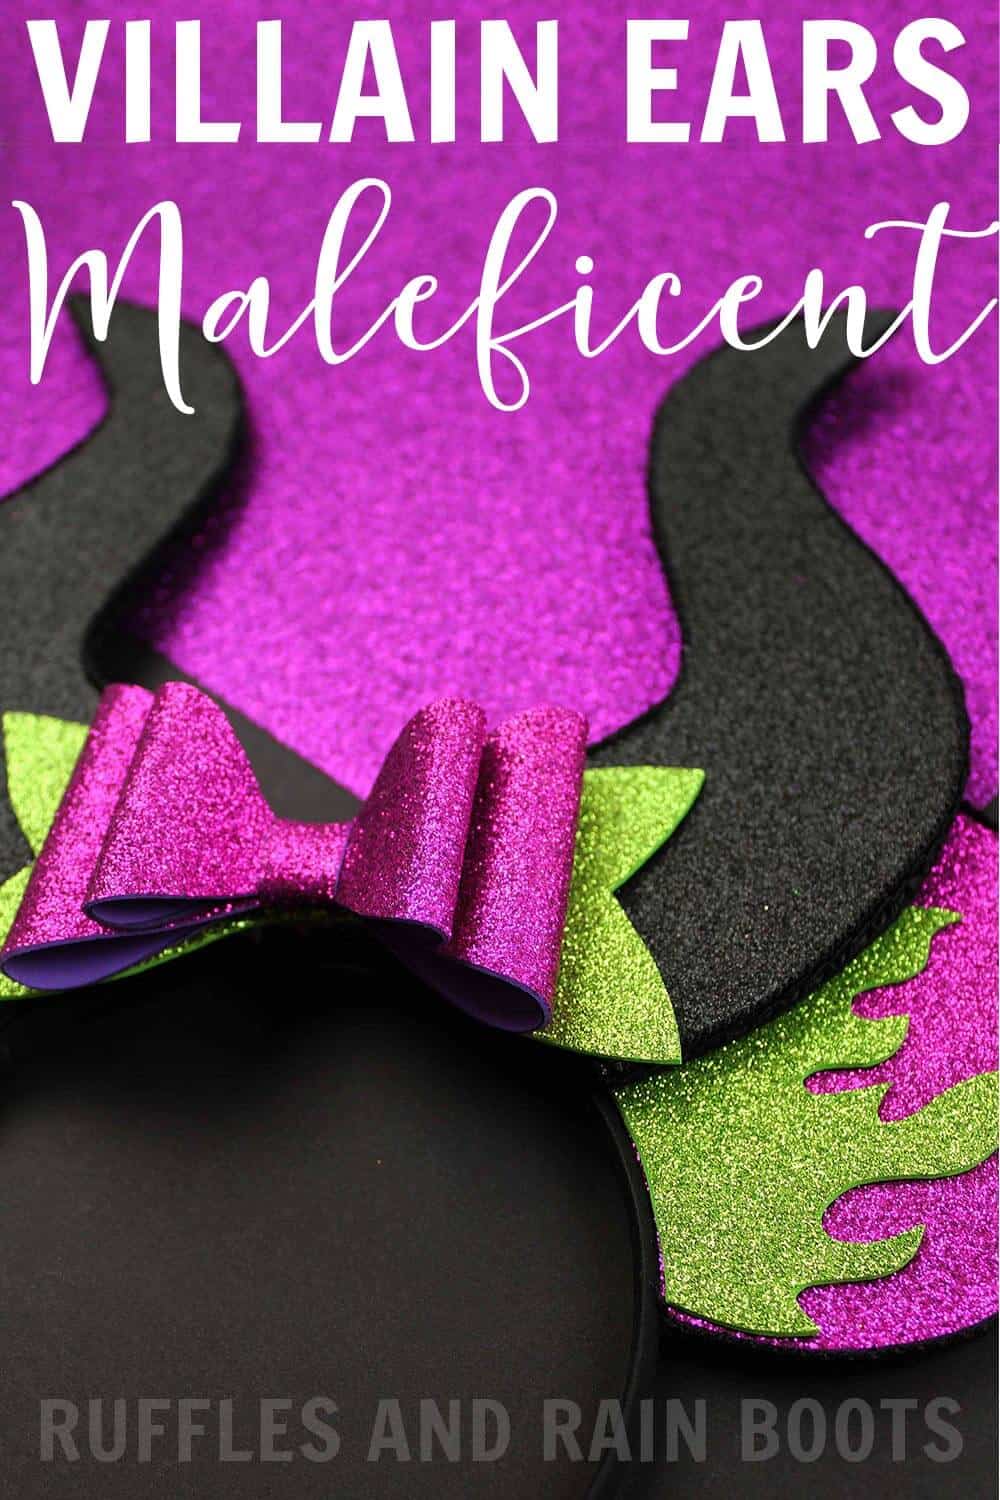
DIY Foam Maleficent Mickey Ears
These Maleficent Mickey ears are the perfect accessory to a Maleficent Halloween costume or to watch the new Maleficent 2 movie. It’s a fun, no-sew craft that needs only basic craft supplies and hot glue.
Foam Maleficent Mickey Ears
Here at Ruffles and Rain Boots, I’ve been known to share a DIY mouse ear headband (or twenty). I love making them for Disney vacations, dress up, and even parties. If you’re interested, you can see all of our DIY Mickey and Minnie ears here.
But sometimes, friends, you just want something quick and easy. And that’s exactly what these foam Maleficent Mickey ears are – quick and easy. Today, we’re sharing how to make these mouse ears with basic craft supplies you likely have on hand. Let’s get started.
No Time to Make These Now? Pin Them for Later
In case you have to grab something (or want to make these in a craft group), save this to a Disney crafts board on Pinterest. It will be here when you’re ready to start.

Tips When Making Mickey Ears from Foam…
I’ve been so many mouse ears, I figure it’s a good thing to share what I’ve learned with you beyond the tutorial. Here are some of my favorite tips when making your own Mickey ears or Minnie ear headbands.
- Use my tutorials as a guide. Allow yourself to add your own touches. If you can’t find something I mention, go to the craft store with your phone in hand and show them what you need – most are very helpful. I do it all the time!
- Nothing will be perfect, and that’s okay. I used to do something over and over until it was perfect, wasting time and craft supplies. Learn from my mistakes: no one will ever look as hard as you will. Give yourself grace.
- Okay, now down to the nitty-gritty with these Maleficent mouse ears… Make sure the headband is comfortable. It is your base, and although these Mickey ears are light, no one will want to wear something which bothers them.
- Leave off the bow or use any bow material you want or have on hand. I made this one with foam but love to use premade sequin bows or bows I make from tulle or fabric.
- Download the Malefience mouse ears template here. You can use all of the pieces, just a few, or print it off just to get ideas of the size. Either way, it’s a free Mickey ear template for you.

As an Amazon Associate, I could earn from qualifying purchases.
How Do I Use Foam to Make Maleficent Mouse Ears?
I’m so glad you asked! Below is our written tutorial. If you’re making a YouTube playlist, click here for our FULL Maleficent Mickey Ears from Foam video tutorial.
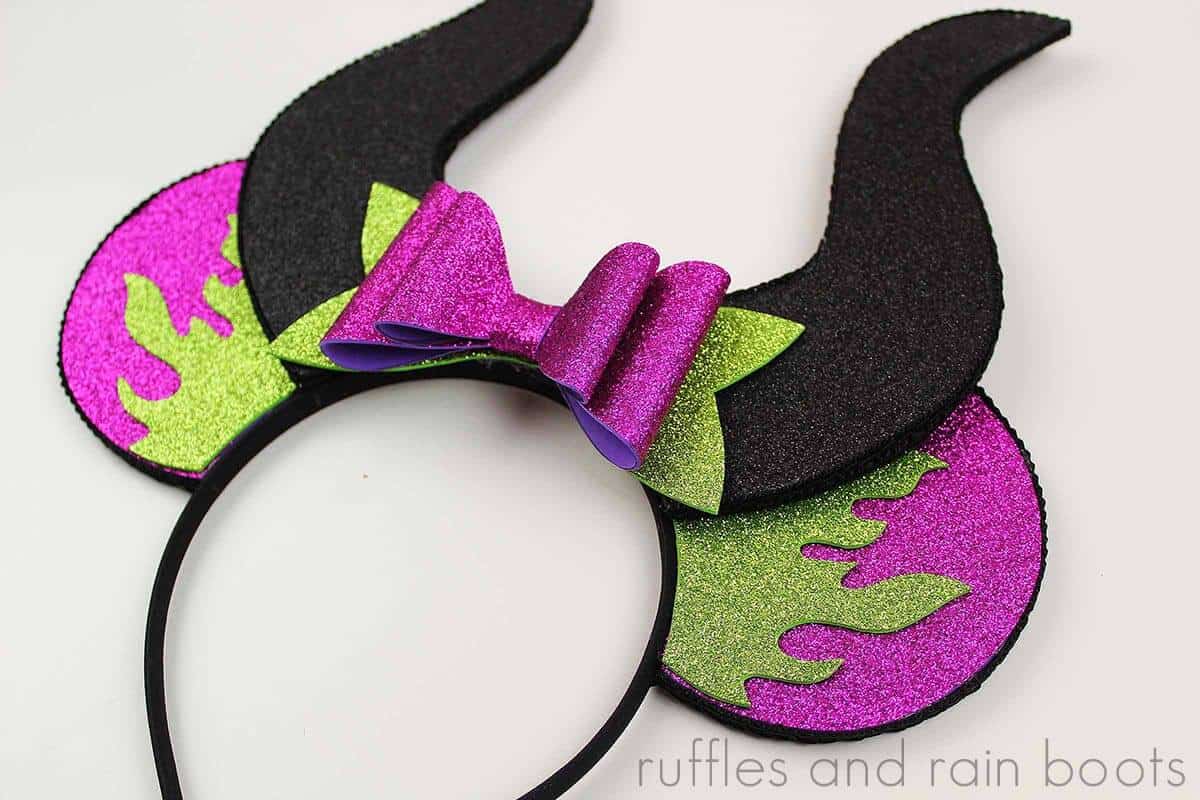
Foam Maleficent Mickey Ears
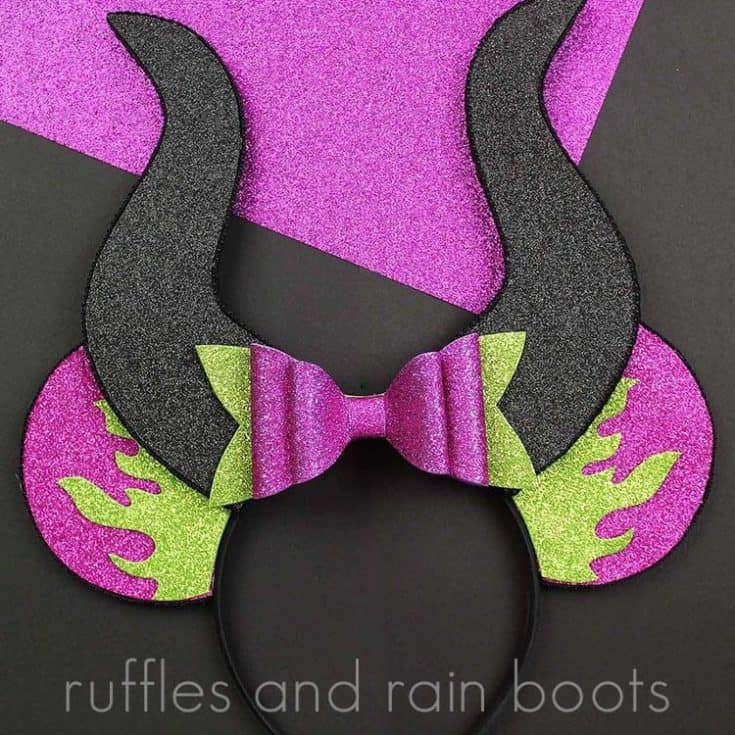
These DIY foam Maleficent Mickey ears are a perfect way to show your support for the Disney villain everyone loves to hate.
Materials
- Black Headband
- Black, Purple, and Green Glitter Foam Sheets (we used these)
- 5/16th inch Black trim (grosgrain, velvet, or designed ribbon, just no satin)
- Maleficent Mickey Ear Template (print)
Tools
- Scissors
- Hot Glue
- Marker or Pen (medium tip)
Instructions
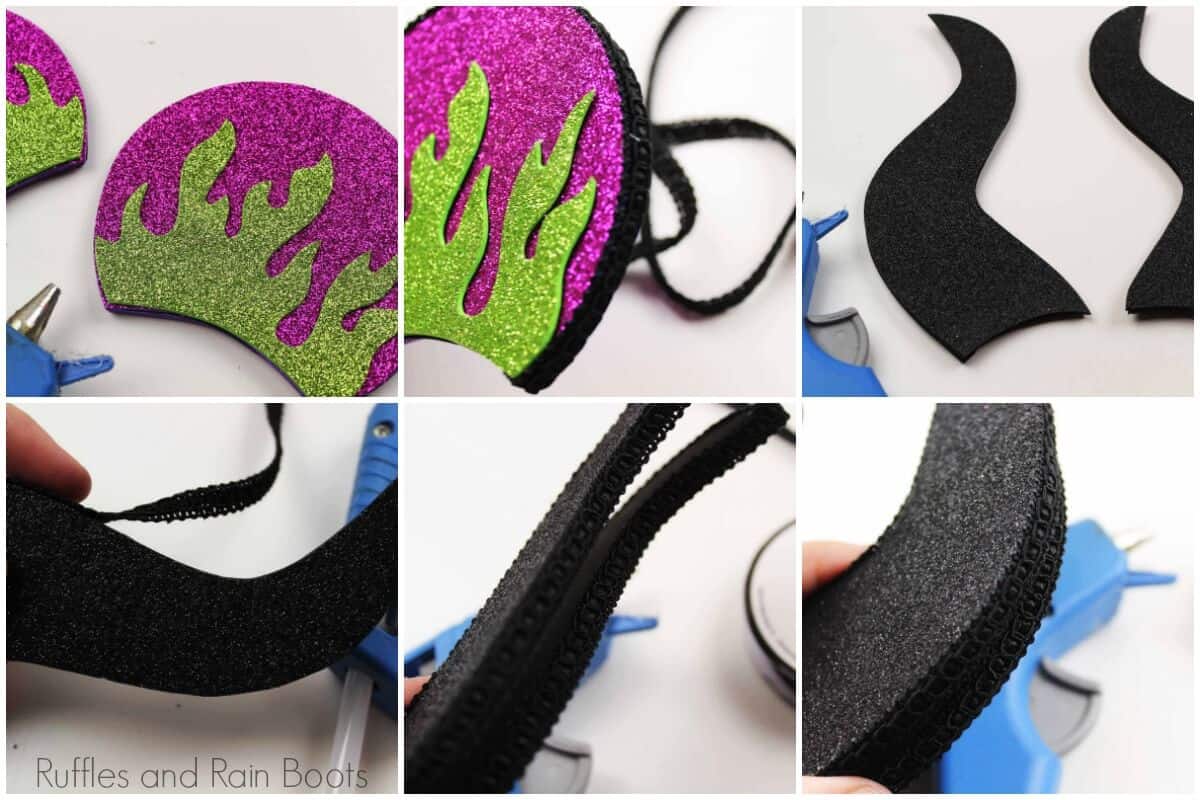
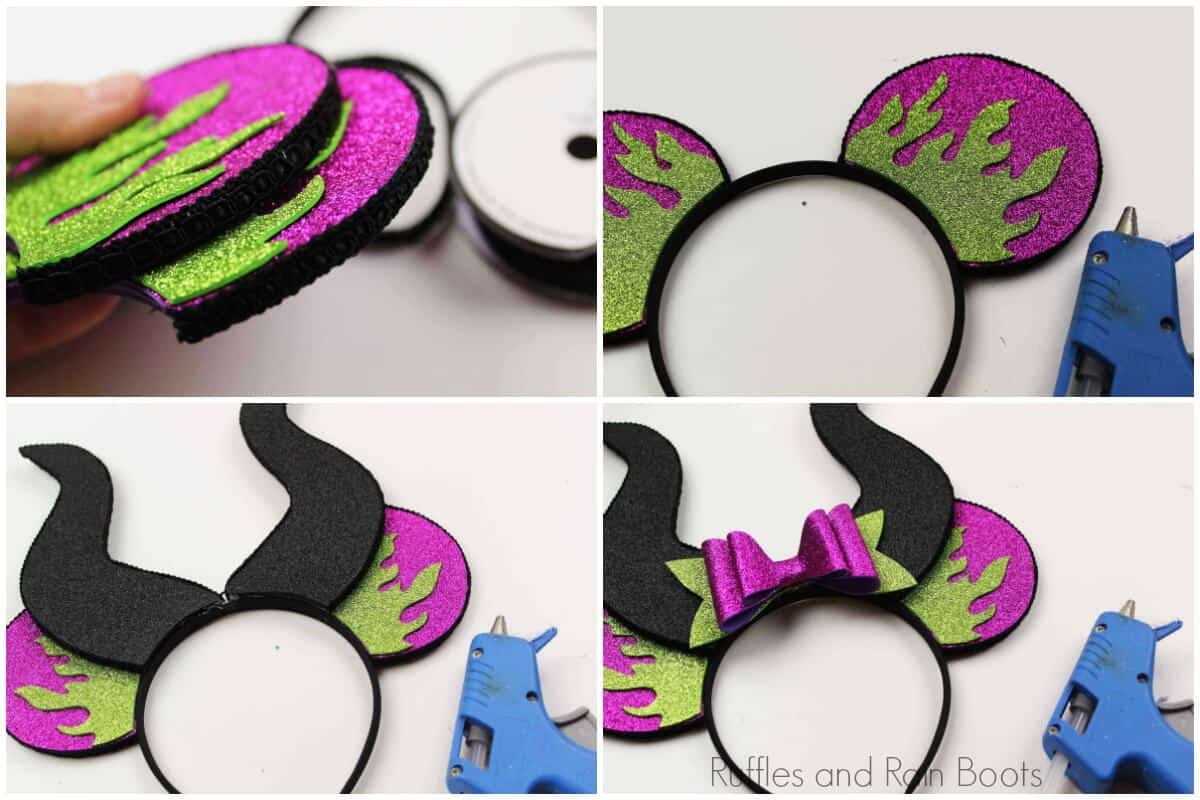
- Cut out the templates and trace them onto the foam pieces. You will need three pieces of everything except the bow for each ear and horn.

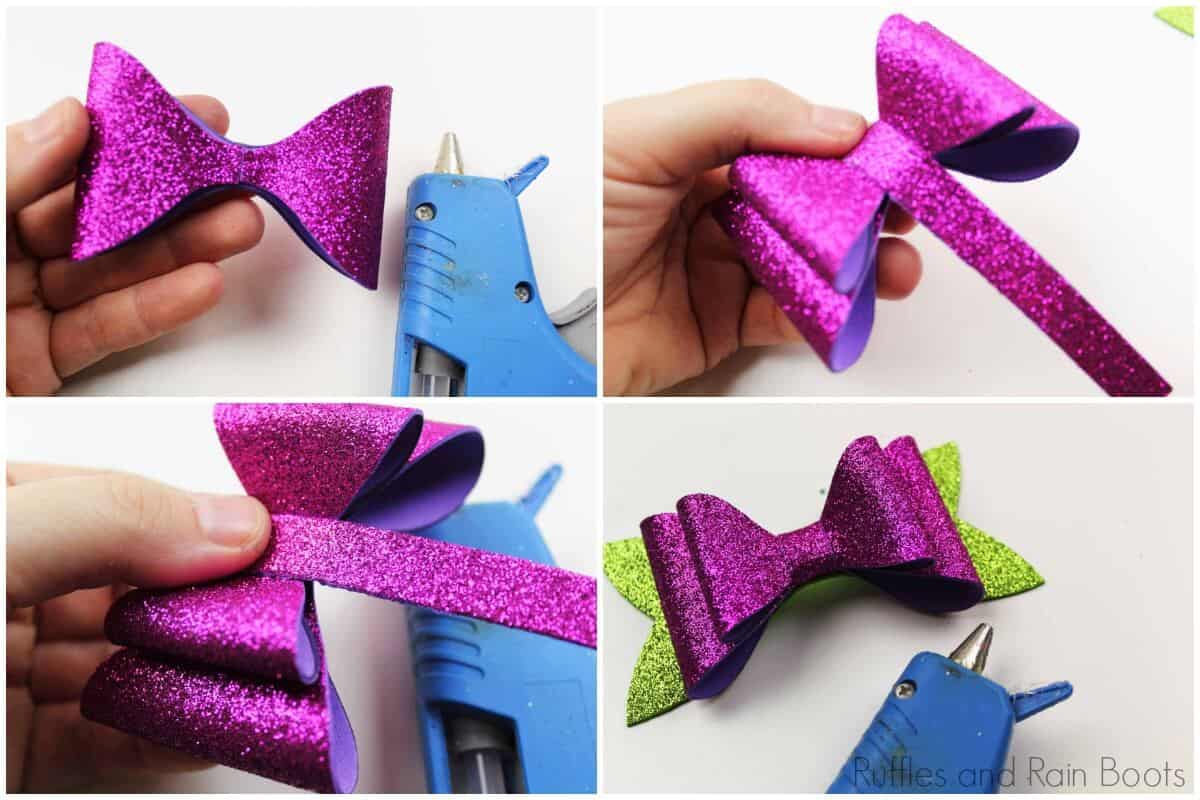
- Assemble the bow. Attach the ends of the smaller bow piece and repeat with the other bow piece. Attach them together with glue, attach them to the bottom piece, and secure all by wrapping a small strip in the middle. Secure all with glue.
- Glue three of the head sections of foam together with the glitter facing the front. Attach the green fire to the front of the ear with glue. Repeat both tasks for the other ear.
- Next, glue three sections of the horn foam pieces together, glitter facing the front. Repeat with the other horn.
- Add the border on the edges of the entire ear (Mickey head and ears) with hot glue, working in small sections.
- Secure the ears to the headband and glue on the bow in the center, if using.

Notes
For a ridiculous amount of DIY Mickey and Minnie ear headband tutorials, visit Ruffles and Rain Boots.
Creativity, Delivered
Would you like inspiration delivered right to you each week? Sign up for the once-weekly Ruffles and Rain Boots newsletter and you’ll get that and more! Get access to the exclusive libraries full of free SVGs, hand lettering practice, and so much more.
More Mickey Ear Tutorials You Might like
It’s no secret I love designing and making my own Minnie and Mickey ears. If you need inspiration, here are a few more villain mouse ear tutorials you might like:
- Maleficent Minnie Ears – These are show-stopping Maleficent Disney ears you HAVE to see.
- Foam Pumpkin Head Mickey Ears – If you’ve been to Magic Kingdom near Halloween, we’ve brought this fun character to life with a no-sew tutorial.
- Death Star Mickey Ears – If you’re a fan of The Dark Side, check out these fun mouse ears.
Please Save This to Pinterest or Share on Facebook
Your shares are how this site grows and I am sincerely grateful. Please share this to Facebook or save it to a craft board on Pinterest.

I would love to make these but the file for the template is empty.
Hi there, Stephanie, the link is correct. If you are on a device and attempting to access it through an app (like Pinterest or Facebook), it could show blank or not allow a download.
The link is here (copy paste): https://drive.google.com/drive/folders/1e1sV6GfecFlB1aGi8hThIvklvrck-e4O?usp=sharing