
Dollar Tree Elf Cutting Board
This Dollar Tree cutting board elf craft idea came together in minutes on a recent run to the Dollar Tree. It’s a cute Christmas craft you can create on your own, with the kids, or set up for the kids during the holiday break.
This elf craft idea is great because you can customize it to be any color combination and put on any kind of face you like. And if you’re an “Elf on the Shelf” family, this is a perfect craft the elf can set up for the little ones!

RELATED READING:
What You'll Find On This Page
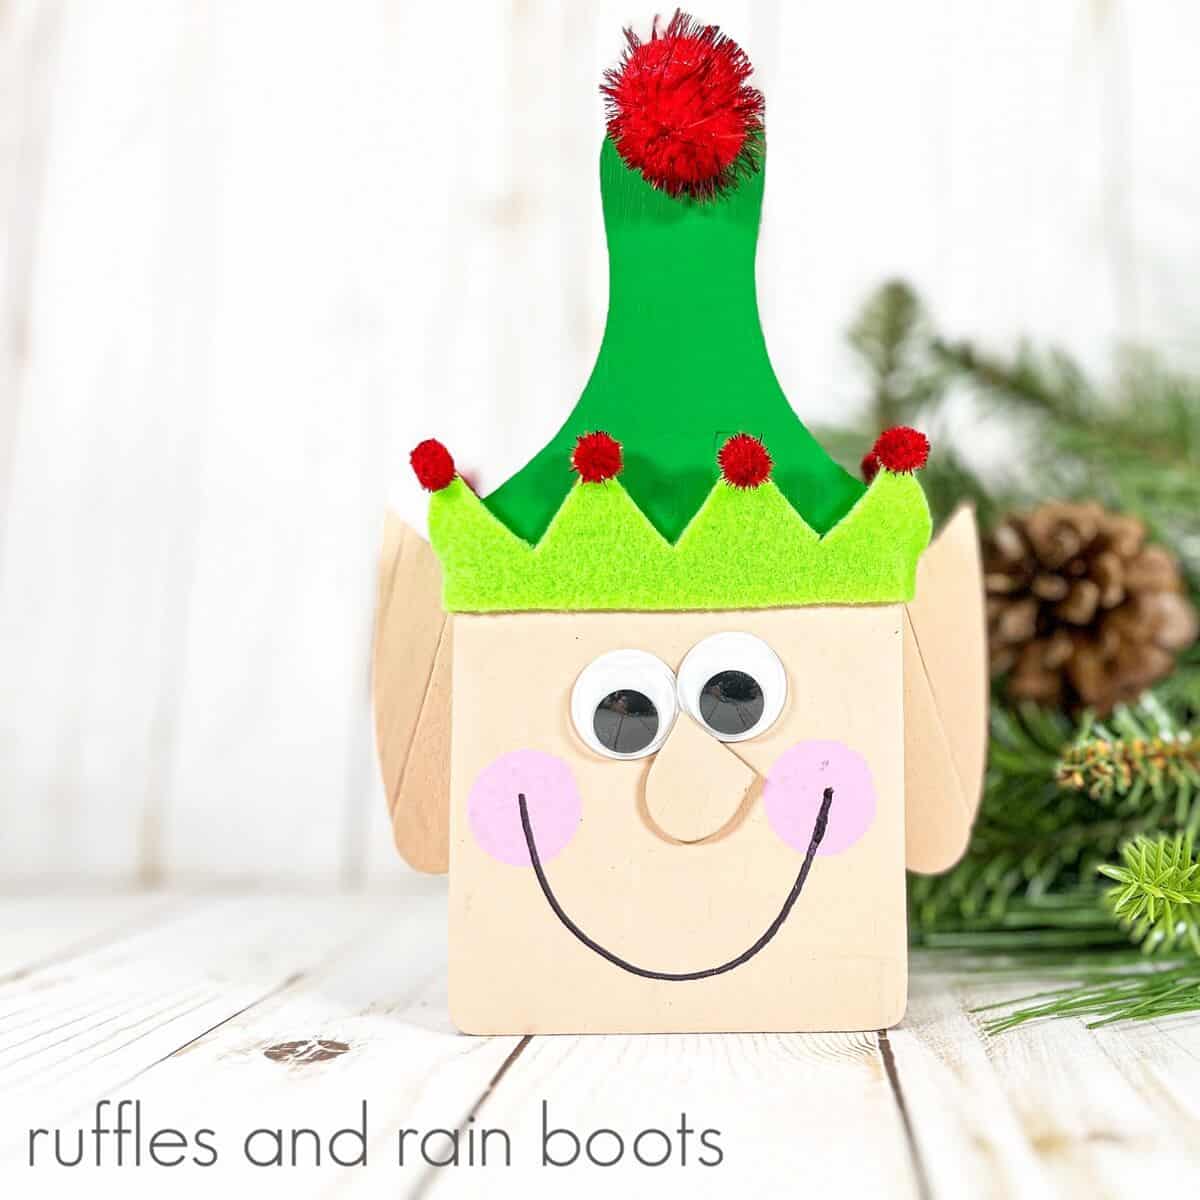
Cutting Board Elf Craft
Here at Ruffles and Rain Boots, like you, we get so busy during the holidays. Planning things like crafts to make with the family, calm-down crafts, or even painting breaks helps to keep the chaos in check.
This cutting board elf is a fun one you can do all at once or in parts. It’s great for art teachers, your mantle, a tiered tray, or even hanging on the door handle. would look perfect on your mantel, a holiday tablescape, or hanging on the wall or your door. This little guy (or gal) looks great anywhere you choose to show them off.
If you need time to gather your supplies from the dollar store, bookmark this page to make it easy to come back to when you are ready to create your elf cutting board Christmas decor craft project.

As an Amazon Associate, I could earn from qualifying purchases. There may be affiliate links within this article.
Tips For Making A Cutting Board Elf
- For very small hands, prepare the elf ears and felt hat accents ahead of time. They can focus on the “paint and decorate” portion.
- I recommend using a hot glue gun for the gluing sections of this craft project for a quick option. You can use glue dots (for the younger kids) or even school glue in moderation (it can bleed through the felt).
- Although many googly eyes have adhesive on the back, I like to add a drop of hot glue to give them an added layer of adhesion to them.
- When you are cutting the glue pieces of craft sticks for the ears, you may get some jagged edges from the scissors. If so, just use some fine grit sandpaper to smooth out that area.
Supplies To Make This Cute Elf Christmas Craft
Below are the supplies we used, but check your craft bin (and holiday decorating supplies) to see what you have on hand.
- Jumbo Craft Sticks
- Unfinished Wooden Cutting Board
- Wiggle/Googly Eyes
- Large and small red Pom Poms
- Craft Paint
- Green Craft Felt
- Permanent Black Marker
- Cutting Board Elf Patterns
How To Make This Christmas Elf Kid’s Craft
Each step for this craft is detailed below to make it easy. Keep this page open while you are creating your cutting board elf. If you would rather have a printable how-to, scroll down and select the print button.

Using a ruler, draw a line about 1/3 of the way down from the top of the cutting board with a pencil.

Basecoat the bottom of the cutting board, below the line you drew with the pencil with flesh-tone acrylic craft paint. Paint the top of the cutting board, above the pencil-drawn line with green paint. Allow to dry and apply a second coat if necessary.

Download, print, and cut out the Cutting Board Elf Patterns. Cut two jumbo craft sticks in half and using a glue gun attach both sets of halves with an additional piece of jumbo craft stick.
Trace the elf ear pattern onto the double craft stick with a pencil. Flip the pattern, and trace on the other double craft stick, making sure you have a right and a left ear. Cut out the elf ears with scissors. Trim the rounded end from a jumbo craft stick, making a nose.

Basecoat the elf ears and nose with the flesh-tone acrylic craft paint. Let dry and apply a second coat, if necessary.

Trace and cut the elf hat pattern onto the neon green craft felt.

Attach the felt hat trim to the bottom edge of the green on the cutting board with a glue gun. Make sure to wrap around the sides and secure it on the back of the cutting board.

Attach the craft stick ears to the right and left side of the elf’s face with a glue gun and glue sticks, using the photo as a guide for the placement.

Attach two wiggle/googly eyes and a nose with a glue gun.

Create cheeks by dipping the sponge dauber into pink craft paint. Stamp on either side of the elf’s face and set aside to dry.

Glue mini red tinsel pom poms to each point of the elf’s hat. Attach one jumbo pom pom to the top of the cutting board handle with a glue gun.

Draw a smile from cheek to cheek with the permanent black marker. Now you are ready to show off your adorable cutting board elf.
More Holiday Crafts You May Enjoy
- How to Sublimate a Mug with a Free Christmas SVG: This funny and sarcastic SVG file is perfect for that person in your life loves a laugh. It’s great when filled with candy or money…
- Rustic Wooden Nutcracker Craft for Christmas: This minimalistic wooden nutcracker will fit into just about any style decor you have. It will elevate any room.
- Dollar Tree Santa Wreath (or Gnome): We get so many compliments on this craft.
- Dollar Tree Santa Pillow (Pillow Gnome): This pillow is one of our cutest holiday crafts. All you need is about 10 minutes, fleece, and a ping pong ball!
Please Save or Share
Your shares are how this site grows and I sincerely appreciate it. Please save this holiday craft to your favorite Christmas pin board or share it on Facebook.

Dollar Tree Cutting Board Elf

Make this adorable dollar store elf using a cutting board with crat sticks, paint, pompoms, and some felt.
Materials
- Unfinished Wooden Cutting Board
- Jumbo Craft Sticks
- Wiggle Eyes
- Mini and Jumbo Red Pom Poms
- Green, Pink, and Flesh Tone Acrylic Craft Paint
- Neon Green Craft Felt
- Permanent Black Marker
- Cutting Board Elf Patterns
Tools
- Glue Gun and Glue Sticks
- Scissors
- Paintbrush
- Sponge Dabber
- Ruler
- Pencil
Instructions
- Using a ruler, draw a line about 1/3 of the way down from the top with a pencil.
- Add a base coat to the bottom half of the cutting board with flesh-tone acrylic craft paint and the top half of the cutting board with green paint. Let dry (add a second coat, if needed).
- Print and cut out the Cutting Board Elf Patterns.
- Cut two jumbo craft sticks in half and using a glue gun attach both sets of halves with an additional piece of jumbo craft stick. Trace the elf ear pattern onto the double craft stick with a pencil. Flip the pattern, and trace on the other double craft stick, making sure you have a right and a left ear. Cut out the elf ears with scissors.
- Trim the rounded end from a jumbo craft stick, making a nose.
- Paint the elf ears and nose with flesh-tone acrylic craft paint. Let dry and apply a second coat, if needed.
- Trace and cut the elf hat pattern onto the neon green craft felt.
- Attach the felt hat trim to the bottom edge of the green on the cutting board with a glue gun. Wrap around the sides and secure it on the back.
- Attach the craft stick ears to the right and left side of the elf’s face with a glue gun and glue sticks.
- Attach two wiggle eyes and the nose with a glue gun.
- Create cheeks by dipping the sponge dauber into pink craft paint. Stamp on either side of the elf’s face and set aside to dry.
- Glue mini red tinsel pompoms to each point of the elf’s hat. Attach one jumbo pom pom to the top of the cutting board handle.
- Draw a smile from cheek to cheek with the permanent black marker.
Meet the Creator
Hi there, I’m Sarah Nenni-Daher. I’m a crafty gal and always have at least 14 projects going at once. I am a crafter, designer, DIYer, and pattern maker. I share my creations here and in the Ruffles and Rain Boots® Shop.
Here at Ruffles and Rain Boots®, you’ll find DIY gnomes, crafts, gifts, cupcakes, laser crafts, and so much more. I love sharing video tutorials over on YouTube and chatting with other crafters in my Facebook groups. We’d love to have you!