
Dollar Tree DIY Acorns Craft
If you are looking for new fall decor, this Dollar Tree acorn craft is just the thing! This is an easy craft that will look perfect on your tiered tray, dough bowl, or glass vase, or on its own in a cluster on the table or mantle.
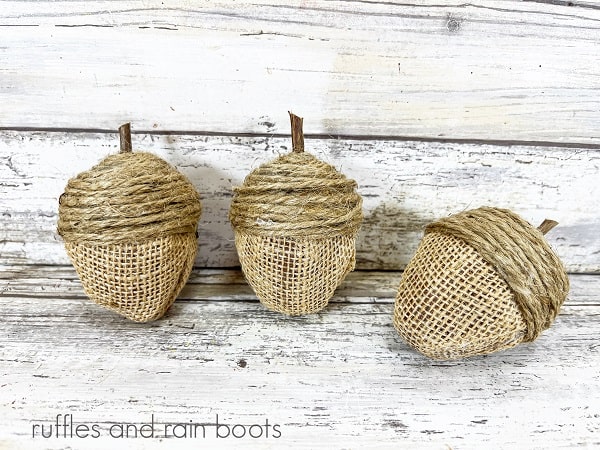
You are not going to believe what our main material is for this craft. It’s plastic Easter eggs! How clever is that? With a few other supplies, you can turn that ordinary egg into something extraordinary for your home.

RELATED READING: Easy Basket Pumpkin (So Cute for Farmhouse Decor)
What You'll Find On This Page
Easter Egg Acorns
Here at Ruffles and Rain Boots, we love fall. We love the crisp cool air (when we can get it here in Texas) and the beautiful colors of the fall leaves. There is something about seeing those reds, yellows, and orange leaves. Just gorgeous.
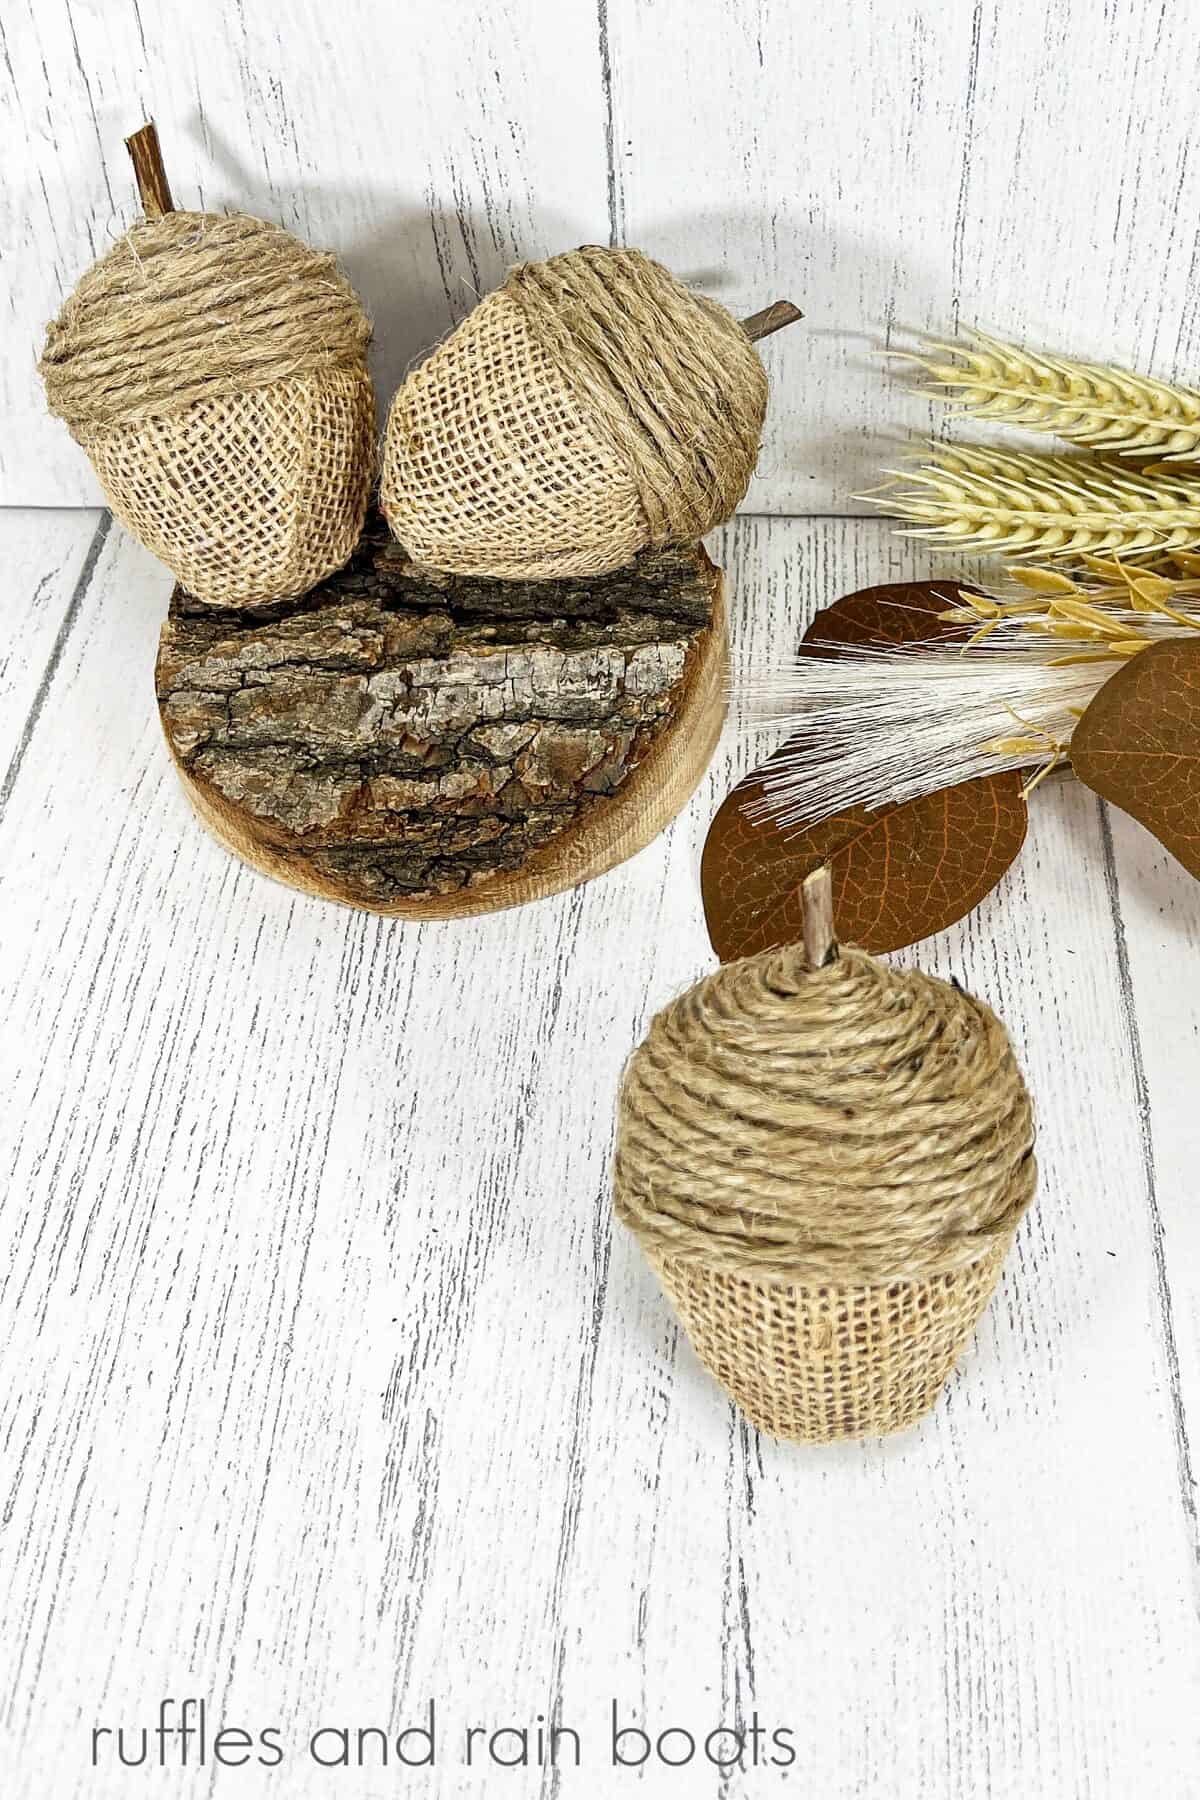
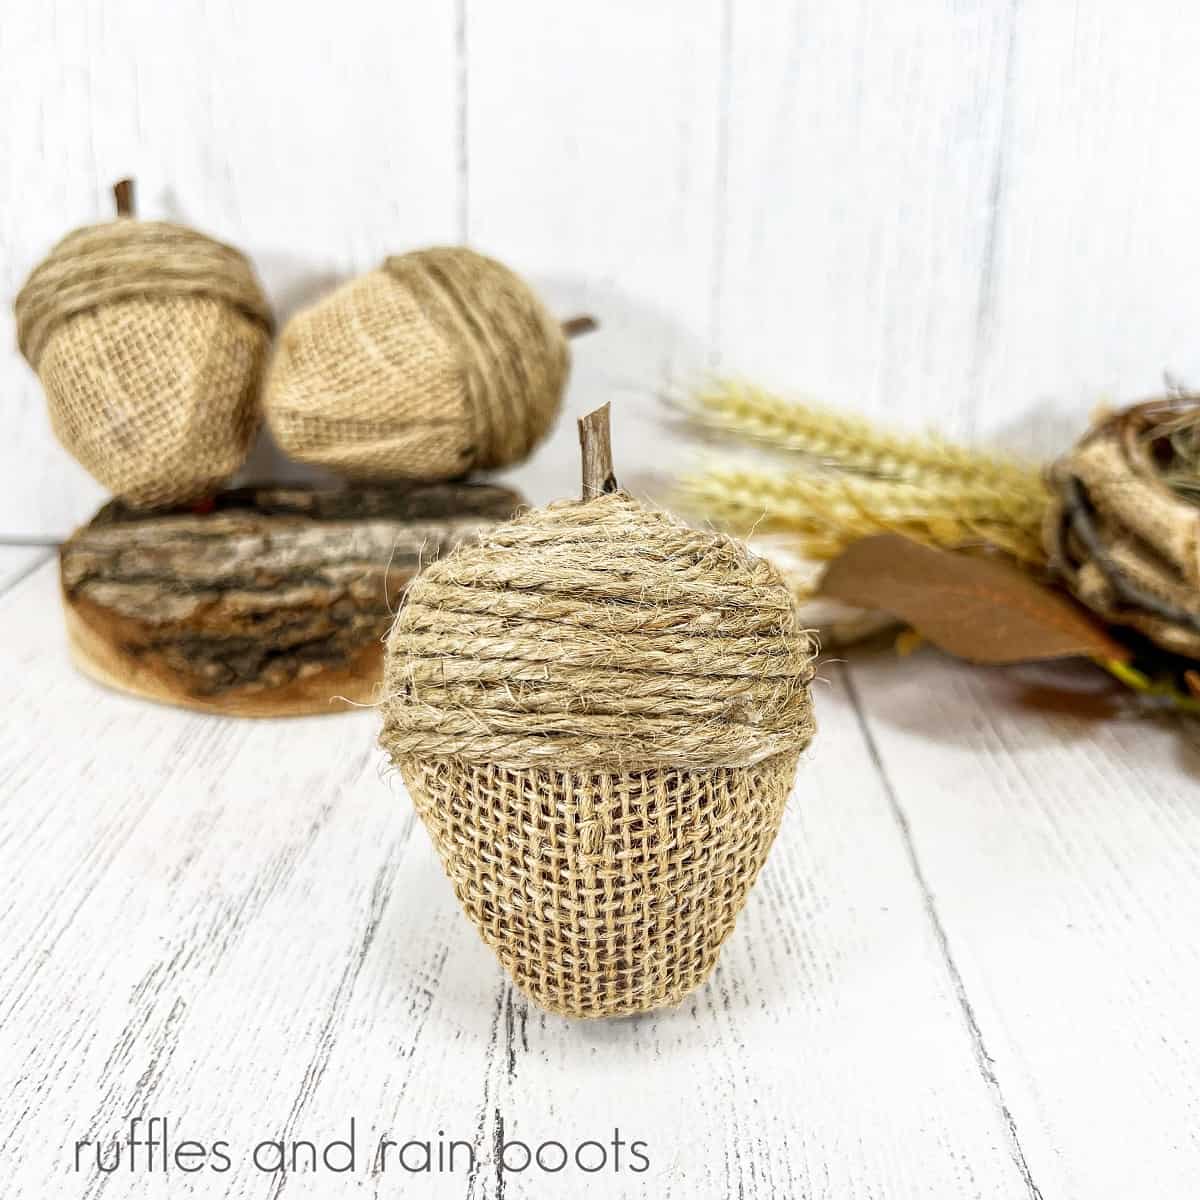
And of course, from some of those trees come acorns. Let the squirrels collect those acorns and you can make our version for your home decor. Go ahead and make a lot so you can share them!
If you need time to gather your supplies, bookmark this page to make it easy when you are ready to create your fall Dollar Tree acorns.
As an Amazon Associate, I could earn from qualifying purchases. There may be affiliate links within this article.
Why These Dollar Tree Fall Acorns Are the Perfect Craft
They are so inexpensive to make! If you had leftover plastic Easter eggs as we did, all you need is some burlap, twine, and a twig from your yard and you are on the way to the cutest craft!
Keep the kids entertained. This is a craft the kids can make virtually on their own. The younger kids will need help with gluing and wrapping the twine, but the older tweens and teens can complete these solo.
The cuteness factor. I love coming up with crafts that are so easy and cute but really look like they are store-bought. I bet your friends and family would be shocked to know you used a plaster egg as the base.

Tips for Making Burlap Easter Egg Acorns
- We used solid plastic Easter eggs for acorns to decorate. If you are using split-style eggs, glue them closed with a hot glue gun before painting.
- If you don’t have any sticks in your yard, they sell some clean sticks for crafting here. You get quite a few, so you have extra to make more fall crafts.
- If you have trouble finding burlap ribbon, you can purchase it by the yard or in a roll at your local fabric or craft store.
- When gluing the burlap, watch out for the glue to seep out of this open weave material. We do not recommend gluing with white or tacky glue.
Supplies to Make a Dollar Tree Acorns Craft
Below are the supplies we used to make these Dollar Tree fall crafts. Before you head to the store for your materials, check your craft and sewing bin to see what you have on hand. For information on how to safely glue your burlap onto the eggs, read the tips above.
- Plastic Easter Eggs
- Burlap Ribbon
- Natural Jute Twine
- Dark Brown Acrylic Craft Paint
- Glue Gun and Glue Sticks
- Twigs From Your Yard
- Scissors
- Paintbrush
- Wire Cutters

How to Make Plastic Easter Egg Burlap Acorns
Each step for this fall craft is detailed below so it’s easy to follow. Keep this page open while you are creating your fall Easter egg acorns with burlap. If you would rather have a printable how-to, scroll down and select the print button.

Paint the outside of the three plastic Easter Eggs with dark brown craft paint. Set aside to dry.
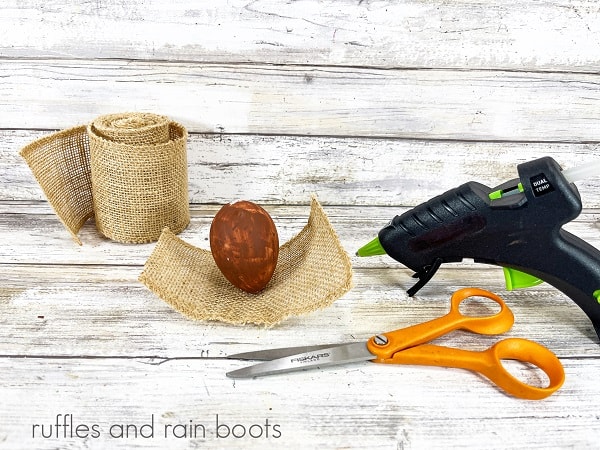
Cut a rectangular piece of burlap ribbon that is large enough to be wrapped around the entire egg.
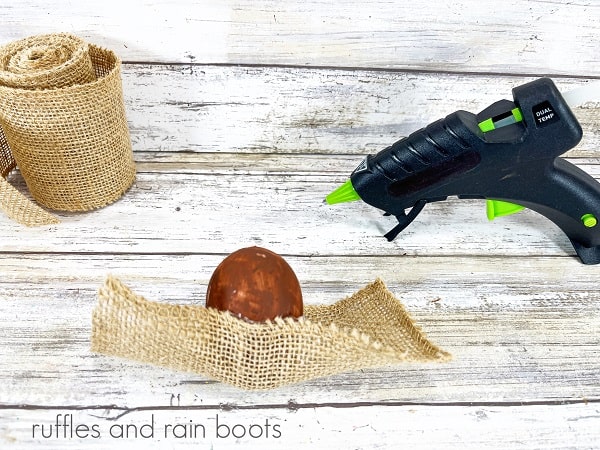
Glue the painted egg on the center of one side with a glue gun.
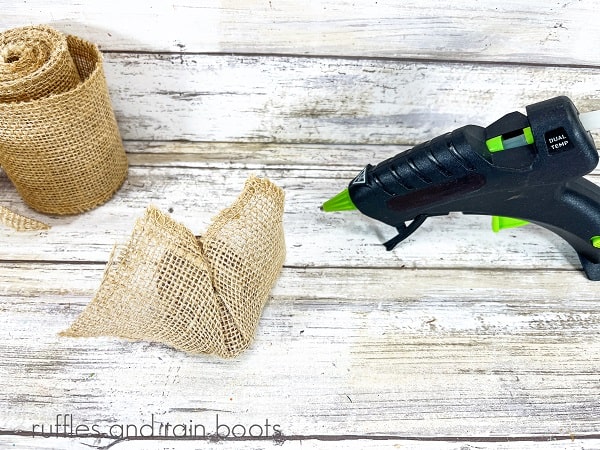
Fold up the short sides of the burlap ribbon and attach it with the glue gun. Repeat with the long sides of the burlap ribbon and additional glue.

Continue to pleat and fold the burlap around the egg, securing each section using the glue gun.

Trim any excess burlap ribbon from the top of the Easter eggs using scissors.
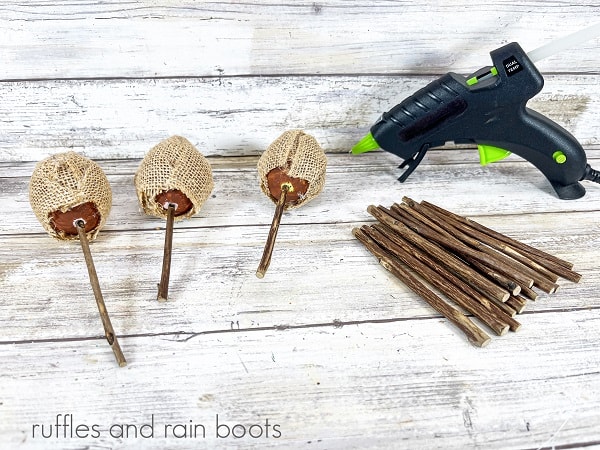
Insert a 6” long twig into the holes at the top of each Easter egg and secure it with a glue gun.

Tie the natural jute twine in a double knot around the twig. This will make a good base to start wrapping the twine around the top of the egg. Trim the end of the knot with scissors.
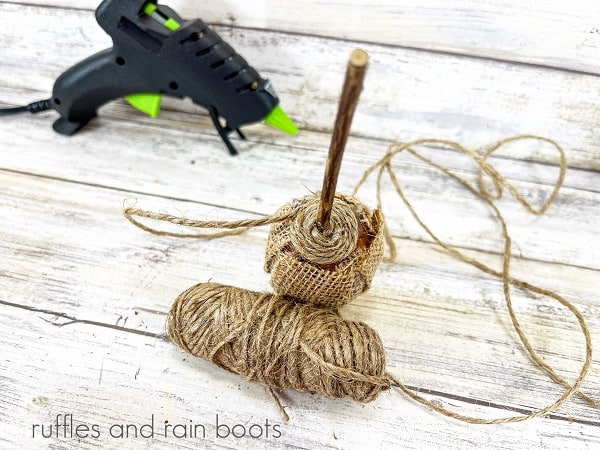
Create the cap of the acorn by coiling the natural jute twine around the top of the egg using the glue gun to attach it as you go.
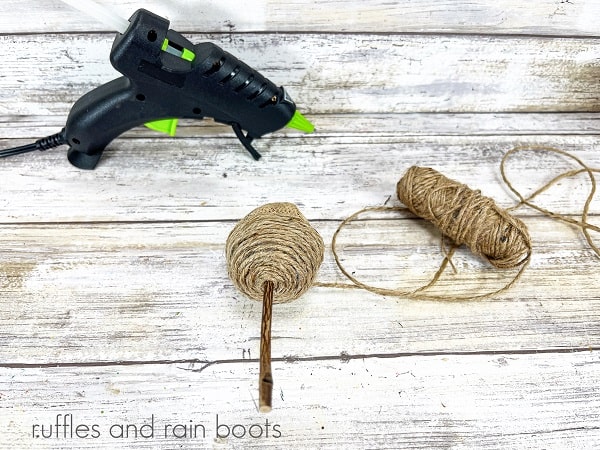
Continue to coil the twine around the top one-third of the plastic egg. Wrap the twine around multiple times, gluing as you go.

To finish, trim the twig to ½” long with a pair of wire cutters.
Repeat the process for the remainder of the eggs. They look great in a grouping in a dough bowl but would also be fun tucked into a mantle display.
Notes for Making Dollar Tree Acorns
Coil your jute twine around the top of the egg neatly and tightly. Using your glue gun, glue a dot every few inches to help it stay in place.
If you don’t already have a hole at the top of your egg to put the twig in, make one yourself. You can use a pair of scissors or a Phillips head screwdriver. Watch your fingers!
Because the eggs are plastic, you may need to paint two coats of brown paint on them. This will ensure you have no pastel colors peeping out through the burlap of your fall acorn DIY.
More Fall Crafts You May Like
- Buffalo Check Fall Sock Gnome: This no-sew gnome for fall is the cutest farmhouse-style gnome on the block! It is super easy to make and the pumpkin graphic makes it pop.
- Easy Dollar Tree Fall Mug Cricut Joy Tutorial: This easy craft will take less than 15 minutes to complete. When you are done, you will have two cute mugs to use in the seasonal sweater weather.
- Easy Fall Shelf Sitter Gnome Pattern: This is the best autumn gnome ever! Using a piece of black and white striped fabric for inspiration, this gnome will be right at home on your mantle.
- Pumpkin Spice Bath Bombs: These pumpkin spice bath bombs are sure to be a favorite tool in your fall skincare game. Your skin will feel luxurious and smell amazing.
Please Save or Share
Your shares are how this site grows and I sincerely appreciate it. Please save this fall craft to one of your favorite craft pin boards or share it on Facebook.

Dollar Tree Acorns Craft

These Dollar Tree Acorns come together in just about 30 minutes with leftover Easter eggs, limited supplies from the Dollar Tree, and what you have in your craft bin. You can easily make these Easter egg acorns in one afternoon. These brightly colored eggs from the Dollar Tree transform into the cutest trio of burlap acorns and will add some homemade charm to your Autumn tiered tray or fall home décor.
Materials
- Plastic Easter Eggs
- Burlap Ribbon
- Natural Jute Twine
- Dark Brown Acrylic Craft Paint
- Twigs From Your Yard
Tools
- Glue Gun and Glue Sticks
- Scissors
- Paintbrush
- Wire Cutters
Instructions
- Paint the outside of the three plastic Easter eggs with dark brown craft paint. Set aside to dry. These are solid plastic Easter eggs, so if using the split eggs, glue them closed before painting.
- Cut a rectangular piece of burlap ribbon that is large enough to be wrapped around the entire egg. Glue the painted egg on the center of one side with a glue gun.
- Fold up the short sides of the burlap ribbon and attach it with the glue gun. Repeat with the long sides of the burlap ribbon and additional glue.
- Continue to pleat and fold the burlap around the egg, securing each ribbon section using the glue gun. Work around the egg, until the entire surface is covered with the burlap ribbon.
- Trim any excess burlap ribbon from the top of the Easter eggs using scissors.
- Insert a 6” long twig into the holes at the top of each Easter egg and secure it with a glue gun.
- Tie the natural jute twine in a double knot around the twig. This will make a good base to start wrapping the twine around the top of the egg. Trim the short end of the knot with scissors.
- Create the cap of the acorn by coiling the natural jute twine around the top of the egg using the glue gun.
- Continue to coil the twine around the top one-third of the plastic egg. Wrap the twine around multiple times, gluing as you go.
- To finish, trim the twig to ½” long with a pair of wire cutters.
- Repeat the process for the remainder of the eggs.
Meet the Creator
Hi there, I’m Sarah Nenni-Daher. I’m a crafty gal and always have at least 14 projects going at once. I am a crafter, designer, DIYer, and pattern maker. I share my creations here and in the Ruffles and Rain Boots® Shop.
Here at Ruffles and Rain Boots®, you’ll find DIY gnomes, crafts, gifts, cupcakes, laser crafts, and so much more. I love sharing video tutorials over on YouTube and chatting with other crafters in my Facebook groups. We’d love to have you!