
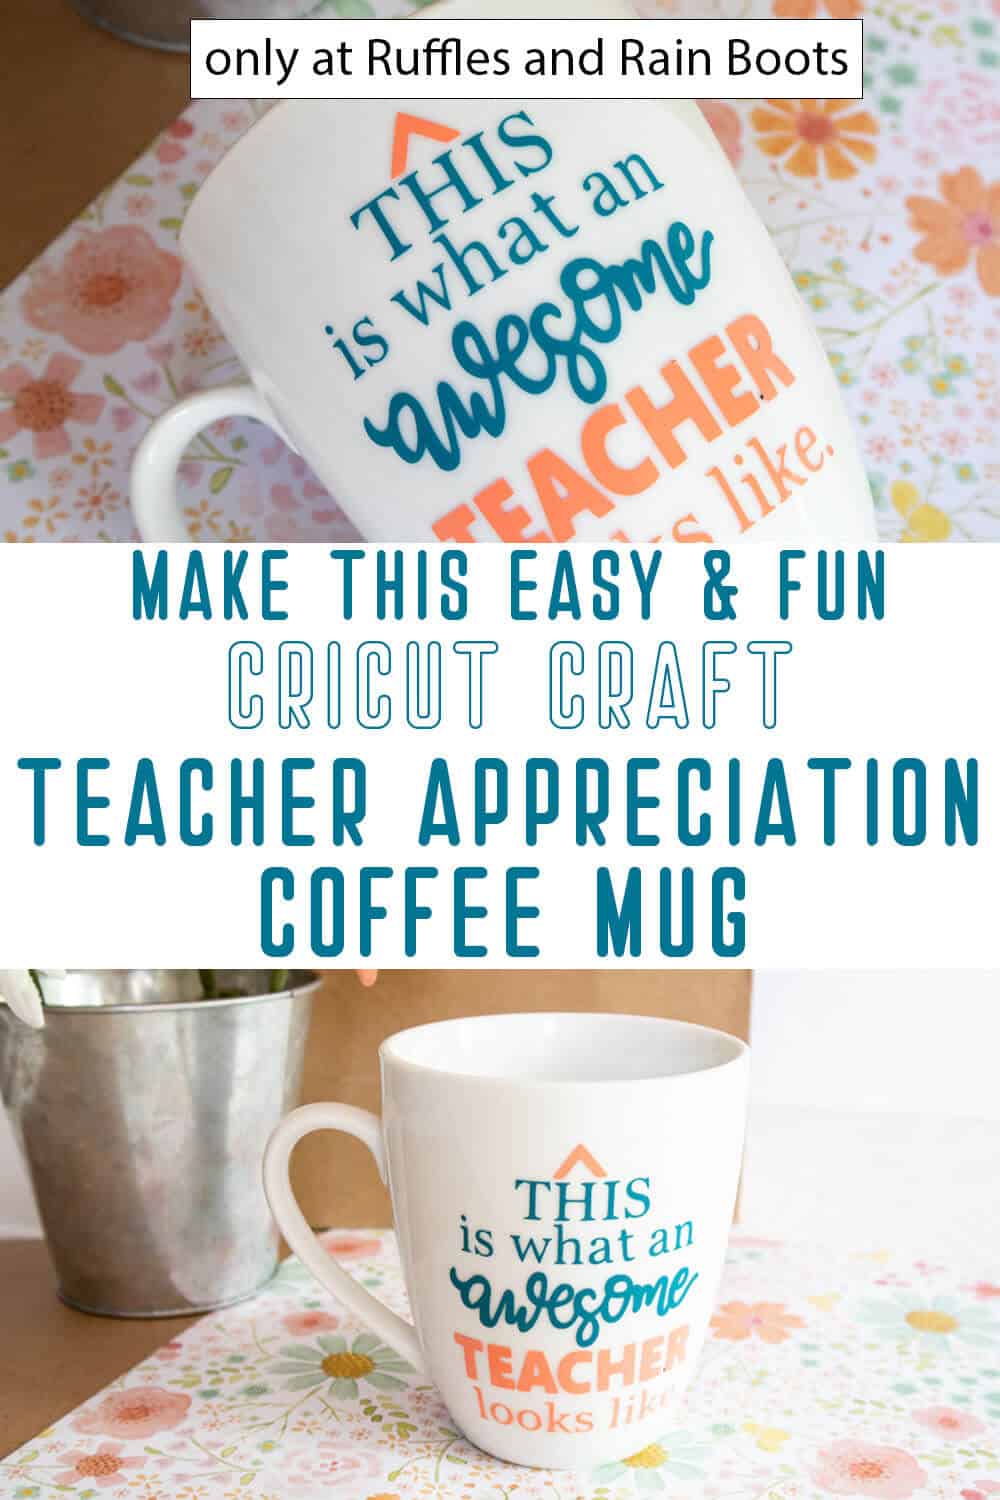
Easy DIY Teacher Appreciation Mug is the Perfect Back to School Gift!
I love this easy and fast DIY teacher appreciation mug. Not only is it super succinct, making a very poignant gift, it’s also fun.

DIY Teacher Appreciation Mug
Here at Ruffles and Rain Boots, we really appreciate the most amazing people that step-up in our lives to support the kids (my own included). And since we’re headed back to school this coming week, I figured a fun gift was in order. So I whipped up this epically easy DIY teacher appreciation mug that I just can’t get over!
RELATED READING: 20 BACK TO SCHOOL CRAFTS ANYONE CAN MAKE
It’s just so fun and really poignant. Awesome just doesn’t even cover it. So, grab your cutting machine and let’s get started.

No Time to Make This Now? Pin it for Later
You’re busy, I get it. Pin this to your favorite easy DIYs board on Pinterest and it’ll be here when you’re ready.

As an Amazon Associate, I can earn from qualifying purchases.
Tips to Make This Back to School Gift Idea
- Click here to grab the free teacher appreciation SVG file so you can quickly and easily get your teacher appreciation mug made with a little vinyl!
- This design is perfect for using with vinyl, sublimation or waterslide techniques. So, you do what you feel comfortable with, but I personally went with vinyl, since I already had the supplies on hand and loved the color combination.
- If you want to take this gift to the next level, you can fill the teacher’s new mug with some hot cocoa bombs, some k-cups or a chocolate stirring spoon with a gift card. Turn the mug into creative packaging for a little mini-gift basket!

How Do I Make this DIY Teacher Appreciation Mug?
I’m so glad you asked. Below is our written tutorial.
DIY Teacher Appreciation Mug

I love thanking the folks that work at the school, particularly my kiddo's teacher. And this DIY teacher appreciation mug is a fast and fun way to do just that.
Materials
Tools
- Scissors
- Weeder Tool
- Cricut Transfer Tape
- Cricut Joy (or other cutting machine) with Fine Point Blade
Instructions
Prepare the File
- Make sure your mug is clean and dry. Open Cricut Design Space and select the “+” sign to start a new project, opening up a blank canvas.
- Select the “Upload” button and insert your file. The image will load onto the canvas. Select the image and click on “Ungroup” in the bottom right. Shift-click on each layer you want to have the same color and click on the “Attach” button. I did this with just two colors, but you can use as many colors as you like.
- Maintain the size or adjust to fit your mug, if desired. To adjust the size of the design element, highlight the image and click on the size box in the top toolbar. Change the sizing to fit your mug.
Cutting the Permanent Smart Vinyl
- Select “Make It” in the upper right corner toolbar.
- If you are using the Cricut Joy Smart Vinyl, select “no mat”.
- Note the amount of Smart Vinyl needed and cut accordingly for each material color.
- Select Smart Vinyl, Permanent from the drop down menu.
- Following the instructions prompted on the screen, cut out the vinyl.
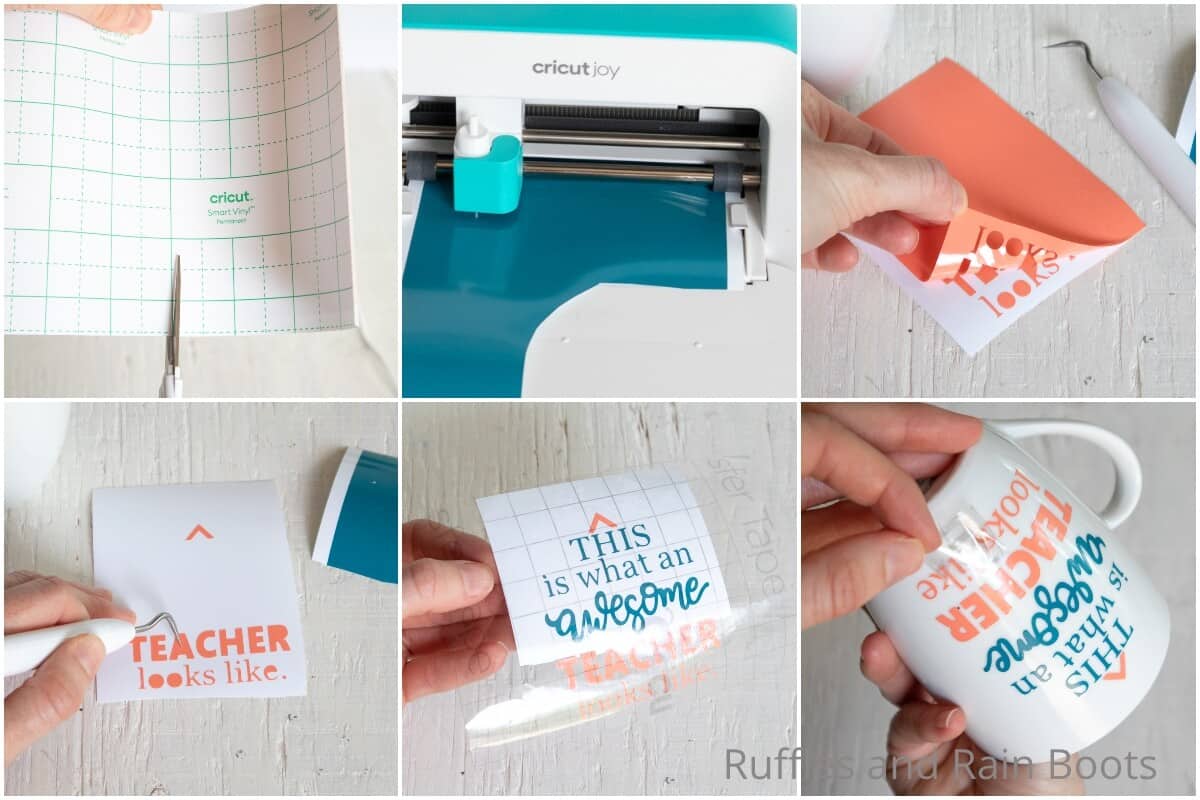
How to Assemble the Mug
- Cut around the general shape of the images, then peel away the excess vinyl and discard.
- Cut some transfer tape a bit bigger than the full size of the image with all of the pieces combined. Remove the transfer tape backing and put the transfer tape on top of one of the cut pieces. Gently rub the vinyl with your fingernail or a tool to help get the vinyl to stick to the transfer tape. Peel away the vinyl backing, leaving just the image attached to the transfer tape.
- Repeat for the other pieces of the image in the other vinyl color, placing each portion of the lettering so they are centered. Gently rub the vinyl to help it stick to the transfer tape and peel away the vinyl backing.
- Position the image with the transfer tape on to the mug and press in place. NOTE: If your mug has a curved surface, clip the transfer tape along the edges to help it wrap around the mug.
- Firmly press the image down with your fingers to affix it to the mug. Slowly peel away the transfer tape, leaving the image on the mug. Allow the vinyl to cure for between 3 days to a week before using. Hand-washing is recommended and no sealant is required.

Notes
For more fun Cricut crafts, visit Ruffles and Rain Boots!
Recommended Products
As an Amazon Associate and member of other affiliate programs, I earn from qualifying purchases.

More Easy Teacher Gift Ideas You Might Like
- Easy DIY Pencil Soaps – I love how easy it is to make this DIY soap for a teacher gift idea. It’s fast, fun and the kid thinks it’s hilarious.
- Teacher Appreciation Gift Card Holders – Planning to give the teacher a gift card? Easy peasy, this is the funnest way to wrap it!
- Ruler Cupcakes – A cupcake for a teacher that loves the sweets is a perfect gift to bring her on the first day or the 50th!
Please Save This to Pinterest
Your shares are how this site grows and I am sincerely grateful. Know a friend who’d like this? Please share it on Facebook or save it to your favorite Cricut crafts board on Pinterest.
Meet the Creator
Hi there, I’m Sarah Nenni-Daher. I’m a crafty gal and always have at least 14 projects going at once. I am a crafter, designer, DIYer, and pattern maker. I share my creations here and in the Ruffles and Rain Boots® Shop.
Here at Ruffles and Rain Boots®, you’ll find DIY gnomes, crafts, gifts, cupcakes, laser crafts, and so much more. I love sharing video tutorials over on YouTube and chatting with other crafters in my Facebook groups. We’d love to have you!