
This Upcycled Christmas Tree Gnome is a Fun Porch Gnome for Winter!
This easy and fast porch gnome tutorial is so cute when you’re done. I can’t believe it took me this long to make my own Christmas tree gnome.

What You'll Find On This Page
Christmas Tree Gnome
Here at Ruffles and Rain Boots, we just love making gnomes. They’re just the cutest things to ever come out of my craft room. But they don’t need to LIVE in my craft room. No, I want them meeting me at the door of my house, hanging out in my kitchen and so much more. That’s what got me thinking about making a fun Christmas tree gnome for the holidays.
RELATED READING: TOMATO CAGE PORCH GNOME
And this fun gnome for your porch is so easy, I found an old tree I wasn’t using anymore and a scarf in the Target Dollar Spot that I just had to bring together. But you could make this with just about any similar supplies. If you’re ready to make a porch gnome for the holidays, let’s get started.
DIY Christmas Gnome Tutorials
If you’re looking for the best DIY Christmas gnome tutorials, you have come to the right place. Check out all of my favorite tomte tutorials for the holidays!

No Time to Make This Now? Pin it for Later
You’re busy, I get it. Pin this to your favorite holiday crafts board on Pinterest and it’ll be here for when you’re ready.

As an Amazon Associate, I can earn from qualifying purchases.
Tips to Make This Porch Gnome
- I grabbed the material to make my hat from the Target Dollar Spot. There was just the perfect little scarf sitting there and I couldn’t help but picture this gnome wearing THAT hat. But you could use flannel, fleece or anything you have laying around. You could even cut up an old sheet!
- If you don’t have an old Christmas tree to use for your branches, don’t fret. You could very well find one at a thrift store or even buy a cheap one off the clearance rack. You don’t need a large tree, I think mine was just a 4-foot tall one, honestly. And I didn’t even end up using more than about half of the tree.
- Using a pre-lit tree is not as easy as using one of the older trees that isn’t pre-lit (speaking from experience here) because the pre-lit trees have all the wires and the branches are usually attached firmly into the base. But, because you’re disassembling the tree, you just need to plan on cutting those branches off and cutting the wires (with the tree unplugged, of course).

How Do I Make this Christmas Tree Gnome?
I’m so glad you asked. Below is our written tutorial.
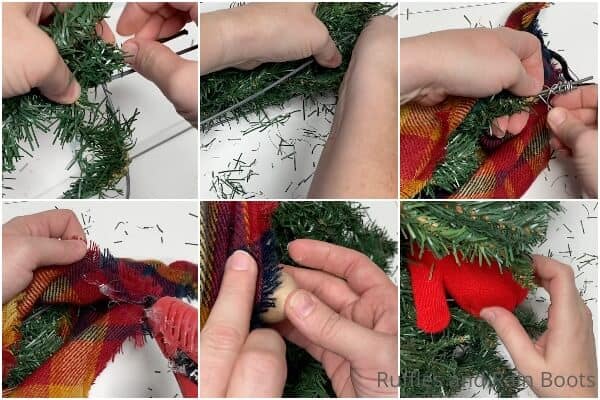
First, if your Christmas tree is pre-lit, disassemble the limbs from the bottom half of the tree, leaving the top portion intact. Once the limbs are removed, starting with the largest limbs (usually those that were on the bottom of the tree), line one up along one of the vertical supports of the tomato cage, with the end of the branch just barely past the widest part (top) of the tomato cage. Using the floral wire, affix this branch in place.
Repeat attaching a branch to each of the vertical supports of the tomato cage. Using the smaller projections of the branches, cover the horizontal supports of the tomato cage.
Fill in any spaces between the branches with additional branches of the tree, working to cover the bottom third of the tomato cage. I used a total of 12 branches.
Take the top third of the Christmas tree and tightly press all of the branches toward the center trunk. Then thread the top of the tree into the center of the tomato cage, from the bottom toward the branch-covered end of the cage. When you have the tree trunk fully surrounded by the tomato cage, secure the tree top in place with floral wire in multiple locations.
Fluff the branches of the attached tree parts to make sure the gnome is as full as you like. If there are holes, add more branches until you are happy with the look.
Pull the tines of the tomato cage together snugly and wrap them in floral wire to secure them, bringing the tomato cage to a nice point. Bend over the ends of the tines, if desired, to keep them from pressing through your hat material.
Cut your fabric into a large triangle with a base wide enough to wrap all the way around the center of the tomato cage and long enough to cover the top 2/3 of the tomato cage.
Wrap the fabric around the top of the tomato cage, pinning it or securing it in place with a piece of floral wire at the top so you can see how the hat will look and if you like the fit. Keep in mind that you will want to have extra fabric around the center to wrinkle at the nose. If happy with the hat fit, hot glue the two edges together in the back of the gnome.
Hot glue the wood bead onto the gnome about halfway up the tomato cage, using a branch to help support the nose, if necessary.
Wrinkle the hat over the nose and hot glue the wrinkle in place to further secure the nose.
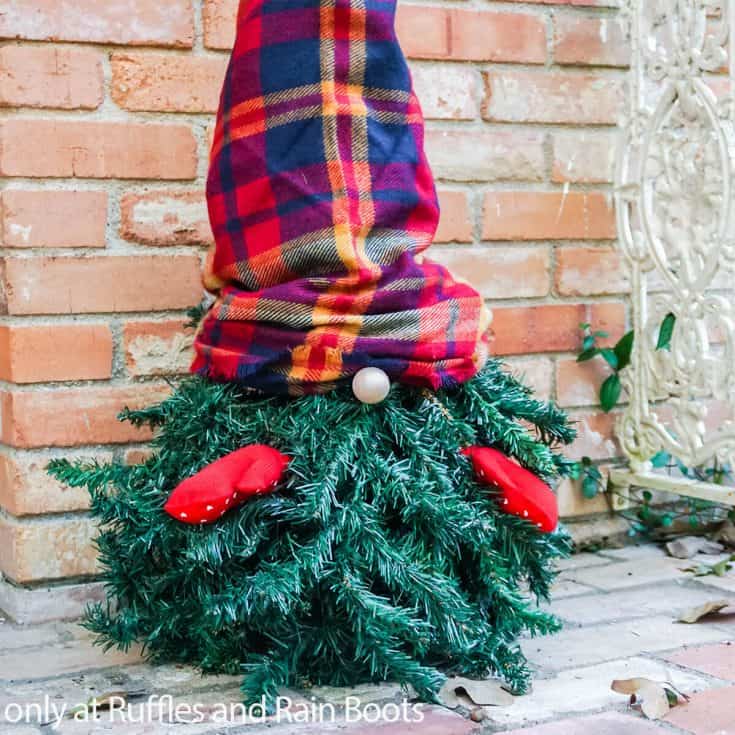
Place a small amount of fill in each mitten, then fit them onto the branches, hot gluing them in place on either side of the gnome, about 10 inches from the bottom.
Place your gnome on the porch and enjoy!
More Gnome Tutorials You Might Like
- Log Gnomes for Your Porch – These easy log gnomes are the perfect farmhouse gnomes to grace your porch this holiday season. Plus they’re super fast to make!
- Gnome Sweet Gnome Porch Gnome Trio – You can make this easy gnome sweet gnome porch trio in just a few minutes. Then you have a whole cadre of gnomes to greet you at the door! LOL!
- Learn How to Make a No-Sew Gnome – Making gnomes has become an obsession for me. And this quick run-down of how to start is everything you need to make your first or fiftieth gnome.
Please Save This to Pinterest
Your shares are how this site grows and I am sincerely grateful. Know a friend who’d like this? Please share it on Facebook or save it to your favorite gnome tutorials board on Pinterest.

Christmas Tree Gnome
You're not going to believe how fast your Christmas tree gnome comes together. Once you have the supplies, it's just bing bang boom and you're ready with a porch gnome of your very own.
Materials
- 1 Tomato Cage
- 1 4-foot Fake Christmas Tree (preferably an old one you don't like)
- 1 yd Fabric (I used a scarf from Target Dollar Spot)
- 1 Large Wood Bead
- 2 Kids' Mittens
- Floral Wire
- Small Amount of Polyfill or Scrap Fabric (for filling the mittens)
Tools
- Wire Cutters
- Hot Glue Gun & Glue
- Scissors
Instructions
- If your Christmas tree is pre-lit, disassemble the limbs from the bottom half of the tree, leaving the top portion intact. Once the limbs are removed, starting with the largest limbs (usually those that were on the bottom of the tree), line one up along one of the vertical supports of the tomato cage, with the end of the branch just barely past the widest part (top) of the tomato cage. Using the floral wire, affix this branch in place.
- Repeat attaching a branch to each of the vertical supports of the tomato cage. Using the smaller projections of the branches, cover the horizontal supports of the tomato cage.
- Fill in any spaces between the branches with additional branches of the tree, working to cover the bottom third of the tomato cage. I used a total of 12 branches.
- Take the top third of the Christmas tree and tightly press all of the branches toward the center trunk. Then thread the top of the tree into the center of the tomato cage, from the bottom toward the branch-covered end of the cage. When you have the tree trunk fully surrounded by the tomato cage, secure the tree top in place with floral wire in multiple locations.
- Fluff the branches of the attached tree parts to make sure the gnome is as full as you like. If there are holes, add more branches until you are happy with the look.
- Pull the tines of the tomato cage together snugly and wrap them in floral wire to secure them, bringing the tomato cage to a nice point. Bend over the ends of the tines, if desired, to keep them from pressing through your hat material.
- Cut your fabric into a large triangle with a base wide enough to wrap all the way around the center of the tomato cage and long enough to cover the top 2/3 of the tomato cage.
- Wrap the fabric around the top of the tomato cage, pinning it or securing it in place with a piece of floral wire at the top so you can see how the hat will look and if you like the fit. Keep in mind that you will want to have extra fabric around the center to wrinkle at the nose. If happy with the hat fit, hot glue the two edges together in the back of the gnome.
- Hot glue the wood bead onto the gnome about halfway up the tomato cage, using a branch to help support the nose, if necessary.
- Wrinkle the hat over the nose and hot glue the wrinkle in place to further secure the nose.
- Place a small amount of fill in each mitten, then fit them onto the branches, hot gluing them in place on either side of the gnome, about 10 inches from the bottom.
- Place your gnome on the porch and enjoy!
Notes
For more gnome tutorials, visit Ruffles and Rain Boots!
Meet the Creator
Hi there, I’m Sarah Nenni-Daher. I’m a crafty gal and always have at least 14 projects going at once. I am a crafter, designer, DIYer, and pattern maker. I share my creations here and in the Ruffles and Rain Boots® Shop.
Here at Ruffles and Rain Boots®, you’ll find DIY gnomes, crafts, gifts, cupcakes, laser crafts, and so much more. I love sharing video tutorials over on YouTube and chatting with other crafters in my Facebook groups. We’d love to have you!